We’re going through our book Creating Motion Graphics with After Effects 5th Edition (CMG5) and pulling out a few “hidden gems” from each chapter. These will include essential advice for new users, plus timesaving tips that experienced users may not be aware of.
Sometimes you need a captured movie to play back more quickly, more slowly, or backward, or to stop altogether. After Effects has options to Time Stretch a clip, which gives it a new constant speed, or Time Remap it, which allows the speed to change over time. Both of these options are covered in detail in Chapter 28. If you manipulate the frame rate and end up with staggered motion compared with the original clip, we also discuss Frame Blending which can help smooth out the result.
Time Stretch
To time stretch a layer, reveal the In/Out/Duration/Stretch columns in the Timeline panel (see figure below) or right-click on the top of any other column and select Stretch. Then click on the value for Stretch for the layer you want to change. This opens the Time Stretch dialog, which can also be accessed via the menu item Layer > Time > Time Stretch.

Reveal the In/Out/Duration/Stretch columns in the Timeline panel by clicking on the expand/collapse button in the lower left corner (circled in red). You can also scrub the Stretch value directly in the Timeline panel. Scrubbing the Duration value will result in Stretch also being changed. Tip: To quickly stretch the out point of the layer to the current time, Command+click on Mac (Control+click on Windows) the value for Out in the Out column.
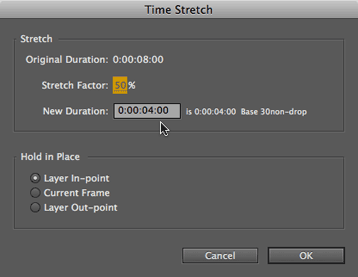 You can enter a value for New Duration, or a value for Stretch Factor in % (higher numbers being slower). Notice that when you change the Duration, the Stretch Factor updates accordingly, and vice versa. The Hold In Place option sets the point in time around which the stretching occurs (the layer’s in point, current frame, or out point). Hold In Place defaults to Layer In-point, which is often the most useful.
Reverse Layer
If you need a selected movie to play from back to front, you can easily reverse the playback direction using the shortcut Command+Option+R (Control+Alt+R). After reversal, the layer bar will show red hash marks along its bottom. All keyframes applied to the layer will also be reversed. This shortcut will apply a time stretch value of negative 100%, while also moving the in and out points so that the frames play in the same position of the timeline as before. (If you don’t use the shortcut and manually time stretch by negative 100%, the layer will reverse itself around the in or out point or current frame, usually resulting in the layer moving in time.) To return the layer to regular playback, reverse the layer a second time using the same shortcut.

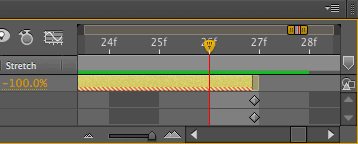 Once a layer is reversed, keyframes will appear to be off by one frame in the timeline: Because keyframes are normally attached to the beginning of a frame in time, after reversal they will now be attached to the end of a frame, which makes them appear to be one frame late. As a result, you may find it less confusing to reverse your footage in a precomp, and then do any editing or keyframing in the next comp up.
 Stretch versus Conform
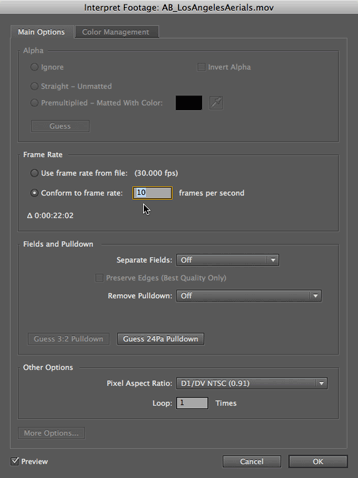
When you time stretch or reverse a layer, any keyframes already created are also time stretched because time stretch renders after masks, effects and transformations. However, the built-in frame rate of the movie can be overridden with the Conform Frame Rate setting (select movie in Project panel and File > Interpret Footage > Main). If you enter a lower or higher value, you’ll slow down or speed up the movie before it even reaches the comp, meaning your keyframes will be unaffected. For example, a 30 fps movie conformed to 10 fps will play every frame three times – equivalent to time stretching by 300%. (Note: Time Remapping also does its magic before Masks, Effects, and Transform keyframes.)
Time Remapping
Time Remapping allows you to keyframe which frame of your source plays at a specific time in your overall timeline. After Effects then stretches the clip between keyframes as necessary to make this happen, even playing the clip backwards if an earlier keyframe has a lower value (i.e. frame number in the source clip) than the one before it.
A natural result of this capability is that the stretch value can be different between keyframes, allowing you to create speed changes during the life of the clip. And because you’re working with regular keyframe interpolation types, you get the benefit of velocity curves for ramping speed up and down.
Enable Time Remapping by selecting the layer and invoking the menu item Layer > Time > Enable Time Remapping. It will then be the first item in a layer’s list of properties, because it renders before Masks, Effects, and Transform. You can then keyframe it just like any other property.

If you enable Show Graph Tool Tips (under the circled Choose Graph Type button), dragging a Time Remap keyframe in the Graph Editor allows you to set both the source frame number (the bottom value) and the overall composition time (the upper value). The Time Remap value to the left (circled in red) shows the source frame number at the current time in the comp.
Time remapping takes a little time to get your head wrapped around. Chapter 28 offers a number of tutorials for you to practice with, from playing time games with a movie of a dancer to more practical repairs such as fixing the timing of a shot to better suit the storyline, adding more handle to a short clip, time remapping a title animation, remapping a precomp of sequenced layers, remapping the results of the Exponential Scale keyframe assistant, using time remapping as a frame sequencer, and using time remap to create a step-time effect using hand-picked frames.
The Real Out Point
If you use the default Time Remap keyframes and apply velocity curves, you may not achieve a smooth entry into the last keyframe, particularly if you use a very long ease in. Because the second default keyframe is created one frame after the last real frame of the movie, the last real frame of the movie appears in the comp before the last keyframe is reached and is then repeated if you freeze the end of the movie.
For example, say you are working with a 15-second movie that starts at 00:00. The last frame is 14:29 and it appears at 14:29 in the timeline. But when you enable Time Remapping, the second default keyframe is created at 15:00 – one frame later. (This is a “feature” not a bug; the reason for placing the keyframe one frame after the end is detailed in the book if you’re curious.)
You may notice a problem only if you have a slow ease into this keyframe. Let’s say the image on the last frame is supposed to freeze at the big finale audio sound effect at 24:00. So you drag the second default keyframe from 15:00 to 24:00 and apply Easy Ease In so that the movie slows down and stops at 24:00. The problem is that the image from the last frame will appear in the comp at 23:09, well ahead of the audio sound effect at 24:00, and the timing will appear to be incorrect to the viewer.
We recommend you re-create the last keyframe whenever you apply Time Remapping. Now when you move the last keyframe later in time to slow it down, rounding errors are less likely to occur. The workaround is fairly simple:

- Before you enable Time Remapping, select the layer and press O to jump to the real out point (at 14:29 in this case), select Layer > Enable Time Remapping. Press the ; (semicolon) key to zoom in closely in time so you can see some detail. See figure above.
- Check the keyframe box (circled in red) to create a new keyframe for the real last frame, at time 14:29. Note: Don’t just drag the default keyframe at 15:00 back to 14:29.
- Advance one frame and uncheck the original default keyframe created at 15:00 to remove it, or select it and press Delete. Press the ; key again to zoom out, and continue to work normally with Time Remapping.
Frame Blending
Any time footage is played back at speed other than its original pace, frames must be skipped or duplicated. This results in staggered motion. Frame blending offers some potential solutions to this problem. After Effects offers two types of frame blending:
- Frame Mix, where adjacent frames are crossfaded to create new in-between frames. Even when footage is sped up, a small percentage of adjacent frames are blended into the result.
- Pixel Motion, where After Effects attempts to track the motion of similar pixels from frame to frame, then creates new pixels where it guesses they should be at an intermediate point in time. This general technique is often referred to as optical flow.

To enable Frame Blending per layer, click in the row of boxes under the film icon in the Timeline panel’s Switches column. The backslash indicates Frame Mix mode; the forward slash is Pixel Motion mode. To see the results displayed in the comp, also turn on the Enable Frame Blending button (the larger film frame icon along the top of the panel).
You don’t have to time stretch to use frame blending. You can frame blend any movie layer that does not have an original frame for every composition frame. Although frame blending often improves the look of footage that has been time stretched or remapped, sometimes the visual artifacts it creates outweigh its benefits. You should always carefully preview the results before committing to a final render with frame blending.
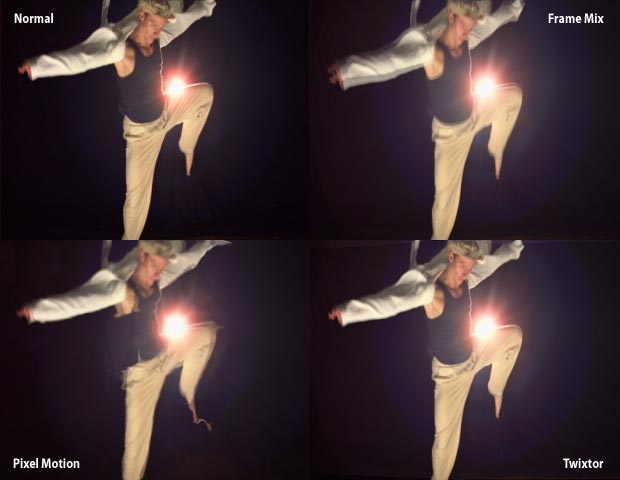
In the chapter’s example project file, we’ve set up some side-by-side comparisons so you can see what Frame Mix, Pixel Motion, and the third-party solution RE:Vision Effects’ Twixtor look like when speeding up and slowing down the same shot (note that another alternative is Kronos from The Foundry). RAM Preview them at 100% Magnification so you can see that whereas a given solution may look good on some frames, it may look terrible on others.
Trish and Chris Meyer share seventeen-plus years of real-world film and video production experience inside their now-classic book Creating Motion Graphics with After Effects (CMG).
The 5th edition has been thoroughly revised to reflect the new features introduced in both After Effects CS4 and CS5 (click here for free bonus videos of features introduced in CS5.5). New chapters cover the new Roto Brush feature, as well as mocha and mocha shape. The 3D section has been expanded to include working with 3D effects such as Digieffects FreeForm plus workflows including Adobe Repouss©, Vanishing Point Exchange, and 3D model import using Adobe Photoshop Extended. The print version is also accompanied by a DVD that contains project files (CS5-only) and source materials for all the techniques demonstrated in the book, as well as over 160 pages of bonus chapters on subjects such as expressions, scripting, and effects.
We will be pulling a few “hidden gems” out of each chapter to share on ProVideoCoalition.com roughly every week. These will give you a taste for the multitude of time-saving tips, not-obvious features, little gotchas, and other insider knowledge you will find in CMG.
The content contained in Creating Motion Graphics with After Effects – as well as the CMG Blogs and CMG Keyframes posts on ProVideoCoalition – are copyright Crish Design, except where otherwise attributed.

Filmtools
Filmmakers go-to destination for pre-production, production & post production equipment!
Shop Now


