We’re going through our book Creating Motion Graphics with After Effects 5th Edition (CMG5) and pulling out a few “hidden gems” from each chapter. These will include essential advice for new users, plus timesaving tips that experienced users may not be aware of.
The next three chapters in CMG5 focus on the tools available in After Effects CS5 for motion tracking and stabilization, including the bundled 3rd party tools mocha and mocha shape. As the built-in tracker and stabilizer share many of the same tools, in this first chapter on Motion Stabilization we also cover concepts that are common to both of them.
After Effects CS5.5 introduced a brand-new Warp Stabilizer which replaces the traditional motion stabilizer for many tasks. For those who have upgraded from CS5 to CS5.5, we give an overview of the Warp Stabilizer here, and then demonstrate how to put it to use here.
A Stable Foundation
In general, a handy approach for many motion graphics and visual effects tasks is to stabilize a shot first, then process it further. For example, if you were wanting to mask a shot to focus the viewer on a particular area – perhaps for a picture in picture effect – but the subject is moving about the frame (or the camera wasn’t locked down), your life would be simplified considerably if you stabilized the shot first, and then masked it – perhaps in a second composition, or by using a track matte.
Another application is when you want to replace a “shakeycam” camera move with a smoother one: Stabilize, then keyframe your own movement, perhaps by attaching the stabilized layer to a null object and then animating the null (setting up a precomp hierarchy would also work). By the way, this second application is something that the new Warp Stabilizer excels at, as it can stabilize and smooth inside the same effect.
![]() The User Interface
The User Interface
Working with the built-in tracker and stabilizer (accessed by opening Window > Tracker) requires understanding the special user interface elements it employs, including the Search and Feature Regions as well as the different states of the cursor.
Tracking and stabilization both take place in the Layer panel; you can double-click a layer in a composition to automatically open it in that panel. In After Effects CS5 and earlier, to invoke the stabilizer you click on the Stabilize Motion button in the Tracker panel, shown at right. (In After Effects CS5.5, clicking Stabilize Motion will open the new Warp Stabilizer; to use the traditional stabilizer, you need to set the Track Type popup to Stabilize and then click Track Motion.) If you have Position checked in the Tracker panel, this will add one Track Point with a pair of concentric boxes (as shown below left); if you have Rotation or Scale selected, this will add two Track Points.
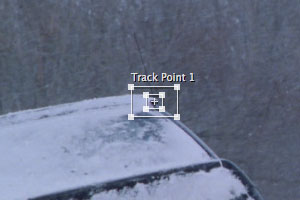
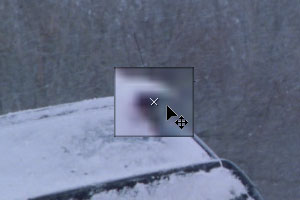
Footage courtesy Artbeats/Winter Lifestyles.
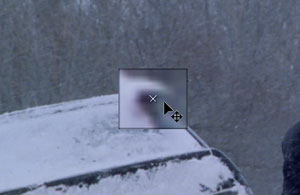
The inner box of the Track Point is the Feature Region, and must be placed on a section of the image with good contrast in luminance or color to track (more on that in a moment). The outer box is the Search Region, which is how far After Effects will look for the features inside the Feature Region from frame to frame. The contents of the Search Region will automatically magnify the underlying image as you move the box around (as shown above right).
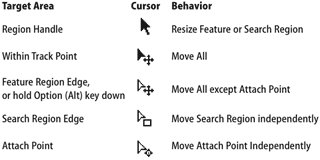 As you move the cursor around the boxes to different target areas, the cursor will change to reflect what you are about to move, as shown in the chart at right.
![]() Essential Options
Essential Options
Exploring the Motion Tracker/Stabilizer Options dialog – shown at right – is the secret to getting a good stabilization or track in difficult situations. There is no one setting that works for all situations; you may need to experiment with different settings to see which gives you the best results.
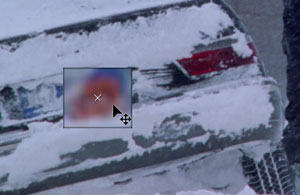
For example, in the two images below, the track on the left would work better with Channel set to Luminance, as there is a large contrast between the snow on the car and the shadow underneath the window’s rain gutter. On the other hand, the track on the right would work better with Channel set to RGB, as the blue license plate and orange year tag have similar luminance, but near-opposite colors.
Broken Tracks
You do not have to track an entire clip with one Tracking Region definition. The best feature to track might change during the course of a shot. Or, you might not have tracked enough of the original shot, and need to add onto a track you’ve already performed.
If you need to pick up a track in the middle, the most important thing is to not accidentally move the Attach Point: Otherwise, your track or stabilization will have a discontinuous jump in the middle. In case you forget, first save your project to make it easy to revert back to the track’s previous state.

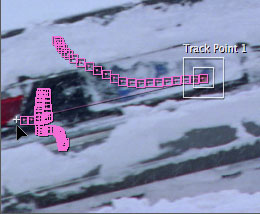 To pick up a track at a later point in time, move the time indicator to the last track keyframe you want to keep (above), press Option (Alt) and carefully move your regions without moving the Attach Point (the cursor will change to a white arrow), then continue your track. At right we’ve moved the time indicator back to the point where we picked up the track, showing the discontinuous jump in the track path – but note that the Attach Point remained close to the original track region (the tail light).
Motion Myths and Madness
As great as being able to track and stabilize objects and footage is, there are a number of gotchas and trade-offs:
- Not all footage can be tracked or stabilized. Run tests (including trying different tools, like mocha or the new Warp Stabilizer in CS5.5) before promising the client you can do what they’re asking for.
- When you stabilize an image, its useful image area will be reduced in size. This is because it is going to get cropped off at the edges as it wanders around. Plan on cropping and framing the layer in some way in the final composition. You can also scale it up, but be aware that this will soften the image. (This is another case where the new Warp Stabilizer – with its Synthesize Edges option – can come in handy.)
- When you stabilize, the image will inevitably get softer. This is because you will be moving and rotating the image off its original, dead-on alignment, resulting in pixels being resampled as they are moved about.
- Beware of sudden, quick camera moves, especially with long shutter times: The resulting shot will exhibit natural motion blur that varies with the amount of movement from frame to frame, which you can’t remove. Technology to remove motion blur has been demonstrated in the lab, but as of now is not yet in a reliable, commonly-available production tool.
Trish and Chris Meyer share seventeen-plus years of real-world film and video production experience inside their now-classic book Creating Motion Graphics with After Effects (CMG).
The 5th edition has been thoroughly revised to reflect the new features introduced in both After Effects CS4 and CS5 (click here for free bonus videos of features introduced in CS5.5). New chapters cover the new Roto Brush feature, as well as mocha and mocha shape. The 3D section has been expanded to include working with 3D effects such as Digieffects FreeForm plus workflows including Adobe Repouss©, Vanishing Point Exchange, and 3D model import using Adobe Photoshop Extended. The print version is also accompanied by a DVD that contains project files (CS5-only) and source materials for all the techniques demonstrated in the book, as well as over 160 pages of bonus chapters on subjects such as expressions, scripting, and effects.
We will be pulling a few “hidden gems” out of each chapter to share on ProVideoCoalition.com roughly every week. These will give you a taste for the multitude of time-saving tips, not-obvious features, little gotchas, and other insider knowledge you will find in CMG.
The content contained in Creating Motion Graphics with After Effects – as well as the CMG Blogs and CMG Keyframes posts on ProVideoCoalition – are copyright Crish Design, except where otherwise attributed.

Filmtools
Filmmakers go-to destination for pre-production, production & post production equipment!
Shop Now