We’re going through our book Creating Motion Graphics with After Effects 5th Edition (CMG5) and pulling out a few “hidden gems” from each chapter. These will include essential advice for new users, plus timesaving tips that experienced users may not be aware of.
After Effects comes with several audio processing effects located inside the menu Effect > Audio. We discussed the basics of audio plus the Stereo Mixer effect in the book’s Chapter 36; in the Bonus Chapter we discuss some of the other effects, including how they work as well as some suggested applications for their use. Our personal bias is more toward audio “sweetening” than special effects creation, and that is our focus in the bonus chapter on the book’s DVD, and in the tips we share here. Of course, the effects available in a dedicated program such as Adobe Audition are far more capable than the rudimentary ones included inside After Effects, but surprisingly often the After Effects versions are all you need to perform simple enhancements.
Truncated Effects
Some audio effects – like delays and reverb – are capable of producing sound that carries on longer than the original sound file lasts. Unfortunately, as soon as the sound file ends, playback of any effects will end as well – sometimes rather abruptly.
To artificially extend the duration of a sound file, you can place it in a longer precomposition and apply the audio effect to the nested layer. To keep things all in one composition, the alternative is to use Time Remapping to “freeze” the source at its natural end, and then drag the Out point of the layer longer to make sure delays or reverbs don’t get cut off. The also allows you to cut off playback of the original audio at any point, such as cutting off a speaker mid-phrase and letting reverb ring on from there – just add a Time Remap keyframe at the desired freeze point, and delete any keyframes afterwards.
Wet and Dry
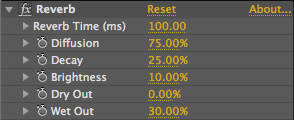 Many of the audio effects feature a pair of parameters called Dry Out and Wet Out. This is because many of the processings sound best if you mix together the unprocessed sound (“dry”) with the processed version (“wet”). Think of this as a sort of Blend With Original, but with more control. Many effects – like Reverb – sound more realistic with relatively high Dry and low Wet amounts; some – like Flange/Chorus – work better set closer to a 50/50 mix.
A nice trick is to fade up the Wet Out from 0 to some nominal setting over time, causing the effect to fade in without reducing the volume of the original sound.
Adding Some Animation to Sound
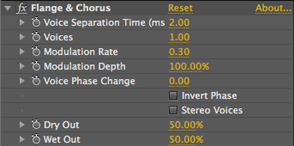 The Flange & Chorus effect is often used to add some “motion” to otherwise dull, lifeless sounds. The secret to making this effect sound good is setting a small amount of Modulation Depth and Rate. This causes the Voice Separation Time to wander (modulate), resulting in a slightly watery, unstable sound. Modulation Rate values of under 1.0 are most common; higher values produce more watery or even drunken effects. A touch of this effect will help add depth (or even a touch of magic) to some sound effects such as cymbal crashes and jet engine takeoffs; some also like to use it on vocals to make one voice sound like several.
Which EQ When?
 For serious equalization (manipulation of the frequency components of a sound), we use a serious tool like Adobe Audition. But a lot of simple corrective work can be done with the simple tools inside After Effects.
Our most-used audio effect (aside from the Stereo Mixer touched on in the previous installment) is Bass & Treble. Adding a touch of treble can help add clarity to music or voice. Adding a touch of bass can add gravitas to a narration. We also use small amounts of bass and treble to match different audio takes that sound slightly different. This is often caused because the person speaking was closer or farther away from the mic during different takes, often resulting in slightly more or less bass respectively.
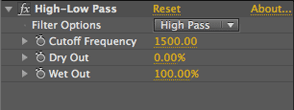 Our next-most-used audio effect it High-Low Pass. Rather than subtly emphasizing or deemphasizing the extremes of the frequency range like Bass & Treble does, High-Low Pass aims to cut them out completely.
High Pass mode lets higher frequencies go through unmolested and cuts off lower ones. We use it to try to cut down on rumble, air conditioning noise, and in some cases hum – try a range of 60-120 for starters. Low Pass mode allows lower frequencies to pass and cuts out higher ones. We use it try to tame hiss and other higher-pitched noise in a recording. Contrary to our advice up top, this is one effect where you want to set Dry Out to 0% and Wet Out to 100%.
In a normal audio program, you may use a parametric equalizer to perform most other tasks. Unfortunately, the Parametric EQ in After Effects has a fundamental design flaw where it is based on linear rather than exponential frequency response (in other words, contrary to the way our ears actually work), making it particularly hard to make precise adjustments in the lower frequency range.
Don’t Clip; Dip
Effects that add to the original sound – such as boosting the bass with Bass & Treble, or even adding together echoes or setting too high of a Wet Out amount for Reverb – can cause the composite sound to go over full range, resulting in unpleasant “clipping” distortion as those over-enthusiastic peaks are hit. The meters in the Audio panel will help tell you if you’re in trouble; avoid lighting up the red indicators at the top during previews. However, if you’ve reduced the Levels parameter for a layer, the red warning indicators won’t light up even if you’re clipping – so use your ears and try to detect if something sounds “crunchy” or less clear.
If you experience clipping, and the audio effect you’re using has Wet and Dry controls, you can reduce these in tandem until you no longer experience clipping. If it doesn’t, place a Stereo Mixer effect before the other audio processing effects, and reduce the volume at the Stereo Mixer until the meters get close to but stay out of the red, or the distortion disappears.
Trish and Chris Meyer share seventeen-plus years of real-world film and video production experience inside their now-classic book Creating Motion Graphics with After Effects (CMG).
The 5th edition has been thoroughly revised to reflect the new features introduced in both After Effects CS4 and CS5 (click here for free bonus videos of features introduced in CS5.5). New chapters cover the new Roto Brush feature, as well as mocha and mocha shape. The 3D section has been expanded to include working with 3D effects such as Digieffects FreeForm plus workflows including Adobe Repouss©, Vanishing Point Exchange, and 3D model import using Adobe Photoshop Extended. The print version is also accompanied by a DVD that contains project files (CS5-only) and source materials for all the techniques demonstrated in the book, as well as over 160 pages of bonus chapters on subjects such as expressions, scripting, and effects.
We will be pulling a few “hidden gems” out of each chapter to share on ProVideoCoalition.com roughly every week. These will give you a taste for the multitude of time-saving tips, not-obvious features, little gotchas, and other insider knowledge you will find in CMG.
The content contained in Creating Motion Graphics with After Effects – as well as the CMG Blogs and CMG Keyframes posts on ProVideoCoalition – are copyright Crish Design, except where otherwise attributed.

Filmtools
Filmmakers go-to destination for pre-production, production & post production equipment!
Shop Now