We’re going through our book Creating Motion Graphics with After Effects 5th Edition (CMG5) and pulling out a few “hidden gems” from each chapter. These will include essential advice for new users, plus timesaving tips that experienced users may not be aware of.
This reference chapter discusses specific issues regarding importing different types of footage items – as well as entire projects – into After Effects. We cover all the options in the Interpret Footage dialog, including the differences between straight and premultiplied alpha channels, as well as how best to import still images, sequences, and Photoshop and Illustrator layers files. Here are a few select tips from that chapter.
Copy and Paste Interpretation
Central to handling the footage you import is the Interpret Footage dialog, where you indicate how After Effects interprets and handles your source files as it hands the images off to your comps. To open it, you must select the footage item in the Project panel, then either select File > Interpret Footage > Main, or click on the Interpret Footage icon in the bottom left corner of the Project panel.
You can change the interpretation of any footage item at any time. If you are working in a comp and need to re-interpret a layer but don’t know its location in the Project panel, right-click on the layer and select Reveal Layer Source in Project. Once its select, you can then click on the Interpret Footage button to change the settings.
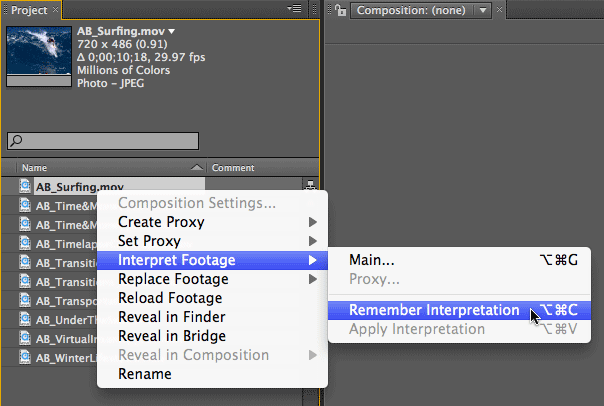
If you have a number of footage items that all need to have their Interpret Footage parameters set the same – such as Straight Alpha, 29.97 fps, Lower Field First, SDTV NTSC?color profile – you can copy and paste from one item to many. Set up one footage item the way you want, right-click on it and select Interpret Footage > Remember Interpretation (you’ll find it also on the File menu); select the other items to receive these parameters, right-click and select Interpret Footage > Apply Interpretation. This can save you countless keystrokes early in a project.
Importing Folders is a Drag
After Effects has consolidated the importing of movies, stills, sequences, layered files, folders, and projects into one dialog: File > Import > File, accessed with the keyboard shortcut Command+I on Mac (Control+I on Windows), or by simply double-clicking in an empty area of the Project panel.
If you prefer to drag an entire folder of sources to the Project panel, hold down the Option (Alt) key as you drag a folder from the computer’s desktop to the Project panel. (If you have trouble, release the mouse button first and then release the Option key; don’t release both at the same time in case the Option key gets released first!). If you forget to hold down the Option (Alt) key, After Effects will attempt to import the contents of the folder as a sequence. (In CS5, dragging a folder to the application icon always results in a sequence.)
Default Frame Rate
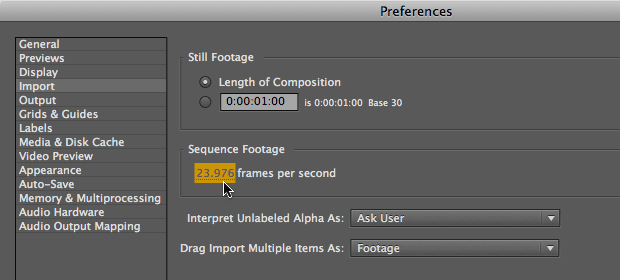
Still images have infinite duration in After?Effects, and may be trimmed as desired. When you add a still to a composition, its default length is set in Preferences > Import. The default setting for Still Footage is Length of Composition, which means they will be automatically trimmed to equal each comp’s duration. An alternative is to specify a time in this preference, which may be useful if you know you will be building a sequence out of a set of disparate images.
When you import a sequence of stills, After Effects automatically assigns it the frame rate set in the Preferences > Import dialog. We suggest you set this Preference to 29.97 fps (frames per second) for NTSC video sequences; 25 fps for PAL; 24 or 23.976 fps for digital cinema. You can change the preference before importing the sequence, or change the frame rate later in the source’s File > Interpret Footage > Main dialog (discussed above).
The Photoshop Import Do-Over
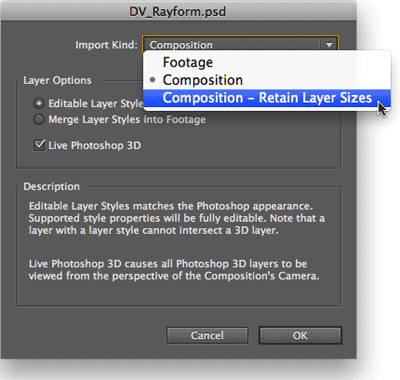 The most powerful way to import a layered Photoshop file is as a composition. This gives you additional choices on how to handle Photoshop Layer Styles and Photoshop 3D layers, plus whether or not to pre-crop the layers (Retain Layer Sizes). The result is a folder containing the layers, and a composition with them properly stacked and arranged.
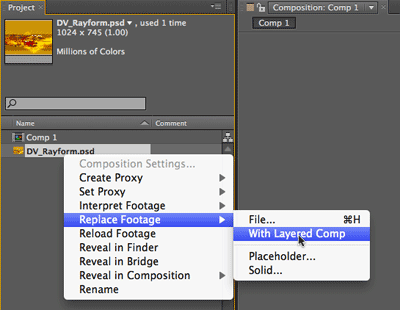 But did you know that if you merged a layered Photoshop or Illustrator file when you import it, you can change your mind and convert it to a layered comp without having to re-import it? You can either right-click on the footage in the Project panel and select Replace Footage > With Layered Comp, or if the merged footage item is selected from inside a comp, use the Layer menu and choose Convert To Layered Comp. The layer will be replaced with a precomp that contains the component layers, and the precomp will replace the original layer in the main comp.
The Illustrator Artboard
You can import layered Illustrator files in three ways, similar to the way you import Photoshop files: as Footage (a merged composite of all layers), by choosing a single layer from the file, or as a composition that contains all of the individual layers that make up the file. As with Photoshop, the comp’s initial frame rate and duration are determined by the last comp you created. Both can be edited after importing.
When you import an Illustrator file, areas that would be considered the “paper” in Illustrator will be converted to an alpha channel in After Effects. Text and outlines will be rasterized; more recent versions of Illustrator now embed fonts in the document, so it is no longer necessary to convert text to outlines. However, unlike Photoshop text, you cannot convert Illustrator text into editable text inside After Effects.
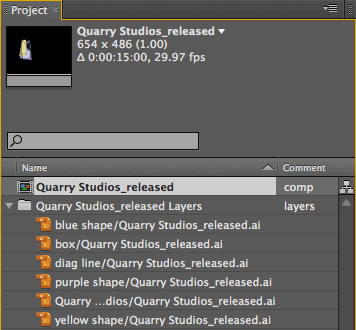
After importing a layered Illustrator file, you’ll have a composition and a folder of individual footage items; change the Composition Settings as needed.
The way that “document size” is handled for Illustrator files has changed considerably in recent versions. Illustrator CS4 introduced the concept of Artboards to represent regions that can contain artwork. While Illustrator can create multiple artboards per document, After Effects will use Artboard 01 (the default when you create a new file) as the Composition size when you Import As Composition. To edit the dimensions, double-click the Artboard tool to open the Artboard Options.
Illustrator also includes a set of film and video document profiles. An advantage of using these presets in CS5 is that if you create a new Illustrator file using one of the Video and Film presets, in addition to creating Artboard 01 at the appropriate size, it also creates a second artboard that is much larger (14,400 x 14,400 to be exact). Provided you import your file into After Effects as a Composition (and you have at least two layers), any imagery that falls outside Artboard 01 isn’t cropped off or lost – it will reside outside the composition frame, ready to be animated onto the stage.
If the file was created without using a CS5 preset (or in a previous version), simply create a second artboard at 14,400 x 14,400 – this magic size will trigger After Effects to behave the same way.
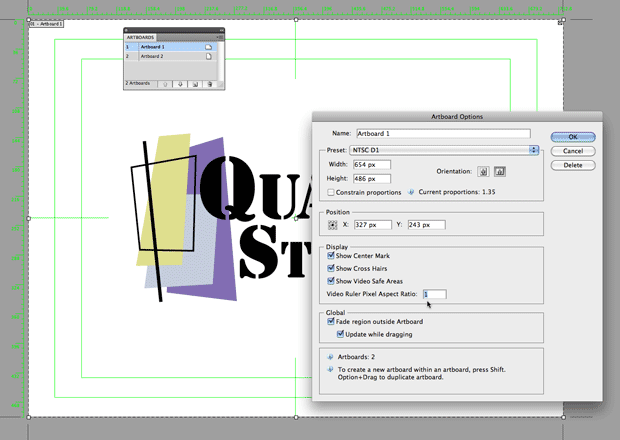
Double-click the Artboard tool (circled) to open the Artboard Options dialog. (Note the “Video Ruler Pixel Aspect Ratio” option; we recommend you set it to “1”.)
Trish and Chris Meyer share seventeen-plus years of real-world film and video production experience inside their now-classic book Creating Motion Graphics with After Effects (CMG).
The 5th edition has been thoroughly revised to reflect the new features introduced in both After Effects CS4 and CS5 (click here for free bonus videos of features introduced in CS5.5). New chapters cover the new Roto Brush feature, as well as mocha and mocha shape. The 3D section has been expanded to include working with 3D effects such as Digieffects FreeForm plus workflows including Adobe Repouss©, Vanishing Point Exchange, and 3D model import using Adobe Photoshop Extended. The print version is also accompanied by a DVD that contains project files (CS5-only) and source materials for all the techniques demonstrated in the book, as well as over 160 pages of bonus chapters on subjects such as expressions, scripting, and effects.
We will be pulling a few “hidden gems” out of each chapter to share on ProVideoCoalition.com roughly every week. These will give you a taste for the multitude of time-saving tips, not-obvious features, little gotchas, and other insider knowledge you will find in CMG.
The content contained in our books, videos, blogs, and articles for other sites are all copyright Crish Design, except where otherwise attributed.

Filmtools
Filmmakers go-to destination for pre-production, production & post production equipment!
Shop Now


