We’re going through our book Creating Motion Graphics with After Effects 5th Edition (CMG5) and pulling out a few “hidden gems” from each chapter. These will include essential advice for new users, plus timesaving tips that experienced users may not be aware of.
Real 3D programs have several advantages over After Effects: For example, their objects have real depth, and the texturing and lighting options are far more advanced. However, After Effects is the better tool in which to refine the final look of your 3D renders, as well as composite other elements on top of them. Offloading portions of the work from your 3D program to After Effects will save time while giving you more power and flexibility – but it requires some planning to set up.
In this chapter in CMG, we give advice on how to successfully integrate your 3D program with After Effects. Unfortunately, there is no one universal file format to bring information from a 3D application into After Effects, so in the book we focus on using Maxon Cinema 4D as it currently has the tightest integration with After Effects, plus is the 3D program we personally use. However, many of the concepts we cover are universal and can be applied to other programs as well. A few of the more universal tips from that chapter are included here.
Camera Export
One of the keys to integrating After Effects with a 3D application is to get the camera move from the 3D program into an After Effects camera. Different programs have different ways of doing this.
For example, with Maya, you have to save the project in the .ma (Maya ASCII) format, not the default .mb (Maya Binary) format. After Effects can then import .ma files, and will cull the camera data from that project. After Effects will also pick up any objects in Maya with “null” or “NULL” in their names and create corresponding layers in After Effects, such as the camera null (cam_null) in the figure below. This is a great tip to use as locators for significant objects – such as video screen faces and even lights – in Maya and then bring those positions into After Effects without transcribing coordinates by hand.

Programs that support the RLA or RPF formats – such as 3ds max and LightWave – require a different workflow. You have to render to an image sequence (not a movie file), and make sure you embed the camera data in the render. Then import the resulting sequence into After Effects, add it to a composition, select it, and choose the menu function Animation > Keyframe Assistant > RPF Camera Import. After Effects will then create its own camera with the same movement.
Other 3D applications may have different workflows. If camera export is not supported directly by the applications, several users and third parties have created plug-ins and scripts to help move the camera data between apps. At the other end of the spectrum, Maxon Cinema 4D will not only export camera data, it will also export lights, mattes, positional nulls, and multipacks renders all in one go, and create a pre-built After Effects project for you. (More on the joys of C4D/AE integration near the end of this post.)
Cameras Don’t Match
Sometimes, your imported camera move will not appear to match the motion in your 3D render. The most common problem is that the Angle of View for the After Effects camera is wrong. Verify the value for this parameter (also known as Field of View) in your 3D program, and enter this value manually in the Camera Settings dialog in After Effects.
Some 3D programs also do not take into account any curves you may have applied to the camera’s path or speed. Therefore, you will often need to “bake” the camera move in the 3D program to create a keyframe for every frame of your timeline before exporting its move. For example, in Maya use Edit > Keys > Bake Simulation in Maya.
Other times, you may have a units mismatch – such as centimeters versus meters. You might need to use expressions to make up the difference, such as value * 100 or value / 10.
The 50 Percent Solution
If we know we will be compositing a layer in After Effects onto the surface of a 3D model, we usually try to make that surface average 50% luminance (gray) after it has been textured and lit.
If we composite the new layer in After Effects using modes such as Overlay or Hard Light, it will pick up the lighting and shadows that fall across the 3D surface without unduly changing the appearance of the new layer. It’s subtle, but it really helps sell the realism of a scene, rather than a graphic appearing to be obviously pasted onto another surface.
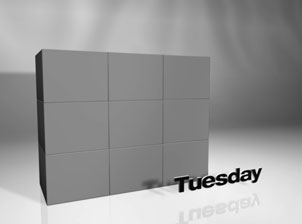
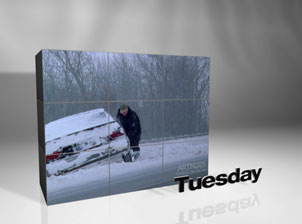
The image at left is the render directly out of the 3D program. Below left shows a video composited on the face of the wall using Normal mode, while below right uses Hard Light mode. Notice how the Hard Light version picks up the shadows and broad specular highlight on the wall’s face from the 3D render, Normal mode does not.
video clip WL101 courtesy Artbeats.com

3D Apps Don’t Do Video
Most 3D programs do not correctly handle some of video’s idiosyncrasies such as odd frame rates and non-square pixels. Therefore, it is safest to render your 3D animations using integer frame rates and square pixels, then conform the results to what you need in After Effects.
For example, render at 30 fps with square pixels (720×534 for NTSC D1), composite layers as needed in this composition, then nest this as a layer into a final render composition. Set the final render comp’s frame rate to 29.97 fps, right click on the nested comp layer, select Time > Time Stretch, and stretch it by 100.1% (the exact ratio between 30 and “29.97” fps). Also scale as needed to fit into the final composition.
(By the way, for a list of proper square pixel sizes for various standard definition formats, jump straight to page 3 of our article PAR for the Course.)
Take it to 11 – Then Back Off
Many 3D artists like to render individual aspects of their scene – for instance, diffuse color, specular highlights, shadows, reflections – as independent “passes” to be reblended in After Effects using a combination of alpha channel and blending modes (Multiply for shadows, Add or Screen for reflections and other color passes). This results in a high degree of control, such as being able to change the strength or blurriness of a reflection map or darkness of a shadow without having to go back into the original 3D project. If you break out the lights separately as well, it’s easy to color correct the contribution of each light after the fact, which is a huge timesaver when it comes to adding that final polish.
Most 3D programs require you to set up and render each of these passes individually. If you are trying to isolate specific properties perhaps on just a few objects in your scene, you can tweak your project file as needed between renders. If you know you will be tweaking a multipass render later in After Effects, it is a good idea to “overdo” properties such as shadow darkness, specular highlights, and reflections so that you have some latitude to decrease the opacity of these layers (and therefore, their contribution to the final composite) without having to render the scene over from scratch:
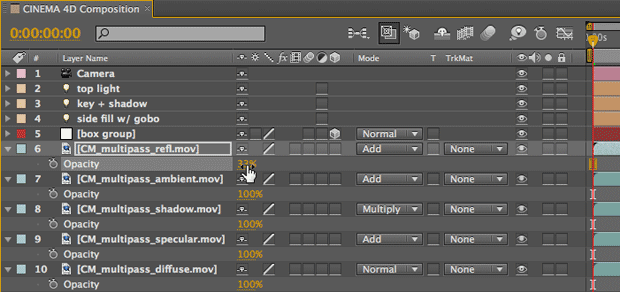
By the way, Cinema 4D makes it extremely easy to create a multipass render and get it into After Effects: You can define which properties you want broken out when you render, have Cinema create a special “.aec” project file for you, import this .aec file into After Effects, and it will automatically reassemble all of your passes into a set of compositions with the correct blending modes already set – you just have to tweak opacities from there. We created a video course on Cinema/AE integration; you can watch it on Cineversity or lynda.com. (If you don’t have a subscription to either, click here for a 7-day free pass to lynda.com.) The introduction to the course is below; in addition to discussing what the course covers, it includes an outline of the basic steps you need to execute to integrate any 3D program with After Effects:
Trish and Chris Meyer share seventeen-plus years of real-world film and video production experience inside their now-classic book Creating Motion Graphics with After Effects (CMG).
The 5th edition has been thoroughly revised to reflect the new features introduced in both After Effects CS4 and CS5 (click here for free bonus videos of features introduced in CS5.5). New chapters cover the new Roto Brush feature, as well as mocha and mocha shape. The 3D section has been expanded to include working with 3D effects such as Digieffects FreeForm plus workflows including Adobe Repouss©, Vanishing Point Exchange, and 3D model import using Adobe Photoshop Extended. The print version is also accompanied by a DVD that contains project files (CS5-only) and source materials for all the techniques demonstrated in the book, as well as over 160 pages of bonus chapters on subjects such as expressions, scripting, and effects.
We will be pulling a few “hidden gems” out of each chapter to share on ProVideoCoalition.com roughly every week. These will give you a taste for the multitude of time-saving tips, not-obvious features, little gotchas, and other insider knowledge you will find in CMG.
FTC Disclosure: We receive software from Adobe and Maxon to help us write our books and create our videos. We receive royalty income from our books and our videos on lynda.com; we gave the videos to Cineversity in exchange to how nice Maxon has been to us through the years. We otherwise are not paid by any of the above to promote their products; they’re what we actually use and believe in.
The content contained in our books, videos, blogs, and articles for other sites are all copyright Crish Design, except where otherwise attributed.

Filmtools
Filmmakers go-to destination for pre-production, production & post production equipment!
Shop Now


