As you are probably aware by now, we’re going through our book Creating Motion Graphics with After Effects 5th Edition (“CMG5” for short) and pulling out a few “hidden gems” from each chapter. These will include both essential tips for new users, as well as timesaving gems that experienced users may not be aware existed.
Chapter 8 of CMG5 covers motion blur as well as echo-style effects. Here’s a few tips on these subjects, including using a stock After Effects plug-in to fake motion blur in footage that doesn’t have enough:
Enabling Motion Blur

This first one is well known to experienced users, but often trips up new users: Motion Blur (as well as Frame Blending) needs to be enabled in two places before you see the result in the Comp panel.
- You need to enable the Motion Blur switch (the column underneath the icon with the echoed dots) for a layer in order for it to render with motion blur calculated. In the figure above, the first two layers have motion blur enabled; the third layer does not.
- You also need to enable the master Motion Blur switch along the top of the Timeline panel to preview motion blur in the Comp panel. Motion blur will be calculated only for those layers that have their individual Motion Blur switches enabled.
Remember that After Effects will only calculate motion blur for layers that are enabled, and that are being moved by animating the Transform properties such as Rotation and Position. The Motion Blur switch will not add blur to previously-rendered or -captured footage (although there’s a workaround for that below…); note that not all effects that create movement will calculate motion blur. If the motion is happening in a precomp, either remember to enable blur for the layers in that precomp, or also enable Collapse Transformations. (Both precomposing and collapsing are covered in later chapters.)
 Setting the Amount and Quality of Blur
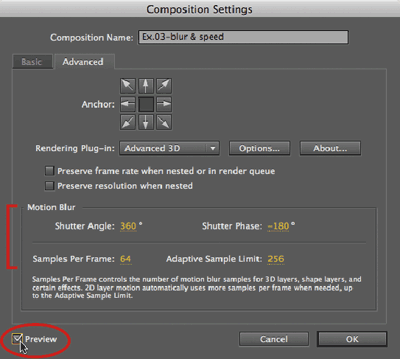
To change the character of the motion blur, you must open Composition > Composition Settings and click on the Advanced Tab. To see the results of your edits, enable the new-in-CS5 Preview switch in the lower left corner of this dialog (see image at right). There are four values that control blur:
- Shutter Angle is the amount of blur, with 360 degrees being a full frame of continuous blur. 180 degrees emulates a standard film camera. To emulate a video or still image camera, take the shutter time (such as 0.002 for 1/500 of a second), divide it by the duration of a frame (such as 0.033 for 29.97 fps), and multiply by 360 (in our example here, the result would be 21.58 degrees).
- Shutter Phase decides how much the blur leads or lags the point in time described by the current frame. To center the blur on the current time, set Shutter Phase to minus one-half the Shutter Angle. (Older versions of After Effects set it to 0 degrees, which meant the blur always lagged the action.)
- Samples Per Frame controls how many intermediate samples are used to fake continuous blur for 3D layers, Shape Layers, and some effects that support blur. We tend to max this out, unless rendering gets really slow – in that case, back it down until just before you see visible echoes on fast-moving layers.
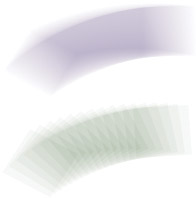
- Adaptive Sample Limit controls how many intermediate samples are used for everything else not covered by Samples Per Frame. Again, we tend to max it out; if you don’t, you might notice echoes on fast-moving objects. In the image at right, the purple object has maximum adaptive blur; the green object has the minimum blur.
 Faux Motion Blur
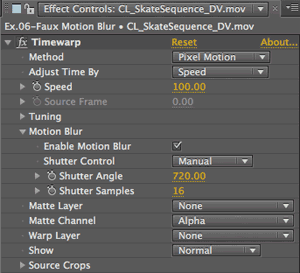
If you receive footage the does not have enough motion blur – such as a 3D render without blur calculated, video footage with a too-fast shutter speed (perhaps shot in Auto mode in daylight – invest in some neutral density filters!), or you just want to create a drugged-out special effect – you can synthesize the blur after the fact. Apply Effect > Time > Timewarp, set Speed to 100, and toggle the Enable Motion Blur switch on. Set the Shutter Angle to taste, and increase the Shutter Samples (the default of 5 is almost always too low, resulting in visible echoes) – 12 is often a reasonable balance between quality and rendering time. Keep on the lookout for sections of your footage appearing to “melt” – this would indicate Timewarp is having trouble processing the footage properly. Better third-party solutions include RE:Vision Effects’ ReelSmart Motion Blur and The Foundry’s Kronos.
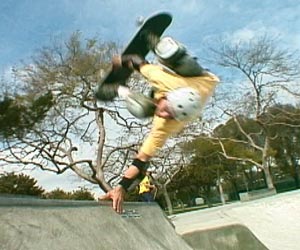
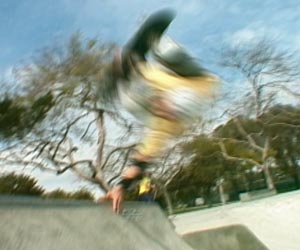
On the left is the original DV footage (courtesy Creative License Media Group); on the right is the same shot with 720 degrees of motion blur added courtesy of Timewarp.
Field Rendering
When you field-render a composition, the frame rate is effectively doubled. This in turn halves the duration of each frame. As a result, everything else being equal, the same Shutter Angle will produce half as long of a visible motion blur trail during field rendering than it will with progressive rendering. Oh – and RAM Previews in the Comp panel are always rendered progressively.
If you field-render a composition and the resulting blur looks too weak to you (or your client, who signed off on the low-res progressive-scan proof you emailed them), you might want to double your Shutter Angle just for field rendering. Once upon a time, you could override the Shutter Angle setting in the Render Settings dialog; no more – you will need to go back and manually change the angle in all of your comps (and effects!). Fortunately, Jeff Almasol of redefinery has created a script that makes it easier to change the motion blur settings of multiple comps at once.
 Selective Echo
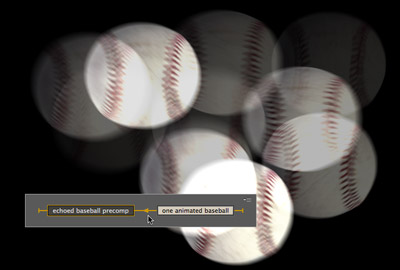
The Echo effect reaches back to the original source file when it renders its result. Also, Effects are calculated before Transformations. This means Echo will not echo any movement or other treatments created by keyframes animation or other effects.
Instead, do your treatments and animation in a precomp. This is represented in the figure at right, where a precomp that contains one baseball animating is fed into a second comp where Echo is then applied.
(Echo works fine on movie layers that capture movement that has already occurred.)
Trish and Chris Meyer share seventeen-plus years of real-world film and video production experience inside their now-classic book Creating Motion Graphics with After Effects (CMG).
The 5th edition has been thoroughly revised to reflect the new features introduced in both After Effects CS4 and CS5. New chapters cover the revolutionary new Roto Brush feature, as well as mocha and mocha shape. The 3D section has been expanded to include working with 3D effects such as Digieffects FreeForm plus workflows including Adobe Repouss©, Vanishing Point Exchange, and 3D model import using Adobe Photoshop Extended. The print version is also accompanied by a DVD that contains project files and source materials for all the techniques demonstrated in the book, as well as over 160 pages of bonus chapters on subjects such as expressions, scripting, and effects.
We will be pulling a few “hidden gems” out of each chapter to share on ProVideoCoalition.com roughly every week. These will give you a taste for the multitude of time-saving tips, not-obvious features, little gotchas, and other insider knowledge you will find in CMG.
The content contained in Creating Motion Graphics with After Effects – as well as the CMG Blogs and CMG Keyframes posts on ProVideoCoalition – are copyright Crish Design, except where otherwise attributed.

Filmtools
Filmmakers go-to destination for pre-production, production & post production equipment!
Shop Now