OpenColorIO is the industry standard color management tool for animation and visual FX. After Effects also has its own, different color management system based on ICC profiles. Generally, these are often thought to be mutually exclusive – you either use OpenColorIO or After Effects.
We’ve spent the last few videos going over this – in Part 10 we looked at the native color management system that’s built into After Effects. In Parts 11, 12 & 13 we looked at why OpenColorIO and ACES were developed, and how to use then in After Effects.
But the two different systems each have their advantages and disadvantages, and it’s possible to use them together to get the best of both worlds. That’s what we’re looking at here.
The After Effects color management system is much easier to use, however crazy that might sound. Conversions are done automatically, profiles are correctly embedded and read, and in general After Effects is doing all the work for you. However, when it comes to High Dynamic Range images, it simply doesn’t look as good as OpenColorIO and ACES.
OCIO & ACES have clear advantages in the quality of their color conversions, as well as consistency across all applications. But using OpenColorIO with a textbook approach involves juggling adjustment layers, and a lot of manual work. It is, as so many users have discovered, tedious, complex and prone to mistakes.
In this video I’ll explain how to use both systems together. The goal is to make our lives as easy as possible, while still retaining ACES-quality image outputs that are consistent with the rest of the industry. This is a hybrid approach to color management, demonstrating how and why we want to use OpenColorIO and ACES together with the After Effects color management system.
Triple layer effects sandwich
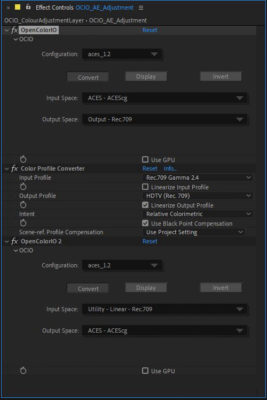
As detailed in the video, this is the approach I’ve been using for the past few years in my own personal projects. It’s the approach I use when working in the ACEScg colorspace, but delivering rec709 outputs. The key is a sequence of color conversions that are applied to an adjustment layer used at the top of each composition. Because this adjustment layer is the key to the hybrid approach, I’ll outline what’s going on in more detail.
Firstly, we need to clarify what we’re trying to do. Overall, we want to make our lives as easy as possible. We want to use the After Effects color management system because it’s simpler, but we want to use OpenColorIO and ACES whenever the results will look better.

The problem with combining OpenColorIO with the After Effects built in color management system is that After Effects isn’t aware of anything we do with the OpenColorIO plugin. If we use OpenColorIO to convert something from one colorspace to another, then After Effects can’t tell. The built-in color management system will have it’s own ideas about what it needs to do – it will use Display Color Management to convert the composition to sRGB so we can view it on our monitors. If we queue up a render, it will tag the render with the colorspace that it thinks the render is in. If we want to convert our output to a different colorspace, then After Effects will think it needs to do it for us, even though we might have done it manually using OCIO. This might result in renders that are tagged with the wrong color profile, or in a worse-case scenario, we end up with a double-conversion and renders that look completely wrong.
The solution is an effects stack devised by one of my work colleagues, Andrew Sanderson. The clever trick is to use OpenColorIO and ACES to convert the ACEScg composition to rec709, in order to get the beautiful highlight rolloff that comes with the ACES output transform. But then we convert our rec709 image back to ACEScg. This “bakes in” the soft highlights, but we end up with an image that is still in the ACEScg colorspace, so After Effects doesn’t get confused.
Now that we have an ACEScg image which has been beautifully tone-mapped to rec709, After Effects’ Display Color Management will correctly convert our composition for our sRGB monitors. If we queue up a render and manually change the colorspace to rec709, then After Effects will take care of the output conversion without us having to juggle different adjustment layers. Because we’ve already used OpenColorIO and ACES to tone-map our ACEScg composition to rec709, having After Effects convert the output to rec709 again doesn’t result in overblown highlights. It also correctly tags the render as rec709.
This hybrid approach works well – in theory and in practise – but it’s worth examining the effects stack because it’s not as simple as just duplicating the OpenColorIO plugin and reversing the settings.
The problem comes down to gamma, and although I introduced the topic of gamma in part 7, I didn’t go into any advanced details – it’s not relevant to your average After Effects user sitting down to do some animation. But, to put it simply, there are a few different ways of encoding a rec709 image depending on what it’s going to be used for. Although we’re pulling off a neat trick by converting our image to rec709 and then back again, if we don’t use the correct gamma settings then our image will end up lighter or darker than we started with.
The actual adjustment layer that I demonstrate in the video has 3 effects. The first is easy to understand – we apply OpenColorIO, and use an ACES configuration to convert our composition from ACEScg to rec709. But the trick is to then use the After Effects color profile converter to convert the image from rec709 with a gamma of 2.4, to a slightly different, linearised flavor of rec709. From here, we can use OpenColorIO again to convert the linear rec709 image back to ACEScg.
If you’re reading this without watching the video then it might seem a bit complex. But the reason we’re doing this is so that After Effects can take care of the difference between our sRGB monitors and our rec709 delivery renders. Without our triple-stacked effects sandwich, we would have to manually change between multiple adjustment layers every time we wanted to render something.
As also demonstrated at the end of this video, the rec 709 renders that we get from After Effects are identical to the same footage converted in DaVinci Resolve, which is also an important consideration for some users.
How it works in practice
Because I’m demonstrating the way that I’ve worked for the past few years, I’ll share a few additional details that didn’t make it into the video.
One great trick to know in After Effects is that you can pre-compose adjustment layers to create one central source for any effects that are used in multiple compositions. In our case, this would be our triple-stacked OpenColorIO conversion. Instead of creating a new adjustment layer at the top of every composition, we just create one composition with one adjustment layer, and use it in all of our compositions. By enabling “collapse transformations” the adjustment layer acts as though it is in every composition. This gives us one central source for all compositions, guaranteeing consistent settings and reducing the potential for mistakes.
So just to list my basic approach to working in After Effects:
- Firstly, my project is set to 32 bit, linear.
- I set the working space to ACEScg, which also turns on the After Effects color management system
- I create a master pre-comp with an adjustment layer in it, which has the 3 color conversion plugins detailed above
- I use this adjustment layer pre-comp at the top of every composition
- This enables me to use Display Color Management, which is always on
- I make the adjustment layer a guide layer, so it doesn’t render
- Any renders / pre-renders I queue up will be in the full ACEScg colorspace, because the guide layer won’t change the outputs
- I render out my final “master” as an ACEScg render, and then I import it
- I create my rec709 deliverable by rendering my imported ACEScg master, but WITH the adjustment layer on – NOT set as a guide layer
- When I queue up the rec709 output, I manually set the colorspace to rec709 in the output module
Not long now
Adobe have been working on integrating OpenColorIO and ACES directly into After Effects, and anyone with a Creative Cloud subscription can download the Beta and try it out. Once native OpenColorIO support makes it into the public release of After Effects, this video and the approach I’ve outlined here will be obsolete. But – hurray! hurray! – everything will be much easier!
This is part 14 in a long series on color management. If you’ve missed the other parts, you can catch up here:
Part 4: Maxwell’s spinning discs
Part 6: Understanding the CIE 1931 chromaticity diagram
Part 8: Introducing Colorspaces
Part 9: The theory of a color managed workflow
Part 10: Using After Effects built-in color management
Part 11: Introducing OpenColor IO
Part 13: OpenColorIO and After Effects
AND – I’ve been writing After Effects articles and tutorials for over 20 years. Please check out some of my other ProVideo Coalition articles.


