In our introductory article, I tried to get you thinking about the journey you’re about to go on, when it comes to creating DCP’s for Cinemas/Theatres. There’s almost as much work in the setup as there is in the actual creation itself. Now that we’ve covered all the important things you need to know about creating DCP’s, let’s get more specific, and talk about the process of getting your footage in the right resolution and color space, so we can then talk about the conversion to JPEG 2000. We’re starting things off with Media Composer in this article, so let’s get it going.
Before we get rolling, I want to stress something that’s very important. For the sake of these articles, we’re going to assume that everything was shot in HD and HD only. Your master timeline will be 1920×1080, at 24fps, and what the process for creating DCP’s is, from those types of files. Obviously, depending on your system and your workflow (4K, 8K, etc), your workflow for the first part of our lesson(s) will be slightly different, but overall, not that much different that it requires it’s own article.
THE FIRST BIG DECISION
We touched on this in the introductory article, but when thinking about DCP creation, the first big decision that you need to make is “FLAT or SCOPE”? Now, I know you’re probably thinking that you want to have both and, yes, you are going to have both, but it’s super rare that you will create a full frame Flat and full frame Scope DCP. You’re going to create one, and then create the other from the original. Think of it like this. If the DCP you are creating will be full frame Scope (2048×858), the Flat version you create will be letterboxed, as the scope version will fit horizontally in a Flat “frame”. If you have created a full frame Flat DCP, the Scope version will be pillarboxed, as the Flat frame will be scaled vertically to fill the Scope frame. So, again, let’s make another assumption for the purposes of these articles that you will have a full frame Flat version (as HD is almost full frame Flat), and we’ll make a pillarboxed Scope version from there.
XYZ LUT
If you haven’t copied over those LUT’s from Resolve yet, now’s the time to do it, and make sure you place them in a folder you’ll have easy access to. If you’ve forgotten where to get to them, or just don’t want to go back to the previous article, you can download them from the below location(s).
Mac
Library>Application Support>BlackMagic Design>DaVinci Resolve>Support>LUT>DCI
Windows:
C:/ProgramData/BlackMagic Design/DaVinci Resolve/Support/LUT/DCI
There’s something else that’s exceptionally important, when talking about the LUT. If your plan is to use Resolve as the intermediary to create the JPEG 2000 files, you do NOT need to add the XYZ LUT inside of Media Composer. Resolve can do that automatically for you. If your plan is to use After Effects as the intermediary, you will need to add the LUT either here in MC or in AE (but it’s easier to add it here, and less of a pain in the ass later). In this article, we’re going to go through the process of adding the LUT here in MC, and obviously if you don’t want to add it at this step of the process, you can just skip over that section.
THE EDIT
If all the footage you shot it in 2K already (or even 4K for that matter), you can set up a project to work in either 2K Flat or 2K Scope. Whichever you prefer.
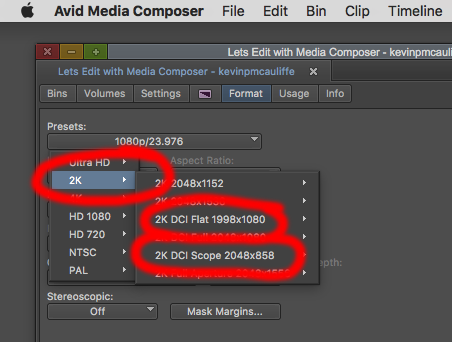
Now, also keep in mind that if you’re shot all your footage in a Flat aspect (Matted for Scope), but want to have it in a Scope Frame (or vice versa), now would be the time to set that up via the Frame Flex Options. I’ve snapped an example of the setup below to give you an idea of the type of setup you would want to use. Obviously there are a ton of different raster dimensions, but at the end of the day, if we’re talking about 2K Flat and Scope DCP’s, your FrameFlex options will be set to either 1.85:1 or 2.39:1 . So with that being said, don’t be an idiot, and work entirely with Linked To footage. Once you’ve got your footage looking the way you want in Frameflex, Transcode all your media to DNxHR (HQ) or ProRes, and start/finish your edit. As for audio, you will be delivering either stereo (2.0) or surround (5.1), so once your mix is done, you’ll need to prep it for a mixdown, that we’ll talk about in the next section.
EDIT IS DONE…..NOW WHAT
If you were editing in native 2K Flat or 2K Scope, you can skip ahead to the XYZ LUT section, as no adjustment is necessary to your footage before moving on. If you’re working in HD (1920×1080 24fps 1.78:1 aspect), you will need to take a step now to adjust your project and footage size to 2K Flat before moving on. You will need to do one of two things at this point. You will either need to mix your HD sequence down, or export it, and re-link to it, so you have a complete timeline as one clip. The mixdown is probably easier for the purposes of this article, so let’s go with that method. If you want to export and re-link the process is pretty similar. Once you’ve mixed down your sequence, we’re not ready to drop it into a timeline just yet. We need to make sure that we have set our project to be a 2K Flat project, and then we want to head back into our FrameFlex settings to make sure that our 1.78 HD clip is cropped for a 1.85 2K Flat timeline. Once that’s done, you can drop both the video and audio into your timeline. To be honest you really don’t need the audio, as normally the video and audio go to the DCP creation application as two separate files, but for right now, I’m keeping the video with the audio, so that there is no confusion down the road. Now, if you aren’t going to do the XYZ conversion in Media Composer, and you’re going to do the conversion and flip to JPEG 2000 in your DCP creation application, you can skip this step, and just export your file. Since you’re exporting larger than HD, if you’re on the Mac, export as ProRes, if you’re on WIndows, you can go with DNxHR (you could go with this on Mac as well if you wanted to), and since AE and Resolve both support the DNxHR codec, you should be good to go. Whether you plan on exporting with the XYZ LUT from Media Composer or not, you should apply it, and look at it, to make sure that you’re getting the proper look with your footage. With your content in the timeline at the correct resolution, add a video track above it, and add the Color LUT effect from the Effects Panel.
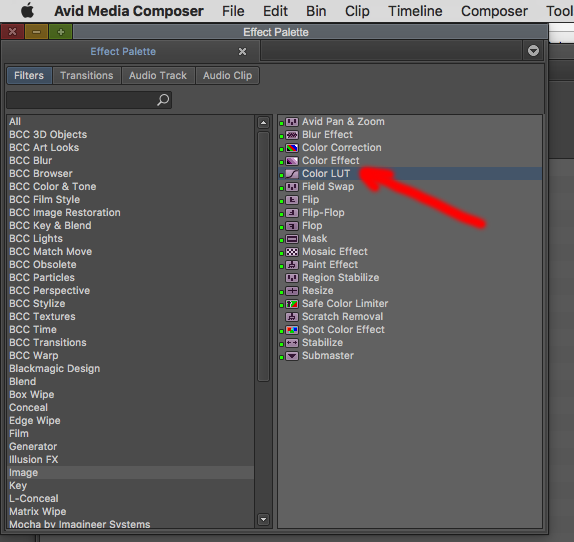
If you’re looking for a way to import a LUT from the effect window, you’re unfortunately out of luck, so go ahead an facepalm Avid for not adding this ability here. We have to add the LUT in another window, and then access it through the effect. Head back to a clip, any clip, right click on it, go to your Source Settings, go to the Color Encoding Window and hit the Color Management Settings button.
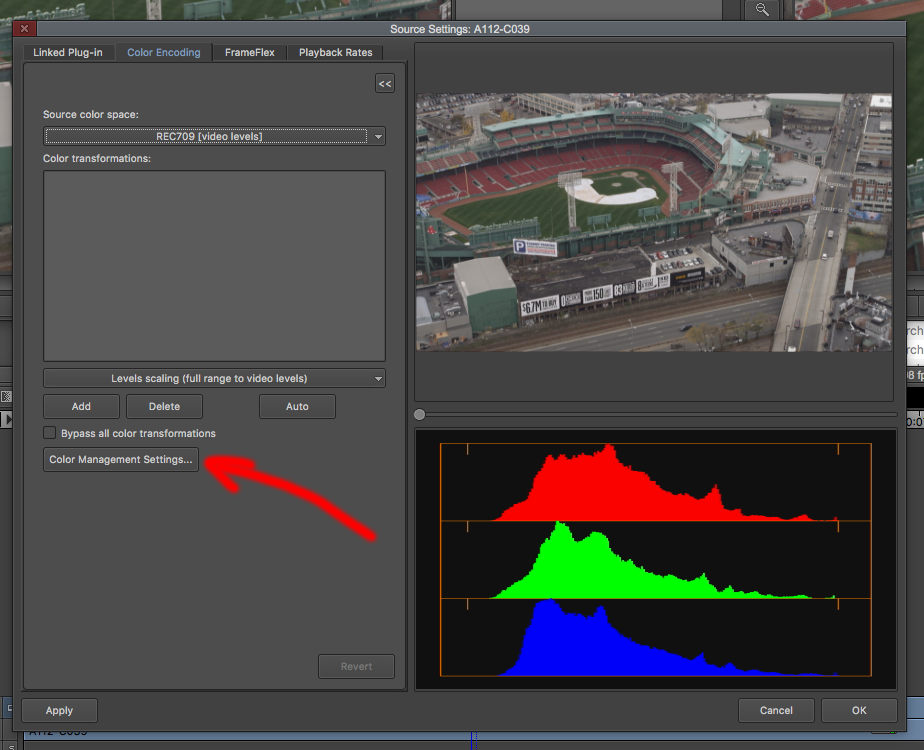
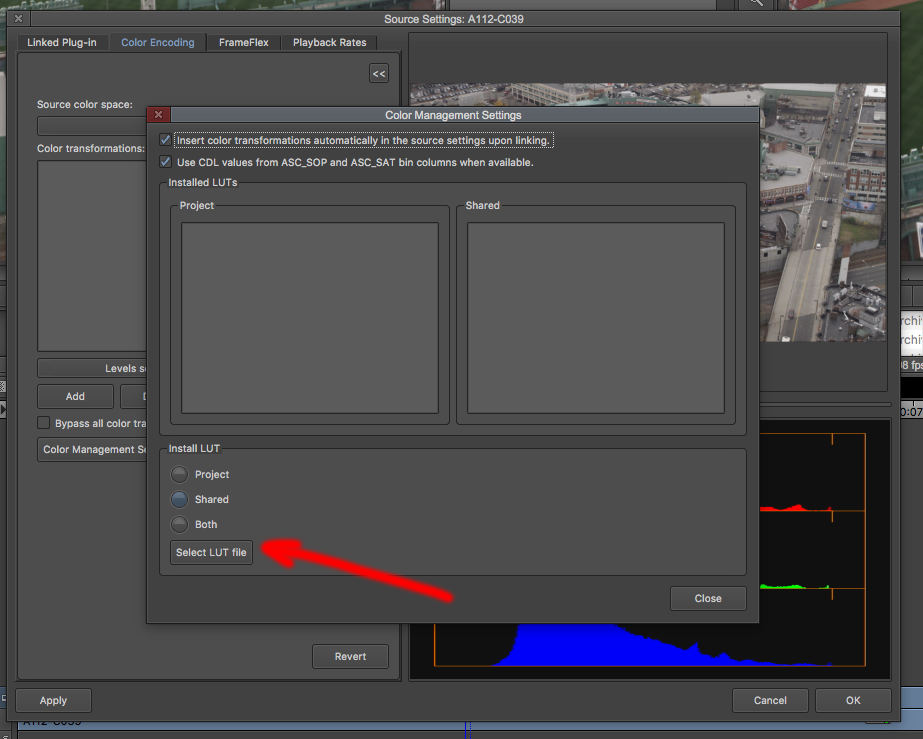
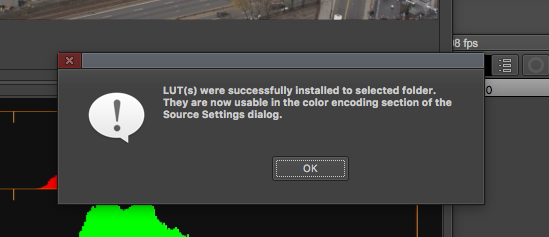
Hit the “Select” button, and navigate to the XYZ LUT that you have on your system. Now, if you are really clever, you would have thought to yourself, “Self, the easiest way to check that the XYZ conversion is working correctly is to convert from REC709>XYZ then add a LUT to go from XYZ back to REC709!” You’d be very clever if you thought this, but the big question is where would you find a XYZ to REC709 LUT? Well, Michael Phillips who is a Former Solutions Manager, Post at Avid Technology and who runs 24p.com has a great article about just this subject, so you can find an XYZ to REC709 LUT on his page, and you can add both of them at the same time! Once they are installed, you’ll get a super happy message telling you this.
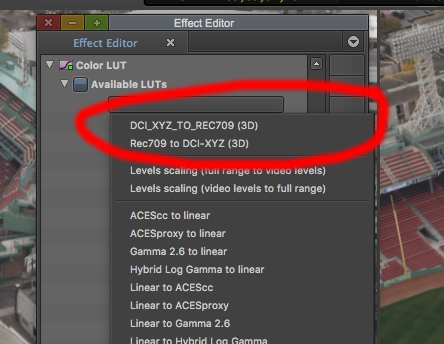
Now, you can head back to the effects editor, and apply the XYZ LUT to your footage. You’ll notice that your two new LUT”s appear at the top of the LUT drop down.
You’ll immediately notice that your footage now looks a bit washed out, and a little on the green side compared to the original.
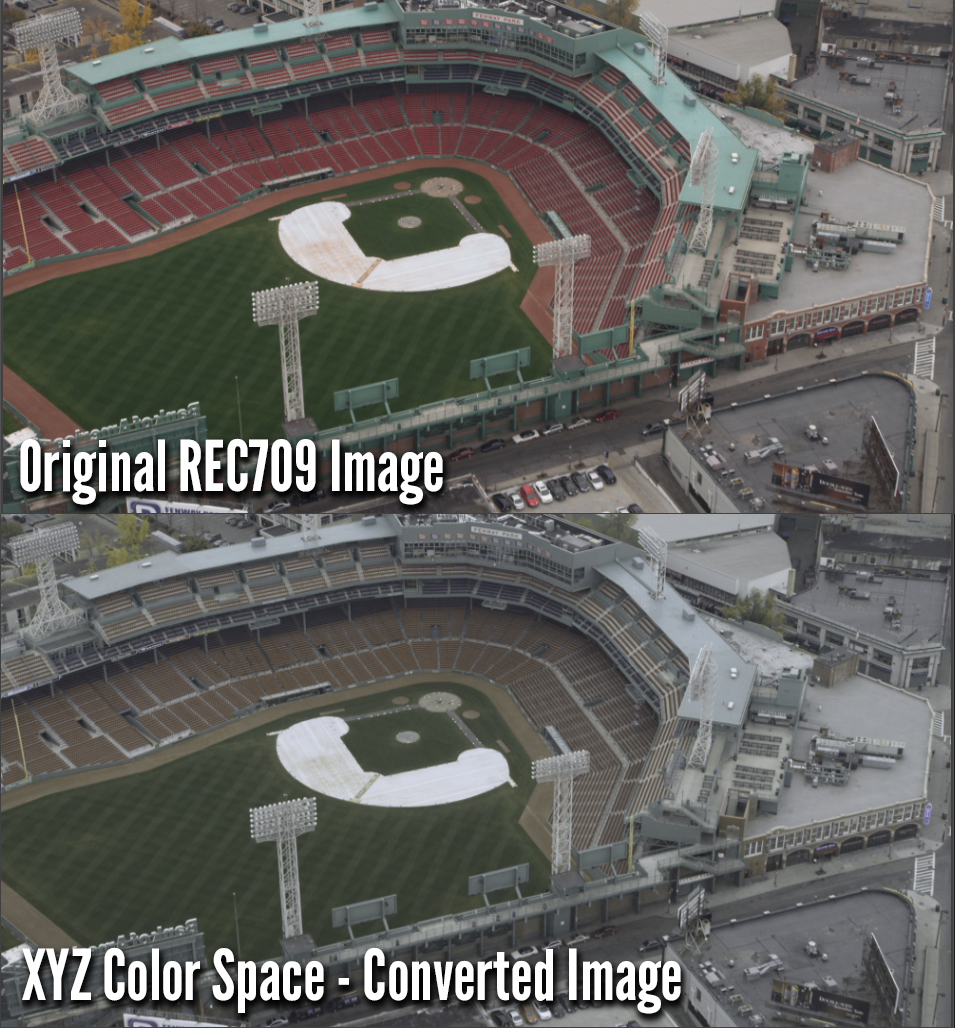
This “washed out” look is completely normal, and if you see this change, the conversion to XYZ was done correctly. To be honest, the REC709>XYZ LUT taken from Resolve is super good, and is really a no brainer. The hardest part is getting the LUT into Media Composer. Now that we’ve got our footage in XYZ color space, let’s convert it back to REC709 to see how close the round trip conversion is.
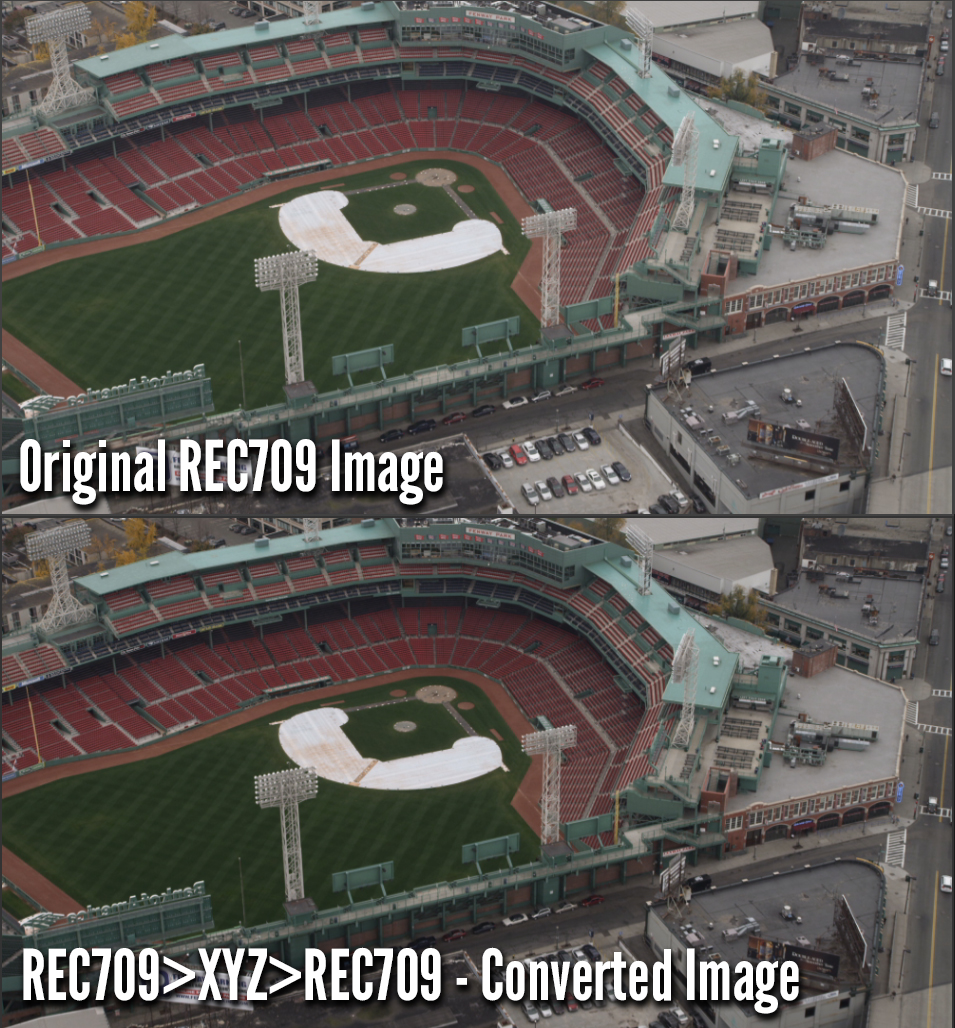
As you can see the roundtrip from REC709>XYZ >REC709 has altered the luminance of our footage, so this is something that you might want to take into consideration, when adding the XYZ LUT. Remember, You can always throw a Color Correction effect onto your footage at the bottom of the effect stack to make adjustments to your footage before the XYZ LUT is added.
Okay, with all of that being done, you’re ready to export your clip to an external hard drive, to make the conversion to JPEG 2000, but we’re going to cover that, in its own dedicated article!
Now, again, I cannot stress enough that you need to find yourself a reliable post facility that can QC your DCP. What do I mean by QC? I mean take what you’ve created, ingest it into a DCP Playout machine, and let you sit in a room at watch it. This way you can make sure that your DCP not only look good, when it hits the big screen, but you can also check things like audio, and what your REC709>XYZ color conversion looks like, so this way you know exactly what your audience will see, no matter where you’re sending it to. AND, if you do run into problems, the facility with the playout machine will probably be well versed in the DCP creation process, and can help you fix whatever problems you might have run into. If you missed it, I’m including a link to my tutorial on how to go through this process in Media Composer.

Filmtools
Filmmakers go-to destination for pre-production, production & post production equipment!
Shop Now