
As you are probably aware by now, we’re going to go through our book Creating Motion Graphics with After Effects 5th Edition (“CMG5” for short) and pulling out a few “hidden gems” from each chapter. These will include both essential tips for new users, as well as timesaving gems that experienced users may not be aware existed.
Chapter 4 of CMG5 helps you to improve your animations by focusing on the timing and speed changes of your movements, including working efficiently with the Graph Editor as well as using Auto-Bezier, Hold and Roving keyframes:
Graph Editor Set
Before you can use the Graph Editor (GE) productively, you have to check the leftmost two popups along the bottom of the GE panel. The first menu sets what properties are shown in the graph editor, and the second determines whether you are viewing the Speed or Value graphs for those properties (Auto-Select Graph Type is a good default).
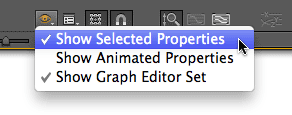 The default for the first popup is to Show Selected Properties. This works well when you select one property at a time, but making careful selections gets a little unwieldy when you want to compare various properties across multiple layers. And toggling on Show Animated Properties can often display too much information for busy layers! So when you first open the Graph Editor, don’t be surprised if there are no graphs visible (because only the layer is selected and not a property), or there may be so many graphs overlapping each other (because Show Animated Properties is enabled) that you are overwhelmed!
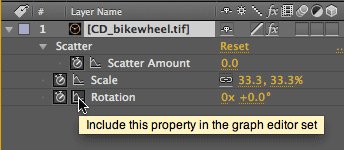 >We think a smart solution is to use the default settings, but to also take advantage of Graph Editor Sets when you need to see multiple properties at once. To add properties to the GE set, toggle on the switch to the right of that property’s stopwatch. This allows you to quickly show and hide graphs without having to select the property – or even to select the layer!
Separate XYZ Dimensions
Normally, After Effects bundles the X, Y, and optionally Z Position values into a single keyframe. However, there are some types of movement – such as balls bouncing (where an object keeps a steady speed in X or Z but keeps changing speed and reversing direction in Y), camera crane + dolly moves (where again the Y movement may be totally independent of what is happening in X and Z), and others – that are much easier to animate if you can get independent access to these dimensions, which you can now do as of After Effects CS4.
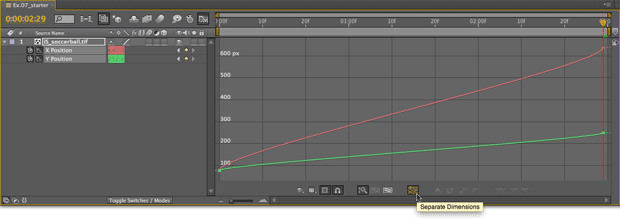
Separating these dimensions requires a trip into the Graph Editor and clicking on the special Separate Dimensions button along the bottom of the GE (see figure above). Once they have been separated, you can edit the new independent keyframes in either the Graph Editor (witnessed by the independent red and green graphs above) or the normal timeline display. However, using Separate Dimensions does come with a price: You can no longer directly edit the motion path in the Comp panel; you have to craft your path in the Graph Editor.
Note that you can disable Separate Dimensions by selecting Position and then clicking the Separate Dimensions switch along the bottom of the Graph Editor; After Effects will then approximate your final animation using traditional bundled Position keyframes.
 Hold Keyframes
If you don’t know how to make keyframes “hold,” you’re creating extra work for yourself! The Hold keyframe’s job is to not interpolate to the next keyframe. A Hold keyframe takes over the entire segment of time until the next keyframe is reached. At this point, the layer will then immediately jump to its new position or value. Of course, if you want to have a property pause on a value and then continue interpolating to another value, make sure the keyframe directly after the hold keyframe has the exact same value so there is no jump.
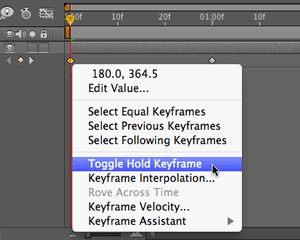
Hold keyframes are great for creating more rhythmic animations, and they can be used on any property or effect parameter. To make a keyframe hold in place, select any keyframe and invoke Animation > Toggle Hold Keyframe (shown above). The shortcut is to press Command+Option (Control+Alt) and click directly on a keyframe in the Timeline panel while in the layer (not Graph Editor) view.
 Users who haven’t discovered Hold keyframes have devised all sorts of workarounds to make a property’s value hold in place. The most common one involves duplicating the prior keyframe and placing it one frame in time before the next keyframe (as shown at right). There is never (ever, ever) a need to do this! Just select the first keyframe and make it hold!
Simple Smoothing
While you can use the Graph Editor to make gradual and sophisticated velocity graphs, a quick and simple method for smoothing out a property’s motion is to toggle all keyframes from Linear to Auto Bezier (aka “smooth” keyframes). Auto Bezier automatically averages the incoming and outgoing speeds at the keyframe; that way you don’t perceive a drop in speed as the layer rolls through the keyframe.
 To see the effect of changing default linear keyframes to Auto Bezier, you’ll need at least three keyframes. Hold down Command on Mac (Control on Windows) and click on one of the middle keyframes in the Timeline. It will change from a diamond to a circle. If the property in question has a motion path (Position, say) the spacing of the dots in the motion path will transition more evenly across that keyframe in the Comp panel. To change all keyframes to Auto Bezier, click on the name of the property in the Timeline panel and then Command (Control) click on one of them. (Note that the first and last keyframes won’t change their behavior but there’s no harm in including them.)
Of course, you can create Auto Bezier keyframes with the Graph Editor forward, and this way you also see a visual representation of what changes are occurring. Compare the following:
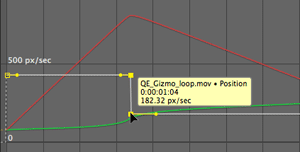 Linear keyframe interpolation means the speed of movement can be different entering and exiting a keyframe – thus the discontinuous break in the graph at the keyframe. Note that editing the Bezier handle on one side of a keyframe will have no effect on the other side, as the handles are “broken.”
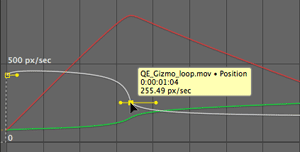 Option+click (Alt+click) on a keyframe in the Graph Editor to convert it to Auto Bezier, smoothing the speed change through the keyframe. Another benefit is that the Bezier handles are now tied together (“continuous”); moving one side up or down will move the opposite handle.
Roving Keyframes
Because After Effects separates the motion path and path velocity for Position keyframes means that you can create a complex motion path and then create an overall speed across the entire motion path. This is made possible by employing roving keyframes.
To try this out, animate an object around the Comp panel using as many Position keyframes as you like (you need at least three, as the first and last keyframes cannot rove in time).
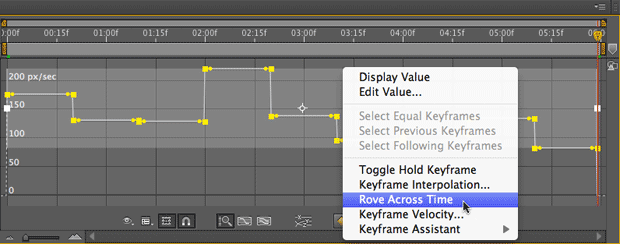
Open the Graph Editor, check that the second popup along the bottom is set to Auto-Select Graph Type (which displays the Speed Graph for Position). Click on the word Position twice to select all of its keyframes. Then click on the Edit Selected Keyframes button (the diamond icon) along the bottom of the Graph Editor and select Rove Across Time from the menu (you can also right-click on one of the keyframes to bring up the same menu).
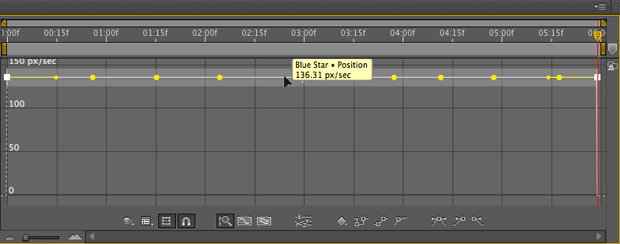
Notice what happens to the motion path and the speed graph: The first and last keyframes kept their original timing, but all of the remaining keyframes in-between have changed to yellow dots and slid earlier or later in time as needed to flatten out the graph. RAM Preview and observe how the speed is now constant for the entire path.
Another way to think of roving keyframes is that the layer has various points in space in the Comp panel that it must hit as it travels along the motion path, but the timing of the first and last keyframes determine the time the layer arrives at the intermediate keyframes.
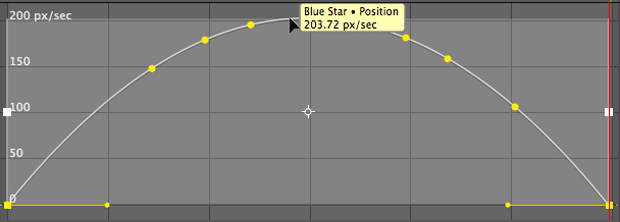
The intermediate keyframes will continue to “rove” in time as needed as you adjust the first and last keyframes. For example, press F9 to Easy Ease them (or click the Easy Ease button along the bottom of the Graph Editor) – now the entire speed graph will be one smooth arc; RAM Preview and the object will smoothly accelerate then decelerate during the course of the entire motion path. You can continue to tweak the Bezier handles on the first and last keyframes, as well as slide them earlier or later in time. For example, select just the last keyframe and slide it later in time, and the same animation will take more time.
Equally important is that you can tweak the motion path: The keyframes will continue to rove across time as needed to smooth out the layer’s velocity along the entire motion path. Try moving individual keyframes in the Comp panel while watching what happens in the Graph Editor.
To disable roving, simply click and drag any one of the roved keyframes, then right-click one and toggle off Rove Across Time from the popup menu. Note you can do this in either the Graph Editor or the normal layer bar view in the Timeline panel. Note that only properties that create a motion path in the Comp or Layer panels, such as Position, Anchor Point, and Effect Point, can be roved.
Trish and Chris Meyer share seventeen-plus years of real-world film and video production experience inside their now-classic book Creating Motion Graphics with After Effects.
The 5th edition has been thoroughly revised to reflect the new features introduced in both After Effects CS4 and CS5. New chapters cover the revolutionary new Roto Brush feature, as well as mocha and mocha shape. The 3D section has been expanded to include working with 3D effects such as Digieffects FreeForm plus workflows including Adobe Repouss©, Vanishing Point Exchange, and 3D model import using Adobe Photoshop Extended. The print version is also accompanied by a DVD that contains project files and source materials for all the techniques demonstrated in the book, as well as over 160 pages of bonus chapters on subjects such as expressions, scripting, and effects.
We will be pulling a few “hidden gems” out of each chapter to share on ProVideoCoalition.com roughly every week.
The content contained in Creating Motion Graphics with After Effects – as well as the CMG Blogs and CMG Keyframes posts on ProVideoCoalition – are copyright Crish Design, except where otherwise attributed.

Filmtools
Filmmakers go-to destination for pre-production, production & post production equipment!
Shop Now


