We are in the process of going through our book Creating Motion Graphics with After Effects 5th Edition (“CMG5”) and pulling out a few “hidden gems” from each chapter, including essential tips for new users as well as timesavers that experienced users may not be aware existed.
Chapter 6 of CMG5 covers managing multiple layers efficiently, including hot keying, comp and layer markers, and the layer switches. Here’s a small set of tips we extracted:
Option Paste for Current Time
Here’s one we bet most of you didn’t know (Chris actually forgot; Trish had to remind him): Pressing Option on Mac (Alt on Windows) when you select Paste a layer will place the layer’s in point at the current time, not the layer’s original start time. The shortcut is Command+Option+V on Mac (Control+Alt+V on Windows). If you forget to press Option (Alt) when you paste, just press [ (left square bracket) to move the layer’s in point to the current time.
Convert Footage to Layers

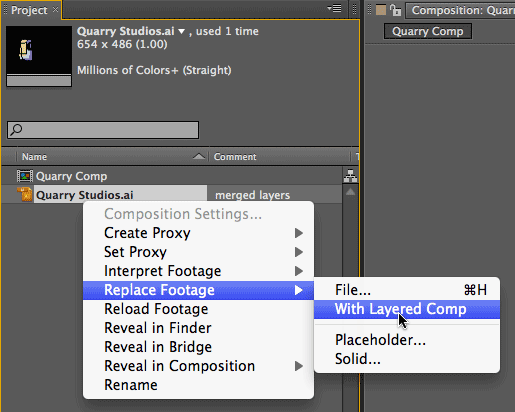
If you imported a layered Photoshop or Illustrator file as a single footage item using the Merged Layers option, but later decided you really wish you had access to those individual layers, you can later replace this item with a layered version without having to re-import. Either select the item in the Project panel and use File > Replace Footage > With Layered Comp, or select the layer in a comp and use Layer > Convert To Layered Comp.
Replace Source
Here’s one you won’t want to forget. You spend time animating a layer and are happy with the animation keyframes, effects, and other attributes. But then you decide the source material needs to be changed (you want to swap out the source while keeping everything else). This is called Replace Source, and for some reason it’s nowhere to be found in any menu! Here’s how it works:
Step 1: Select the layer (or multiple layers) you want to replace in the Composition or Timeline panel.
Step 2: In the Project panel, select the source you’d like to use instead.
Step 3: With the Option (Alt) key held down, drag and drop the new source into the Comp or Timeline panel. All the attributes of the previous layer(s) will be assigned to the new source. You can also select the replacement source in the Project panel and use the shortcut Command+Option+/ (Control+Alt+/).
Guide Layers
Guide Layers are layers that appear only in the current composition, but not in compositions further down a chain of nested comps, or (optionally) when you render. Great uses for Guide Layers include scratch audio tracks, grid or letterbox overlays, or FPO (For Position Only) templates such as a station ID bug that will be inserted live during broadcast – place a copy in your comp with Guide Layer enabled, and you’ll remember to leave space for it. You could even write a note to another animator with the Type tool directly in the Comp panel, making sure they can’t accidentally render it by making the text layer a guide layer!
 To toggle whether or not a layer is a Guide Layer, select it, and choose Guide Layer from either the Layers menu or by right-clicking on it. A blue grid icon will appear to the left of its name in the Timeline panel when it is a Guide Layer.
In Render Settings, the Guide Layers popup defaults to All Off. You can render Guide Layers by changing this option to Current Settings; only guide layers that are visible will render.
Scroll Layer to Top
When many layers are twirled open and the vertical scroll bar is visible in the Timeline panel, you can select a layer and press X to scroll this layer to the top of the visible area. This does not reorder the layer in the stack; it merely auto-scrolls the panel for you.
If you want to actually move a layer up or down a position in the layer stack, hold Command on Mac (Control on Windows) and use the right and left square bracket keys ] and [ respectively. Add Shift to jump the layer all the way to the top or bottom of the layer stack.
Trish and Chris Meyer share seventeen-plus years of real-world film and video production experience inside their now-classic book Creating Motion Graphics with After Effects.
The 5th edition has been thoroughly revised to reflect the new features introduced in both After Effects CS4 and CS5. New chapters cover the revolutionary new Roto Brush feature, as well as mocha and mocha shape. The 3D section has been expanded to include working with 3D effects such as Digieffects FreeForm plus workflows including Adobe Repouss©, Vanishing Point Exchange, and 3D model import using Adobe Photoshop Extended. The print version is also accompanied by a DVD that contains project files and source materials for all the techniques demonstrated in the book, as well as over 160 pages of bonus chapters on subjects such as expressions, scripting, and effects.
We will be pulling a few “hidden gems” out of each chapter to share on ProVideoCoalition.com roughly every week.
The content contained in Creating Motion Graphics with After Effects – as well as the CMG Blogs and CMG Keyframes posts on ProVideoCoalition – are copyright Crish Design, except where otherwise attributed.

Filmtools
Filmmakers go-to destination for pre-production, production & post production equipment!
Shop Now


