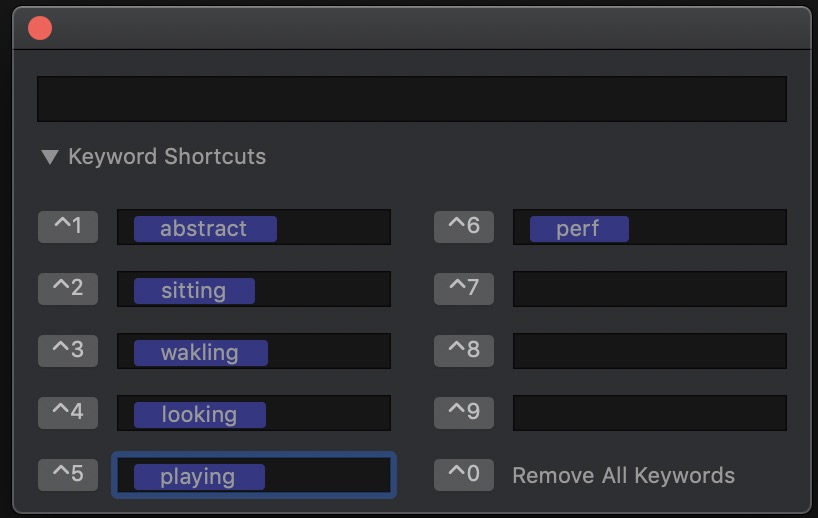
Without a doubt, one of my favorite things about Final Cut Pro X is its different thinking when it comes to organizing and logging footage. Instead of Bins, you get Events and Keyword Collections. Instead of sub-clipping you do keywording. While Events really are just Bins by a different name Keyword Collections and keywording are the paradigm shift when it comes to logging footage for editorial in a new way.
Why is keywording so good?
Imagine, with a keystroke, being able to organize footage into different categories without moving back and forth from timeline to bin, clicking to rename, double-checking the sorting or dealing with a Source monitor. FCPX allows for 9 custom categories (these are the Keyword Collections) and 10 if you count the ‘F’ key which is for Favorites.

You can skim, scroll, scrub and JKL through your footage with an ease and speed not yet matched by any of the other NLEs. It really is a great way to work.
Resolve is trying to do something similar
Enter DaVinci Resolve. As the editing side of Resolve has continued its rapid development (a march toward post-production dominance perhaps?) the engineers have added in a number of different things to help with the organization and logging of footage.

I don’t know how intentional these features were added. By that I mean I don’t know if these several features now present in Resolve 15 were all meant to complement each other but used together editors working in Resolve can implement a poor man’s keywording.
Poor Man’s (or Woman’s) Keywording
It takes a few steps to set up and you don’t end up with quite the same end result as FCPX but when used properly it could give editors an extra layer of organization in DaVinci Resolve that you can’t quite get the same way in Avid Media Composer or Adobe Premiere Pro.
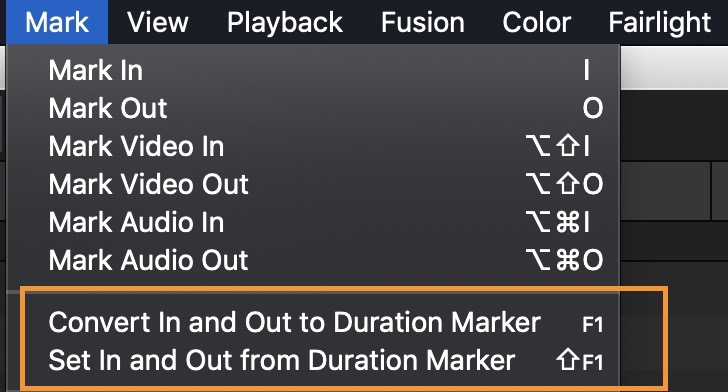
- First, set the Convert In and Out to Duration Marker menu item to a dedicated keyboard shortcut.
Efficient range-based keywording only happens when you can do it quickly so the more keyboard shortcuts the better. Resolve’s new visual keyboard mapper helps.
- Next, set Modify Marker… to a nearby keyboard shortcut
To make this technique work efficiently you have to be able to edit your Marker data with a keyboard shortcut as you don’t want to have to double-click it each time. By mapping the commands on side-by-side keys you can quickly add each one.
- Make note of the keywords you want to use while logging. I like to do this on paper or a text document before I begin logging.
Resolve has a keyword feature that lets you tag clips with keywords that can be used in various places around the application for logging and metadata entry. Keywords suddenly became much more useful with the addition of the Keyword Dictionary above so you can see what keywords are in use, add new ones, as well as remove old any misspellings.
- Log your footage by setting IN to OUT points on key moments in a clip and hitting your Convert In and Out to Duration Marker keyboard shortcut to set a new Marker with a (and this is important) Marker Duration.
With this action, you’ll have a new Marker with a duration that was set by the IN to OUT points marked on the source clip.
- Edit the Marker and add Marker Keywords
Using the Modify Marker… keyboard shortcut (I set mine to F2 but it defaults to shift+M), bring up the Modify Marker dialog box. Tabbing through the different fields lets you enter different information but the key to this technique is adding these keywords in the Marker dialog box. You could add them to the whole clip but then you won’t get a keyword that is just part of a range within that whole clip.
After you’ve tabbed to the Marker Keyword field just a letter or two on your keyboard to log the moment marked is all you need. Resolve will automatically show a pop-up of words that match the characters typed. Hit return to enter that token and you’ve now logged that piece of the source clip with an extended marker duration. Sort of a range-based keyword.
- Create a Smart Bin filtering for your Marker Keywords
Resolve Smart Bins are the key to making this work. They aren’t Keyword Collections like FCPX but they are as close as we can get.
Creating a new Smart Bin for each of your Marker Keyword ranges will then give you quick access to them in their own bin.
But there are some caveats
This is not as good as FCPX range-based keywording for a few reasons.
- You don’t get Smart Bins automatically created, you have to go in and create them yourself.
- There aren’t keyboard shortcuts for quickly assigning a Marker Keyword you have already created, you have to go into the Marker pop-up and begin to type.
- You have to view your Smart Bin by list view and not thumbnail view to see the clips.
- Marker Keywords are case sensitive so be careful as you set them up and type them.
-
The filtered clips in the Smart Bin show the entire clip and not just what is between the IN and OUT of the Marker Duration.
That last bullet point is probably the biggest disappointment in this workflow as it would be great to only see the section of the clip that has been Keyworded, not the whole thing. It feels like we are getting there but not entirely there yet.
How to make this workflow better
Resolve is just a couple of small things away from making this workflow even faster. Here’s my wishlist.
- Allow the assigning of an already setup Marker Keyword just by a single keystroke.
- Have a provision to automatically create a Marker Keyword Smart Bin once a NEW Marker Keyword is added to a clip.
- Have an option to only show the frames inside the marker duration for that Marker Keyword Smart Bin.
If you think that I’m basically saying to make Resolve’s Marker Keywords more like Final Cut Pro X’s Keywording then you’re right. But it is great to have something like this in a “traditional” NLE.
There are a few other ways to utilize these tools and speed up this logging workflow. Things like naming your Markers and using the Live Media Preview feature of DaVinci Resolve. Maybe I’ll go over that in a part 2.

