With the prevelance of flat screens and digital transition, it's time to stop worrying about 4×3. That statement might seem a bit lame, as many of us have already migrated to HD work where 4×3 SD really isn't our concern any more. However, when it comes time to distribute our work, documentaries, shorts, bah'mistzva's, whatever they may be, the good old DVD is still the most feasible means of distribution. The mandatory AACS fees for Blu-ray will keep legitiamte distribuion on BD out of reach for 95% of us (oh how I miss the, HD-DVD). So until the cost of blank BD media drops into the realm of sanity (likely still 18-24 months away) at which point you could distribute duplicated discs which dont require AACS, you are left bring your HD project back down to an SD world.
It's happened a number of times now for me in the past year where I've had my head in HD and then sit down to design some nice DVD menus for a project and forget all about 4×3 title safe. So I've started forcing “16×9, 16×9 Letterbox” only for my DVDSP projects. For the feature this is not a big deal at all, but for menus and subtitles it has an impact.
When a 16×9 project is displayed as native 16×9, the DVD player typically just spits out the 720×480 (or 720×576 for you PAL kids) anamorphic pixels unadultered, and lets your TV stretch out the composited image for so it appears correctly. However, in letterbox mode, the player will vertically squeeze the video by 25% and center it in the 480 frame. The issue arises that this squeeze is done to the video layer, not the composited image, so it happens before any graphics were involved. So if you have button overlays or subtitles, the video underneath them just shifted and thus they no longer line up in the correct position any more.{C}
Addressing Subtitles
For subtitles it's not the end of the world, just not optimal as they will appear in their anamorphically squeezed native state, so they'll look like horizontally squished text that's hanging out likely in the black letterbox matte. Depending un placement though you can end up with the unfortunate but all to common scenario where the subtitles land half in the picture and half in the matte making legibility tough. Ideally you should create two subtitle streams, one for native 16×9 and one already vertically squeezed/positioned for Letterbox. You can then add a script on the pre-command of your video titles to check what display mode the player is in and enable the correct subtitle stream on the fly to match.
preparing graphic subtitles
If you use pre-rendered graphic subtitles with your projects, it's possible your subtitling software can create a second set for you that is squeezed/positioned correctly. If that's not an available option for you, you can batch your 16×9 subtitles through photoshop/fireworks and make a second set yourself and just re-use the script file. If you batch in photoshop/fireworks, it's a fairly easy process that you can make an action for and run on a copy of the whole folder full of subtitles images.
- Scale the image vertically smaller by the matching 25% that the video will be squeezed by the player. For NTSC this makes the image size, 720×360, for PAL it's 720×432.
- expand the canvas size vertically back out to 480 or 576 respectively. Note that the canvas will get filled with the active background color, so make sure it matches with the background color of your image before doing the canvas resize.
- copy the script file for your subtitle stream to the new folder of the resized images
- Import the script file into the next subtitle track.
preparing live text subtitles
These would be subtitles where the text is editable in DVD Studio Pro.
-
If they were imported froma script file, import the script again on an additional subtitle track.
- If you made them by hand in DVDSP, it's painful, but option+shift+drag each subtitle down to the next track and it will make a duplicate of it in the new track.
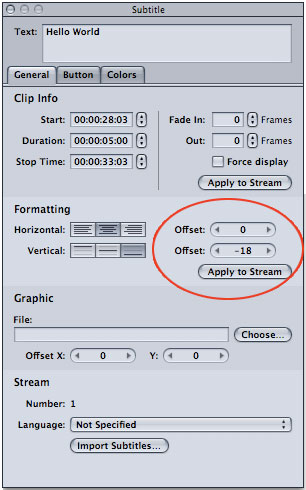
- click on one subtitle in the new track. In the general tab of the inspector window for that subtitle, change the vertical offset to -18. This is a subjective number, depending on font size, and personal prefernce regarding how far into the picture you would like the subtitles, you may need to go more or less than this.
- click apply to stream.
Enabling the right stream
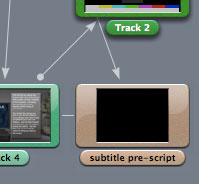
For this example I will use a script that each title in my project will use as it's “pre-script”, which is a bit of code that will execute at the beginning of playback for that title. So start by creating a new script, to keep things straight, I named mine “subtitle pre-script” in the inspector window. For this script will be using two GPRMs, you can choose to name them as well in the inspector pallete fro convenience if you'd like as well. You can use any two GPRMs if you already have others in use. I dont yet in this project so I'm using the first two.
- GPRM 0 – Will be used for calculating which display mode the player is in.
- GPRM 1 – will be used for storing whether subtitles should be turned on or not. A quick assumption: I plan on having menus for my disc where I control wether subtitles are visible or not, so I will be using checking GPRM 1, under the assumption that a menu button is also in place to set the value denoting I should turn on the subtitles during playback or not. I'm using a simple boolean notation where 0 = no and 1 = yes, display the subtitles. So the menus would set GPRM 1 = 1 noting that subtitles should be turned on. If you always want your subtitles on (if for example you were using a motion menu and had buttons over video) you can skip the stuff with GPRM 1 and the first line of the script.
Subtitles Pre-Script
-
Exit Pre-Script if (GPRM 1 = 0)
>> this says, if I dont need to be displaying subtitles exit now as there's no need to continue further with the script. -
mov GPRM 0, SPRM 14
>> SPRM 14 is a system register storing player information like it's display mode, so this is simply getting those values. -
and GPRM 0, 3072
>> This is a 'bitwise' operation that's basically doing some binary math on the variable we got for the player infomration to reduce it down to just the infomration we need. Bitwise operations area bout as complex a concept as DVD gets into so I;m not gonna take the time to explain them here, perhaps in another post. If you want to try to learn more about them there's some info in the user manual. For, now just do what is listed here, accept it for what it is, and keep moving on. -
Set System Stream St(Subtitle Stream 1)(On) if (GPRM 0 = 3072)
>> This line will override the previous line if GPRM 0 = 3072… which from the math we did earlier, means that the player is in native 16×9 mode, so we'll enable and display the original 16×9 subtitle stream. -
Exit Pro-Script
>> All done, if needed the correctly formatted subtitles have been turned on, and playback is ready to go.
Set System Stream St(Subtitle Stream 2)(On)
>> Because of the first line of script,we know we want to be displaying subtitles, so this line goes ahaead and enables the second subtitles stream, our new letterbox stream we made, and sets it to (On) – visible.
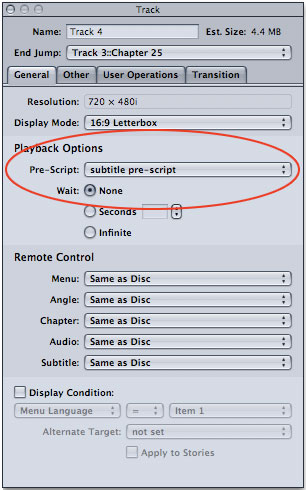
Lastly in the inspector pallete for each title you want to use this script, under 'Playback Options' select the script from the “pre-script” pulldown menu.
Two sets of menus
With true “menus” you can only assign one overlay graphic to the menu, so to accomodate 16×9 and letterbox, you need to create two sets of menus, one with each size of overlay. Then we will create a second script very similar to the one used for subtitles. The difference this time, rather than turning on subtiles, it will jump to the appropriate menu.
Menu Decision script

-
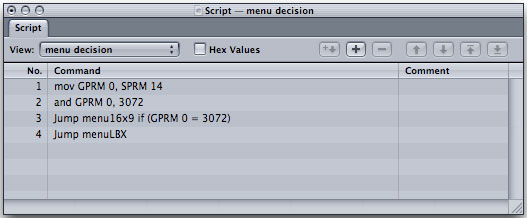
mov GPRM 0, SPRM 14
>> Again, SPRM 14 is a system register storing player information like it's display mode, so this is simply getting those values. If you wanted to be more efficient, you could get this value once on disc startup and set the GPRM value and do the Math that one time, then just do the comparisons on that already calculated GPRM in all the necessary scripts. -
and GPRM 0, 3072
>> This is a 'bitwise' Math operation same as above in the subtitle example. -
Jump menu16x9 if (GPRM 0 = 3072)
>> If the player is in native 16×9 mode, then Jump to my menu named 'menu16x9' -
Jump menuLBX
>> Otherwise, jump to mey menu named 'menuLBX'
To make use of this script, any time you would be going to the menus (like on disc startup, or as the 'End Jump' property of your titles), rather than linking to the menu itself, link to this script and it inturn will link you to the appropriately sized menu.
Buttons over video: motion menus
If you are doing motion menus in a title with buttons over video, Setup your title similar to what was described above for the subtitles. Give yourself a second subtitle track and set the letterbox overlay graphics in that second stream. Assign a “pre-script” to your title as described above for subtitles, without the first line as you will always want to turn on your overlays every time.
Box drawing for your buttons
When drawing the boxes for each button in your motion menu, you need to increase the height of your box to accomodate the letterbox overlay. In these screen grabs you'll see the box extends above the button a fair waise so that when the letterbox overlay is enabled it still falls within the boundries of your button.


Try it out
There is a gotcha here in verifying everything is all set up correct. You basically need to have faith that if you see it correct when doing your box draws and you see the offset highlight that you have it right. That's because DVD Studio Pro does not display letterbox subtitles correctly when you “simulate” your project. If you use DVD Player it will display in native 16×9. So, if you want to check it out for yourself, you have to burn a DVD-R and check it out on a 4×3 TV.

Filmtools
Filmmakers go-to destination for pre-production, production & post production equipment!
Shop Now