Adobe has announced the next round of updates to their video tools, including a few intriguing updates to After Effects CC 2017. We’ll review the major new features here (click here for Adobe’s official version), but will also spend some time musing about their implications.
Essential Graphics Panel
An age-old question surrounds the interaction between the motion graphics artist and the editor – especially if they’re at different companies: how accommodating should the After Effects artist be to those using their creations? Some AE artists still refuse to hand over their After Effects projects, instead delivering just rendered elements and reserving the right to charge for any changes down the road. However, it’s a fact that more often these days clients insist on receiving the project files as part of the deliverables – especially when they have to deal with tight turnaround times for changes on their end. Should you fight this trend? Or should you distinguish yourself by creating projects that are particularly easy for an editor to figure out and modify?
If you fall into the latter camp (or if motion graphics and editing are under the same roof, and you don’t feel like waging war with your fellow workers), the new Essential Graphics panel will make it far easier for you to prepare a project for easy handoff.
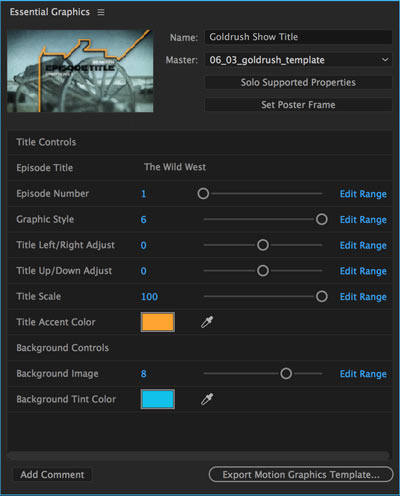
 After creating a composition or hierarchy of comps, you can open the new Essential Graphics panel or workspace, and drag the desired parameters to edit from the Timeline into Essential Graphics. Currently Source Text, slider values, checkboxes, and color controls may be added; point, angle, layer, and other custom controls may not (nor may any parameter that resides in a panel instead of the timeline – note that this includes most of the parameters for styling text and paragraphs).
Once in the Essential Graphics panel, you may rename them and re-order them (as well as set value ranges for the sliders) plus add comments to create a custom, minimalized user interface for editing your chosen parameters of this comp (or nested sub-comps). You can even choose a poster frame for reference. Editing a parameter in the Essential Graphics panel changes the corresponding value in the composition. This happens under the hood; this function does not create user-editable expressions between the parameters, which is the way we used to create the poor man’s equivalent of this by hand. (There’s some hand-waving in the NAB demo that might give you the impression that Essential Graphics also automagically gives you the ability to auto-scale graphics and re-arrange layouts based on changing a simple parameter in that panel; it still falls on the shoulders of the clever motion graphics artist to design a sophisticated composition that has these features.)
After you’re done, you click on the Export Motion Graphics Template button in the Essential Graphics panel, and After Effects performs the equivalent of File > Dependencies > Reduce Project followed by > Collect Files to create a bundle that contains the source material, composition, and Essential Graphics UI you created. The result has the extension .mogrt rather than .aep or .aet, and may be saved on your local drive, to your CC Libraries (which will then appear in the Libraries panel of your Adobe CC apps, and can be shared with other users), or back to the Essential Graphics panel.
To open a motion graphics template file, you then need to go to Premiere Pro (running on a computer that has an appropriately recent version of After Effects installed – it can even be an expired trial version; it just needs to access the rendering engine) and add it to a video track in your sequence. It then behaves like a Dynamic Link composition imported as a pseudo-footage item, with the important enhancement that Premiere Pro has an identical Essential Graphics panel that will present the same controls as you created in After Effects.
(A bit surprisingly, After Effects currently does not seem to be able to open a .mogrt file, although you can always save, reduce, and collect an After Effects project to share with a fellow AE user. Note also that Essential Graphics also replaces the Text Templates feature that was introduced a couple of years ago; After Effects can no longer save Text Templates, although Premiere Pro will still be able to open and use those .aecap projects in at least the near future.)
In addition to collaborating on specific projects, this also opens up opportunities to create easier-to-use templates to sell through services such as Pond5. Note that Adobe is bundling new graphic and text templates with the new version of both After Effects and Premiere Pro, and that Premiere Pro itself will see seriously upgraded graphics and text creation capabilities in this update to CC 2017.
Camera-Shake Deblur Effect
Another flashy new feature coming to After Effects CC 2017 is the ability to reduce the camera blur present in a shot. This has been a problem in the past when you received a piece of hand-held footage, stabilized it (using Warp Stabilizer VFX or perhaps mocha AE) to smooth out the movement, and then found the blur varied from frame to frame depending on how fast the camera was moved (shook) in the original footage on that frame. Photoshop has had a camera de-blur effect for a few versions now, and as tempting as it may be to render your problem footage out to a sequence and batch-process it in Photoshop, the results were slow and potentially disappointing.
This new After Effects de-shake effect is very different than the Photoshop version. The After Effects version analyzes the footage to identify sharp versus blurred frames, then replaces the blurred frames with optically-flowed new frames created from sharp frames before and after the problem frames in the shot. (If you’re adventurous, you can then optionally apply Pixel Motion Blur to a nested comp to recreate the amount of motion blur you want on the smoothed or stabilized shot.)
How well does it work? As well as Pixel Motion or Time Warp does on any piece of footage – which is to say, sometimes great; sometimes, with artifacts. But it’s nice to have the option for those occasions when it does it work: It can save you a re-shoot or having to dump a shot altogether. The images shown here are supplied by Adobe from a case when it does work; they also performed some minor color correction on the “After” shot (the second of the pair):
GPU-Accelerated Box Blur
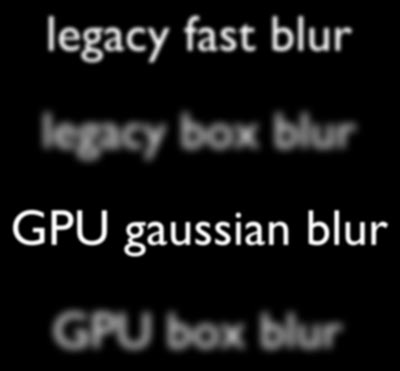
 Adobe continues to attempt to speed up portions of After Effects by taking advantage of the GPU (graphics processing unit) inside your computer. One of the more controversial examples of that is when they recently created a GPU-accelerated Gaussian Blur effect, and decided to make the old Fast Blur and Gaussian Blur effects “obsolete” (they were still included with After Effects to render old projects, but they no longer appear in the Blur & Sharpen category). The problem was, Fast Blur was one of the most-used effects, and the new GPU-accelerated Gaussian Blur effect looked very different at the same parameter settings – and wasn’t always faster, either.
Adobe’s latest solution to this is to introduce a new GPU-accelerated Box Blur effect. Box Blur with Iterations set to 3 has essentially the same blur character as the old Fast Blur and Gaussian Blur. Alas, Box Blur – both the legacy version, and the new GPU-accelerated version – looks radically blurrier for the same Blur Radius or Blurriness setting as the other versions of Fast Blur or Gaussian Blur. So while it’s a very nice addition, you still can’t plug in the same values you used to use for Fast Blur and get the same look. For reference, all four lines of text here have the same Blur Radius or Blurriness setting (5).
Other effects to receive GPU acceleration in this release include Drop Shadow, Fractal Noise (which had slightly different features than the accelerated Turbulent Noise), Gradient Ramp, Levels, Levels Individual Controls, and Offset.
Lumetri Scopes
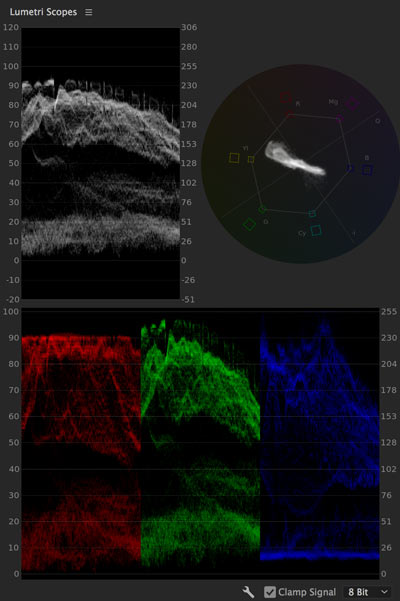
 After Effects users have long asked – nay, cried – for some good video scopes built into the program, without the need to Dynamic Link into Premiere or use Synthetic Aperture’s Color Finesse (which is still bundled with After Effects, by the way).
Well, rejoice: The Lumetri/Speedgrade scopes that Premiere Pro users have enjoyed for some time now are now available in After Effects as Window > Lumetri Scopes. Unlike what they name may imply, you don’t have to use Effect > Color Correction > Lumetri Color to take advantage of them; they show the current state of your composition (not a single layer or effect – unless you do some soloing, of course). They also work for images displayed in the Layer and Footage panels.
And There’s Also…
Of course, there are a myriad of other smaller features and bug fixes coming in the new version, including the very nice ability for layers selected in compound effect such as Displacement Map to be accessed both before (the old way of working) and after effects and masks have been applied – this previously required some pre-composing to make work the way you expected. Other nice touches include:
- the ability to assign label colors to markers (double-click the marker and change it in the Marker Settings dialog)
- Mask Mode keyboard shortcuts: while creating a mask, press the first letter of None, Add, Subtract, Intersect, Lighten, Darken, or F for Difference to set that mode for the mask
- you can rename and create hierarchies inside the Solids folder
- there is now support for right-to-left reading text (such as Arabic and Hebrew) as well as Indic text such as Hindi, plus other refinements for Middle Eastern text
- there are numerous additions to the Scripting language, many centered on the new Team Projects feature that we have not touched on (it’s still in beta with this release)
Again, visit the official Adobe After Effects blog post for more details. But in short, this upcoming release is looking like a nice enhancement – especially if you regularly work with Premiere Pro editors.

Filmtools
Filmmakers go-to destination for pre-production, production & post production equipment!
Shop Now


