EQ is an essential tool for mixing audio. It can enhance recordings by boosting, reducing and removing certain frequency characteristics. EQ was developed as a way to equalize differing sources to sound similar. The simplest and most common EQ are what used to be called the “tone control” or the treble and bass knobs common on car radios or home receivers. Sometimes there are controls such as a “presence” switch and often there is a bass boost switch. There are as many flavors in these controls as there are audio manufacturers but you get the idea. Each of these things alter the frequencies one way or another.
Although a powerful tool, caution must be used in the application of EQ. Digital Audio is no different than any thing else in life – you may be able to change it but that doesn’t mean it’s necessarily for the better. EQ can be an amazing tool, in the right hands, in the right room on the right material. It can be used to help clarify dialog tracks, remove murky or boomy frequencies and help the overall sound quality of a mix. Particularly when there are multiple audio tracks playing simultaneously EQ will define one track from another by boosting or cutting particular frequencies.
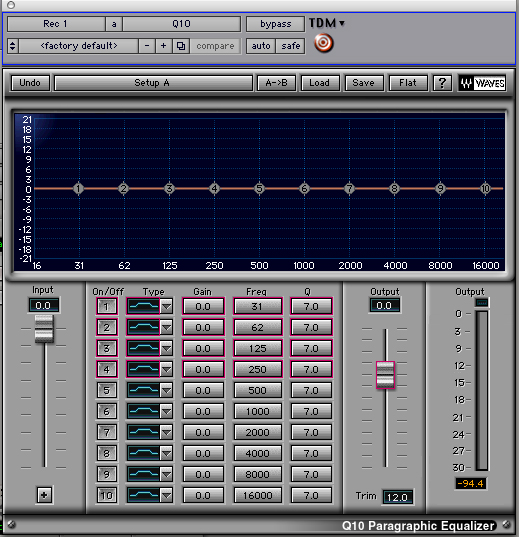
Human hearing of frequencies is calculated on a scale of hertz or cycles per second. The commonly defined range of human hearing is 20 hertz to 20,000 hertz per second. A graphical EQ device, be it a hardware version or a software plug-in like those shown here generally work within that range. (Depending on your age and life experiences your hearing may be markedly less than this…) Since EQ affects frequencies the controls are laid out typically for 20 Hz to 20,000 Hz range.
In the application of boosting or cutting particular frequencies there are also several controls which determine how the boost or cut will be applied. The first is the range of the particular frequency itself, the second is the amount of boost or cut, usually described in decibels, and third is the “Q” or width of the boost or cut. If the horizontal line is flat, as shown here, then no EQ processing is happening.

Looking at the photo here you can see the controls just described. This particular EQ is a 10 band EQ meaning that you can affect 10 different bands of frequencies at one time. The graph indicates the frequency to be affected sorted with the low frequencies at the left of the graph to the high frequencies at the right. Each ‘band’ has several controls – on/off, the type of “curve” to be applied, the gain or amount of the processing, the frequency where things are being applied, the Q of the processing and the overall input of the source and the output after processing.

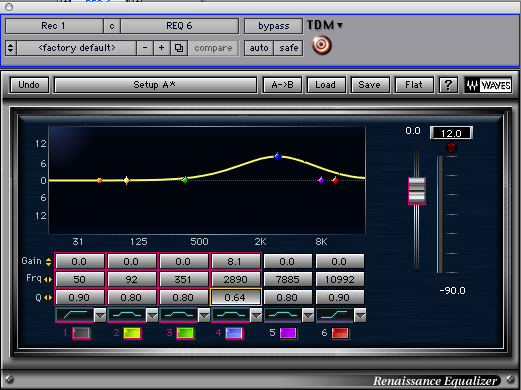
This six band equalizer is using a bell curve aptly named since the EQ curve it makes looks like a bell. In this particular setting band 4 has added 8.1 db of gain at the center frequency of 2890 and the Q is set very wide affecting a wide range of frequencies that are near the key frequency. To apply EQ to satisfaction is to determine the central frequency to be affected, the size of the Q, the shape of the curve and the amount of gain that is being cut or boosted.
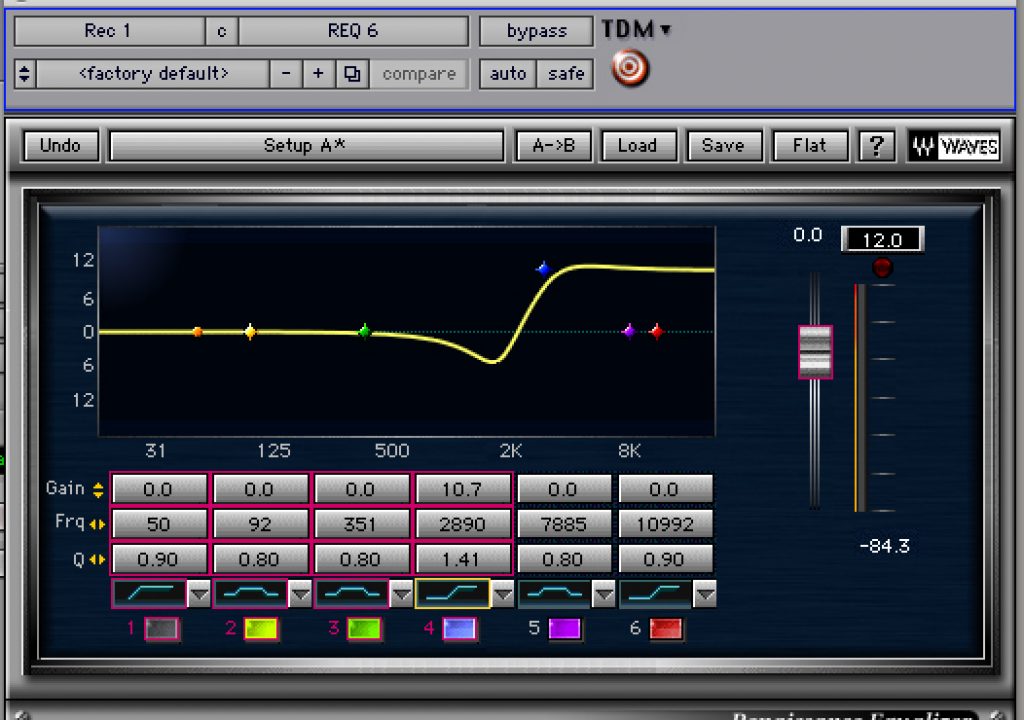
Here is the aptly named shelf curve. Various EQ makers apply this curve differently and this particular one makes a slight cut prior to the boost. By the way, please note that these are pretty extreme boosts being made in these examples to more clearly show what is being discussed. Typically EQ will be applied at much lower boosts or cuts and at several different frequencies. The idea with EQ is generally to do as little as possible to affect the desired change. Improperly applied EQ can easily mangle the recorded audio to something unacceptable.
This picture shows two different type of EQ curves – the curve applied to band 1 is called a “High Pass” filter and the curve applied to band 6 is called a “Low Pass” filter. These filters will remove all of the frequencies at the cut off frequency. So, in this example, the high pass filter removes all frequencies below 100 hertz and the low pass filter removes all frequencies above 10,000 hertz. The Q setting affects how how sharp or how gradual the slope of the cut off is. These are extremely useful and effective filters for removing unwanted elements in recordings.
Pass filters are powerful tools for affecting the recorded audio being processed. Here are a few examples that might shed light on their particular usage. Let’s say that the boom operator had trouble holding the pole and the fidgeting fingers created handling sounds during the recording. Often these noises are very low in the frequency range and are difficult to hear without playback through a sub-woofer. A high pass filter may remove all of the noises without affecting the quality of the recording at all. Applying a low and high pass filter creates a band of frequencies that will pass through it. This type of setting is referred to as a “band-pass” EQ. Limiting the frequency range of a recorded signal can be useful in a number of ways. Many devices such a telephones have a “limited band-width” of frequencies so you can mimic this bandwidth with a band pass filter.
If there is a steady noise in a recording it may be possible to notch filter out the offending frequency. This graphic shows several bands that are tied together to really define the notch. The idea here is to carve out only the offending frequency and try not to disturb anything else around it. As you can see a graphical EQ is a very handy way of visualizing your sound. Mix engineers will often “sweep” the notch along that horizontal range of frequencies until the frequency range to reduce or add is pinpointed. Notches can be very useful in eliminating any type of steady state noise. Steady is the key idea because if the noise or sound oscillates to other frequencies then the notch is no longer relevant since it is specific to only a narrow range of frequency.
EQ is an amazing tool with many useful applications. This post only scratches the surface of this wonderful, misunderstood and useful tool. Experiment with EQ and learn how each of the controls affect the frequencies. Learn how cutting and boosting achieves different effects and how specific frequencies affect specific sources.
More importantly – listen to the world at large and imagine if you had to use EQ to recreate the sounds you hear. Walk by a stone building with music playing inside, loud but boomy and distant, decipher what EQ curves might be applied to a standard music track to achieve a similar sound. Astute listening over time will guide you on how to use EQ to mimic the sounds we hear in and of everyday life.


