Are you an Editor who finds After Effects to be a bit too daunting? There are other tools out there to help take your work to the next level, and Zaxwerks 3D ProAnimator is definately one of them!
Editors are in an interesting time right now. There debate is still raging on whether or not they should spring for the Creative Cloud. Media Composer (and FCP7/X) editors like to do much of their effects work inside of their Media Composer timeline, which is all fine and good, but what happens when you need to get down to the nitty gritty of title animation. Some editors still like to try to do everything in their NLE, but with editors more and more wearing multiple hats, the choice to go outside of the NLE is becoming more and more common. But that brings up two huge points of consideration when deciding if After Effects is your way to go. First is obviously the price. Most people say “$50 per month is a great deal”, and don’t get me wrong, yes it is. I love After Effects, but I also live in Canada, so obviously the $50 US has now become almost $70 Canadian. Secondly, it’s the time factor of learning an application like After Effects. It can be a very daunting beast. It’s not CAN you learn it, it’s do you have the time to learn it. So, what are your alternatives? In this first article, I’m going to look at a great alternatives for editors to attempting to wrap your head around After Effects. Let’s take a look at Zaxwerks 3D ProAnimator!

WHY ZAXWERKS 3D PROANIMATOR?
Well, there are some big factors. Let’s start with the most obvious.
PRICE
At $375 to own, you’re looking at a great price that could easily pay itself off on the first couple of jobs you use it on. Now, if you happen to be an After Effects wiz, as well as an editor, and want to use it in your After Effects work, they do have an After Effects version, as well as a combo standalone/plug-in version of 3D ProAnimator for for $425. Most people might immediately overlook the combo version, and say “Well, I’m buying the standalone, so that’s good enough”, but what’s important to keep in mind is that if you work on a workstation where multiple editors with multiple skill levels are working (some are strong AE users, other have no AE experience at all, for an extra $50 you’ve covered yourself and your fellow editors of all skill levels.
Now, price doesn’t mean anything if the application is a dog, but that is definitely not the case here. You’ll notice that 3D ProAnimator is more than just a Text animator when you launch it.
WHAT YOU GET
If you’ve never seen 3D ProAnimator before, you’re in for a treat. When you launch the application, you are immediately greeted by the project creation window, which will tell you right away that you’re dealing with more than just text in 3D ProAnimator. As you can see, you have the ability to create 3D text (Yes, true extruded text), you can import an illustrator file (to extrude), you can create a variety of 3D primatives (Cone, Cube, Cylinder, etc), and you can even import 3D models to include in your animations. Now, as far as the 3D models types that are supported for import you get Zaxwerks Objects (created via a Zaxwerks effect), OBJ, 3DS, LWO (Lightwave), FAC (Electric Image Models), C4D and even DXF (Autocad Models). Basically you’ve just run the entire gammut of just about every 3D object type there is out there. Normally, I find, 3DS is the one nobody supports, and there are a ton of great models out there, but I can never use them, so this is a big one for me!
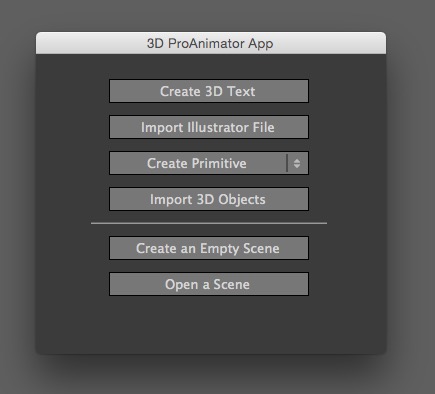
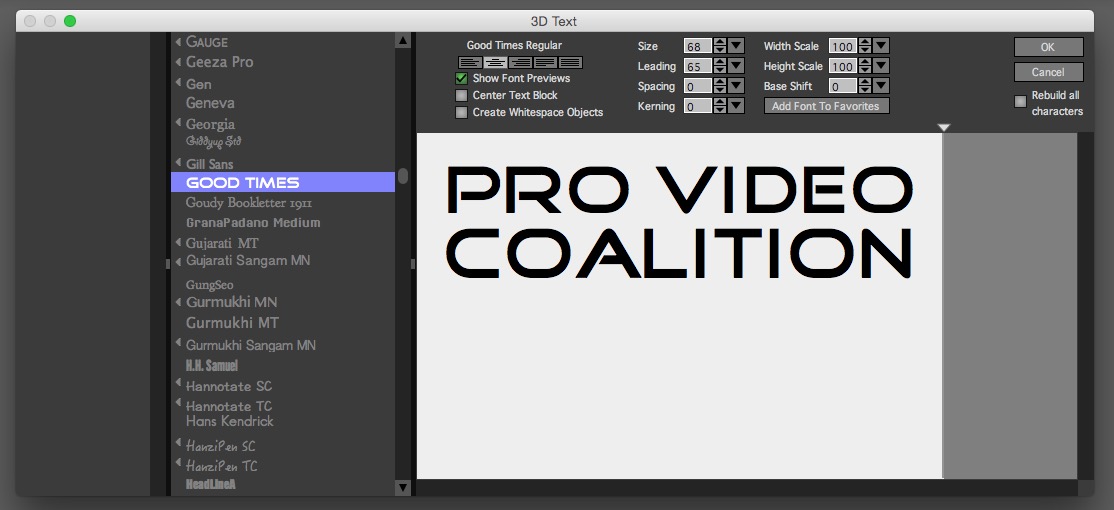
Now, let’s start simple and talk about creating simple, effective 3D Text. Once you launch the application, simply hit the “Create 3D Text” button in the Project Selection Window. You will now be greeted by the 3D Text Window, where you can choose your font type, and basically set it up however you need adjusting Kerning, Leading, etc. A great feature is that the 3D Text window is that you have the ability to show “Font Previews” in the Font Selection panel, so you’ll know exactly what your font is supposed to look like, and won’t have to be clicking through a million fonts, to find the right one.
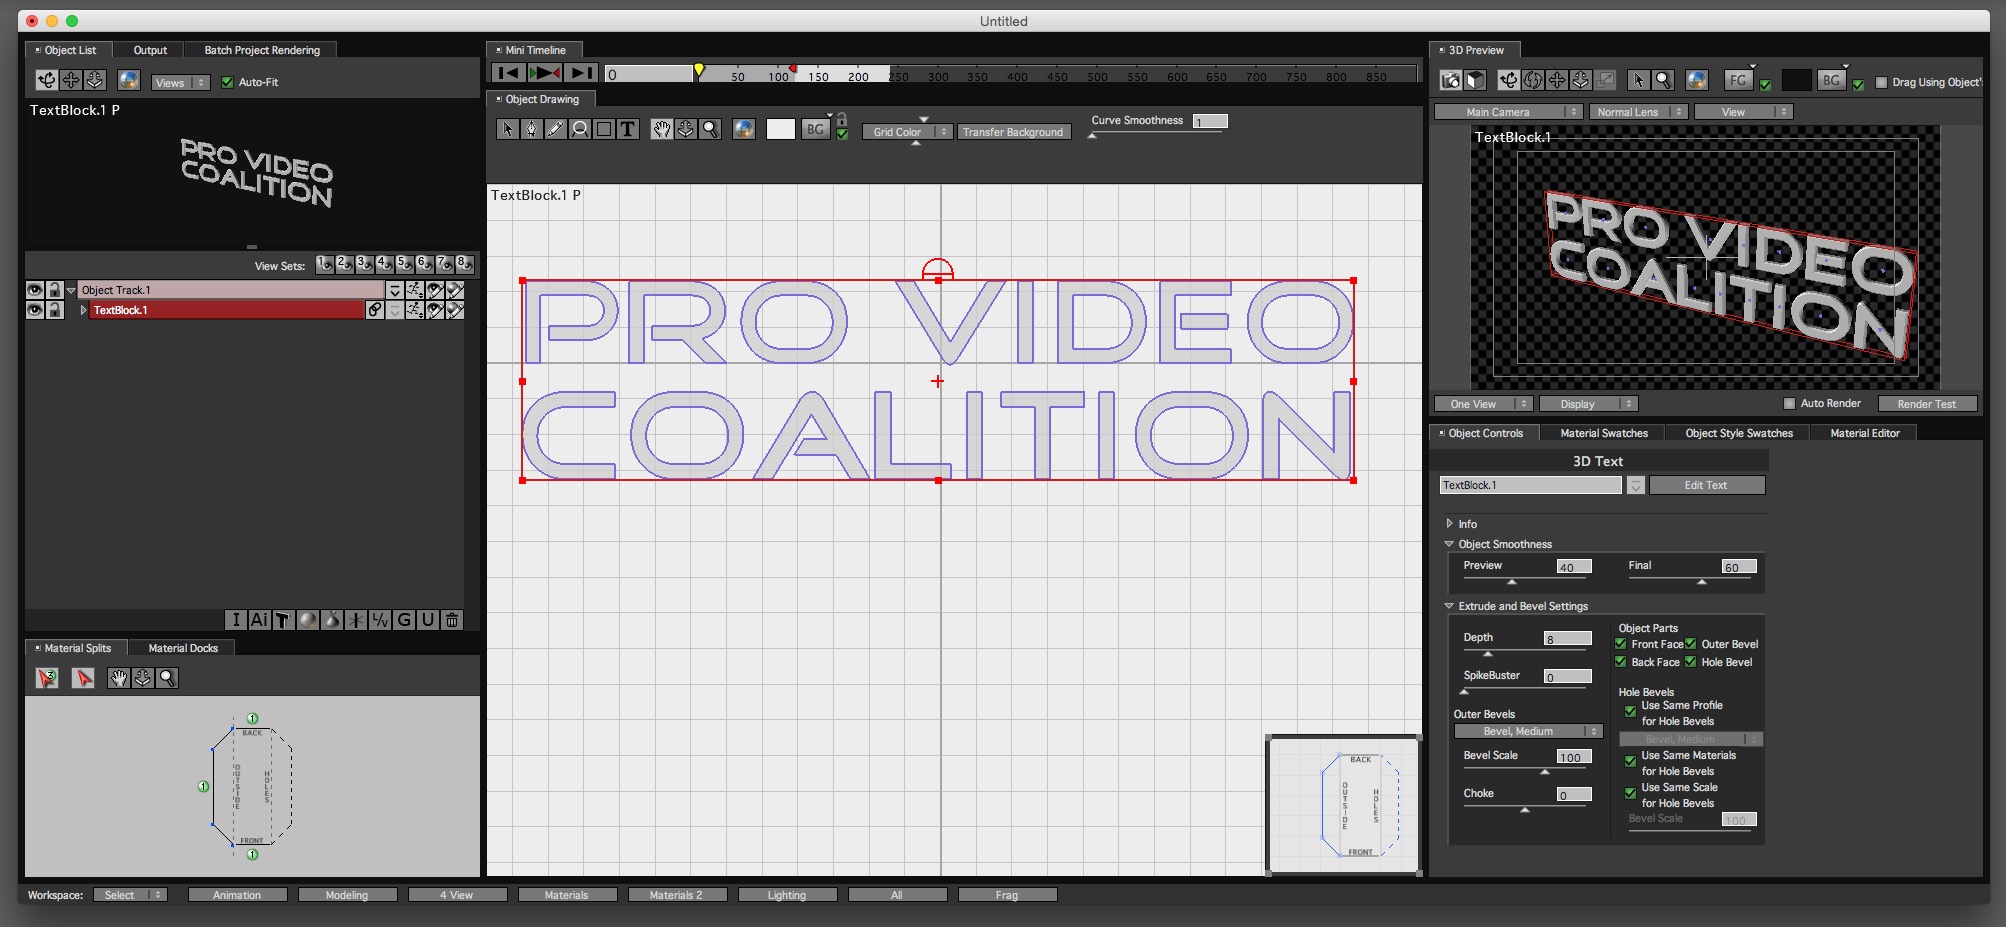
Once you’ve entered your text, simply click “OK”, and you’ll now be brought to the main 3D ProAnimator window. Now, don’t freak out. I know that this might look daunting, but if you think your way through it, you will see that there is a lot of logic in what’s going on here. The first, main window you are brought to is actually the Animation window and, for right now, we’re going to bypass that window, and we’re going to head to the Modelling window that can be accessed from the bottom of the 3D ProAnimator window either through the drop down menu, or by simply clicking on the “Modeling” button.
MODELING
Believe it or not, you’ll do almost 50% of your main work in this window right here. As you can see, we have the text that we entered, AND we also have access to all the vector splines that went into making it. Not happy with the way your text or logo looks? You can actually make adjustments right here, without having to go back into Illustrator (assuming you’ve imported a vector based logo from Illustrator).
To quickly break down what’s going on here, let’s talk briefly about the important tabs in the Modeling layout:
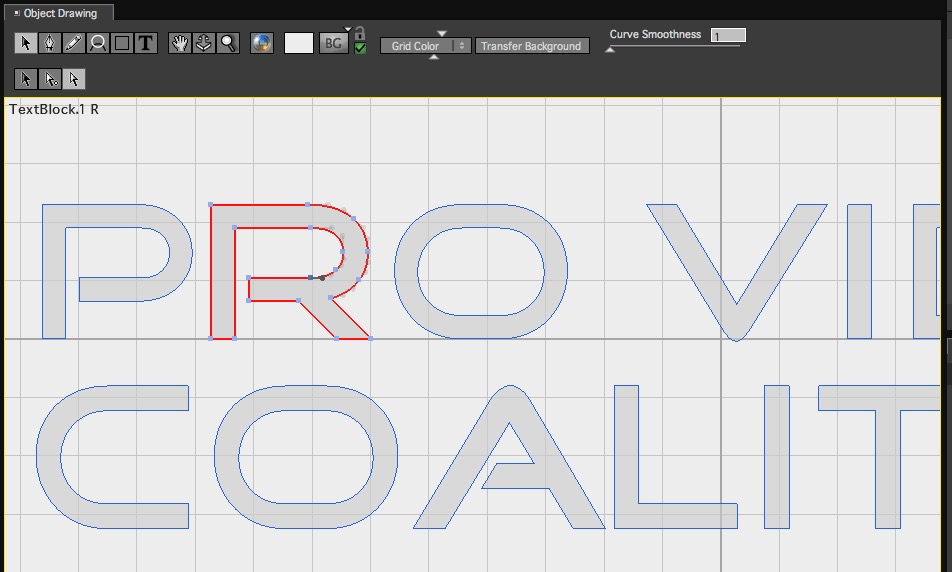
Object Drawing
This is where you will make any adjustments to your text or Illustrator file, to make it look exactly the way you want
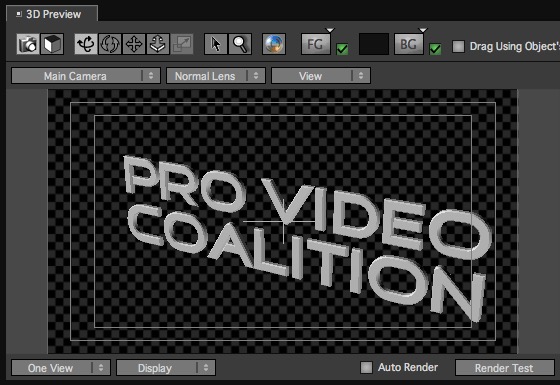
3D Preview
Fairly self explanitory. Get a 3D preview of what your extruded text/logo will look like.
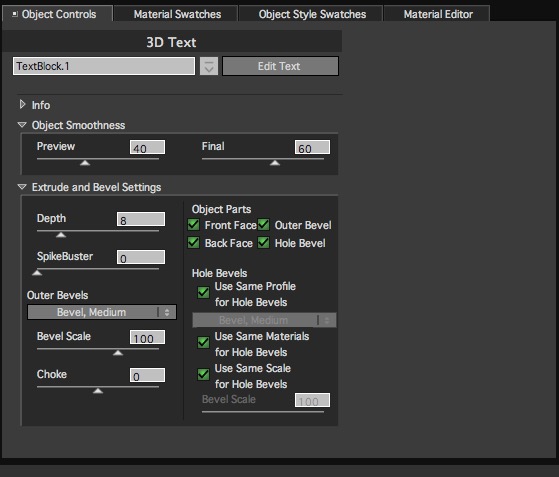
Object Controls
Get better control over things like the type of bevel your element has, Extrusion depth, Object Smoothness, etc.
Material Swatches
This is where you can choose what material you want to style up your text/element with. I didn’t count, but there is easily over 100 different materials with the ability to import and use as many as you want.
Object Style Swatches
Looking for a pre-built look, simply head over to this tab, double click on the style you want, and you’re all set to go!
Material Splits
If you want more finite control over what part of the object that your materials are being applied to, you can break down the element into the Front/Back/Extrusion/Bevels, and apply different materials to different aspects of the text.
Material Docks
Depending on how my splits you’ve made, this is where you can apply the different textures to the different aspects of your text/element.
This might sound more confusing than it really is, and when you sit down in front of 3D ProAnimator, and hit the modelling button, it actually makes a lot of sense, the only tricky part is knowing where to find each of the parameters you want to adjust. I should also point out that applying Materials and Object Styles are as simple as dragging and dropping them from the swatch, right onto the text/element! Something else that I should also point out is that when working in the modeling window, there is no need to “save” anything to work in a different module. ProAnimator works just like one of it’s Big Brother/Big Sister 3D animation applications like C4D or Maya. Once the text has been created, it’s ready to be manipulated however you might want to use/animate it. Okay, so I’ve picked an object Style, and I’m ready to animate. So what’s next?
ANIMATING
Okay, so to get us started, we’re simply going to click the “Animation” button at the bottom of the 3D ProAnimator UI, and we’re now brought to the Animation layout. In the Animation layout, there are really two main windows that we’ll concern ourselves with, and that is the Animation Timeline and the Animation Controls Window.
Animation Timeline
This window is where you will animate/apply preset animations to your text/element, as well as set up basic timeline parameters like the duration and FPS. Working with animation presets is really the foundation of getting you up and running as quickly as possible, and ProAnimator doesn’t disappoint. Your animations are broken down into two categories, object animations and camera animations. Again, this is fairly self explanatory with object animations being those where the text animates onto the screen in a pre-determined fashion, and camera animations are those where the camera is moving through the frame, and the text can be either stationary or have an object animation applied to it. Let’s look at Object Animation presets, as Camera Animation presets will function in a similar fashion. 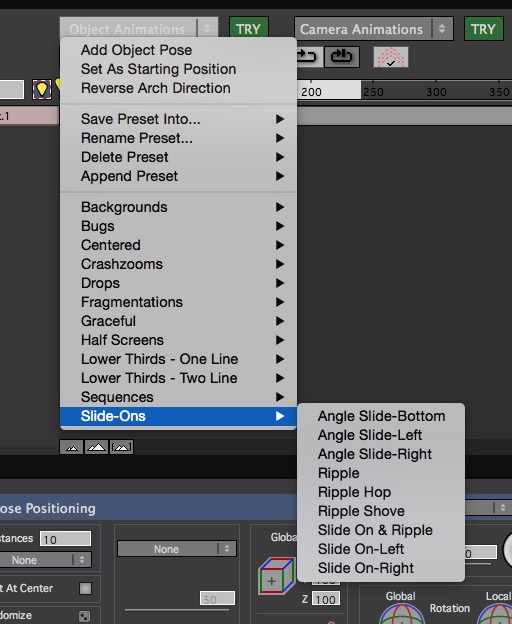
To apply an Object Animation, simply click on the drop down, select the one you want, and you’ll see the animation appear in your Animation Timeline. Now, you’ll notice that there are two different colored parts of my animation, dark blue and light blue.

The dark blue sections represent “Poses”, meaning it’s where the text either starts, stops or, possibly, pauses in the middle of an animation to sit on the screen for a few seconds, before it moves off with the rest of the animation. Looking at the animation preset that I’ve applied, it’s essentially five different animation. The initial pose, the transition in, the mid-pose, the transition out and the final pose. Pose basically meaning position. To get in an adjust any of these animation presets is very simple. Simply click on the section of the animation you want to manipulate, and all the parameters will immediately appear in the Animations Controls window.
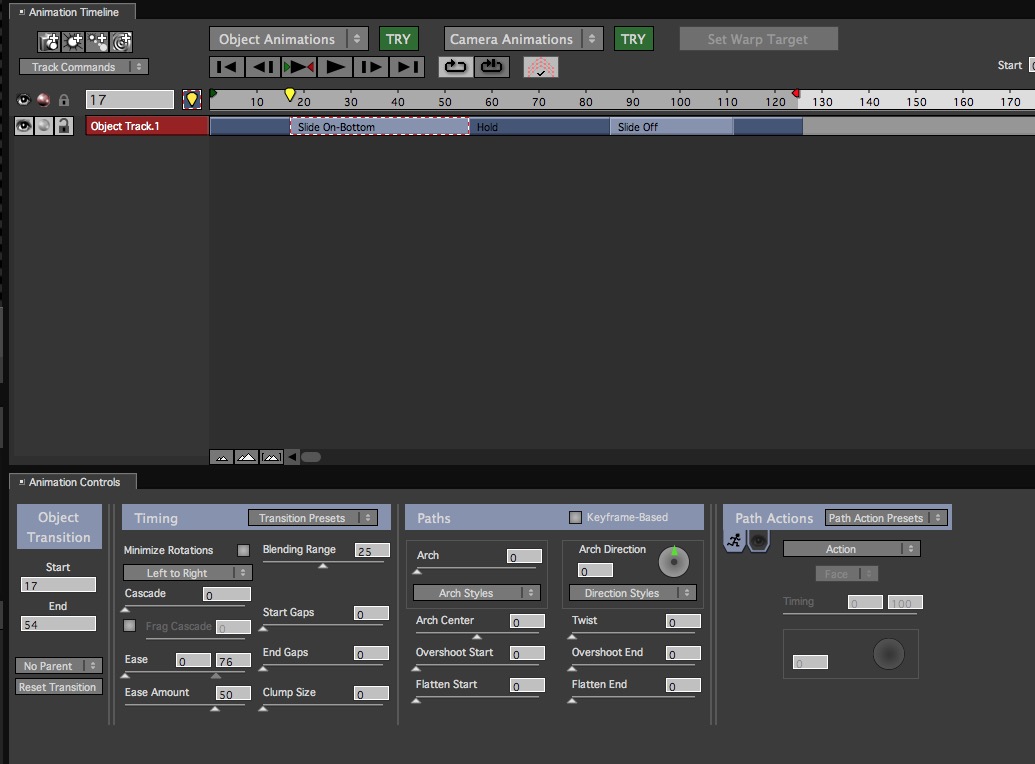
Now it’s just a matter of tweaking the parameters to your liking, and you’ll be all set to go! To be honest, I could spend five article talking about just the tweaking of the parameters, as the tool is really that in-depth. But, the best part is, you don’t have to make it complex in the beginning. Start simple and work your way from there. To be honest, 3D ProAnimator really reminds me of Avid’s Marquee, in it’s “glory days”, as this is what we, as Media Composer, editors were all hoping it would be. Sadly it never happened, but it looks like we might have a new tool at our disposal to take Marquee’s place!
RENDERING/EXPORTING
One thing that I haven’t talked about is the ProAnimator sequence settings or anything like that. Well, what’s important to keep in mind is that they are really irrelevant, as we are dealing with Vector lines and shapes that can be taken and blown up to whatever size we might need them to be, without any sacrifice to quality.
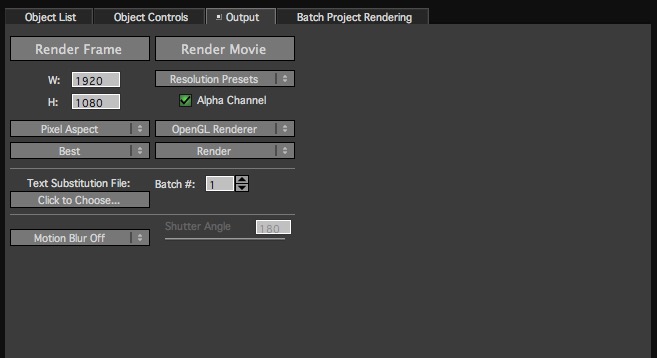
To export elements from 3D ProAnimator is pretty straight forward. Simply head over to the “Output” tab, and enter the relevant information like Frame Size, Pixel Aspect, Anti-Aliasing quality, etc. Now, something that I was a little disappointed with was the fact that as far as output type, Quicktime Animation, for alpha outputs, H264 or various Image Sequences were my only options. I would have liked to have seen an option for me to go in and select the Avid QuickTime codec with alpha channels for my outputs, as that’s my normal After Effects workflow, but in the end that was a very minor detail.
Before I wrap up there is something that I have to mention. I’ve worked with After Effects for a long time, going on 18 years, and so I’ve done quite a few animations in my time, but I have never seen animation smoother and better looking then I have in 3D ProAnimator. There’s something about the way that Zaxwerks has gotten their animation, combined with Motion Blur, to look ultra fluid and realistic, and the best part is, an absolute beginner can get their renders looking top notch with very little work or time with the application.
In the end, if you’re an editor who’s looking to add another tool to your toolkit to take your work to the next level with a very easy learning curve (to get you up and running), but with a ton of power under the hood to keep your clients on the edge of their seats with every project, definately give ProAnimator a look. I barely scratched the surface of what it has to offer (built-in Lens Flares, Lighting Rigs, etc), and the $375 you spend will have every penny of it shown in your end product! If you would like more information about Zaxwerks 3D ProAnimator, you can check it out at www.zaxwerks.com .
Kevin P McAuliffe has been an editor for almost 20 years, and spends most of his days cutting in Media Composer, or compositing in After Effects. To keep up to speed when his new Media Composer tutorials are released, follow Kevin on Twitter @kpmcauliffe, send him an e-mail at kevinpmcauliffe@gmail.com, or subscribe to the YouTube Channel to stay up to date!

Filmtools
Filmmakers go-to destination for pre-production, production & post production equipment!
Shop Now


