I recently had a chance to compare the PMW-EX1 with a RED and an F23 (about which, more will be said in coming days). I collected quite a few video clips from the cameras and I’m going through the process of exporting still frames from the two Sonys, using Final Cut Pro. As I want to capture the full exposure range in the stills, there’s more to it than just parking the playhead on a frame and doing File > Export > Using QuickTime Conversion. As it turns out, there’s also a surprise.

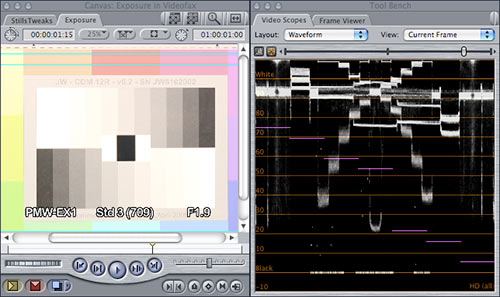
Here’s an overexposed frame shown in FCP’s Canvas and WFM. This XDCAM HD EX clip from the EX1 is used in its native YCrCb (digital YUV component) format, and it has values ranging from 0% up to about 109%, the limit of overexposure in the 709 encoding used (of course, my timeline is also set up for YUV processing, or I wouldn’t see anything over 100%).
If I export this frame as-is, values above 100% will be clipped to 100% in the translation from YCrCb to RGB.
This occurs because FCP always exports to RGB stills assuming nominal 601 and 709 mappings: Y=0% renders as RGB=0,0,0 while Y=100% renders as RGB=255,255,255. FCP has long been able to allow an imported RGB value of 255,255,255 to map to either Y=100% (white) or Y=109% (super-white) depending on sequence settings, but unfortunately FCP always assumes the 100% mapping on export.
So to have exported stills that embrace the entire exposure range of the original clips, decrease the overall picture level from 109% to 100% to pull “super whites” into the legal range.
This is most easily done with the Color Corrector or Color Corrector 3-Way (both under Effects > Video Filters > Color Correction). In numerical mode, take the highlights slider
down to 235 from its default value of 255.
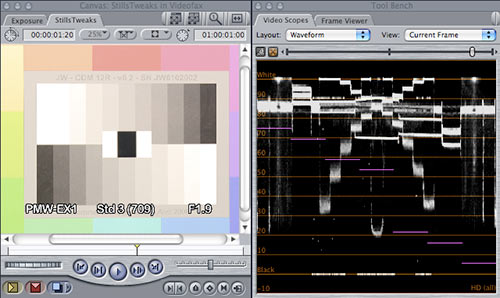
Having done that, the Canvas and WFM look like this:

Now the waveform is neatly contained in the 0% to 100% range. Notice that you can now see a differentiation in the last two bars on the lower row, which was well-nigh impossible before: FCP’s Canvas also maps 100% Y to RGB=255,255,255 and clips super-whites.
(The grayscale in these images isn’t very linear because this image is severely overexposed, and the EX1 is desperately applying its knee to contain the bright bits.)
So, having applied a gain change, I exported a test still… and what I got was a nasty surprise: Correct rendering up to an RGB value of 222,222,222, with everything above that level limited to 222,222,222. It’s as if I hadn’t applied the gain change until after FCP had clipped the superwhites! I found that I had to render my timeline first before exporting a still; when I pre-rendered, everything came out correctly:

Note how the the right-hand image lets you see the the lower grayscale fully, while the left-hand one clips the brighter values (it’s most easily seen on the grip head holding the chart, centered at the bottom of each image).
I’d guess at the following sequences of events:
• When I have raw YCrCb footage with filters applied but not rendered, and I export a still, FCP “sees” the rendering target as an RGB format. It thus takes my YCrCb source, transforms it to RGB (clipping its super-whites in the process), and then applies the filters, darkening peak whites from 255,255,255 to 222,222,222.
• When I pre-render the clip with filters applied in a YCrCb timeline, all the processing happens in YCrCb space, which allows super-whites. My image gets gain-reduced with no clipping. Then, when I export a still, FCP uses the render file as its source. Since it has no values over 100%, no clipping occurs, and I get an output still which accurately reflects the full range of my original YCrCb image.
The moral of the story? Since FCP appears to treat any export format as a “virtual sequence format”, it pays to pre-render any effects before exporting stills or RGB clip formats, otherwise, what you see won’t always be what you get!

Filmtools
Filmmakers go-to destination for pre-production, production & post production equipment!
Shop Now


