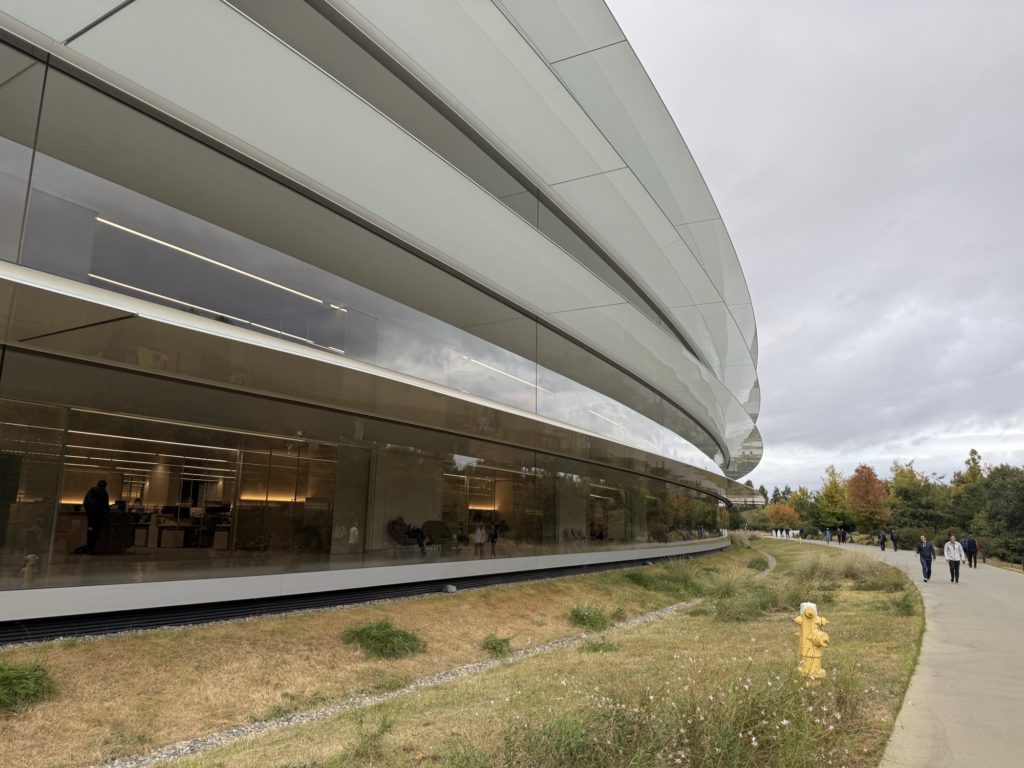
Here at the Final Cut Pro Creative Summit, at the Developer Center just across from Apple Park, we were shown the latest version of Final Cut Pro 11 for Mac in a slick, live, in-person demo. After that, we trekked across to Apple Park itself to check out some live demos and ask some tricky questions. In a first, we were allowed to take pictures outside Apple Park, and it’s as stunning a building as you may have thought.
Back to FCP. As well as the 3D spatial video editing support promised earlier this year, a number of additional features that editors will love are included, and the most impressive is the Magnetic Mask. Let’s take a tour through the new features in FCP 11. (There were also new releases of Logic, FCP for iPad, and Final Cut Camera. Scott Simmons has also written a great article about these releases — check it out.)
Magnetic Mask
Over the last few years, AI has really stepped up, making tedious or impossible jobs far less arduous, and the new Magnetic Mask is a machine-learning-powered tool that will win many fans. While chromakey remains the simplest solution for removing a person or object from a background, you’re not always in control of the shoot or the client.
A couple of releases back, FCP added the Scene Removal Mask, which combined a difference mask with machine learning smarts to remove a fixed background, and third-party effects like Keyper enabled automatic “person tracking”. These solutions were useful, but sometimes lacked temporal stability, and Keyper could only recognize people.
Similar to the Rotobrush in After Effects and the Magic Mask in DaVinci Resolve, the new Magnetic Mask isolates part of a shot, and is more powerful than previously included options. To use it, drag the Magnetic Mask effect directly onto a person or an object in any shot, and its outline will be automatically recognized. Move the mouse a little to shift the detected outline, and if it’s still not right, you can use brush tools to add or subtract areas. When you’re happy with this frame, press Analyze and it’ll be tracked throughout the shot — but this isn’t a fixed shape like the existing object tracking.
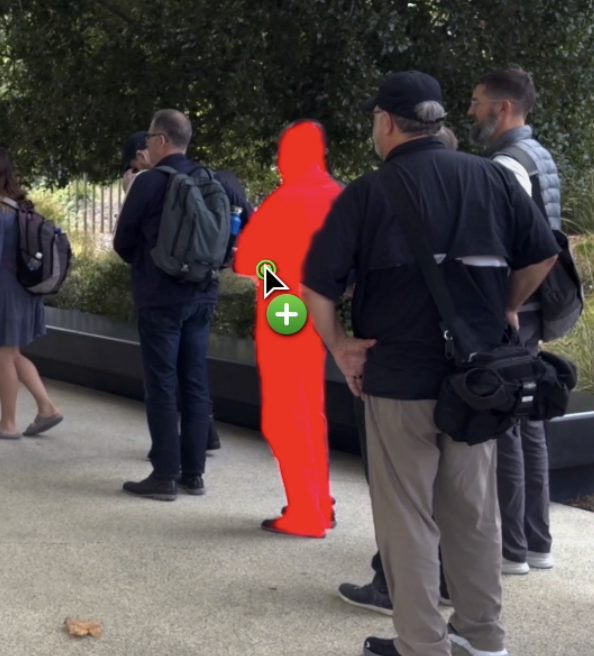
Instead, as the object changes from frame to frame, the Magnetic Mask outline changes to match it, similar to the Segment Anything Model previously announced by Meta. A person’s arms moving as they walk? No problem, they’ll be found and selected in every frame. What if they walk behind something, and then walk out again? Occlusion is well handled, so there’s a good chance it’ll work perfectly. What if you need to track multiple people at once? No problem, each selection will be shown in a different color, and can even occlude one another.
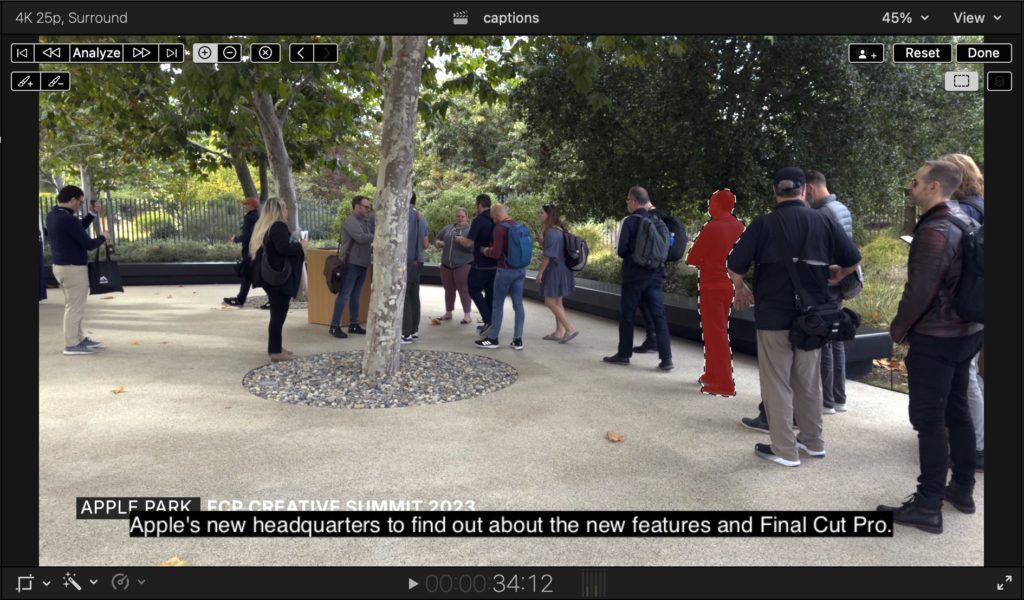
It’s quick, it works well, and it’s the perfect solution when a client asks to isolate any part of a shot. The usual workflow will be to duplicate a shot above itself, silence the top copy, then use Magnetic Mask to isolate part of that top copy. Add whatever effects you need to the top clip and/or the bottom clip, and add any other elements (like titles) between the two clips if you wish.
There are included sliders to tweak the edges, but if you want a full suite of matte tools, you should probably do this in Motion instead — it’s got this new effect and many more effects for final tweaking. In FCP, this is a solid tool that gives good results, and should make it easy to highlight just about anything.
Automatic Captions
This is a feature that people have been requesting for a long time, and it’s finally here. Leveraging the support in macOS Sequoia, it’s now possible to create high-quality captions, offline, for free, very quickly indeed — select any number of clips, right click, then choose Transcribe to Captions. If you needed this already, you’ve probably been using something like MacWhisper, or Descript, or Premiere Pro, or DaVinci Resolve, or Simon Says to create captions and then reimport them, but this is quicker and easier. (Note that this is English-only for now.) How good are the captions? Quality is good, but this model seems less likely to guess at words it doesn’t quite recognize than MacWhisper. If you see an ellipsis (…) that will often indicate an omission you should check.

It’s important to note that these captions are the good kind of captions — closed captions. These are exported separately as an SRT file, are displayed at the viewer’s preferred size or can be hidden entirely, automatically move out of the way when the playback bar appears, which aid accessibility and search engines, and which can be edited after the video is uploaded if a mistake is found. The bad kind of captions are open captions: burned in titles, with fixed size and font, that can’t be turned off and that are inaccessible. These are, however, the only way to go if you’re targeting platforms like Instagram and TikTok that don’t support proper closed captions.
If you need to create titles from your closed captions, that’s not yet built in, and though there have been apps that offered this feature (including Captionator and Transcriber) there’s a brand new one that does a great job: captionAnimator, from Intelligent Assistance. Give it a timeline with closed captions and a single title of your choice (set up just the way you like it) and you’ll receive a new timeline full of open captions to match.
Text-based editing is also not yet part of the app, but you can use the Timeline Index to navigate through all the captions, and you can click on any caption to jump to it in the timeline. It’s possible to use scripting to make things a little easier (though a script I posted here earlier wasn’t quite good enough!) and I’ll pursue this further.
Spatial Video Editing
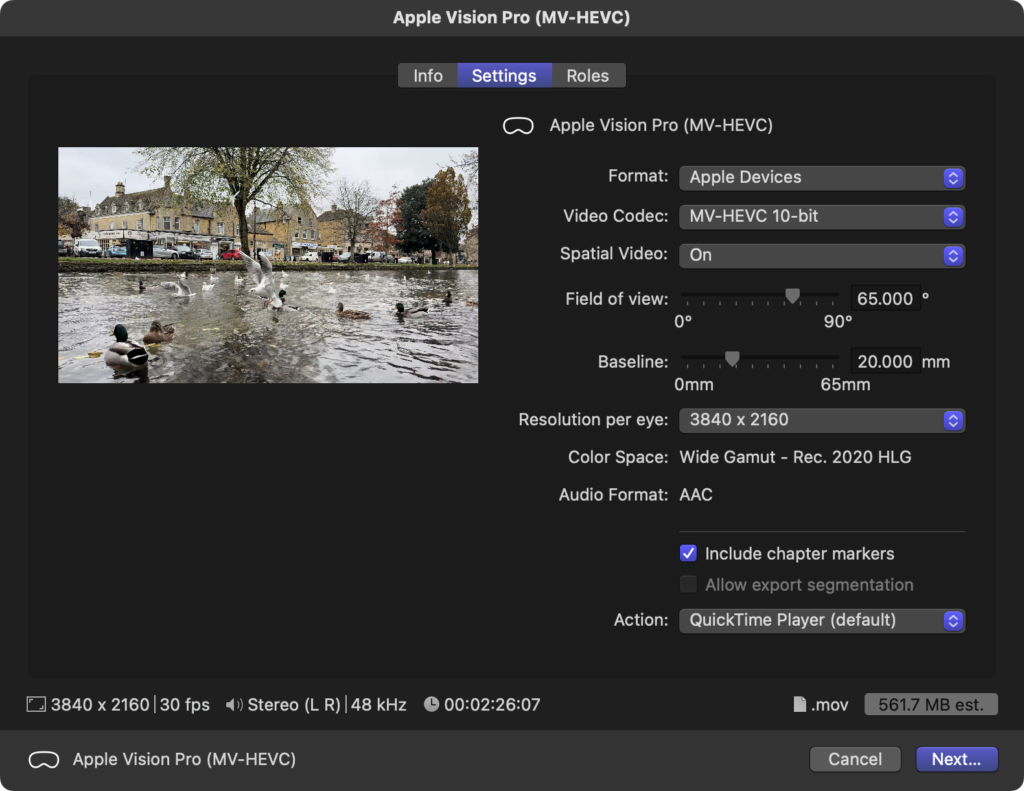
Please excuse my excitement — I’ve had an Apple Vision Pro for a few months now, and although it’s a wonderful device, it’s been a challenge to create my own content for it. Workarounds did exist, but now they’re redundant: FCP 11 can import and edit Spatial clips from recent iPhones (15 Pro, 15 Pro Max, any 16) or the Apple Vision Pro itself, and then export to Spatial using a new destination in the Share command. Distribution is sorted too, thanks to Vimeo’s recent announcement of their Vision Pro app and support for Spatial videos.
If you’re not across the format, Spatial video is 3D stereoscopic video, using the MV-HEVC codec, with metadata to describe the field of view. It’s not 180° VR, but is much more like a traditional 3D movie, and doesn’t require a wholesale change in the way you make your videos. Indeed, you can shoot in 3D, edit in FCP, and then deliver to Spatial and traditional 2D from a single timeline. This should make experimenting with this format risk-free, so if you have clients curious to try it out, why not?
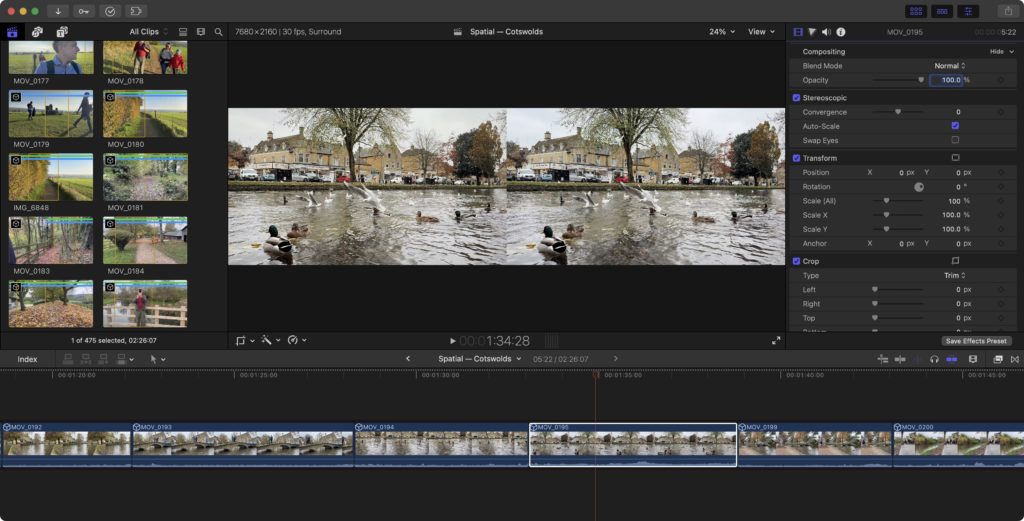
Under the hood, Spatial clips are treated as double-width clips with the left and right eyes side-by-side at full size, and indeed, if you were to use another app (such as Blender) to create clips in this FSBS format, you can treat them just like regular Spatial clips if you choose the right Stereoscopic setting in the Info Inspector. That’s happy news, because it means editors can take advantage of existing 3D tools without any further work.
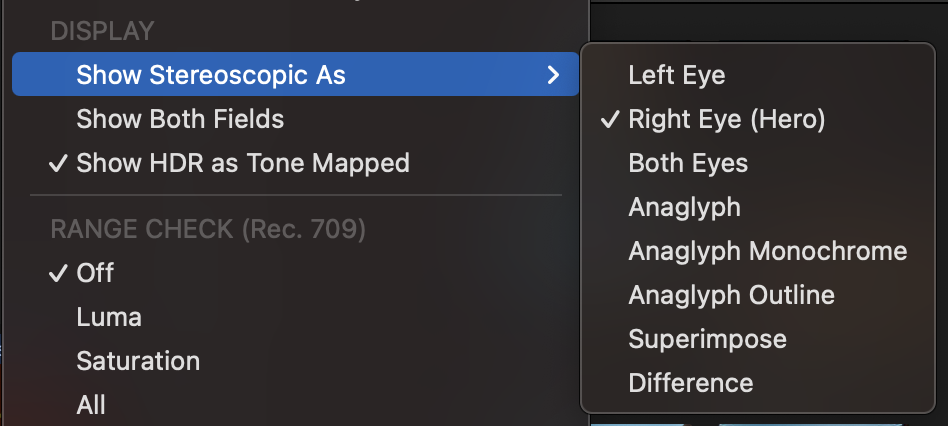
When working with Spatial clips, a new submenu in the Viewer called “View Stereoscopic As” offers several ways to work. You can choose to see just one eye, both eyes together, or an overlap of the two in Anaglyph, Superimpose or Difference mode. Yes, you can pop on a pair of red/cyan glasses and work with that if you like, though of course it’s not the same as working live on the Vision Pro. Sadly, there’s no direct link to the Vision Pro yet, though I expect it’s in the works.
In the Inspector, you’ll see a new setting group under Video that includes a Convergence adjustment. This moves a clip forwards or backwards in 3D space by adjusting the gap between the two eyes, and this is how you should position titles in 3D space. Negative convergence moves away from the viewer, while positive convergence moves towards the viewer. Be sure to use positive convergence briefly, at low values, and sparingly, because you’ll be asking your viewers to go cross-eyed, and it’s uncomfortable.
Right now, it’s also a little tricky to reframe, crop, rotate or scale spatial clips. The Transform controls are disabled by default, and if you activate them, you’ll find they control the virtual double-width clip rather than each eye independently. This control is needed for some technical tasks, but if you want controls that adjust both eyes together, there’s an easy workaround. Create a new effect in Motion that publishes all the Transform properties (Position, Crop, Four-Corner) and now you can adjust these properties for both eyes at once.
In future releases, I’d love to see built-in transform controls which do what most editors need, and also full 3D integration from Motion templates into FCP, but this is OK for now.
With regard to Spatial video, FCP isn’t alone; DaVinci Resolve announced Spatial support earlier this week, and in the future will be supporting 180° VR Immersive 3D for their upcoming URSA Cine Immersive camera too. Still, as impressive as 180° Immersive videos are, simple Spatial is an easier way into 3D for most folks. It’s never been easier for regular humans to work in 3D video, and I can’t wait to see what we make.
Many smaller improvements
Besides the new headline features, many smaller key commands and more minor updates round out the release. Support for 90/100/120fps timelines is very welcome, allowing everyone to create media for today’s high-frame rate displays. The new Vertical zoom-to-fit command (Option-Shift-Z) complements the existing horizontal zoom-to-fit (Shift-Z) to keep your timeline view organized. Commands already existed to select the clip above or below the currently selected clip (Command-up/down) but it’s now possible to move clips up and down in the stack too, with Option-up/down). If you’ve ever wrestled with specific vertical placement in a complex stack of connected clips, you’ll now have a much easier time.
Browser clips can now be hidden, not simply rejected — but why would you want to hide clips rather than delete them? Well, if you’re using multicam or sync workflows, the original source clips would normally remain visible after a multicam clip has been created, and you probably never need to touch those original clips again. Now, they’re hidden by default, leaving the browser display much cleaner. Of course, you can reveal hidden clips if you wish, or not hide them in the first place.
A new set of Modular transitions allow you to smoothly move from one shot to another, pausing mid-transition to show both frames together in a split screen, with plenty of options. While I’d expect most editors to make use of a sensible side-by-side or top/bottom split, there’s a Shapes option there too. If you’ve been missing a star wipe, here’s an option for you.
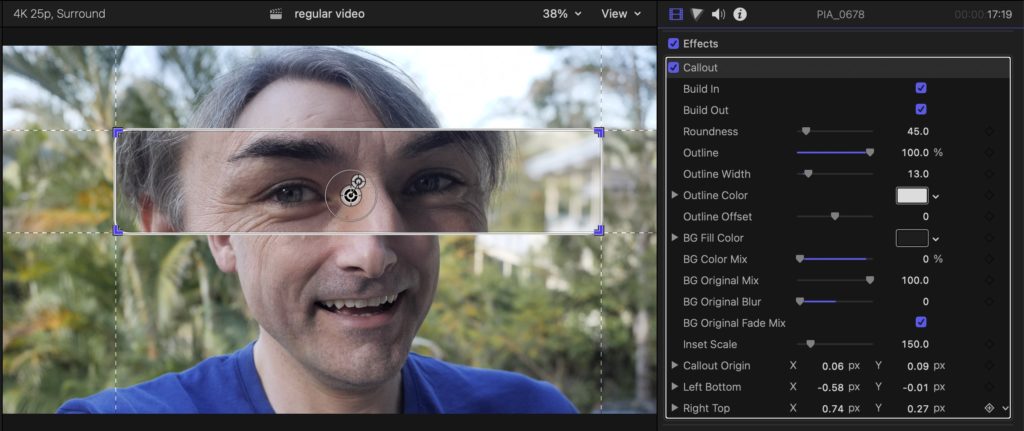
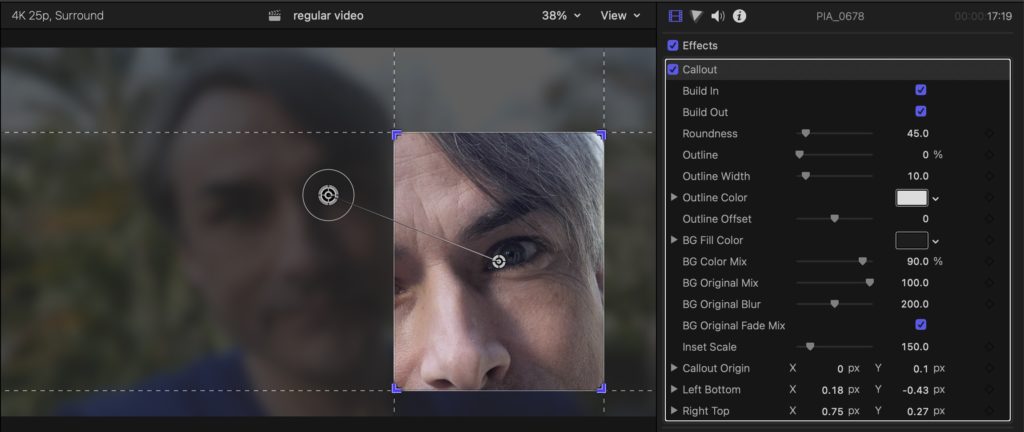
There are also two new effects, Callout and Picture in Picture, which enable new, useful ways to focus attention on part of the frame, and offer on-screen controls and additional sliders to make them very customizable. Note that if you want Callout to occur part-way through a clip, you’ll need to blade the clip up and apply the effect to one segment only.
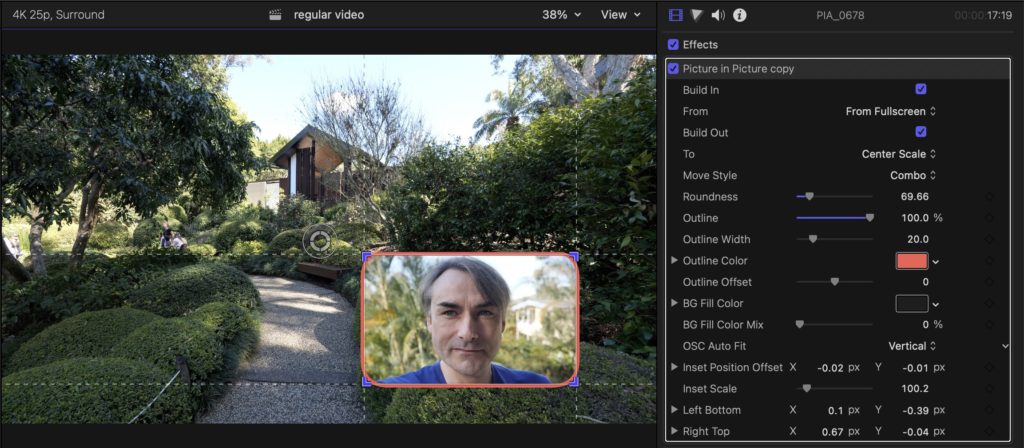
However, I do confess to somewhat mixed feelings here, because these effects duplicate some of the features of my own plug-ins! Callout draws attention to a specific part of the frame, much like the Zoom In titles in my funwithstuff Annotator plug-in. Picture in Picture shrinks and crops a clip to a rectangle and adds a border, much like the Rectangles effect in my funwithstuff PiP Kit plug-in.
Now, I’m not claiming I’ve been “Sherlocked”; my plug-ins aren’t the only options on the market, and they still offer many more options than the new defaults. Hopefully, if people like these new effects and want additional controls, they might seek out and find mine. But still, if you see emoji-based particles like funwithstuff Emojisplosion in a future FCP release, I’ll be suspicious.
Blackmagic RAW support coming soon
This was announced but it’s not yet available: thanks to the Media Extensions support in macOS Sequoia, Blackmagic will be implementing support for Blackmagic RAW in Final Cut Pro. This is great news, and we’ll be sure to test this when it goes live.
Final Cut Camera 1.1 can now do Log HEVC
If you want the quality of Log but would prefer to avoid external SSDs, you may have chosen to go with Kino or Blackmagic Camera, but now there’s an official Apple-made app that allows Log HEVC recording, with a great zoom control. You can also choose to preview your video with a LUT, and use the new tilt and roll indicators to level your camera in two dimensions.
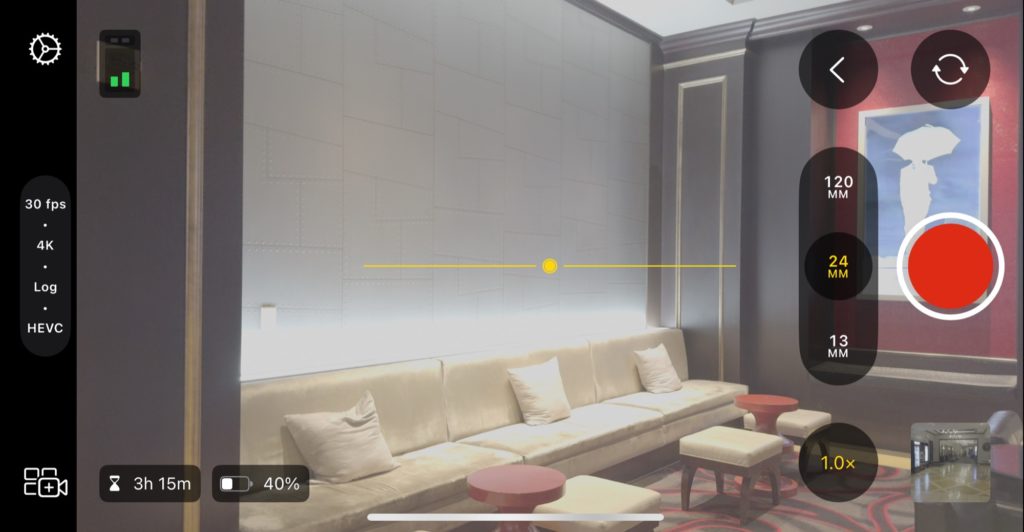
The data rate is low-ish (under 25Mbps for 4K) but I haven’t seen any issues myself. If you need a higher data rate than that, Blackmagic Camera has a ton of options, but Final Cut Camera has a clean UI that will win a lot of fans.
Final Cut Pro for iPad 2.1
Several of the new features on the Mac have come across to the iPad. Magnetic Mask is here, as are the new Modular transitions and the new Picture-in-Picture and Callout effects and the higher timeline frame rate support. Enhance Light and Color has come across from the previous Mac release too, and a new pinch gesture allows vertical scaling in the timeline. The pencil support has expanded to include additional brush options, so you’ll have more options for Live Drawing. Remember too that these drawings can be brought back to the Mac version.
Either way, if you enjoy editing in FCP for iPad, or you prefer to use it to manage a multicam shoot and then transfer to Mac, it’s a solid app with genuine utility. It’s great to see its updates continue.
Logic 11.1
With the new release for Mac and iPad, there are several new features. Here’s the full list, but the standout is the inclusion of the Quantec Room Simulator by Wolfgang “Wolf” Buchleitner. The live demo we heard sounded great, and it’s great to see digital audio history being recreated. The update is free, and you can roundtrip between Mac and iPad, so give it a shot.
Conclusion
This is a big release of FCP — serious small improvements, brand new features for everyone and a whole new dimension for brave souls exploring the new frontier of 3D. Automatic captioning will bring accessible captions for everyone who needs them, and enable text-based editing too. Cheap and affordable options now exist for anyone who also needs to hard-code those captions as animated titles as well.
Editing in 3D for the Apple Vision Pro just got a whole lot easier, and while Spatial isn’t as breathtaking as 180° Immersive, it absolutely makes a tangible difference, and it’s much, much easier to shoot, edit and distribute. While we’re here at the Final Cut Pro Creative Summit, I’ll be talking about 3D, Spatial and Immersive video, and there are many other talks to be had too. Right now, I need to get chatting and prep for my sessions over the next two days. It’s a great conference, and this was a great way to kick off the first day. Cheers!
*The script for blading around captions needs tweaking — look for an update soon.

Filmtools
Filmmakers go-to destination for pre-production, production & post production equipment!
Shop Now


