Today, Final Cut Pro 11.1 was released, and as usual, it’s a free update. If you’re mid-project, either wait until it’s complete, or take a back up just in case something breaks. Zip a copy of the current app, rename it to include its version number, and archive it, just in case.
This release contains several useful features, some of which aren’t obvious, and some which enable useful new workflows. Let’s dig in.
Native Adjustment Clips with new powers
That’s right, you no longer have to find a third-party Adjustment Layer to be able to add color corrections, effects or transforms to many clips at once. But hang on — because they’re not built in, you may never have encountered them, so what are they? An Adjustment Layer is a title with the text removed, and because a title can include an element that affects everything below it, anything you do to the Adjustment Layer affects everything below it.
(A quick aside… why call it an Adjustment Layer? Simply because of the Adjustment Layer color corrections in Photoshop that moved across to Premiere Pro and After Effects. However, the native Adjustment Layer in Premiere Pro still only supports effects and not Motion property transforms, making it far less useful. In FCP, an adjustment layer can scale, crop or reposition clips underneath — so you can use one to punch in and out on a complex composite, but in Premiere Pro you’ll have to fall back on the Transform effect, which mostly works but feels a bit broken.)
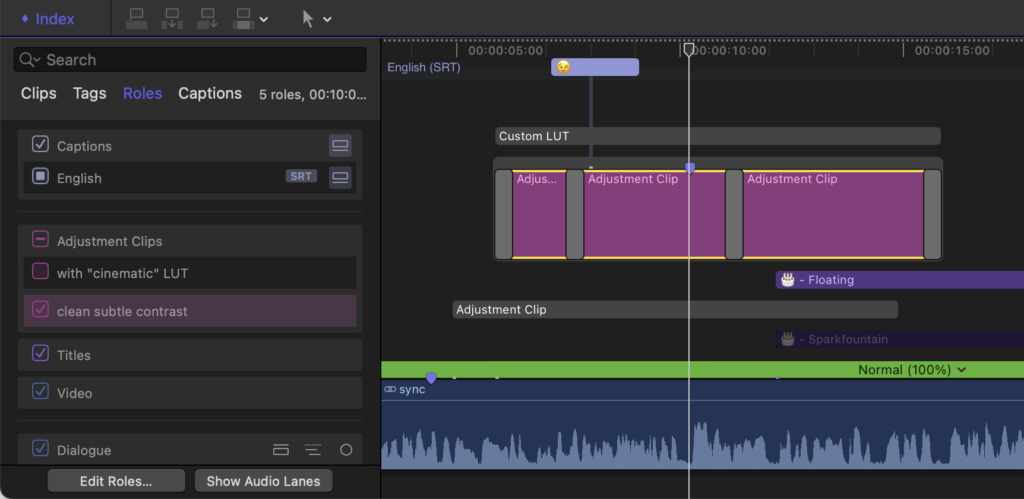
To use Adjustment Clips in FCP 11.1, just type ⌥A (or use Edit > Add Adjustment Clip) and one appears on top of your timeline, ready to be trimmed and repositioned. Like a standard Adjustment Layer, any effects, crops, transforms or color corrections on an Adjustment Clip apply to every clip below it, and it remains an incredibly useful concept. However, the Adjustment Clip is better in many ways.

First, you can add transitions to them, fading a color correction in and out, just as you might expect, but in a way that Adjustment Layers never did. This is a massive workflow boost, because you can now adjust the settings of color corrections across an adjustment clip simply by adding it into a Storyline (⌘G) before blading it up, setting different corrections in each section, then adding cross dissolves (⌘T) on all those cuts. This is a fantastic no-keyframes way to adjust color over time, and it’s a great way to work.
Second, you can apply an effect to a named Adjustment Clip in a single movement by selecting an effect in the Effects Browser and then tapping ⌥A. For bonus points, select a range in the timeline (with the Range Tool, or simply tapping I, then O) and then select an effect and tap ⌥A. The named adjustment layer will then span just that range.
Third, Adjustment Clips have their own dedicated Role. If you add one, you’ll see a new Adjustment Clips role which can be turned on or off, and if you don’t like its new default color, you can change it by pressing the Edit Roles button. This makes it easy to experiment with looks in more complex ways. By creating subroles within Adjustment Clips, you can easily try out new looks, on many separate clips across your timeline if you want, then flick them on and off from the Timeline Index. This is a powerful technique.
Fourth, the simple fact that it’s built in makes it much less hassle to use Adjustment Clips in a collaborative environment. No need to make sure everyone has the exact same Adjustment Layer installed, just ⌥A and you’re done. One quick note, though. While you shouldn’t use Adjustment Layers on any new projects, don’t delete your old ones, or they’re be missing from any archived jobs you open down the track.
(Update: existing Adjustment Layer titles now support transitions just like new Adjustment Clips do, indicating a behind-the-scenes change. While this is welcome, I’d still recommend using the new, official Adjustment Clips to avoid issues with missing titles when collaborating or after reloading from archive.)
This feature alone earns the .1, but there’s more!
Markers can move
So simple, so obvious, so finally here. This feature was present but hidden in some previous versions of FCP, but was disabled, presumably for a good (and likely technical) reason. Now, you can simply drag a marker sideways to move it within a single clip, or drag it up to remove it. Note that you cannot drag a marker to a different clip. Fingers crossed that we see multi-colored markers soon, but for now, if you want a spot of color on the timeline, the best workaround is to add an emoji in a caption and attach it to any clip with a ⌘⌥-click.
Image Playground is now integrated
Pressing the Import button now pops up a menu which includes Import and Image Playground as options. If you find this slows you down, the standard ⌘I shortcut still works, as does drag-and-drop — which, incidentally, skips any rewrapping that Import might do.
AI has been discussed quite a bit here, and though there are different opinions on how good it is and how ethical it is to use, Apple’s approach has apparently been on the more ethical side. And even if you’d rather avoid GenAI art in general, using AI-generated art for placeholder graphics is an ideal and obvious use case.

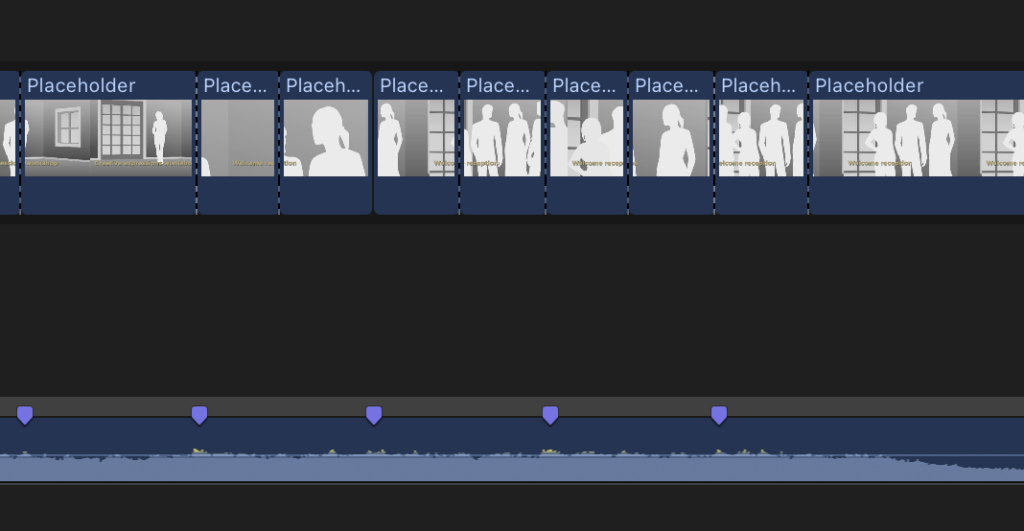
My main issue with the implementation here is that Image Playground only makes square images (not ideal for use in landscape or portrait videos) and it was trained to create person-centric images. While the Placeholder generator (present since 10.0) offers a selection of focal lengths, Image Playground likes every person to be a head-and-shoulders shot in a square format, and after cropping to widescreen, they’re simply too close. I’ve also found that Image Playground really wants to feature specific people, so if you ask for “humans” it’ll ask you to point to a photo of a specific human it can imitate.
I hope a future training model can produce images with a wider range of focal lengths in a 16:9 ratio, because pre-editing to Placeholder generators is a fantastic way to work. Recently, I used Placeholders to create temp edits to approved music for back-to-back same-day-edits at a conference, and if I could have used semi-realistic shots rather than silhouettes, the client would have had a much clearer idea of my ideas ahead of time.

Still, Image Playground is an excellent tool for live ideation with some clients, and it’ll be useful.
Quantec Room Simulator is included
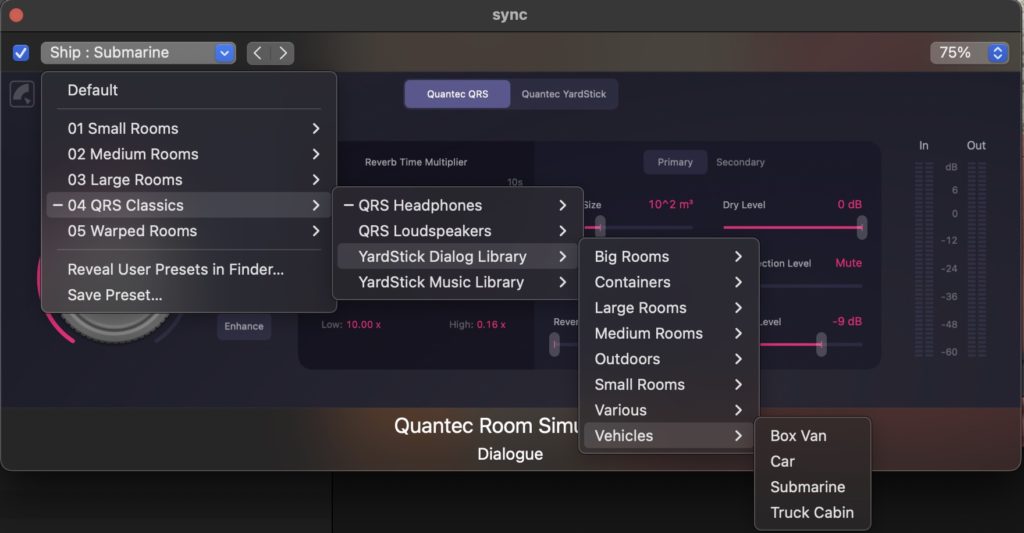
At Apple, when this feature was shown at the Final Cut Pro Creative Summit as part of a Logic Pro demo, the audience was floored, but then slightly let down to discover that QRS was only in Logic Pro. Still, we didn’t have to wait too long. Now it’s in FCP as well, in the Spaces category, under the Logic heading.

While my focus is usually more on the video than the audio, this is an effect I can absolutely see myself using, especially if I ever need to simulate how characters would sound in a submarine, or a 1000L tank, or a Mining Machine Hall — seriously, check out the incredible range of presets.
Bug fixes and workflow boosts
It’s now possible to rename audio effects in the Inspector, just as you can rename video effects, which really helps to stay organised in a complex effects stack.
It’s always been easy to reveal the source clip for any clip on the timeline (⇧F) but it’s not been so easy to find the original clip inside a multicam clip — until now. With a clip selected on the timeline, a single press of ⇧F will select the part of the original browser clip in use on the timeline, and a second press of ⇧F will select the original clip inside the active angle.

This allows you to very easily replace part of a multicam clip on the timeline with its original source clip, handy if you need to perform one of the few features that multicams don’t support, like stabilization. Previously, you’d have had to dip into a multicam to perform this operation, and now you don’t. (Note that if you’re looking for a full solution for multicam flattening, that’s possible with a tool from the legends at Automatic Duck. You can grab Multicam Flattener from the App Store.)
Many other bugs have been squished, including some related to the Magnetic Mask. Also, there’s now a keyboard shortcut for showing or hiding the Magnetic Mask editor: ⌃⌥⌘M.
Minor updates to Motion and Compressor
Small updates and bug fixes were added here too. Motion gets access to Image Playground, plus some bug fixes, and Compressor gets better quality retiming — presumably the Smooth Slow Mo from FCP. This will be useful for anyone producing work for immersive, where 90fps is preferred. Most cameras can’t reach that frame rate at their top resolution, and for some kinds of productions at least, this will bridge the gap between every other camera and the top spec beasts — the Blackmagic URSA Cine 17K, Blackmagic URSA Cine Immersive, and the Immersive Camera One and Two from Immersive Company.
Conclusion
As ever, it’s great to see useful features still being added to an app that’s never charged a cent in upgrade fees after over a decade. Of course, Apple can make that work out because you’ll need a Mac to run FCP, and Blackmagic make Resolve work by selling you cameras and production gear, but I appreciate free upgrades however they’re made possible.
Adjustment Layers were great but the inability to transition them was always an issue — and now Adjustment Clips provide a much more complete solution. Image Playground will be useful for some editors today (it’s a powerful way to experiment) but I can see it becoming even more useful in the future with a few flexibility improvements. And QRS? Definitely worth a deeper dive. If you’ve already backed up FCP 11.0 and any active projects, update away, and happy editing.

Filmtools
Filmmakers go-to destination for pre-production, production & post production equipment!
Shop Now


