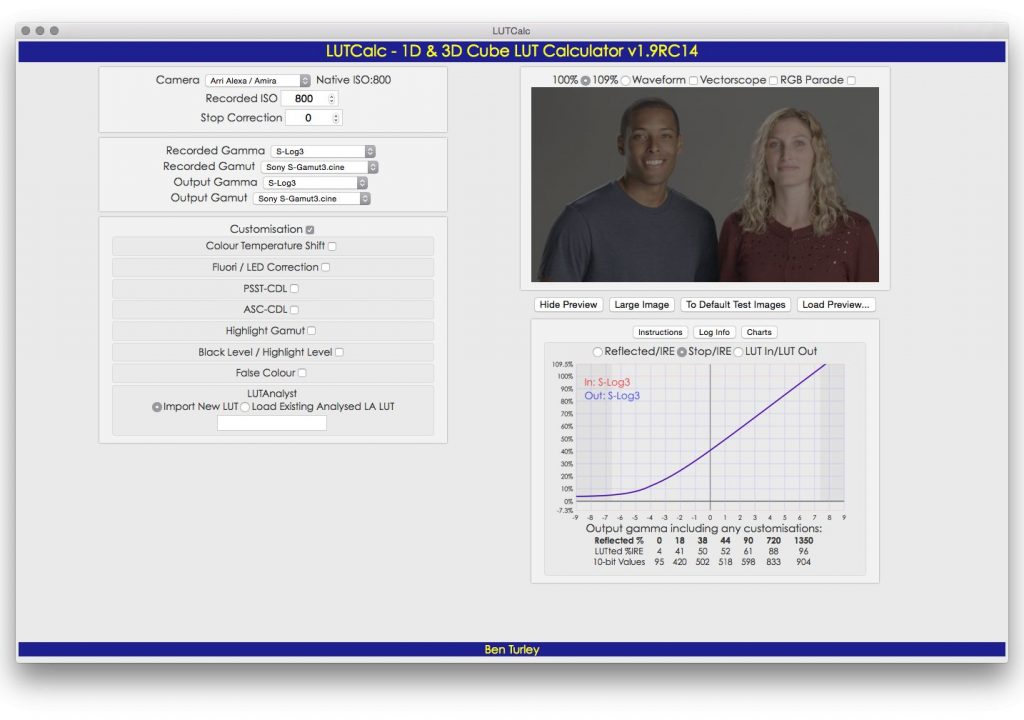
A new, free app gives us the power to mix and match LUTs—even between cameras! This is what happened when I crammed an Alexa Rec 709 3D LUT into an F55…
Note: The LUT created in this article didn’t completely work out, so I made another one. You can learn about the new, improved LUT here.
Several years ago, at an NAB focus group, I showed Sony the difference in how Alexa saturates color with overexposure vs. an F55. Or, maybe I should say I showed them how Alexa desaturates color with overexposure: once a hue passes a point at or near middle gray in brightness, its saturation locks and it only gets brighter. Traditional video cameras continue to saturate color as exposure increases until color channels clip, at which point they focus on damage control to prevent highlights from shifting hues.
Arri emulates film, a subtractive color process where maximum color saturation is found in shadows and mid-tones. Sony works with video’s inherent additive color properties and allows saturation to increase with brightness until a color channel fails. Both systems have their merits, but for an old film guy like me film-style highlights are the way to go.
To Sony’s credit they responded quickly to my demonstration. Within six months they rolled out the LC709 Type A LUT, which attempts to somewhat emulate Alexa’s color response. It’s not perfect but it’s a solid alternative to Sony’s traditional broadcast look, which is a bit dated for the digital cinema world I currently inhabit. Bright saturated color may sell TV sets in retail stores, but cinematographers tend to be visually sophisticated craftspeople who find highly saturated colors garish. We prefer subtlety and sophistication in our color palettes. Our job is to tell stories, not sell TVs. LC709 Type A brought Sony a step closer to our world.
I don’t want to appear ungrateful (not only has LC709 Type A been my go-to LUT for a couple of years, but my contact at Sony tells me the “A” stands for “Art Adams”) but Sony hasn’t hit the mark perfectly with this LUT. LC709 Type A often feels a bit too desaturated and a little flat in the mid-tones. Some have complained that Arri’s Rec 709 in-camera LUT is a little too “crunchy” (contrasty) but I like it. LC709 Type A doesn’t feel contrasty enough.
In tests I’ve noticed that LC709 Type A crams close to three stops between 40% and 70% on a waveform, whereas Alexa only squeezes in two. This means that the first two stops above middle (18%) gray are less bright than they would be on a punchier gamma curve. LC709 Type A can feel a little underexposed to my eye, especially when I light by meter, which may be why a lot of cinematographers rate Sony cameras normally but set their meters to read 1/2 to 2/3 stop slower.
A colleague of mine, cinematographer John Chater (owner of Chater Camera, where I do a lot of my testing and renting) was frustrated early on by the fact that Sony released the F55 without making any LUTs available for Cine-EI mode. He pulled some footage into Resolve and applied Arri’s Rec 709 LUT to SLog2 footage and was pleasantly surprised. I remembered this when I discovered LUTCalc and thought, “I wonder if I can hack Alexa’s Rec 709 LUT into an F55?”
LUTCalc is an awesome new tool written by cinematographer Ben Turley, who is way better at math than I am. He also understands LUTs at a much deeper level. I suspect he wrote this tool for himself, but he’s made it publicly available on GitHub as both a web app and as a download for OSX. Not only does LUTCalc contain standard gamma curves and color gamuts that manufacturers have made publicly available, but he’s made it easy to mix, match and tweak them to your liking. The program is still a work in progress, but it’s already hugely powerful and a wonderfully useful toy… sorry, tool. (I’ve spent hours playing with it, so it doesn’t feel like a tool. I wrote about some of those experiences here.)
When I first looked into LUTCalc I didn’t find the Arri Alexa Rec 709 LUT in the menus. When I asked Ben about this he told me, “I only work with publicly available information, and that information isn’t publicly available.” After some further discussion, though, he told me that there was a way to do it if I was a bit adventurous.
What I’m about to show you are the steps Ben talked me through, along with some of my own embellishments, and it all seems to work. I don’t fully understand all the parameters yet, and I haven’t taken this new LUT out for a spin on a real job (although I hope to do so shortly) but it works well in testing. If you decide to replicate these steps, I AM NOT RESPONSIBLE FOR YOUR RESULTS unless you like them.
When in doubt, test!
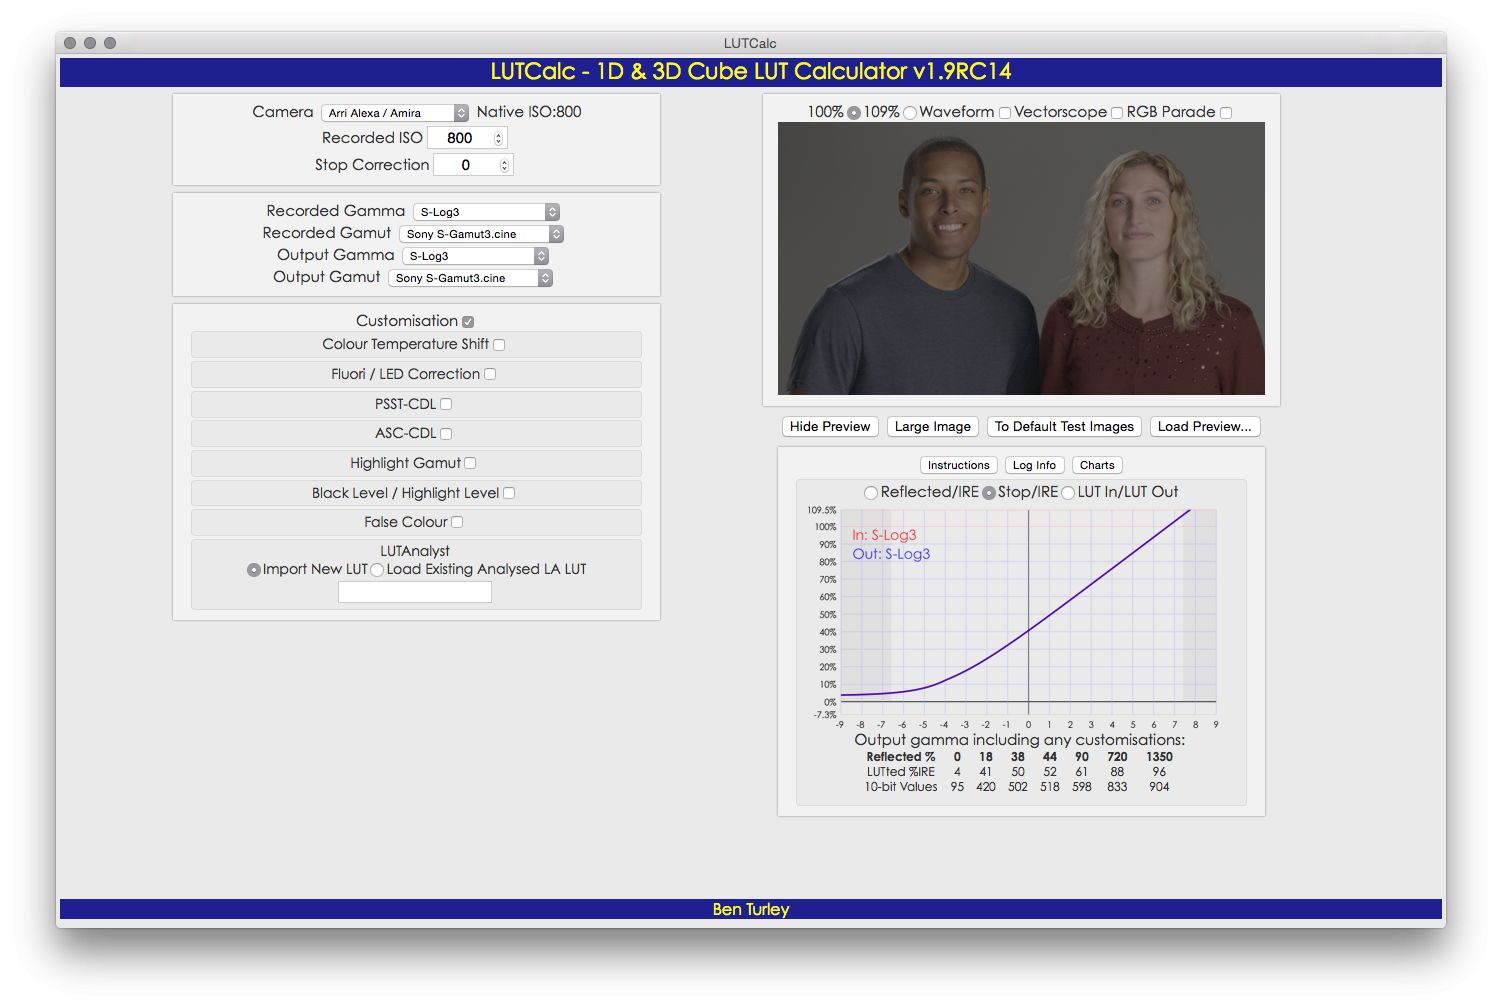
This is the LUTCalc OSX app. The web app has slightly different capabilities to the OSX app, but everything we do here should work on both. Both apps offer waveform, vectorscope and histogram. I’ve uploaded my own reference image from a previous Sony test. (While the OSX app allows me to use a TIFF image I believe the web app only allows JPEGs and PNGs.)
First, though, we need to gain access to the Alexa LUT. Ben suggested that I download Amira Color Tool and install the Amira Looks package. In that package there’s an “X-2-Alexa” look. Select that and apply it to the sample image, then go to File > Export > Video Parameters as 3D LUT. In the next box select Iridas as the file format, 65 as the number of mesh points, and click “Save.” In theory you now have a 3D LUT .cube file containing a representation of Alexa’s Rec 709 LUT.
The next step is to get that LUT into LUTCalc. Here’s how you do it:
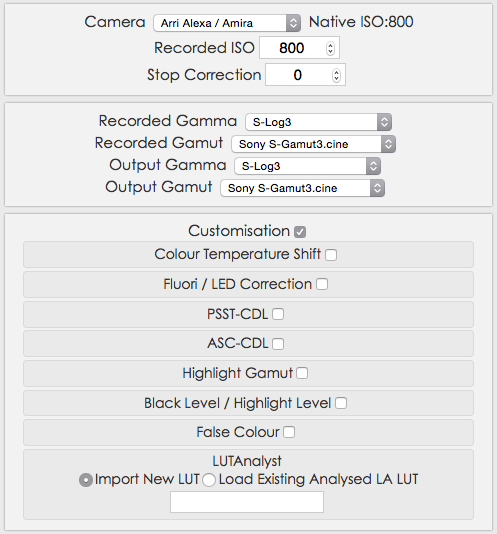
At the top of this screen, set the camera to Arri Alexa/Amira. The ISO will set itself to 800. Don’t worry about Recorded Gamma/Gamut and Output Gamma/Gamut for now. Click in the white space below Import New LUT, and in the screen that opens select the X-2-Alexa LUT you just exported from Amira Color Tool.
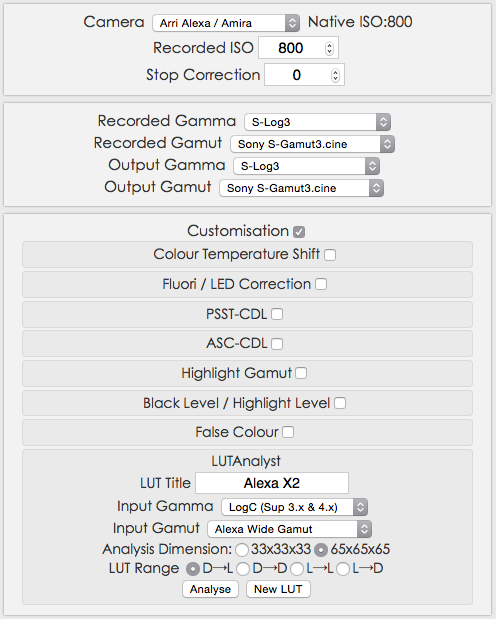
Once the LUT title appears, set Input Gamma to LogC (Sup. 3.x & 4.x) and Input Gamut to Alexa Wide Gamut. (Don’t select Adobe Wide Gamut by mistake… that looks really weird. Or so I hear. I certainly haven’t done that.) (Often.) Choose 65x65x65 for analysis dimension, and D>L (data to legal) for the LUT range. Then click Analyze.
Once that step is complete, you’ll find “LA – Alexa X2” as an Output Gamma/Output Gamut option. Change the camera at the top of the screen to Sony PMW-F55, and set Recorded Gamma and Recorded Gamut to S-Log3 and Sony S-Gamut3.cine.
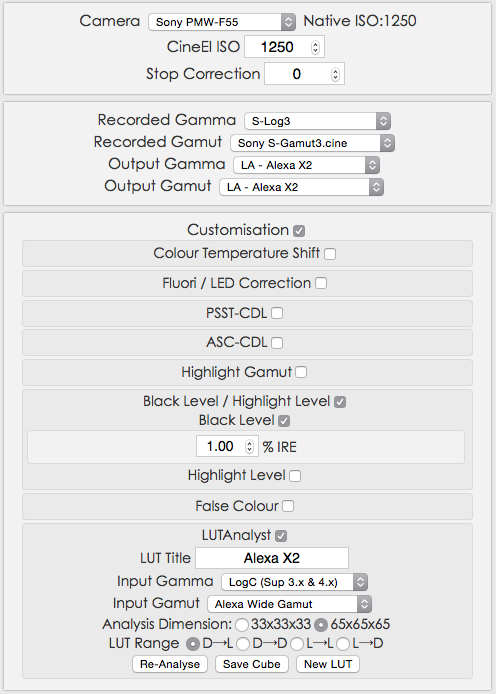
Although we’ve selected F55, the LUTs we generate should work in F5 and FS7 as well. During a recent test I built a LUT and loaded it successfully into both an F5 and F55 without issue. They looked slightly different due to the fact that the cameras use slightly different color filter arrays, but other than that the LUTs were perfectly compatible. (The FS7 is basically a scaled down F5, so no issues there either.)
About half the time I find myself baking in the look when shooting with the FS7 and F5. Many LUTs have boosted black levels: the LC709 Type A LUT, for example, has a black level of 4%. I prefer a bit more snap to my images (which is why I’m going through this exercise in the first place) so I went into LUTCalc’s customization settings and set the black level to 1% instead. You can see that above under Customization > Black Level / Highlight Level > Black Level = 1.00% IRE.
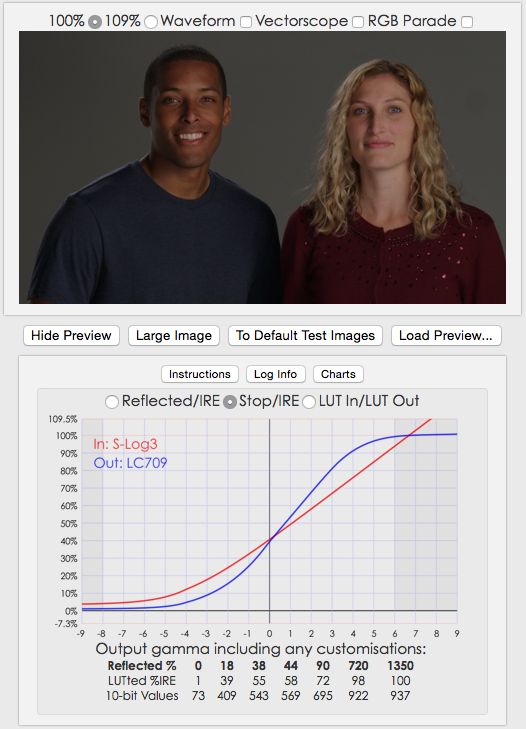
This is LUTCalc with Sony’s LC709 gamma curve and color gamut, which is their extended range Rec 709 look in Cine-EI mode. I think it’s better than anything available in Custom mode but it’s still a bit too video-y for my tastes. The saturation is okay in the shadows and mid-tones but highlight saturation is unpleasant to my eyes. Blue skies turn a nasty hue of cyan just before clipping, which reminds me of Betacams from the 1980s (or the AJA Cion before they fixed the color science).
I use this LUT for toy commercials. As saturated as it is, I find it much more pleasant than anything that Custom mode, with its array of standardized matrices and hypergammas, can offer.
LUTCalc provides all sorts of useful data. The curve graph is a great way to visualize what’s happening to the gamma curve as we adjust it, and the table below keeps us out of trouble.
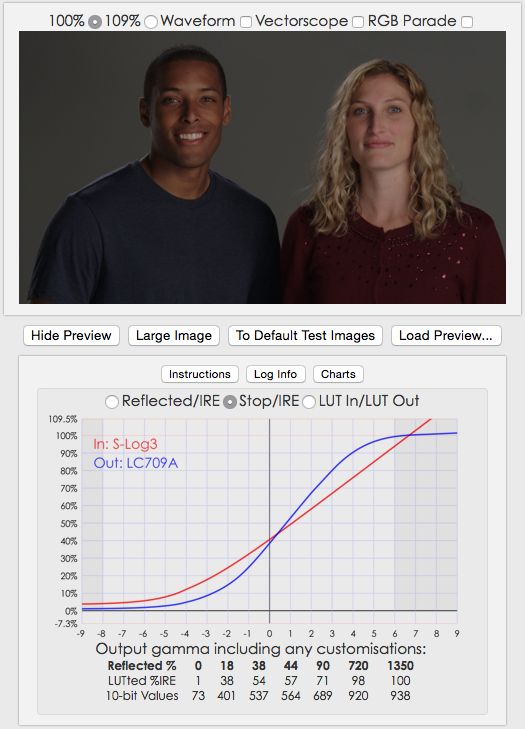
This is the LC709 Type A gamma curve and color gamut. It’s less saturated, and while it’s pretty I often find it lacking appropriate color saturation, as well as contrast “pop” due to the mid-tones being a little too compressed. Maybe this is one of the reasons so many DPs rate this camera 1/2 to 2/3 stop slower than it is—to get some “pop” out of the image.
I do generally like this look, but I can’t leave well enough alone. I want more contrast and saturation in the mid-tones.
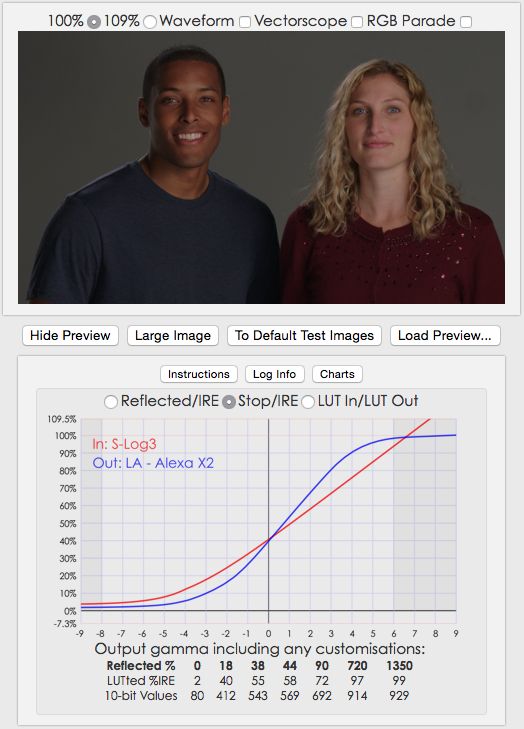
This is the LUT I built using the tricks I showed you above. Mid-tones are a little lighter, and the image seems slightly less warm than LC709 above. This is interesting, as when I’ve done this trick in the past—applying Arri’s Rec 709 to Sony footage in Resolve—it becomes a little yellower, but that’s not the case here. The mid-tone contrast is much gentler and the brighter mid-tones “pop” a bit more.
It’s commonly believed that Sony F-series cameras ISO settings are a bit higher than what Sony says they are. If we look at the charts above we’ll see that 18% gray maps to 40%. In theory, though, it should map to 43% in “true” Rec 709, which only allows for about six stops of dynamic range. Because of this we apply an S-curve to log data to roll off the shadows and highlights, where our eyes compress tones anyway, and stretch out the mid-tones to a spacing the conforms roughly to the Rec 709 spec. That gives them the contrast that both we, and an HD monitor, expect to see.
The formula to determine where 18% gray falls on a waveform is be found in Charles Poynton’s excellent but difficult-for-those-of-us-to-understand-who-don’t-excel-in-math book Digital Video and HD. It is:
100 * ((normalized reflectance)^(gamma) * 1.099 – 0.099)
This is a tricky one. Normalized means that whatever scale you’re working in gets compressed to a range between 0 and 1. I used to think that meant I had to reduce the real world reflectance range of 0-100% to a new range of 0-1, which is easy to do: just move the decimal two spaces to the left. But, of course, nothing is that simple in HD.
Camera manufacturers don’t measure real world reflectance as 0-100%, but rather 0-89.9%. That’s because there are very few matte objects in the world that exceed 90% reflectance, and it’s possible to make a reflected reference chart with white at 89.9% reflectance without having to make the white chip translucent and backlight it.
So, instead of normalizing a range from 0-100% reflectance, we have to normalize it to the range the camera manufacturers use, which is 0-89.9% reflectance. That means squeezing 0-89.9% into a range between 0-1.
First we normalize 18% gray to the 0-1 range, which is easy: it’s .18. Then, to convert this value to the 0-89.9% range we divide .18 by .899. That gives us .20.
Rec 709 gamma is .45 (the inverse of the monitor gamma standard of 2.2). Let’s plug those values in and see what happens:
100 * ((.20)^(.45) * 1.099 – 0.099) = 43.3940
In theory, our waveform value for middle gray in a true Rec 709 world is about 43%.
Log curves are just storage mediums, so it doesn’t matter where middle gray is as it’s going to be moved around in the grade anyway. Arri says middle gray falls at 40% in their Rec 709 implementation because they like the way that looks (or so I was once told). This makes perfect sense: we can’t be slaves to numbers all the time. Still… numbers can be useful, and it’s nice to know where the person who designed the ancient and crippled monitoring spec that we are forced to work with thought a reflected value should be. It’s a good starting point.
I played around with the slope/offset/power controls in LUTCalc without really knowing what I was doing, and I found that a value of 1.2 in slope lifted the curve to place middle gray at 43%:
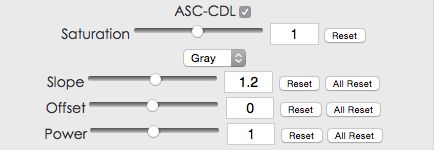

This opened up the mid-tones a bit, moving the female talent’s flesh tone highlight from 50% to 55% on the luma waveform. Here’s what the Alexa LUT looked like before this adjustment (18% reflectance at 40%):

The above is the Alexa LUT applied to F55 footage without any gamma adjustment. The next image shows the same image with slope adjustment to bring middle gray from 40% to 43%:

The image pops a little bit more. I like it!
We could also do this in the ISO adjustment, but it’s cleaner to do this in the ASC-CDL controls as monitoring ISO is controlled by the camera. More on that in a moment.
Let’s take a quick look at how these three LUTs stack up (with the slope adjustment). First, LC709:

Next, LC709 Type A:

And, lastly, our hacked Alexa LUT:

I do like the “Alexa” look. Her eyes are bluer, his face is warmer and feels like it has a bit more exposure.
If you decide you want to emulate this look without hacking Amira Color Tool’s LUT, there another neat trick we can do with LUTCalc:
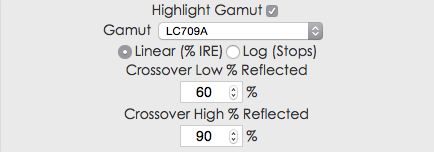
LUTCalc allows us to change the color gamut based on waveform percentages. If we set the Output Gamut and Output Gamma to the more saturated LC709 LUT, and then use the above settings to blend that into LC709 Type A across a range of 60% to 90%, we can retain increased saturation below 60% (which is where average caucasian flesh tone tops out) with LC709 and transition to LC 709 Type A’s reduced saturation in the highlights.
One of the very best tricks we can do with LUTCalc is compensate for fluorescent lighting:

Here I’ve incorporated a correction of roughly 1/3 minus green into the image. The effect looks like this:

It definitely works. (The advanced module is meant to correct for specific types of fluorescents, like cool white and warm white, but it isn’t functional yet.)
This has been the great weakness of the FS7/F5/F55: the inability to white balance under different types of lighting. The reason is that SGamut3.cine and SGamut3 are so huge that the math to reduce those gamuts to Rec 709 is quite complex. Each white balance point requires its own 3D LUT. Sony isn’t willing to build all those into the camera, but with LUTCalc we can build our own and install them as user LUTs. (Sony Raw Viewer will build post LUTs but not in-camera LUTs, and doesn’t offer the same real world references to plus green and minus green gels.)
I’m not sure what kind of correction to use in the real world yet, so I’m planning to run off a bunch of LUTs with different minus green values (1/8, 1/4, 1/2) and see what works. I’ll probably also have to use the color temperature shift panel at some point as most cool white flos don’t fall at exactly 4300K, but the near future I’ll stick to 4300K and focus on removing the green cast over warm/cool.
Exporting LUTs is relatively easy:
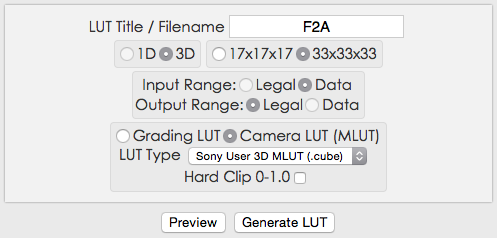
For the moment I’m outputting legal range LUTs as some of my work doesn’t see much grading before it goes to air. Also, I know most monitors will display legal range okay whereas some OLEDs hard clip at 100%. It is certainly possible to use LUTCalc to generate full range LUTs.
Sony MLUTs appear to have a 33×33 lattice structure, so select that as well as Camera LUT (MLUT) and click Generate LUT.
Grading LUTs are a little different. There are a lot more options, but the key thing to know is that the ISO value is a 1D LUT that does not have to be saved in the 3D LUT we created above. It is applied in the camera simply by choosing an ISO value, but the post LUT has to contain either the proper ISO or (better yet) be stacked with a 1D ISO correction LUT, which is much easier.
This is an important distinction. If I create a series of minus green LUTs to correct for various amounts of green in fluorescents, I have two choices:
- Make a series of LUTs for each ISO I think I’ll use (say four degrees of minus green LUTs at three different ISOs, for a total of 12 3D LUTs), or
- Make a series of LUTs at a base ISO and create an additional set of 1D LUTs that only correct for ISO (four degree of minus green plus three 1D ISO LUTs, for a total of seven LUTs)
A reader of my previous LUTCalc article pointed out that we can change the camera ISO at the top left of the LUTCalc display (Stop Correction = -1, for example, to reduce the ISO by half) and then, instead of outputting a 3D grading LUT, output a 1D grading LUT that only moves middle gray around. You’ll have to send that over to post as well, and they can stack both the 3D LUT we created above with the 1D LUT to correct for ISO. In Resolve this means two nodes: one with the gamma/gamut 3D LUT applied and the next node with the 1D ISO correction LUT applied.
So, instead of generating a series of 3D LUTs that contain all the minus green and ISO combinations I think I’ll use:
F2A_ISO1000_25MINUSGREEN
F2A_ISO2000_25MINUSGREEN
F2A_ISO4000_25MINUSGREEN
F2A_ISO8000_25MINUSGREEN
F2A_ISO1000_50MINUSGREEN
F2A_ISO2000_50MINUSGREEN
F2A_ISO4000_50MINUSGREEN
FSA_ISO8000_50MINUSGREEN
I can instead send the following to post:
F2A_25MINUSGREEN
F2A_50MINUSGREEN
F2A_ISO1000
F2A_ISO2000
F2A_ISO4000
F2A_ISO8000
(I don’t have to generate a LUT for ISO 2000 as that’s the default, but it’s easier to give it to post than it is to explain why they need to apply the ISO correction LUT sometimes and not others.)
THIS SECTION HAS BEEN UPDATED—SEE NOTE BELOW
Last but not least, you have to know how to get the MLUT files into the camera. Format an SD card in the camera and then create the following directory structure, which changes slightly depending on the camera:
PRIVATE > SONY > PRO > CAMERA > PMWFS7
PRIVATE > SONY > PRO > CAMERA > PMWF5
PRIVATE > SONY > PRO > CAMERA > PMWF55
or
PRIVATE > SONY > PRO > CAMERA > PMWF55_F5 (I used this on both the F55 and F5 successfully. I haven’t tried it on an FS7.)
EACH DIRECTORY NAME MUST BE CAPITALIZED. Why? Beats me. Because!
It’s best to format the card in the camera as it requires the ancient but fairly universal FAT16 file system.
UPDATE: Ben Turley tells me via comments (below) that the first three file directory trees (PMWFS7, PMWF5, and PMWF55) are for internal settings files only. He says the PMWF55_F5 directory appears to be the universal directory where MLUTs reside, and that the FS7 will see this directory as well.
When you read in the card you may see duplicates, where each LUT file has a version with underscore marks (“_”) instead of spaces. The version without underscores is the one that works. Not sure why this happens but I assume that it’s some sort of workaround for FAT16, which doesn’t normally accomodate complex file names beyond the 8×3 file naming convention.)
LUTCalc is an amazing tool, and I’m grateful that one lone cinematographer with superb math and coding skills has taken up the task of filling in Sony’s gaps.
Art Adams | Director of Photography
July 27, 2015

Filmtools
Filmmakers go-to destination for pre-production, production & post production equipment!
Shop Now