In our last lesson, in our look at learning HitFilm Pro, we talked about most of the tools in the toolbar, and how you’ll use them in your editing workflows in HitFilm Pro, and in this lesson, we’re going to keep the discussion of the toolbar going by talking about a few other tools including the Rate Stretch Tool, and the Export Tools.
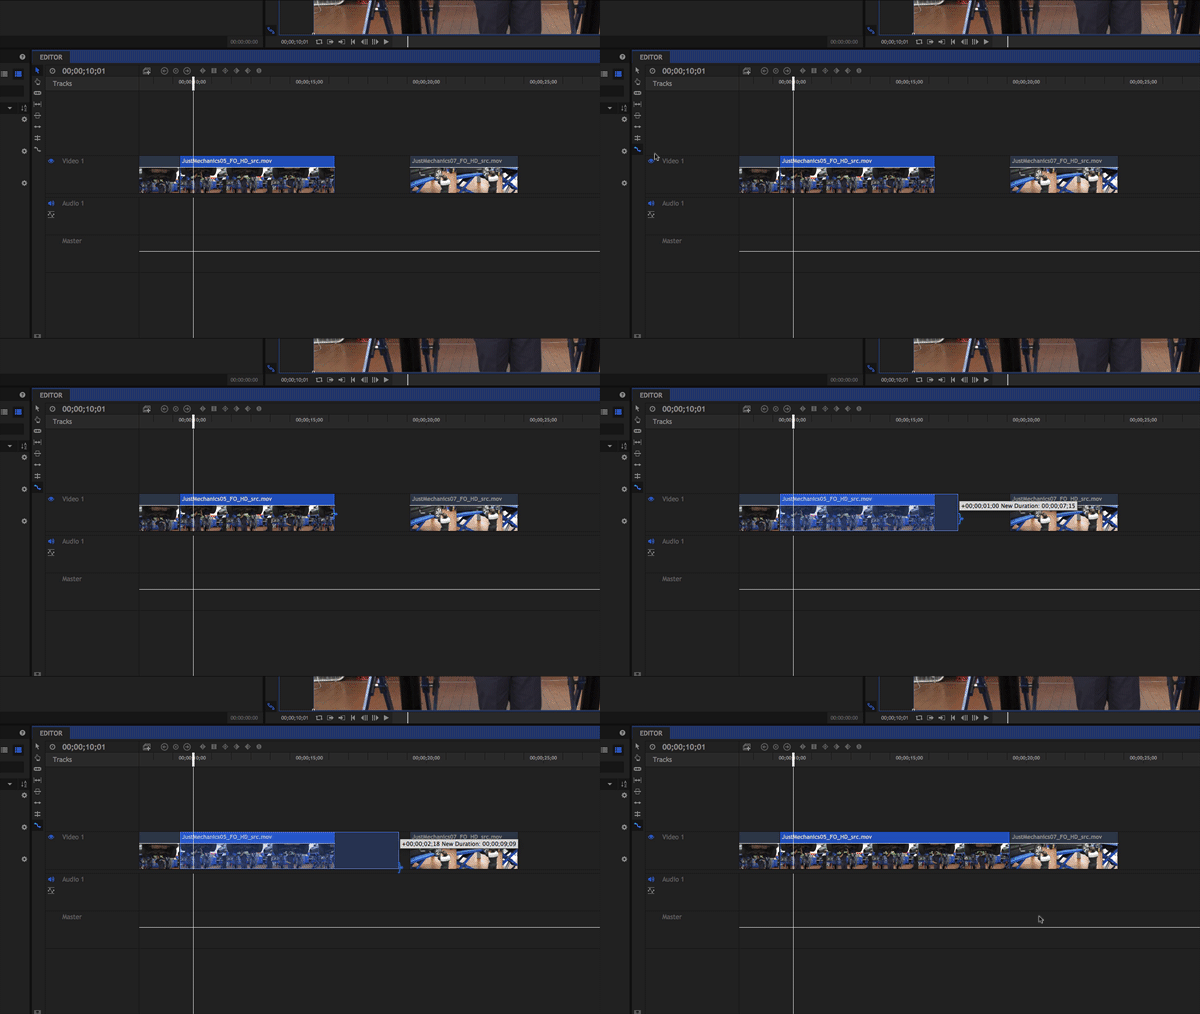
We left off at the end of the last article, getting ready to talk about the Rate Stretch Tool, so let’s take a look at how it works, exactly. One problem you’ll encounter, when working with speed adjustments, is that unless you’re working on a single shot basis, it’s pretty tricky to figure out exactly how much to adjust a clip, to get it to fit into a space between two clips. Using the “default”, Right Click>Speed/Duration command, can be pretty cumbersome, again, trying to get a shot to fit in between two other shots.

That’s where the Rate Stretch Tool comes into play. How it works is pretty simple. Hit the keyboard shortcut of “S”, or navigate over and select the tool on the toolbar. Then, grab the edit you want to stretch out to fill the space between two edits and, voila, you’re done!

Now that you’ve done this, if you right click on the clip and head back to the Speed/Duration option, you’ll now see that the timing of the shot as been updated, so you’ll know exactly how much (or how little for that matter), your shot as been slowed down.

Let’s now jump over the Export options for just one second, for me to point out another “tool” on the toolbar (even though I wouldn’t really call it a tool).
This is the Snapping Tool, and it can be turned on and off by simply using the standard keyboard shortcut of SHFT+S on the keyboard (on both Mac and Windows).
Now let’s move on and talk about exporting, as we have two tools on the Toolbar that we can use to export. The exporting process itself is the same, it just depends on whether you want to export your entire timeline, or just a portion of it. The two tools are the “Export Contents” tool, and the “Export In/Out Area”, which are both pretty self explanatory.
We’re just going to go with the “Export Contents” command for this lesson, and you can apply what we talk about to the “Export I/O Area”. Once you hit the tool on the toolbar, you’re now brought to the Export tab, and you’ll see that your sequence is queued up and ready to export.
You’ll notice that the export window is broken down into two distinct sides. The actual queue itself, and the Preset window. To use one of the “packaged” presets, simply drag and drop it onto the the item in the queue, and it will immediately be updated with the new export settings. You’ll notice that down at the bottom of the Presets window, there is a button to create your own presets, and when you click on it, you really only have three choices (keep in mind that I am on a Mac, so this may vary slightly on Windows machines). MP4, Still Image (JPEG, PNG, ETC), and QuickTime movie. Mac users will also have the ability to export ProRes files directly from HitFilm for delivery directly to stations, or spot delivery services, or post/VFX houses if necessary.
One thing that I found surprising, and a little disappointing is that when I went into create a preset, I don’t have access to all the codecs on my system. Only ones that HitFilm says I can have access to, so no Avid DNxHD/HR exports from HitFilm Pro for me…..sigh.
Once you’re done and ready to export your timeline (or composite shot) back to the desktop, or wherever else you’re planning on sending it to, you can simply hit “Start Exporting” in the lower left hand corner, and HitFilm Pro will start exporting, and give you detailed information about it’s progress, start time, elapsed time, and how much time is remaining in your exports. I do want to mention that since I’m working on very short form items and even single composites in HitFilm Pro, for the most part, all my exports have been lightning quick.
As I mentioned briefly before, the export window with its lack of exporting options, was a pretty big disappointment for me, because if you want to compete against the big boys when it comes to compositing, you need to have all the exporting options/codecs at your disposal otherwise you’re just going to tick people off and make them export and deliver items in two steps, as opposed to the assumed one step that they would have in other NLE/Compositing applications.
Alright, with that being said, I want to move on it the next few lessons, and talk about composite shots, and how you’re going to create them from edits, as well as creating them as stand alone items.
FTC Disclosure
I have received no compensation from HitFilm for the production of these tutorials. Opinions in this article, whether you agree with them or not, are my own!


