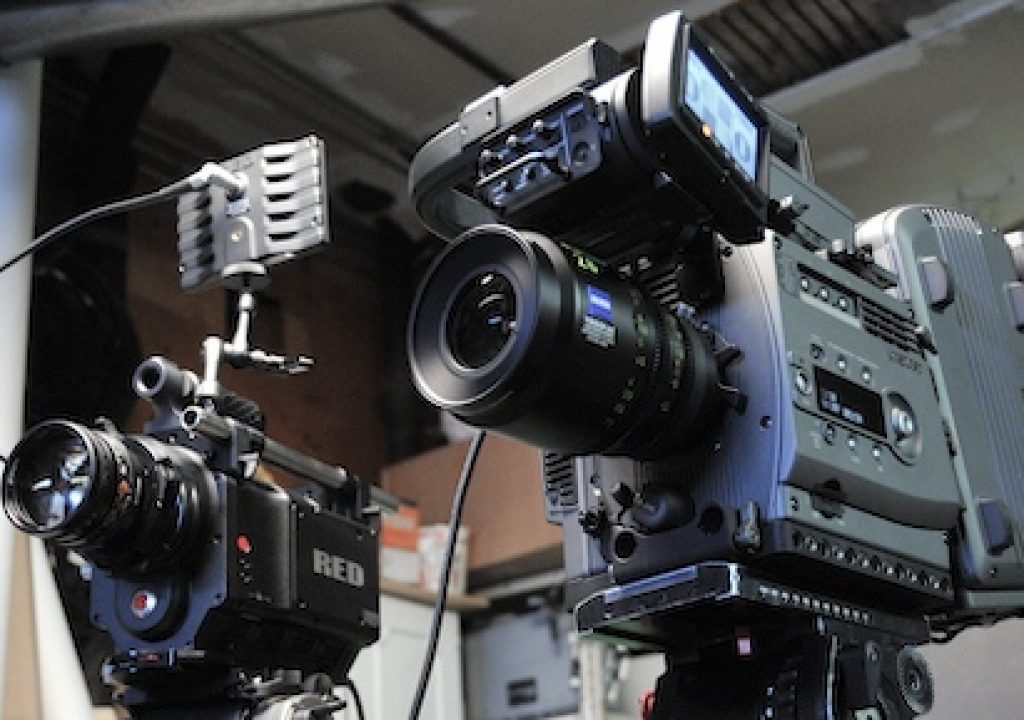
On March 7th, Tim Blackmore and I visited Videofax, a San Francisco camera rental house. Videofax is unique in the area (as far as I know) in having both a RED ONE digital cinema camera and a Sony F23 HDCAM-SR camcorder. Videofax’s Leigh Blicher kindly invited us to come by and take a look, following the DCS RED Event the previous weekend. How could we refuse?
I took along our Sony PMW-EX1, because it provides a good basis of comparison: cameras like the EX1 are readily accessible, so they make a nice reference point; and I’m quite familiar with it (Videofax also has an EX1, but it was out for five weeks as the B camera on an HDW-F900R feature shoot). Besides, what could be more unfair: I’m comparing a $6500 EX1 with a $25,000 RED and a $200,000 F23 (all cameras priced in shooting configurations)! That’s quite a price span, and I’m not for a moment assuming you can call these cameras equal. Really, it’s like comparing apples, oranges… and pears.
It’s unfair in other ways, too. I know the EX1 pretty well by now, but I’d never used the F23 before, and only had a brief exposure to RED last September. We only had a few hours to learn enough about the cameras to shoot a couple of interior test before Videofax’s prep area was needed to park their camera truck, back from a gig; and then another hour to grab some quick ‘n’ dirty outdoor images. So our tests are fragmentary, the cameras weren’t fully set up, the charts were sloppily lit, and there are some mismatches in focal lengths and framing.
And RED, of course, is a moving target: it’s still under development, both in the camera’s firmware and in REDCINE, its “digital film lab” application. The firmware we used is supposed to be superceded soon (on average, there has been a new build every two weeks), so take my findings as a snapshot of an evolving product, not as any sort of final word.
Nonetheless, I think this was a comparison worth doing: if nothing else, we’ll see just what the differences are between two Sony 1920×1080 cameras, one costing 30x the other’s price, and a non-realtime, 4k Bayer-mask camera from an upstart company that didn’t exist three years ago.
I’m not going to rate or rank the cameras, but I will compare images and comment on ’em, and (I hope) show detailed enough results that you can look at them, decide on whether you think my methodology allows any sort of adequate comparison, and make informed judgments on your own as to what the different cameras can do for you. Along the way I’ll discuss my post-production process (I’ve already started with this article about pulling stills from FCP), so that—with any luck—you can avoid some of the pitfalls and surprises I encountered.
The Cameras
The PMW-EX1 is a five-pound Handycam with three 1/2″, 1920×1080 CMOS sensors. We recorded it using its onboard XDCAM HD EX compression in 1920×1080 24p HQ mode. This camera, with a built-in 14x Fujinon zoom, sells for about US$6500, and rents for $350/day.
The F23 is a digital cinema camera that probably weighs 30 pounds or so with the SRW-1 deck and a Zeiss DigiPrime lens attached. It’s built like a Hollywood 35mm camera, that is, it’s built like a tank. It uses three 2/3″, 1920×1080 CCDs , and allows 10-bit recording in either 4:2:2 or 4:4:4 modes on the SRW-1, complete with 24p modes and variable frame rates that can be ramped while shooting. It can record and output standard 709 gamma imagery, a hypergamma image (with two options for highlight compression and the choice of either 100% or 109% maximum whites), or Sony’s S-LOG, a filmlike curve designed to capture every scrap of information available to the sensors.
We put a 28mm T1.6 DigiPrime on it, the best of the DigiPrimes according to Videofax. We took the 4:2:2 monitor output into an AJA IO HD, recording 10-bit 1920×1080 ProRes422 HQ to a RAID-1 drive set using Final Cut Pro (I had previously determined that ProRes422 HQ, Apple’s answer to Avid’s DNxHD, Cineform, and Canopus HQ, was close enough to 10-bit 4:2:2 uncompressed for the purposes of this test).
An F23 with recorder and a decent zoom or set of primes sells for something in the ballpark of $250,000, and rents for about $3000/day or a bit more depending on the package.
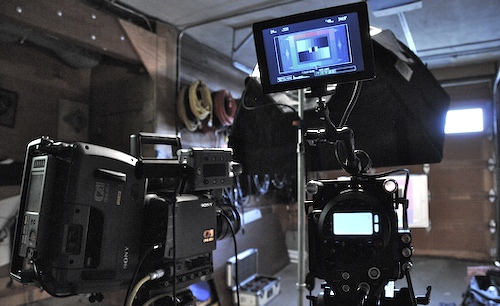
The F23 and the RED, set up for charts
The RED is a much-hyped digital cinema camera designed from the ground up for cine applications. It has a single, super-35mm-sized CMOS sensor (about the same size as a DX-format DSLR’s sensor) with an RGB Bayer-mask color filter atop its 4520×2540 photosites; we shot it in 4k 2:1 mode: 4096×2048 at 24p. This RED, only three weeks old, was running build 14 of the RED’s firmware, the current released version. RED records a RAW image using its own compression scheme; we used the standard 28 Mbyte/sec mode and recorded on an 8GB CF card, which we then transferred to the drive array using a FireWire 800 CF card reader and a beta version of R3D Data Manager to manage the transfers. Videofax had a nice crate of PL-mount Zeiss T1.3 SuperSpeeds; we used the 50mm and 18mm for our tests.
REDs sell for $17,500 (body only), but realistically a shooting package will be in the range of $25,000 to $65,000 depending on lenses, viewfinders, recording systems, and support kits. RED rentals with lenses seem to run around $2000/day.
The Setups
We first set the cameras up to shoot resolution and ChromaDuMonde charts. Charts were clamped in a grip head about five feet ahead of the cameras and roughly aligned to be parallel to the “film plane”. A 500w Tota-light in a Chimera was placed above the cameras to illuminate the charts; the illumination was not perfectly flat, but we were going for quick, relative comparisons, not rigorous measurements.
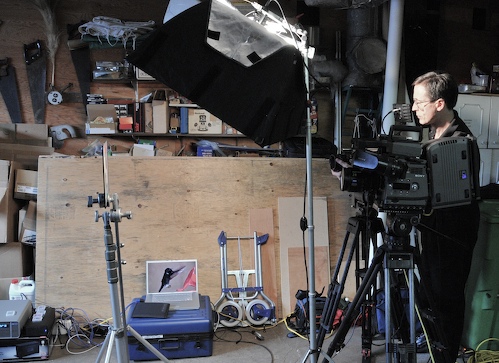
Adam aims RED at a chart
A 4×4 black card was set up behind the cameras to keep reflections off the chart surfaces, but we didn’t cover the garage windows behind the charts, which may have induced some flare. As all cameras faced the same windows, yet none showed any obvious flare issues, we felt this was good enough for our purposes (again, we had two people, three cameras, four setups, and six hours, so please forgive the rushed nature of the tests).
We used the EX1 at 0dB and the F23 at -3dB gain settings, and used their output signals displayed on FCP’s WFM to set levels. We rated the RED at ISO 320 and used an incident meter to set its level. At the default position of charts and light, the EX1 was at F5.6, the F23 was at T4 and a third, and the RED was at T4.
Cameras were all shot in 24p modes with 180 degree shutters (1/48 sec) or close to it: either the RED or the F23 was showing 1/51 second, but I don’t recall which.
Detail was turned off on the EX1. It should have been off on the F23, by default, but I didn’t check it, and the evidence of our images is that it was on at some level: there are telltale overenhanced outlines in some shots. The RED, of course, shot raw data.
Multiburst / Resolution
We shot the multiburst resolution chart full-frame on F23 and on RED, using the 28mm on the F23 and the 50mm on the RED.
I then swapped in the 18mm on the RED and repositioned the chart to half the screen height (filling about 1024 of the 2048 active scanlines), for two things: to double the effective detail of the chart for better gauging resolution in 4k mode, and to see directly what resolution you’d get in 2k mode.
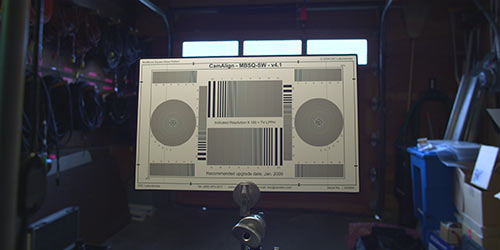
The view from the RED with the Multiburst chart at half the image height
I already had shot a multiburst test for the EX1, so I didn’t repeat it here.
ChromaDuMonde / Exposure
We then switched to the CDM chart and ran through exposure settings by varying aperture in 1-stop increments, to gauge latitude, highlight handling, and shadow detail. We shot the F23 in rec.709 gamma, in hypergamma 4 (compressing 460% brightness down to 109% with a smooth curve, not unlike the Cine gammas on the EX1), and in the S-LOG mode. We shot the EX1 in STD3 (default 709 gamma), CINE 4, and CINE 1 gammas. The RED, of course, shot raw data.
Real-world Images / “the Look”
We then moved outside. Unfortunately we had a nicely overcast day with flat light, but we could still shoot some test indicative of the overall “looks” of the cameras, even if we couldn’t stress their dynamic ranges.
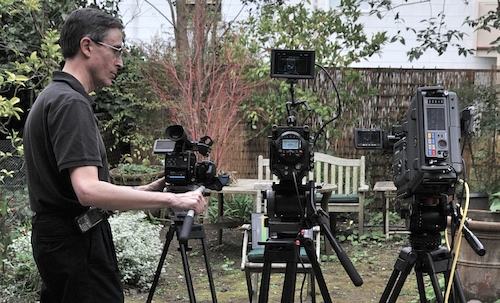
Adam sets up the cameras outdoors
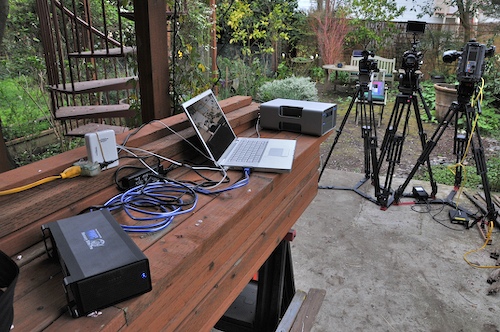
The cameras and the capture system.
We shot Tim in the garden, holding the CDM chart, trying to equalize lens angles and apertures so that we could see the differing depths of field rendered by the differently-sized imagers.
We didn’t get a perfect match (EX1 @17mm, F23 @ 28mm, RED @ 50mm, all within 1/3 stop of F2.8, using built-in or hand-held ND filters as needed), but we’re in the ballpark. The EX1 white-balanced to 8300K, and we set that by hand on the RED. The F23 was shot at 6300K, one of its built-in filter-wheel settings.
I also grabbed a quick handheld shot of the scene with an HVX200, just to compare colorimetry and rendering.
We then spun the cameras around to shoot close-ups of some flowers, using the same settings.
And then it was time to break the kit down and take our data home.
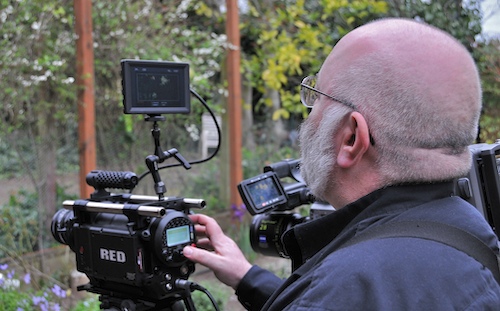
Tim tweaks the RED
Results
For comparison, everything was brought into Final Cut Pro 6.0.2 and rendered to a common format: ProRes422 HQ at 23.98fps, 1920×1080.
RED clips were converted from 4k 2:1 to 1920×1080 by downsampling with the sinc filter to fit height (and crop the sides) using REDCINE build 90. I exported ProRes422 HQ clips using 709 gamma and 709 colorimetry, using a Sharpen of 50.00 and Detail: Medium (I’ll post a separate article discussing the choices and the REDCINE workflow).
Some RED stills were also exported at an unscaled 4K size using REDCINE or REDAlert version 1.56, so we can see exactly what’s happening at full res. We’ll look at those first.
Multiburst / RED 4k Resolution
When we talk about TV, we talk about TVl/ph: TV lines per picture height. When we talk about digital cinema, we talk about a 2k image or a 4k image as images with that many pixels across. To convert TVl/ph to horizontal pixels, we multiply by the aspect ratio of the picture. As we shot the RED at a 2:1 aspect ratio, we can read the “TV number” off the resolution figures on the chart and multiply by two to get the “cine number”.
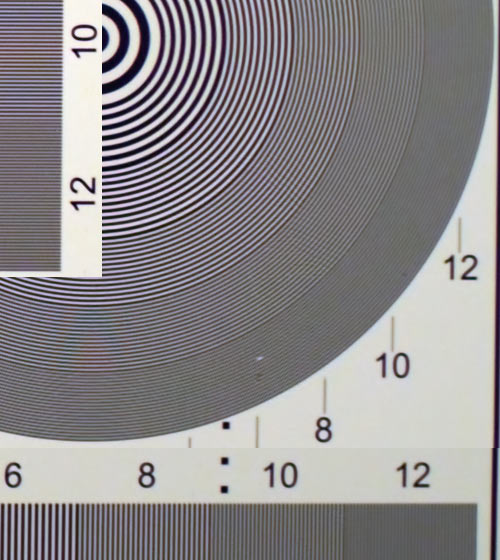
RED, 50mm SuperSpeed (4096×2048)
At its full, 4k resolution, the multiburst chart is outmatched: it appears that resolution is dropping off around 1200+ TVl./ph (2.4k+ in “cine numbers”), but it’s inconclusive, because that’s as high as this chart goes.
Fortunately, I pulled back (by switching to the 18mm lens and repositioning the chart) so that the chart filled half the screen (close enough for a rough measurement, at least: the right side of the chart’s active area wound up 1012 pixels tall instead of 1024 pixels, or 98% of its intended size). This does two things:
• The chart can be read directly to show what happens when the RED is operated in 2k mode, reducing the scanned area of the sensor to allow higher frame rates.
• The chart can be read and its figures multiplied by two (since the chart is half the size, its spatial frequencies are doubled) to indicate resolution at 4k.
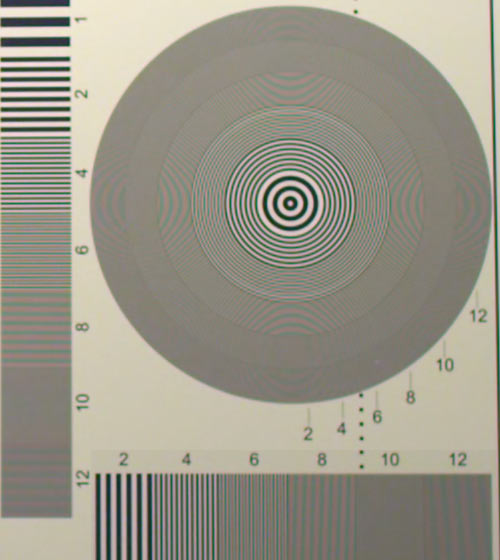
RED, 18mm SuperSpeed, 1/2 size chart (4096×2048)
I’d say, at a rough guess, we’re seeing a bit past 600 TVl/ph indicated. Double that for the half-size chart and double again for the 2:1 aspect ratio; and we have 2.4k+, probably between 2.4k and 2.5k.
That agrees nicely with the full-size result using the 50mm lens.
“But wait!”, you cry, “isn’t RED a 4k camera?” Well, yes… and no. Yes, it has 4k pixels across the sensor, but it also uses a Bayer mask for decoding color. Pulling fine detail out of a Bayer mask image without triggering a variety of luma and chroma artifacts is a devilish task; RED is actually doing pretty well in getting 2.5k out of a 4k imager, especially given its progressive-scan nature (Bayer-mask images in interlaced cameras have the advantage of dual-row summation to reduce twitter; this summation agglomerates two adjacent rows with offset green photosites, allowing such images to have higher horizontal resolutions without triggering artifacts).
Even if you use the full 4k imager’s width, the resulting 2.5k image isn’t markedly sharper than the 1.9k image captured by a three-chip 1920×1080 camera. In HD terms, it’s about 30% more resolvable detail (put the other way, full-raster HD resolves about 76% as much detail compared to a 4k Bayer mask image). And compared to a 2k film scan or full-raster 2k digital cinema masters, it’s still 25% finer detail. This is nothing to be sneezed at: it allows you to push into the image in post by 25% to crop out intruding mics and light stands and the like, or just to better compose a tight close-up, with no resolution loss in the final image.
In my workflow, I’m not even using the full width; I’m cropping the edges of the 2:1 image to fit a 16×9 (1.77:1) HD picture. That crop effectively gives us 2.2k of resolution—still 15% better than shooting full-raster 1920×1080, still enough resolution headroom for some reframing or motion stabilization without resolution loss. In short, shooting RED at 4k for a 2k (or 1080-line HD) post and release path makes a lot of sense.
In 2k shooting, the RED’s resolution drops to about 1.25k, roughly the same resolution as full-resolution 720p video (1280×720 pixels). This corresponds with observations from various RED users that 2k images are noticeably softer than 4k images even when both are “printed” to 1920×1080 HD.
Note the color rainbows or moir© on the chart, an artifact of the Bayer mask: red and blue are sampled half as frequently as green, so color aliasing occurs before . Practically speaking, these don’t show up in real-world images very often, unless you happen to shoot a repetitive pattern (ventilation grillework, chain-link fences, etc.) that just happens to fall at the spatial frequencies need to trigger this sort of thing.
REDCINE has a noise-reduction filter that handily takes care of these rainbows, along with reducing chroma noise in the image overall, without noticeably degrading sharpness:
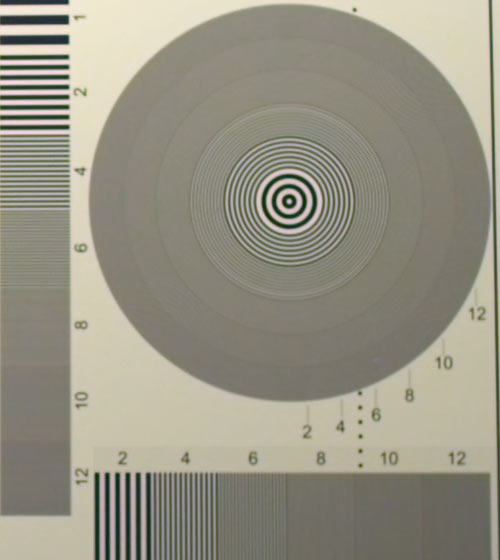
RED, 18mm SuperSpeed, same shot with NR on
So you can have all the resolution the RED is prepared to give, without any annoying chroma moir©, at least in unscaled outputs.
Overall, I’d say the RED and REDCINE combined deliver all the detail one can reasonably expect, with no nasty deBayering artifacts.
Multiburst / Resolution
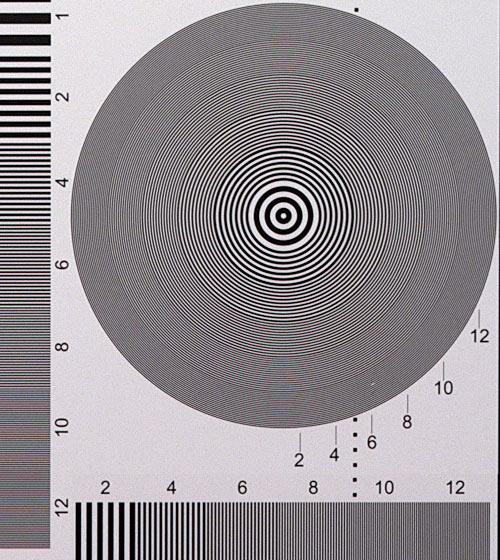
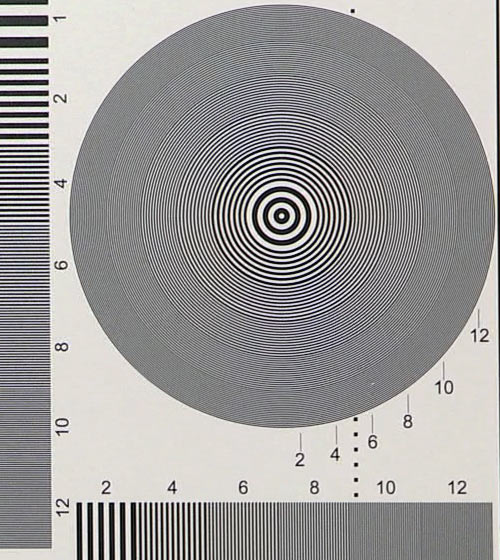
Here are details of the multiburst chart from all three cameras, including the RED’s images rescaled to 1920×1080:
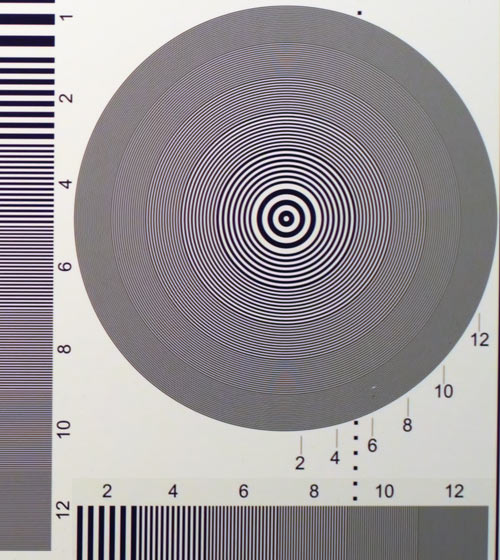
RED, 50mm SuperSpeed (1920×1080 downscaled from 4096×2048)
F23, 28mm DigiPrime (1920×1080)
EX1, 14x Fujinon @ roughly 17mm (shot previously; 1920×1080)
I see the RED resolving roughly 1000 TVl/ph, with minimal aliasing. This is what I’d expect of a well-behaved camera making a full-resolution 1920×1080 image with proper filtering. There is a tiny hint of color aliasing to the RED’s fine detail in the form of red & blue rainbows; in the downsized clip I saw little difference in images rendered with and without noise reduction.
The F23 shows detail out to 1200 TVl/ph, although with obvious aliasing: a 1920×1080 camera cannot resolve more than 1920×1080; higher-frequency information may leak through its optical low-pass filter, but it will appear as aliasing and moir©, not as accurately-rendered spatial information. It appears from the image that some detail enhancement was present, so proper comparison with the unsharpened RED image is impossible.
But what I can say, from the clarity of the zone plate and the contrast of the fine detail, is that 28mm DigiPrime has more than enough sharpness for 1080 lines, and that the F23 has been tuned to favor fine detail even if it comes with a bit of aliasing (this really shows up in the CDM detail shots, below). And the F23’s image is remarkably free of color offsets, rainbows, or chromatic aberration of any sort; it’s absolutely the cleanest video image of a multiburst chart I’ve seen as far as color is concerned.
The EX1 was shot previously and has its default sharpening on. In this test it’s a very close match for the F23, although it’s clear from the enhanced edging that the default sharpening on the EX1 is stronger than the sharpening we had on the F23. Detailed study of the zone plates, enlarging them 2x or 4x, shows the F23’s contours to be smoother (it probably has a better fill-factor and/or better on-chip microlenses, so that there’s less aliasing due to more accurate area integration at each photosite). The F23 has a “fineness of rendering” that adds to the subjective quality of the image in a hard-to-quantify manner.
From the multiburst tests, it’s clear that all these cameras can produce honest 1920×1080 images and fill all those pixels with unique details, albeit with differences in apparent sharpness with the lenses and detail settings we used. What the RED lacks in apparent sharpness, it also lacks in aliasing: fine detail doesn’t shimmer or ripple as it moves across the image the way it does on the 1920×1080-native cameras. The RED also resolves 2.4K+ in its full-sized output, allowing some “headroom” to crop, push in and reposition when extracting an HD image, without loss of resolution in the process.
[edited 2008.03.20 1240 PDT: clarified resolution discussion to avoid implying the Sonys could resolve greater than 1920×1080. -AJW]
ChromaDuMonde / Resolution
Here are details of the DSC ChromaDuMonde chart from all three cameras. All have been graded to reduce brightness differences but they are otherwise unmodified.
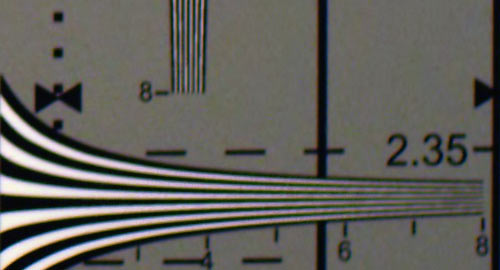
RED, 50mm SuperSpeed (4096×2048)
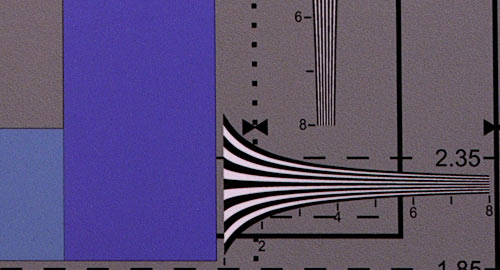
F23, 28mm DigiPrime (1920×1080)
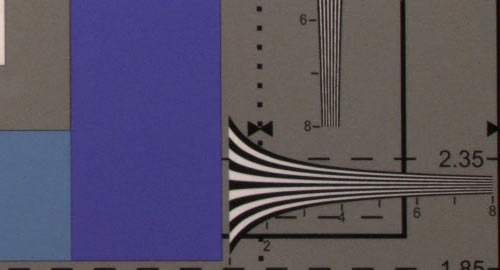
EX1, 14x Fujinon @ roughly 17mm (1920×1080)
The interesting bit here is how the F23 sees the fine texture of the inks in the CDM chart, details that evade the EX1 and the RED.
Why? The supernatural sharpness and clarity of the DigiPrime? The F23’s bias towards detail past the Nyquist limit? A happy accident of the detail circuit peaking its response at the exact spatial frequency of the chart’s texture? I think it’s acombination of all three, but I’m open to alternative explanations. I know it’s not detail settings alone; I’ve since tried to make the EX1 show that same texture by cranking up its detail and running through its detail frequencies, with no success: that subtle information just isn’t making it through the EX1’s optical system to begin with.
ChromaDuMonde / Exposure
Have patience; there are a lot of images loading here. I pulled sample frames from each exposure test, one stop apart; added camera, gamma, and lens data; superimposed the WFM trace; dropped gain to preserve super-whites in the JPEG outputs; and then made up “exposure strips” for each test. You might want to copy the images to your computer and then open them in an app that lets you switch between them easily, making comparisons easier.
The lighting is very even on the F23’s chart, but is hottest on the upper-left corner for the EX1 and the RED. In flat, even light, the white end of grayscale is about 1.5 stops over center (mid-gray); the black end is about 3.5 stops under.
While the number of underexposed stops varies by camera, each strip shows three frames of overexposed images: +1 stop, +2 stops, and a nominal +3 stops, though that +3 varies a bit based on the maximum aperture of the lens used. The nominal exposure on each camera was set up in its “709 gamma” mode and not varied for other gammas, so some strips (like the F23’s S-LOG and the EX1’s Cine1) show a darker-than-normal image at the “properly exposed” stop. In our test, the RED’s “correct” exposure was T4, the F23’s was T4 and a third, and the EX1 was at F5.6.
The burned-in waveform’s limits are -10% to 110%, so it includes both super-black and super-white areas.
RED

RED, 709 ungraded (see discussion below)

RED, graded in REDCINE & FCP (see discussion below)
F23

F23, 709 gamma

F23, hypergamma 4

F23, S-LOG (note use of super-black levels)
EX1

EX1, STD 3 (default 709 gamma)

EX1, CINE 4 gamma

EX1, CINE 1 gamma
• When all the cameras are set up to output 709 gamma, they all appear to have roughly the same overexposure headroom.
• The EX1 appears to clip at the same level of overexposure regardless of gamma setting.
• The RED and the EX1 seem to have about the same overexposure headroom, at least in tungsten lighting.
• The F23 appeared to have its black level set to Y=0, not Y=64 (10-bit levels), so its 709 and hypergamma shadows are clipped.
• The F23 in 709 gamma appears to be limiting its whites to 100%. This is an option in the menus; apparently it was on.
• The F23 in S-LOG appears to use the entire brightness range, including super-black and (presumably) super-white.
• The F23 has more headroom in hypergamma 4 than in 709 gamma, and so much more in S-LOG that it appears we didn’t come close to exhausting it.
• The “ungraded” RED strip uses REDCINE’s 709 gamma as-is, and shows cyan highlights with some tonal scale reversal (some white [cyan] bars are darker that their gray surroundings or other, less-bright bars!). These artifacts occur when changing the levels of fully-saturated color channels to white-balance the image, resulting in a diminished red-channel level and clipped blues and greens. I’ll be posting a full discussion of this in a day or two.
• The “graded” RED strip corrects for the issues in the ungraded strip using controls in both REDCINE and FCP, also to be discussed in that separate article. REDCINE exports clips using the brightness range 0%-100%; I decided to use the entire range from 0%-109% in FCP. There isn’t any brightness in my graded clip that isn’t fundamentally present in REDCINE’s ungraded clip; I just chose a different maximum white point in my regrading.
There aren’t any huge surprises here, just some minor ones.
The EX1’s gammas let you vary the look, and the roll-off into overexposure, but all of its gamma settings (at least, the three we tried) top out at the same clipping level.
The F23 has gobs of headroom, but that, aside from its film-style design, is probably its most famous attribute.
RED has about the same headroom as the other cameras in 709 gammas, and there doesn’t appear to be anything above that (according to REDCINE, there isn’t; I can’t pull more details out of the overexposed highlights once the color channels start saturating, even if I change gammas). Given all the hype, that’s a bit surprising, but let’s not get too carried away: this is a $17,500 CMOS camera, and it seems to perform about as well as other CMOS cameras do.
Also remember, the RED records RAW images. This ain’t no point-and-shoot videocamera; this ain’t no film camera with film’s nice S-curves; if you want a nice knee or rolloff for your highlights, you have to put it in yourself!
Real-world Images / “the Look”
We lined up the three cameras (and my handheld HVX200) and shot a quick outdoor scene at F2.8, to see how the depth of field of the different cameras compared and get an idea about real-world images.
I took all the clips into FCP, did a one-pass white color correction using the Color Corrector 3-Way’s “eyedroppers” to sample black, white, and gray from the chart. I then tweaked exposure and saturation to get roughly comparable levels and approximately equal saturations (this is a very rough grade based on the chart’s values, but the F23’s black are still a bit low, and I don’t pretend to have “equalized” the colors).
Images are ordered by sensor size.
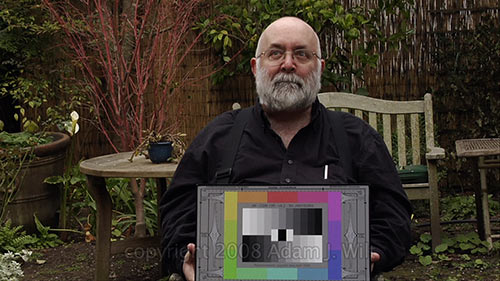
HVX-200, Cine-like V (1/3″ CCD), lens angle unrecorded
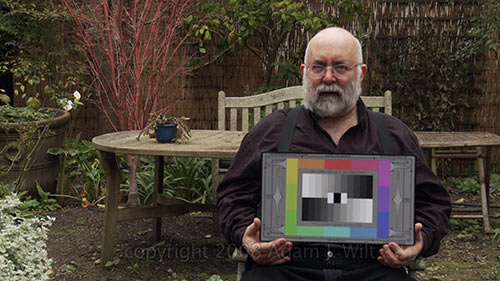
EX1, Cine 4 (1/2″ CMOS), about 17mm. Unfortunately, the background is focused and Tim isn’t!
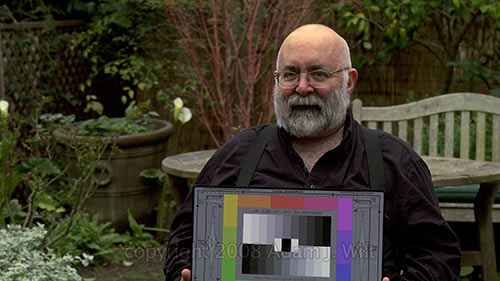
F23, hypergamma 4 (2/3″ CCD), 28mm
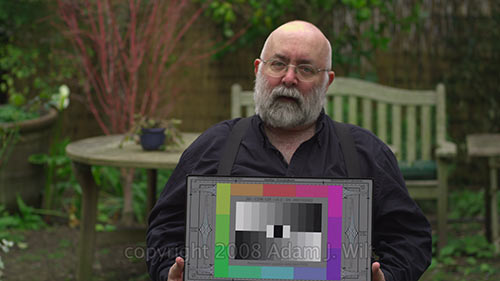
RED, (S35mm-sized CMOS), 50mm
I had to boost the level on the F23 quite a bit (we set this shot up for the aperture, not the exposure and add saturation. I had to desaturate the Panasonic a fair amount.
Aside from the progression in shallowness of depth of field, what’s striking is the difference in colorimetry. Both Sonys show Tim’s black shirt as a reddish-purple, while the Panasonic is less strident and the RED is the most accurate. The RED also has nearly twice the spread on the vectorscope along the green/magenta axis (thus, twice the saturation in those colors) compared to the other cameras.
Tim’s head highlights differently in the four shots. If you like smooth desaturation, you’ll probably like the Panasonic and the EX1 the best (they’re my favorites in this regard). If you like to hold color in the highlights as long as possible, the F23’s rendering may please you the most. The RED shows a neutral rendering but with incipient clipping; I’d probably want to massage these highlights a bit in REDCINE and FCP to smooth the transition, as I did in the exposure tests with the CDM chart.
It’s also interesting to look at close-up details of the RED and F23 images:
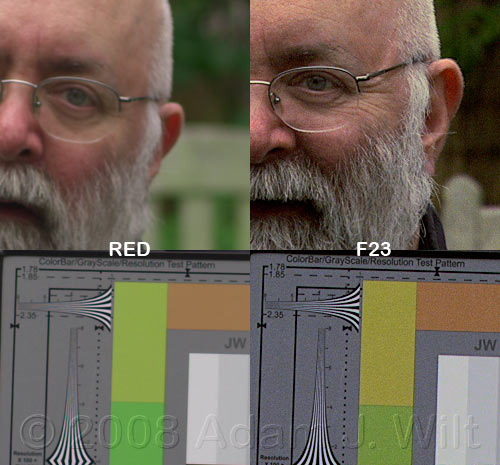
details, RED and F23 images
Here again, the F23 seems to have an edge—in more ways than one. While the picture is sharper, it’s definitely edgier; that dratted detail signal is definitely being applied. The F23’s image also appears to be considerably noisier (!), probably a combination of the gain boosting I did to bring its levels up and the additional added detail.
In playback, the F23’s picture is noisier than I’d expect; there’s more “grain” on the chart and in out-of-focus areas than I’d like. Again, I blame my gain boost, saturation boost, and the camera’s added detail; this isn’t a fair representation of what the F23 should be able to do.
On the other hand, the RED was far quieter than scuttlebutt had led me to expect: in this test, it’s the quietest camera of the bunch by far. To be sure it wasn’t my middle-of-the-road export settings in REDCINE, I re-exported the clip using Detail: High, Sharpen 100.00, and NR: Off. The result? The new export is very slightly sharper than the older one, but it’s not visibly noisier. Impressive!
Other aspects of the differing sharpness: I focused these cameras on the CDM chart. Tim is within the depth of field limits on the F23, but on the RED, his eyes are starting to go out of focus, and his ears are quite soft. That’s what 35mm depth of field gets you: really critical focus! Also, in fairness, on my exposure ramps the 50mm SuperSpeed looks a bit soft at T2.8, not coming into its own until T4, so it’s likely that shooting this scene at T4 instead of T2.8 would have resulted in a noticeably crisper picture. Something to try another time…
Random Observations
These aren’t full reviews, just some stuff we noted. There’s no attempt to be fair and balanced; we were under the gun to get some tests done with mostly unfamiliar gear. Take these comments as stream-of-consciousness observations, not as considered statements.
Also, I focus excessively on the RED. We have three RED reservations in the pipeline (#s 2323-2325), so I’m predisposed to focus on it as we have to decide whether we’re actually going to buy the darned things when our numbers come up.
F23 & 28mm DigiPrime
What a monster! It’s a big, heavy beast with the SRW-1 drive mounted in the rear position. It took extra care to flip the thing in my lap to attach the tripod plate (which looked laughably inadequate to secure the mass of the camera) as I was literally afraid of crushing the viewfinder. Most of the time I had Tim help me maneuver and carry it (not a bad idea when you have nearly a quarter-million dollars of borrowed camera in your hot, sweaty hands), and we always had the both of us on it when we were mounting or unmounting it or moving the tripod.
The removable assistant panel made it easy to squat by the capture station and monitor the image as I changed camera settings. Both the panel and the left-side display and buttons were laid out the same way, and were clearly designed for trouble-free operations: for example, the SET button doesn’t enable doing anything unless you hold it down for a second, preventing inadvertent activation. The fit and finish of these controls, and of the camera as a whole, are such that I’d guess the assistant panel alone costs as much as the EX1.
The EVF is an LCD with a removable magnifying hood, so it can be used as either a traditional eye-level finder or as an orientable flip-out LCD. It seemed awfully flimsy compared with the rest of the camera, but it performed well. I especially appreciated the rotary peaking control, just as on older CRT finders; I could dial in exactly the amount of EVF detail needed to focus a shot. The camera has two viewfinder connectors allowing both the operator and an assistant to have dedicated monitors.
The DigiPrimes are gorgeous lenses, well marked and smooth of action. I didn’t see any breathing as I focused, and the image is as rectilinear and undistorted as they come. And the image it makes on the F23 is literally breathtaking. There is no detectable chromatic aberration, no flare to speak of, and the F23’s picture with it is so clear and limpid that it’s like looking directly at the scene with the naked eye. On the CDM chart, the F23 / 28mm sees the fine texture of the printing inks that neither the EX1 nor the RED could reproduce. The 28mm is well capable of resolving detail strongly out to the limits of what the camera and chart will show, and probably beyond. Apparently, you do get what you pay for!
RED & SuperSpeeds
The RED is a compact little football (rugby ball for non-US readers) of a camera, dominated up front by its massive PL mount and in the rear by its bright white LCD status display. The camera’s body is a rough casting, painted with black textured paint; round black plastic buttons operate most functions with two bright red start/stop buttons (one on the back, one on the left side) providing a touch of color. The coarseness of the finish is offset by the high precision look and feel of the satin-silver Lemo connectors used for most accessories.
The camera has no built-in viewfinder, shoulder mount, support rods, pistol grip, or carrying handle; all these are add-ons using cheese plates, adapters, and jointed arms for attachment—in this way you build the camera up for your particular needs. Videofax doesn’t yet have the RED EVF (they’re in short supply) but did have the RED LCD, which we used on a RED arm. A carry handle was attached, but we didn’t bother to fit support rods, matte boxes, or the like, we just screwed the tripod plate right into the camera.
Some of the connector choices are odd: video and genlock use miniature connectors normally seen inside equipment; they’re fragile things in my experience, not well suited for the rough-and-tumble world outside a camera. Videofax’s camera has an adapter from Element Technica that converts the RED’s funky connectors to industry-standard BNCs—but you’d still need audio transition cables for RED’s oddball miniature XLRs.
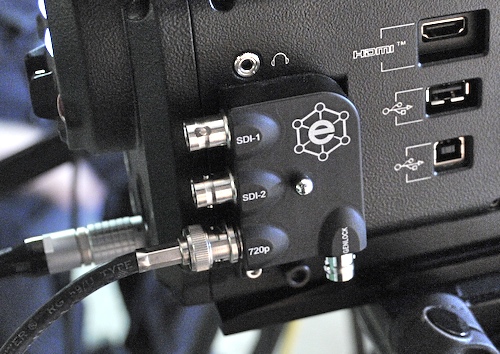
Element Technica’s adapter panel
The locking collar for the PL mount felt rough in its action; apparently a few REDs of this vintage slipped out of Orange Country with unlubricated mounts, and I suspect this may be one of them.
The camera takes about 90 seconds to boot up. Don’t be in a rush, eh?
A flimsy joystick with a fragile feel is used to navigate the camera’s menus, which are displayed very differently on the rear LCD and on the monitoring output—it seems the UI designer for one didn’t consult with the UI designer for the other. Neither design makes good use of the screen real estate available; I assume after some time the menu structures would become memorized, but the lack of visible hierarchy (the menus show only one level of detail at a time) and inconsistent interaction “language” made for a fair bit of frustration (I spent a couple of minutes fruitlessly trying to display a center marker before discovering that a visually unrelated “Enable” box needed to be checked).
Menus are traversed laterally by pushing the joystick side-to-side, and you move up a level by pushing it up, but moving down a level (shown on the screen as an animated down arrow) requires pushing the joystick in, not down (in fairness, this RED’s joystick had already fallen off three times in its short life, and its re-attachment may have prevented it from being pushed down).
Here’s hoping the RED folks revisit the menu design, or that every operator or assistant has plenty of prep time to learn its quirks.
For all that I dislike about the menus, I have nothing but praise for the monitoring display.
You can turn on a variety of frame markers and action-safe areas; critical data like frame rate, shutter speed, color temperature, clip name, and timecode are always shown, surrounding (not overlaying) the active picture. The RED’s sensor overscans: even at full 4k recording you have a visible border around the active (recorded) image, just as on a film camera, so you can see when booms and mics and other out-of-frame elements are about to intrude on your shot.
You can show a histogram below the picture and/or zebras on the picture, or turn on a false-color mode which shows exposure level with color—those of you familiar with the AccuScene viewfinder will feel right at home, since RED bought AccuScene, and this is the very same false-color display.
Beyond that, there’s a little “traffic light” below the picture, with red, green and blue “bulbs” that light up whenever 2% or more of the associated channel’s photosites are saturating. This simple set of idiot lights is the best overexposure warning I’ve ever seen; there’s no searching for zebras in the picture or pondering just how much of the histogram is pressing up against the right edge of the scale. Quick and to the point, it frees me up to watch composition and motion, and still see when I’ve got a problem—at which point I can look at my zebras, histogram, or false-color display. Anything that makes an operator’s life easier is a good thing, and this is one of ’em.
The SuperSpeeds are good-looking lenses, but they don’t seem to be up to the level of the 28mm DigiPrime. The 50mm, at least, seems a bit soft at the widest apertures, if fully crisp by T4, and there’s a bit of chromatic aberration noticeable on the 4k frame grabs, though it’s minimal. There’s also a bit of barrel distortion. I mention all this not because the SuperSpeeds were bad, but to emphasize again how astonishingly good the 28mm DigiPrime was. (It’s amazing how quickly one gets spoiled when one has a chance to work with top-quality glass!)
PMW-EX1
I’ve already discussed the PMW-EX1 in some detail, so I won’t reprise it here.
But after dealing with “real cameras” like the RED and the F23, with massive bodies, solid metal construction, and robust lens mounts, the EX1 felt, well, a little bit precious and delicate. All the controls felt unnaturally small and fiddly. This isn’t an EX1 problem, it’s just the nature of small handheld cams compared with their bigger, heavier brethren.
Big cameras and small cameras are simply built to different scales: this sounds obvious, but every time I run “real cameras” alongside small video cameras I’m struck by the difference.

Filmtools
Filmmakers go-to destination for pre-production, production & post production equipment!
Shop Now