![]()
The 2015.3 icon above isn’t included in the update but if you want a snazzy custom icon to keep track of your different versions of PPro then grab that here.
But First a Couple of Little Things
The super thin timeline tracks
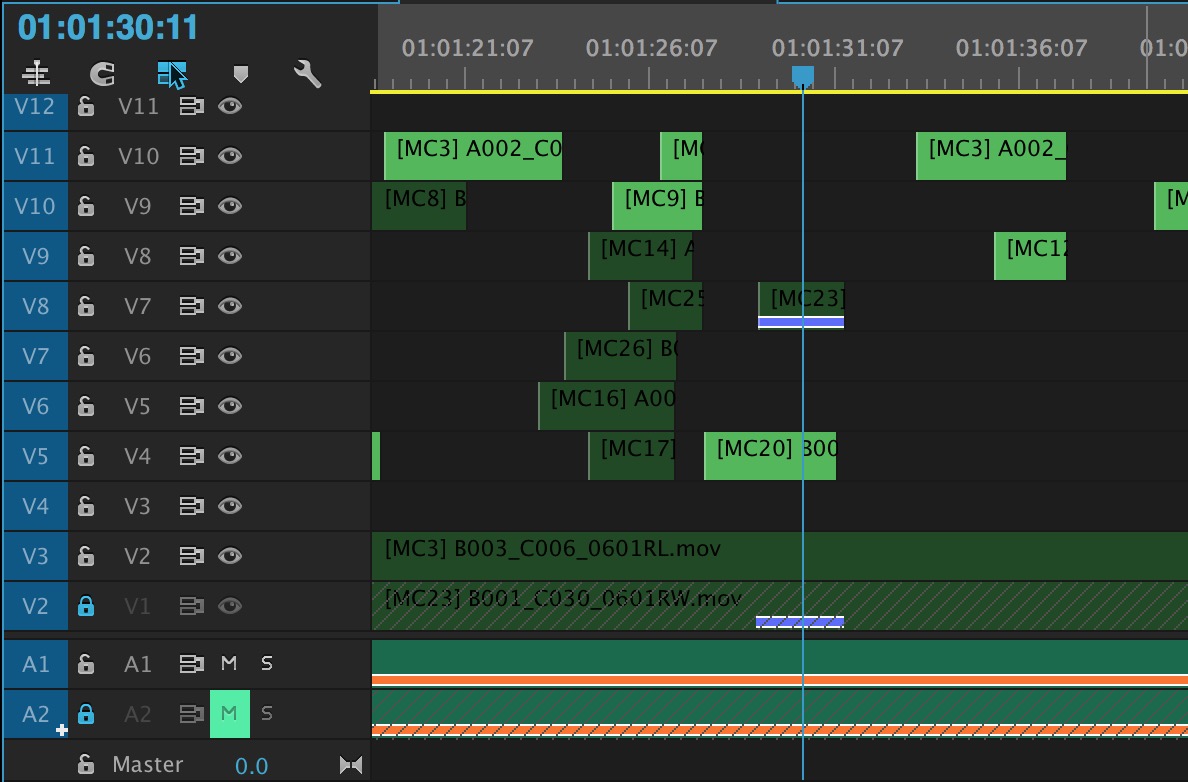
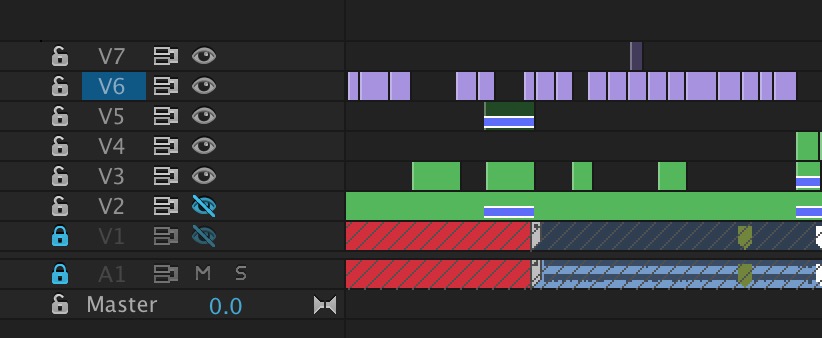
While a very simple addition Adobe has reduced the size of the minimun timeline tracks to make them even smaller. This type of thing is a big deal to editors as it enables more data on screen at any given time. This is very important when it comes to working on a laptop. Check the keyboard shortcuts for Minimize All Tracks.

Minimum track height in the previous version of PPro.


The minimum track height in the 2015.3 update is a lot thinner.
Zoom to Frame

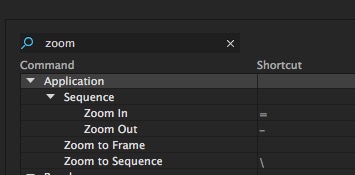
Avid editors coming to Premiere will rejoice in this new keyboard shortcut as it is the same as the Media Compsoer FOCUS button. With one keypress the PPro timeline will zoom from whatever zoom level you are currently sitting to a very close (focused) zoom level of one frame. Press that button again and it returns to the previous zoom level.
My crazy hybrid editing keyboard layout has changed again as I added this new Zoom to Frame keyboard shortcut to H which is where is lives on an Avid keyboard. That’s a Media Composer keyboard above.
And don’t confuse this shortcut with the Zoom to Sequence shortcut you may have already mapped to your keyboard. That still works fine but it only zooms between a full-wide timeline view and whatever the last zoom level was in which it was set. It’s nice to have them both.
There’s a lot more little features in this 2015.3 update so head over the Retooled.net as they put together a video overview of a lot of them.
Proxy editing
Premiere’s new Proxy editing is the biggest feature update to come to PPro in a long while. Long after VR has come and gone and the new VR editing tools are all but forgotten Proxy editing will still be around. I was able to put Proxy editing to good use just a couple of days after release in what will be a somewhat typical project. I’m not going to go into detail into exactly how to create proxies and how to use the new Ingest features of PPro 2015.3 as there is a good overview of these feature on Adobe’s How To site.
A big workflow change worth noting is that a new Ingest Settings option in the Project Settings will allow Premiere to manage media. You can see the options above as this will allow for some brand new PPro workflows. There’s a tiny Ingest checkbox in the upper right of the Media Browser that respects these settings. Be aware of that as it’s easy to miss. Also be aware that you can send files to your Creative Cloud cloud. That might be a lot of proxy video to upload to a cloud with only 20 GB of space.
One thing to note about proxy editing: There are many untypical scenarios and I have to imagine it’s a difficult feature to program for. There are many different formats and many editors will want to work in many different ways but at its heart they all work the same: take higher resolution media than your system can handle, transcode it to something your system can handle, attach those transcodes to the high rez media, edit. For example, I have no idea what would happen if you tried to attach proxies that were different lengths. You would never do that so I didn’t want to try to break the feature, just make it work how I would use it.
I was able to test the Proxy mode while working with the beta and those tests were successful, but this was the first time using proxy mode on a real job with a large batch of footage.
A large part of my wish for good proxy editing is I refuse to edit at less than Full playback resolution with a yellow dropped frames dot. When talking with other editors who speak of their love of native 4K editing, digging deeper into the conversation often reveals they drop playback resolution way down and their green dot is constantly yellow. While I can deal with 1/2 playback resolution I cannot deal with dropped frames. Green dot FTW.
The job I had come in was a music video shot anamorphic on ARRI Alexa. The footage was 2944×2160 ProRes 4444 mov files. While ProRes is going to be easier to play back for most systems than something like native RED .R3D files, even on a fast RAID I was unable to get acceptable performance playing back the camera originals. To even view the footage properly in PPro I had to interpret the footage with an anamorphic pixel aspect ratio.
Part of the dropped frames playback could probably be attributed to having to conform the anamorphic footage.
Even with a very fast RAID this was asking a lot of the laptop as it played the camera original footage: play 3K ProRes 4444 footage with a LUT applied and a conformed pixel aspect ratio while scaling it down to 1080 while often in a multicam clip.
This was the perfect place for proxy editing
With Premiere Pro 2015.3 there is a new Ingest option mentioned above upon loading media. This can handle both the copy and organization of media as well as the creation of proxy files. I did not use this as I had organized the media myself on my RAID prior to import. If you want to create proxies after the fact that is still possible via a right+click on master clips with the new Proxy sub-menu.
You can create the proxies right out of Premiere Pro by choosing Create Proxies. This will launch Adobe Media Encoder and go to work. I like the choice of placing the proxies next to the original media just be careful of this if you have some weird digital camera folder structure where the camera originals live.
I gave it a try but was unsuccessful in figuring out how to take this 3K anamorphically squeezed media and get it to an unsqueezed and letterboxed 1920×1080 file all in one transcode.
I created a preset in Adobe Media Encoder but when trying to use this preset via PPro I got this error. Since PPro is using AME to create the proxy files I would have thought it would accept any preset created in AME.
Chatting with workflow wizard and my favorite production foodie Gary Adcock via Twitter, he sent me these settings he uses created via a sequence in Premiere. I will try this next time.
After a few trial attempts I resorted to a different method. While I still didn’t get letterboxed 1920×1080 files I did get smaller ProRes Proxys. Perhaps I am not smart enough at math.
A big workflow plus – Attach proxies created elsewhere
Perhaps one of the more important things (and possibly killer features) about PPro Proxy workflow is it allows you to attach Proxy files created outside of the PPro/Media Encoder universe. The Attach Proxies dialog box is the key as it’s my understanding that PPro is looking for a few defined parameters and the _Proxy name on these proxy clips. I have no idea how this would work if proxy files were named differently but from the Match File Properties below it looks like there is some parameters that can be tweaked. My goal here was to make ones that I knew would work.
The Attach Proxes dialog box looks a lot like the Link Media box only with a few options removed.
I jumped into the transcoding powerhouse application EditReady (which I had used in my testing) to create the proxy files. There I was able to set the files to transcode to a smaller multiple of the 3K files as well as add the _Proxy suffix. This kept the 4×3 aspect ratio so the desqueeze would happen in Premiere.
Yes I could have used Adobe Media Encoder here but I love the simplicity and features of EditReady.
Once those files were created it was as easy as a right+click on all my the master clips (thank God this is a batch process as it has to be to be an effective workflow) and choose Attach Proxies. What makes this work is the Relink others automatically that will find them all in one operation.
The real plus of proxy editing came when I was able to toss my 60 GBs of proxy files onto a tiny USB flash drive and take this edit out of the edit suite. This meant the most important aspect of proxy editing worked: taking the proxy files away from the original media.
This is proxy editing. A laptop and a tiny flash drive. There’s 60 GBs of ProRes Proxy media for this project on that drive created from well over 1 TB of camera originals.
In order to take ONLY the proxies away on a portable drive I had to reattach the proxy files again once opening the job on another system off that flash drive. This meant the original drive name and file path of the proxies had changed (as well as the original media was gone) so the media came up offline. Reattaching the proxies was just like relinking media. I selected all, right+click, attach proxies and they all linked up from the USB flash drive. In this case I had to relink my audio file as well.
When proxy editing is turned on the Toggle Proxies button turns blue. You may have to add this via the + that is the Button Editor.
An interesting thing here is that even though the original footage was offline and nowhere to be found, once the proxies were attached PPro would show that proxy media even if proxy mode was turned off. More on that in the Missing section below.
In my mind this is exactly what proxy mode should do: letting you easily take much smaller and lower-bandwidth files away from the big originals and edit.
The Proxy Status column is a new addition to the bin metadata columns. In the beta version the sequence had an indicator in the Proxy column as well but that doesn’t appear to be working here.
Upon opening this PPro project file back on the desktop system with the original media on the fast RAID (NOTE-the proxy files were missing from this RAID as they were never copied to it) I was prompted to reconnect the Proxy files. More on that in the section below.
One thing I noticed that is cool about the proxies was the feeling Hover Scrub in the browser. When Proxy mode was turned off I could Hover Scrub just fine but it wasn’t super smooth as you could feel that it was heavier media. With Proxy mode on Hover Scrub was buttery-smooth. It’s an interesting thing when you can do that side-by-side and feel how much faster it is working with lightweight media.
This is the first release of Proxy Editing so there are a few things missing
This Proxy workflow is brand new and once can assume will be evolving in future releases. There’s a few things that we need to help flesh it out.
Currently to enable proxy editing the main way will be via the Toggle Proxies button under the Program monitor. This is easy one click access to proxy editing but we need another way to enable proxy editing without having to show the transport controls under the Program window. You can click that Toggle Proxies button and switching between them on this job was instant but what is really missing is a menu command.
I would like to see Enable Proxies added to the Wrench menu in the Program monitor or the Sequence menu command (which would mean we would get a keyboard shortcut too). We get a new option for VR but not toggling proxies?
It would also be great to have some visual indicator in the interface that is permanent where you can tell that you have proxy editing enabled. Working offline on my job it is visually impossible to tell the difference between the proxys and the full rez media on a small screen. Yes I could place a watermark in the created proxy media but that is a waste in many situations.
I would prefer that when working in Proxy mode with the original media missing that Premiere WOULD NOT show me an image when proxy mode is turned off. That way I wouldn’t get confused as to what I’m seeing or wonder which image I’m looking at.
Final Cut Pro X has the right idea showing a unique offline image when in Proxy mode and the proxy files are missing. A similar, unique offline image would be great when the full rez media is missing while you’re in Proxy mode.
It’s worth noting that Premiere seems to use the original media upon export when you are editing in Proxy mode. I can see this as a good idea for image quality but it could significally increase export times depending on your media. It would be great to have the option to use proxy media for an output. If the original media is missing then PPro will use the proxy media which makes sense (I did this several times on this job), otherwise you wouldn’t be able to export when proxy editing the road.
It would also be nice to see a bit better file relinking management, for lack of a better term. Once I created my proxies I was able to move the edit between two portable drives, just having to find a single file on the relink and PPro found the rest since Relink other automatically was checked. Upon opening the project back on the main RAID where the proxy media didn’t exist PPro asked for a relink to the proxy files. I chose to Offline All and then everything came up offline even though proxy mode was turned off.
Upon opening the master project back on the system with the full rez media and the fast RAID I was prompted to relink the proxies since they were attached. Offlining all the proxys here still brought the clip offline as it didn’t relink back to the camera originals.
I had to perform a Link Media operation which then relinked all the files back to the full rez media. I guess I could have used the new Reconnect Full Resolution Media option under the Proxy submenu but I didn’t even think about that since the clips were all offline.
It’s worth noting that when writing this article I went back and forth between the RAID with the camera originals and the portable drive with the proxies opening and closing the same Premiere Pro project file many times. That was a lot of relinking of both proxies and original media and it worked every time.
I did notice one other odd thing. Saving in the proxy project took noticeable longer in this music video with proxy files than in my other job that is cutting in the new Premiere 2015.3. That is a much larger job (a reality show) with a ton more clips, sequences and media. That is cutting on an entirely different system so that might have something to do with it. But the longer save time for this project project was very noticeable.
Overall, proxy editing was a success
As I mentioned above there are a lot of ways to do proxy editing. By do I mean what the editor will want out of proxies and how the editor might choose to create them, both applications and sizes. Both FCPX and Resolve are a bit more rigid in their proxy workflow, especially FCPX since you have no choice in creation or even relinking. My proxy editing experience in Resolve has been less than successful as often the proxy files fail to create. In FCPX it works fine but I’m limited in what and how I can create them and God-Forbid I ever need to relink them.
I really like what Adobe has done and this first real-world proxy edit was a success. There’s now a couple of different things I can check off of my 4 THINGS THAT WILL TAKE ADOBE PREMIERE PRO TO THE NEXT LEVEL list. Now if we can get Adobe working on the media cache and collaboration.

