By now anyone who has ever heard of Final Cut Pro has heard that Apple shipped Final Cut Pro 7 as part of the new Final Cut Studio on July 23. It wasn’t the total FCP reboot that many had hoped and consists mainly tacked on new features. The early word was that it probably should have been called Final Cut Pro 6.5 (and I agree) but you can’t make a splashy new release with only half a number advancement can you? I had some time over the weekend to kick the tires on FCP 7 there are some very nice features that have been added to this release. The true test will come when I install at the office and pound it hard for days on end (which won’t be for a while as I won’t be between projects for a couple of weeks) but for the little project I’m working on at home it’s working well thus far. Here’s an early observation on some select features where I was able to kick the tires.
Markers and colors are your friend, and finally usable
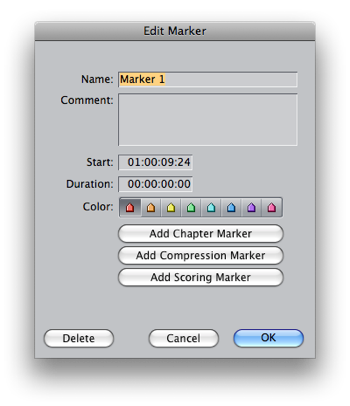
The first thing I wanted to check out were the new Markers. There’s 8 different colored markers and they can be added in the timeline ruler as well as to clips edited into the timeline (and of course in the Viewer):

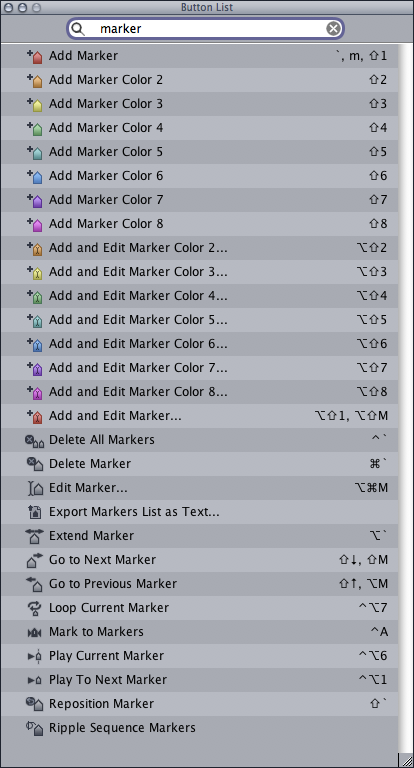
When you open the Marker dialog box you can click and choose different colors or they may be added via keyboard shortcuts. The new keyboard shortcuts for the marker colors are shift+ the number keys 1-8 so if you’re using the Keyboard Manifesto keyboard layout they’ll have to be mapped elsewhere. There’s also a really handy ability to add a marker and edit it without stopping playback. For that ability you have to use the Add and Edit Marker command:

As you can see from the above image they default to shift+option then numbers 1-8 but I mapped both to the keypad on my custom keyboard layout. Apple also added the ability for the timeline markers to ripple with an edit. If you ripple delete a 2 second clip from the timeline then all markers after will ripple and move 2 seconds earlier in the edit. There is also the ability to turn this off under Sequence > Ripple Sequence Markers:
That’s what we like when new features are added … the ability to turn the feature off if we don’t want to use it. The markers also ripple when you trim an edit as well. It is also possible to finally move markers in an easy way. You can move the playhead to a desired point and use the Mark > Markers > Reposition command for a timeline marker or a clip marker or you can just command+click and drag a timeline maker to move it. But beware, if you drag out of the timecode ribbon (which you can easily do) the marker will disappear without a trash can icon or any kind of warning.
I love the new colored bin tabs. If you select a bin and color it via Modify > Label (or right+click on a bin and label) then when you open the bin the tab will reflect that color. And bins can now be rearranged and torn off by dragging their tabs. This is a simple interface enhancement but a very nice one indeed. Plus they added a little project icon in the tab of the actual project tab. Yea that should have been there all along.
More ProRes for all
There were new quality levels of ProRes introduced which is a welcome addition as more choices is always better than less. As a creative offline (or craft editing as Apple calls it) editor many of my edits go to finishing on other systems so the addition of the proxy and LT sizes make for some quality video at small file sizes and low bandwidth. Not that you would ever use the new ultra-high-quality ProRes 4444 for an HDV source but as a comparison I converted an HDV clip to all the ProRes sizes and they are all quite speedy with the Proxy version being very fast to render and work with.
A detail view of an HDV clip compressed to ProRes (Proxy)
A detail view of the same clip compressed to ProRes 4444
It’s easy to see the compression in the top example but it’s quite acceptable when offline editing. You can also see compression in the ProRes 4444 frame but that’s HDV compression, not the codec. Garbage in, garbage out. Oh, ProRes 4444 does support alpha channels.
Speed will finally ripple
Making speed changes has been radically advanced in FCP7. The Change Speed command now has the option to Ripple Sequence when making a constant speed change:
Next, lots of little things and a couple of big fails
It’s the little things we love the most
There is a lot of little things added to FCP 7. Things like being able to remove all of the “through” edits in a timeline at once:
This is major timesaver when prepping a project for online or an EDL for a color grading session.
There’s now little tic marks to indicate the 4×3 title safe areas on a 16×9 edit:
You can also close all bins with a right click:
The Timecode Viewer is very clean and almost perfect with one glaring omission. It can be moved and resized and the clip info that can be displayed at the bottom can be resized as well by dragging the little divider line:
The omission is that the Timecode Viewer can’t display the source timecode for clips in the timeline. Nor does it display the information that had been added for those clips in the timeline. I know there’s the question of how it would work if you have multiple video layers but even it if would display V1 info then that would be a good start. That’s not much information in the help files about the Timecode Viewer so maybe it’s due for improvements the next time around. It’s a good start.
Oh, and Livetype has been put out of its misery but it should be left behind when doing the new install of Final Cut Studio.
And there are some fails as well
One selling point of FCP 7 is Improved render management (from the Apple website):
I can find no evidence of this improved render management in any of the operations that I have tried. The biggest render pain-in-the-ass in FCP has been when you toggle Clip Enable or turn off the visibility of a video layer you lose your render files:
There has always been the ability to get them back with an undo and my hope was this would have been fixed with this “improved render management” but it works as it always has … as in it doesn’t. Renders aren’t preserved when performing ripple/roll trims either, be in with tools in the timeline or the Trim window. Neither are they preserved if you have a rendered clip say on V1 and you move a clip above it on V2. Immediately move the V2 clips and the render is gone. If renders aren’t preserved in any of these tasks then I wonder WHAT Apple means by improved render management. These are the most common ways that I lose a render so I would love for someone to tell me what this really means. If you know please comment below.
Speaking of rendering, you may have heard there is “background rendering” in FCP 7 but that’s not true. There are more background processes than ever before so maybe background rendering is the next step:
You can export clips in the background via the fantastic new Share menu but you can’t background render. The new Share menu is a great addition and full of options (include burning a DVD or Blu-ray disc). It will encode in the background and allow you to keep working. The app did slow down a bit when doing background encoding and the only crash I saw was this bit of madness that occurred when I tried to use the virtual cluster on my MacPro when encoding for a Mobile Me upload:
A force quit are reboot of the app fixed the issue. It didn’t occur when I encoded via share and didn’t use the virtual cluster.
The other big beef I have with this FCP7 update is in how they are marketing “Camera-native editing” support and I call bullshit:
This is simply not true, at least from the standpoint of DVCPRO HD P2 and RED media that I have here to test. There are settings in the Log and Transfer tool for “Native” RED and P2 AVC-Intra. But bring in RED footage as native, for example, and it gets rewrapped as a .mov file (as it always has) even though the clip appears in the project without the .mov extension. I’m sorry but THIS IS NOT NATIVE support if FCP has to rewrap these files. You just cannot “start editing right away” as you have to load up the Log and Transfer tool and wait for it to do its thing. Even when using the new Automatic Transfer function might speed things along so you don’t have to babysit L&T all the time you still aren’t going to be “editing right away.” If you are an editor working on-set and need to do a quick rough of a scene and the runner brings you a 32 gig P2 card full of media it is going to take time to get that into the .mov format so you can edit, even if it’s as fast a copy time from the card to your media drive. That is not native editing with media you can “edit right away.” If this process is different with XDCAM and AVC-Intra footage please leave a comment below. We discussed this very topic at length on Studio Daily recently and the comments are a good read, especially if you would like to one day really edit camera native files in FCP. But not with Final Cut Pro 7 … despite what Apple’s marketing bullshit says.


