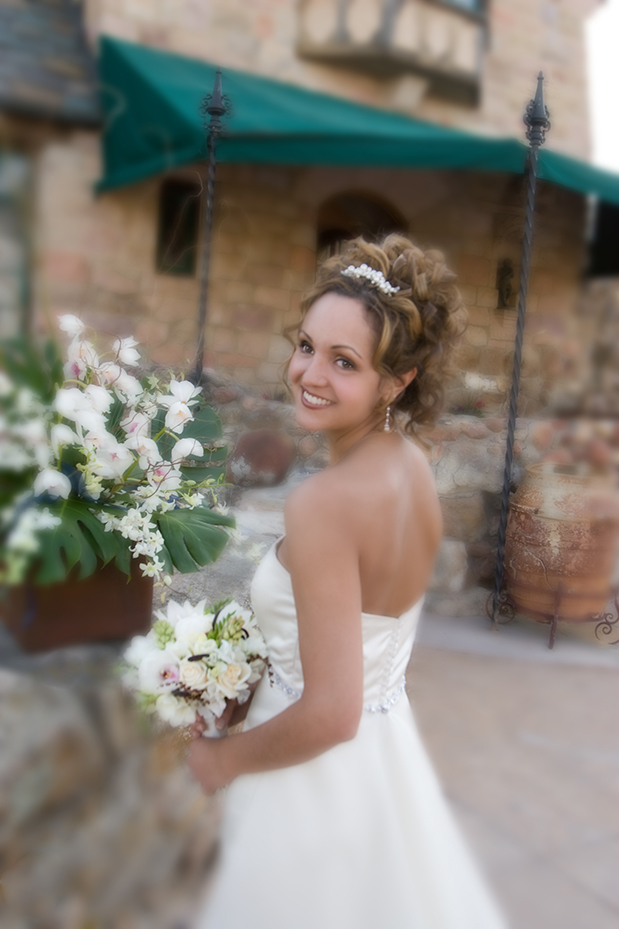
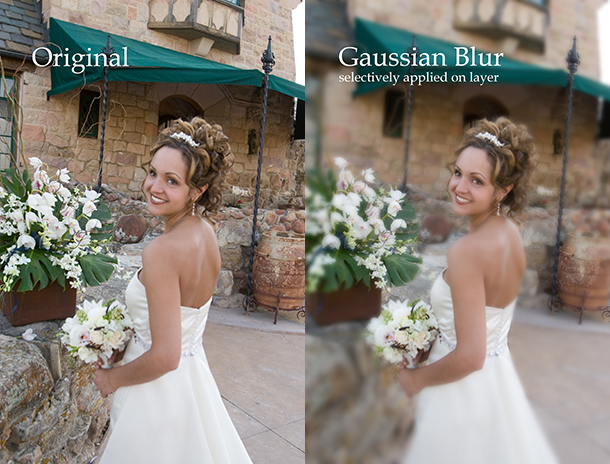
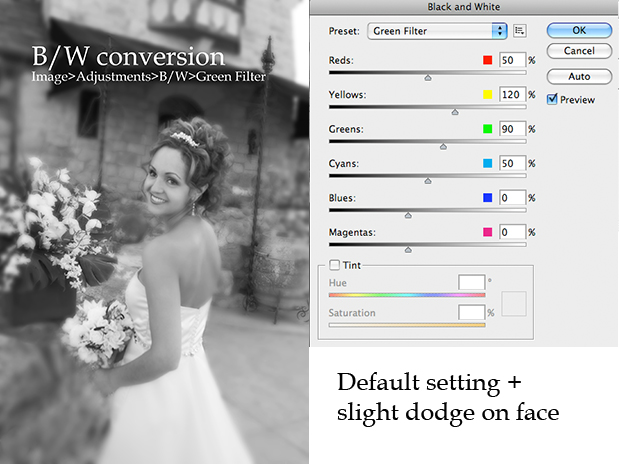
The reward you’re looking for is intriguing, selective Bokeh that often improves impact and design, while de-emphasizing the setting to make the subject stand out. I like camera gadgets as much as anyone, but the nature of my photojournalistic-speed jobs dictates that I almost always must create effects in post. It actually takes less time and effort, and you can change your mind artistically as often as you want. You’ll be saving precious minutes, while otherwise your client hangs around in front of the camera wondering if you’re ever going to stop fiddling with your gear and take the picture.
You know the trend among high budget weddings and events seems to be tighter scheduling and higher expectations of the photographer as miracle worker. Attracted by the idea of little time expended with traditional posing and fewer worries about having to interact with the photographer, these people are often the ones who choose the most interesting hands-off photojournalistic style to document their day. Mostly they just don’t hold still for the camera and demand the photographer be discrete to the point of anonymity.
Here’s the step-by-step formula easily compete in less than a minute.
Before Starting Lens Baby Look Alike Effect:
- Complete all color correction, enhancements and retouching
- Save this adjusted image as a new file for security and clarity
Tip:
At this point I crop and size for final output, to avoid accidentally eliminating the blur effect by cropping later. I also sharpen for output, and selectively give extra sharpening to any areas, like eyes. You definitely don’t want to sharpen after you blur! (Of course with today’s high MP capture, I know many photographers who don’t sharpen at all, relying on their lab’s sharpening protocol to get the best prints.) I recommend saving another version at this point.
Start the Effect:
- Duplicate the layer by Command/Control J
- Apply the maximum blur you think you may need to the duplicate layer with Filter>Blur>Gaussian Blur; I suggest 15-25 setting; judge by the preview window
Tip:
Always err on the more blur side, since you can easily reduce the effect by lowering the opacity of the blur layer. I use this setting so often that I wrote an action that performs the initial steps automatically, but pauses to allow me to vary the amount to taste.
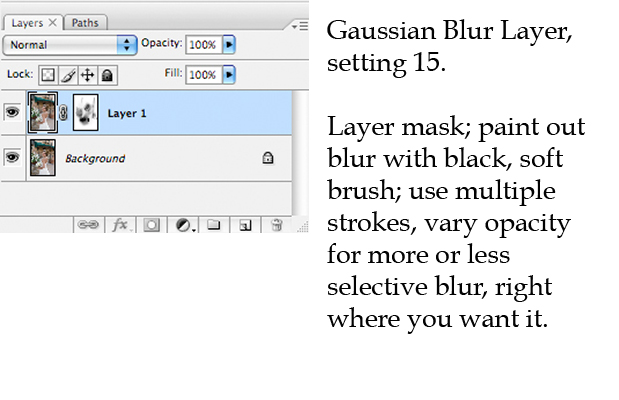
- Attach a layer mask via the third from left icon at the bottom of the layers palette
- Enlarge the image to see what you’re doing; expect to move in and out to judge your work
- Select a very soft, round brush in Normal Mode; I suggest starting at 30% opacity and 30% flow
- loosely paint on the white mask using black in the foreground of the color picker to gradually reveal the sharp version of the background image below in the layer stack
- Need more or less blur in a certain area? Go back and paint more, change the color picker to white, or simply start the process again
Lower the layer opacity if the effect is too strong overall
Tip:
This is where your artistic vision comes in. Paint several times over areas that you want sharper, which results in a gradated effect. Paint irregularly and experiment with halation that can result serendipitously from blurring. The mask will show various tones of grey, representing the areas of the blur layer that have been punched through revealing the original underneath. If you make a false stroke, change the color picker to white to paint blur back in.
Save! You’re already done!
Flatten and save as a final version file type you prefer, ready to print. If you think you may want to rework any phase of the art, save as a Photoshop document PSD, preserving layers in tact.
Advanced Options:
- Choose a different shape of brush for different effect
- Choose a much stronger blur, say 50 to 75 amount
- Choose different types of blur other then Gaussian
- Fill the layer mask with black and paint with white as foreground in the color picker to add blur selectively rather than my preference to subtract it by the above method of painting black on a white mask which deletes blur
- Something more radical? Try the Smudge tool, grouped under the Sharpen tool, to push image elements into a soup
- Image edges can often benefit artistically from a darkening vignette, or sometimes a light one, by using the Burn/Dodge tool
- Edge darkening in a more sophisticated manner is done by drawing a marquee, lasso or any other selection, feathering the selection to at least 75, inverting the selection and darkening the selection in Levels or Curves
If you’re not sure how far to go with the Lens Baby Look Alike effect, trust your monitor at 100%. Fortunately blurring for effect is an inexact science and a bit more or less blur will probably will make little difference in the artistic result so long as something in the image is acceptably sharp. The best part is that the entire process of selective blur can take as little as a minute.

Filmtools
Filmmakers go-to destination for pre-production, production & post production equipment!
Shop Now

- Attach a layer mask via the third from left icon at the bottom of the layers palette
- Enlarge the image to see what you’re doing; expect to move in and out to judge your work
- Select a very soft, round brush in Normal Mode; I suggest starting at 30% opacity and 30% flow
- loosely paint on the white mask using black in the foreground of the color picker to gradually reveal the sharp version of the background image below in the layer stack
- Need more or less blur in a certain area? Go back and paint more, change the color picker to white, or simply start the process again
Lower the layer opacity if the effect is too strong overall
Tip:
This is where your artistic vision comes in. Paint several times over areas that you want sharper, which results in a gradated effect. Paint irregularly and experiment with halation that can result serendipitously from blurring. The mask will show various tones of grey, representing the areas of the blur layer that have been punched through revealing the original underneath. If you make a false stroke, change the color picker to white to paint blur back in.
Save! You’re already done!
Flatten and save as a final version file type you prefer, ready to print. If you think you may want to rework any phase of the art, save as a Photoshop document PSD, preserving layers in tact.

Advanced Options:
- Choose a different shape of brush for different effect
- Choose a much stronger blur, say 50 to 75 amount
- Choose different types of blur other then Gaussian
- Fill the layer mask with black and paint with white as foreground in the color picker to add blur selectively rather than my preference to subtract it by the above method of painting black on a white mask which deletes blur
- Something more radical? Try the Smudge tool, grouped under the Sharpen tool, to push image elements into a soup
- Image edges can often benefit artistically from a darkening vignette, or sometimes a light one, by using the Burn/Dodge tool
- Edge darkening in a more sophisticated manner is done by drawing a marquee, lasso or any other selection, feathering the selection to at least 75, inverting the selection and darkening the selection in Levels or Curves
If you’re not sure how far to go with the Lens Baby Look Alike effect, trust your monitor at 100%. Fortunately blurring for effect is an inexact science and a bit more or less blur will probably will make little difference in the artistic result so long as something in the image is acceptably sharp. The best part is that the entire process of selective blur can take as little as a minute.


Filmtools
Filmmakers go-to destination for pre-production, production & post production equipment!
Shop Now