Final Cut Pro 11’s Spatial Video support is good, but currently missing a key feature: the ability to preview a live timeline directly in the Apple Vision Pro. Though Apple famously doesn’t comment on future plans, it was clear they were aware of the request. Viewing a stereoscopic 3D timeline in 2D while you’re editing is like working with proxy files: you can get an edit done, but you can’t see how it really looks. Worse, it’s difficult to fine-tune the critical convergence value so that each shot flows neatly into the next, and so titles don’t clash with the content behind them.
Happily, well-known 3D and Immersive filmmaker Hugh Huo has discovered a clear, reliable workflow that brings live 3D preview to the FCP timeline today. Here, I’ll outline the steps involved and expand on them to include some Adobe apps, but please do watch Hugh’s original video and subscribe to his YouTube channel — he’s helping a lot of people understand some complex workflows and deserves our thanks.
If you want to follow along, you’ll need a Mac, an Apple Vision Pro, and either FCP 11, Premiere Pro or After Effects. The key technology here is NDI, which stands for Network Device Interface. Familiar to serious streaming professionals, NDI provides a standardised way to transmit video over IP networks. We’ll be using it to send the video feed from our video apps to the network, then using another free app on the Apple Vision Pro to display it.
It’s real, it’s free, and it’s stable. Let’s get started.
Installing the free NDI tools
First, you’ll need to download and install the NDI Tools, which is straightforward. After installation, you must also override a new security feature in macOS, and the process of restoring legacy video device support is a little trickier. The steps are detailed here, but to summarise, you’ll need to Shut Down (not just Restart) your Mac, then reboot by holding down the power button for a long time. On the Recovery Mode screen that appears, choose Options, then launch Terminal from the menu bar at the top.
In the Terminal window that appears, type this exactly:
system-override legacy-camera-plugins-without-sw-camera-indication=on
Restart your Mac from the menu and log in as usual. Now, NDI can work.
Configure NDI in the system and in your app(s)
In System Settings, you’ll see a new panel called NDI Output. (You’ll also find a number of new apps in Applications, but we don’t need them to make this work.) At the top of the panel, you can select from a number of different video resolutions, bit depths, brightness ranges and frame rates. What to choose?
Of course, you should match the frame rate you’re working with. This is likely to be 30fps if you’re shooting Spatial on iPhone, but if you’re shooting with the Canon 7.8mm Spatial Lens or a Lumix 3D lens, match your chosen frame rate. Regarding everything else? Start small.
At least at first, you might want to start with 1080p rather than UHD, SDR instead of HDR, and 8-bit instead of 10-bit. Resolutions are easy to identify, but be sure to avoid the interlaced options. While none of the options here are labeled as “8-bit”, you want the ones not labeled “10-bit” or “16-bit”, and it’s similar for SDR: avoid the options with “PQ” or “HLG” for now.
Why be cautious? Because NDI really does need a good network for smooth results. It’s safest to get it working first, then crank up the settings to find your system’s limits. If you can use an ethernet cable to plug into the same router that your Apple Vision Pro is connected to wirelessly, fantastic.
When you’ve made your choice, press the Restart NDI button below. Note that you can’t change settings if they’re already in use by a video stream, so if you need to change this setting later, be ready to stop and restart the A/V Output.
One minor note: because NDI uses standard widescreen video resolutions, you’ll have to work in timelines using those same aspect ratios (per eye). Square or vertical timelines will appear stretched, and original clips shot in “open gate” won’t look right until they’re on a timeline.
Setting up FCP, Premiere Pro and/or After Effects
Final Cut Pro 11 can output to NDI through the standard A/V Output option. Head to Final Cut Pro > Settings, then choose Playback, and choose the NDI option at the bottom, double-checking that the frame rate matches your timeline.
Because you’ll want to turn A/V Output on and off quickly, at least while you’re playing with settings, it’s a good idea to add a shortcut to the A/V Output command. Choose Final Cut Pro > Command Sets > Customise, then search for “a/v” at the top right, select the “Toggle A/V Output on/off” menu command below, and type a shortcut of your choice.
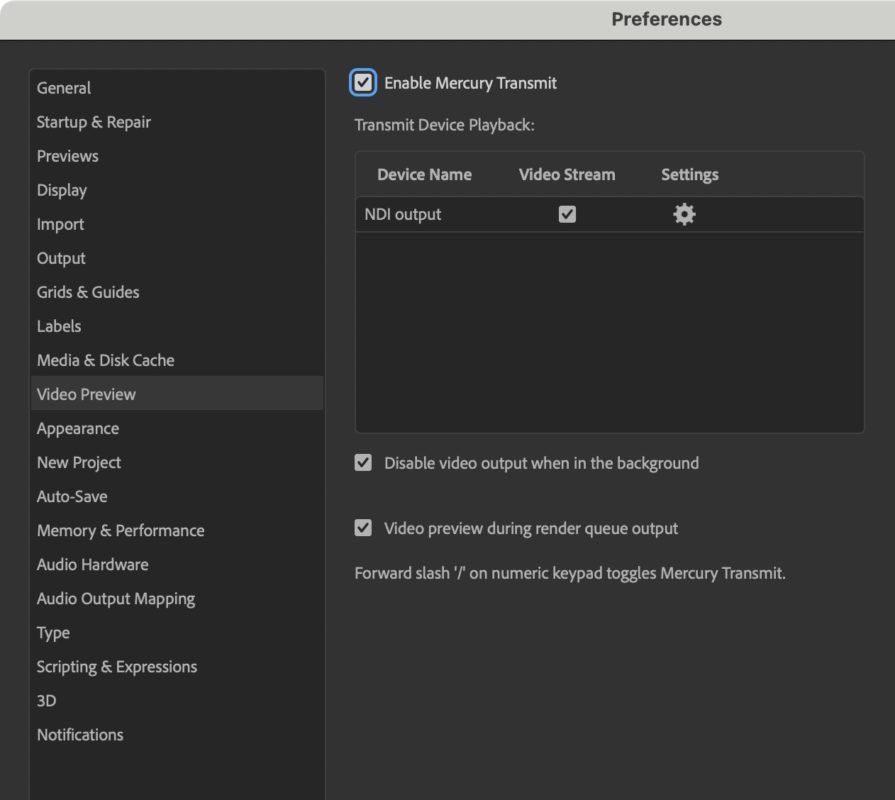
In After Effects, choose After Effects > Settings > Video Preview, and check “Enable Mercury Transmit” at the top. NDI output should already be checked below.
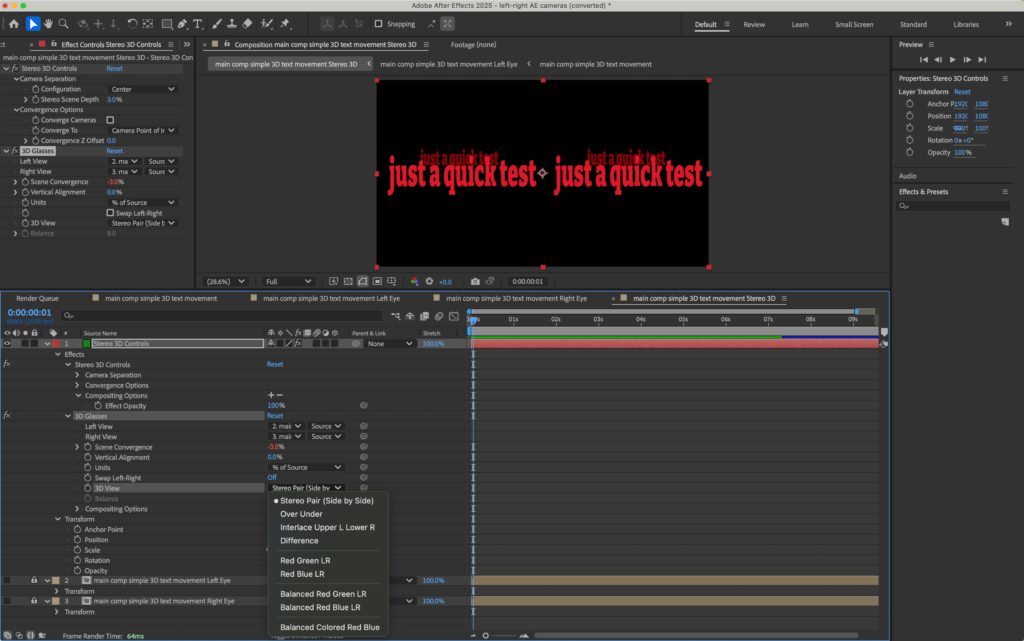
Assuming you want to use the Apple Vision Pro to work with 3D stereoscopic content in After Effects, you’ll need a Stereo 3D Rig. You’ll need to start by creating a two-node camera, then right-click it and choose Camera > Create Stereo 3D Rig — here’s more info on stereo AE workflows. With the Stereo 3D rig in place, find the Stereo 3D Controls in the timeline. Twirl down Effects, 3D Glasses, and find the menu next to 3D View. Set this to the first option, Stereo Pair (Side by Side).
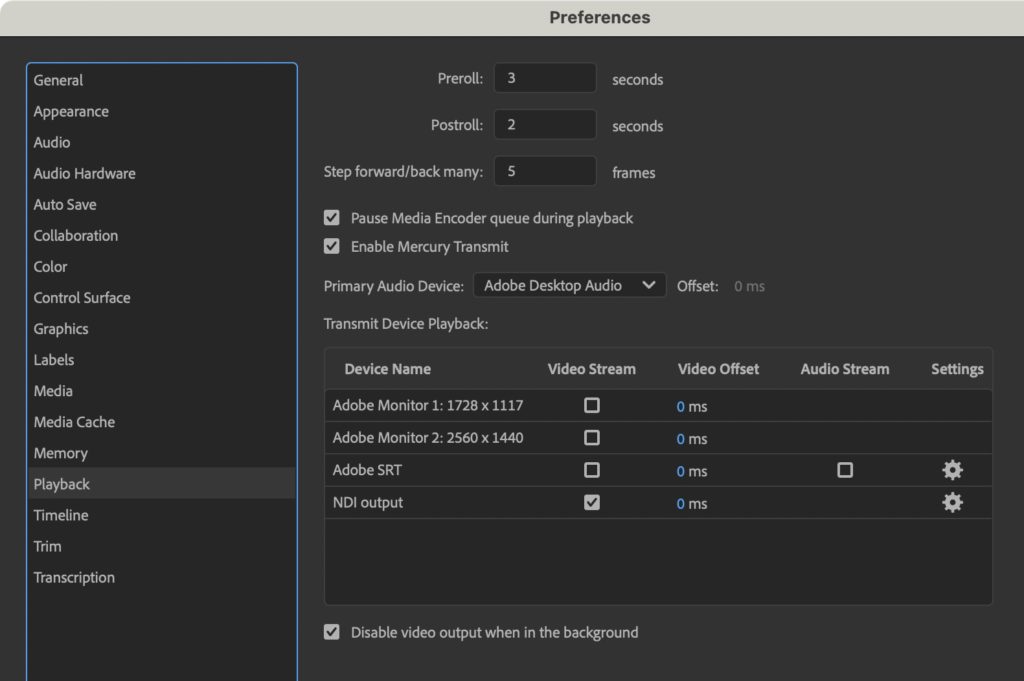
Lastly, it’s possible to make this work in Premiere Pro too, though without a full 3D workflow you’ll need to set up a side-by-side timeline by hand. Still, I’ve tested this with 2D previews and it works well. Head to Premiere Pro > Settings > Playback, then make sure Enable Mercury Transmit is checked and that NDI output is checked below that.
Viewing an NDI stream on the Apple Vision Pro
This is simple. Wear your Apple Vision Pro, and enable Mac Virtual Display. The new Wide and Ultra-Wide display modes have made a huge difference to the screen real estate available, and also to the clarity of the screens shared. Audio now travels to the Apple Vision Pro too, but if you have any issues with audio sync, you can use System Settings’s Audio panel to pipe your audio direct to NDI directly.
Head to the App Store, search for Vxio, and install it. This app is free, and can hook into an NDI feed on your network. Other NDI apps are available, but this one supports Side by Side and even Immersive views, and that’s the secret sauce making this work. Huge thanks to developer Chen Zhang for making this available — and note that there’s an iPad version available too.
In Vxio, you should now see a list of active A/V streams, one for each app you have active. Final Cut Pro output is called macOS AV Output, but Adobe apps are individually named.
If you look at the stream name, then pinch and release your fingers, it’ll pop up into a new window, and that works well for a 2D stream, but not 3D. Instead, pinch and hold on the stream name to pop up a menu, then choose Side by Side. That’s it.
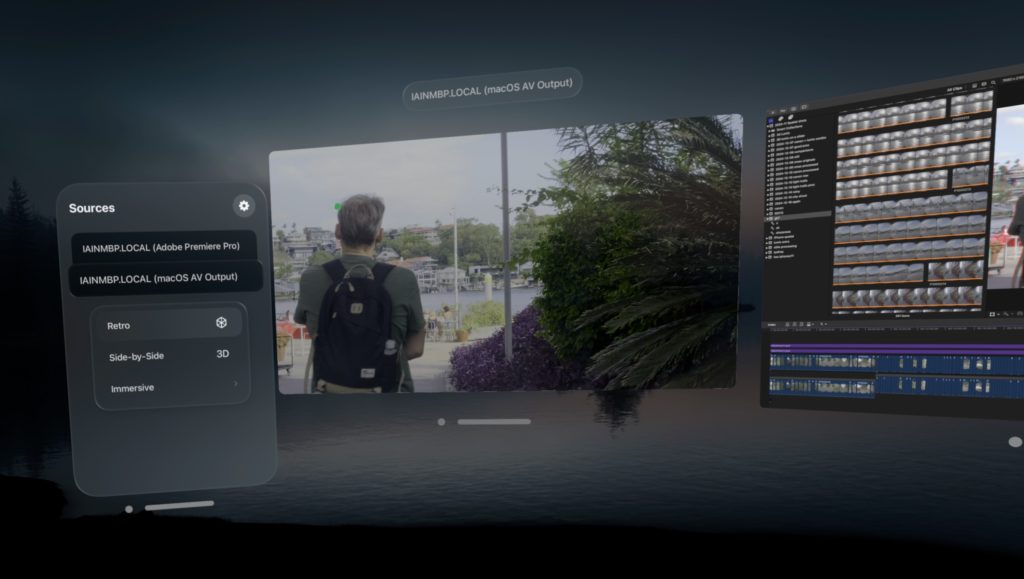
You now have a resizable floating window showing live 3D, in sync with your timeline, alongside your NLE on your Mac screen. Because it packs left and right images together, clarity won’t be quite as good as when you export and play the final output, but it’s still a huge step up over no live preview at all, and gives you a much faster feedback loop.
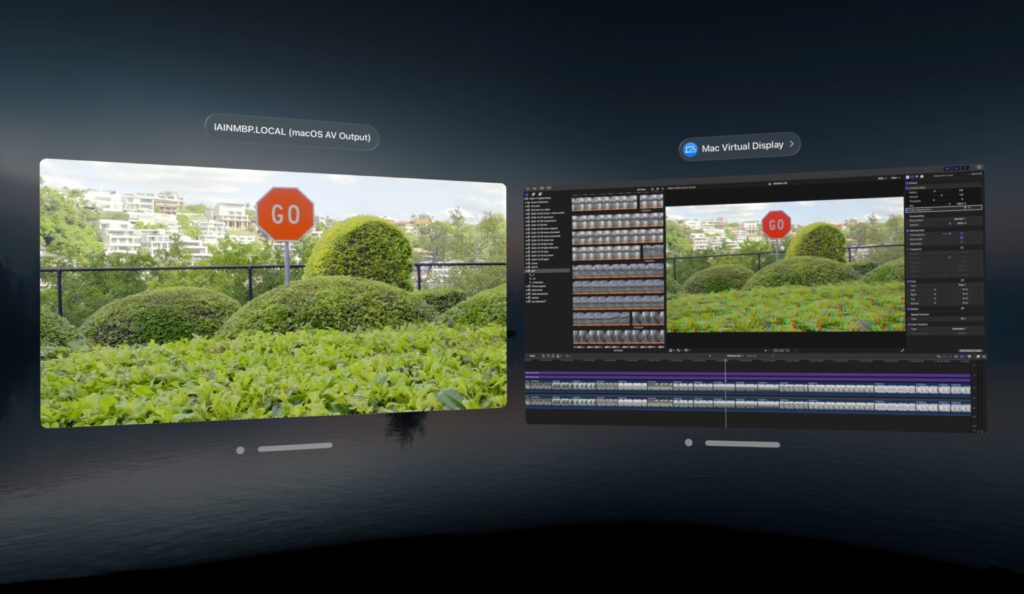
You could also use this workflow to send video to a producer or client who views in 3D while you edit in 2D, or even for a pure 2D workflow where the client’s simply not in the same room as you. John M. Chu, the director of Wicked, used the Apple Vision Pro in production for all kinds of tasks, and these workflows are likely to become more common.
Just to check it works, some of everyone’s favorite Premiere Pro demo footage in a 2D preview window, next to the Mac Virtual DisplayIf you experience choppy playback, make sure your network doesn’t have any bottlenecks, and that you’ve chosen the right frame rate. If it’s working well with 1080p content, and you’ve got UHD content to work with, pause the A/V Output, head to System Settings, change the NDI output settings, Restart NDI, and see how you go. I’ve had a smooth experience all the way up to UHD 16-bit HLG personally, but even if I could only preview still frames at low resolution it would be worth doing. Tweaking convergence in anaglyph mode is just not the same as seeing it in actual 3D, and it’s something you’ll want to nail for a comfortable viewing experience in an edited piece.
Why didn’t we have this already?
While this is stable for me, I think this solution is likely to be a little too janky for mainstream audiences; asking regular humans to bypass security settings is not Apple’s style. Further, I suspect many networks are just not ready to handle the amount of data involved. With luck, Apple will soon have a simple, reliable built-in feature that’ll work for everyone, but advanced users can get a head start now.
What about Immersive editing in FCP?
While there’s no official 3D 180° support, 2D and 3D 360° support is included. If you edit a 360° project and activate A/V Output, you can choose from four different Immersive options in a submenu. This lets you play back a 360° timeline live in an Apple Vision Pro, and if you can set up a 180° or 360° side-by-side timeline, it’ll work in 3D.
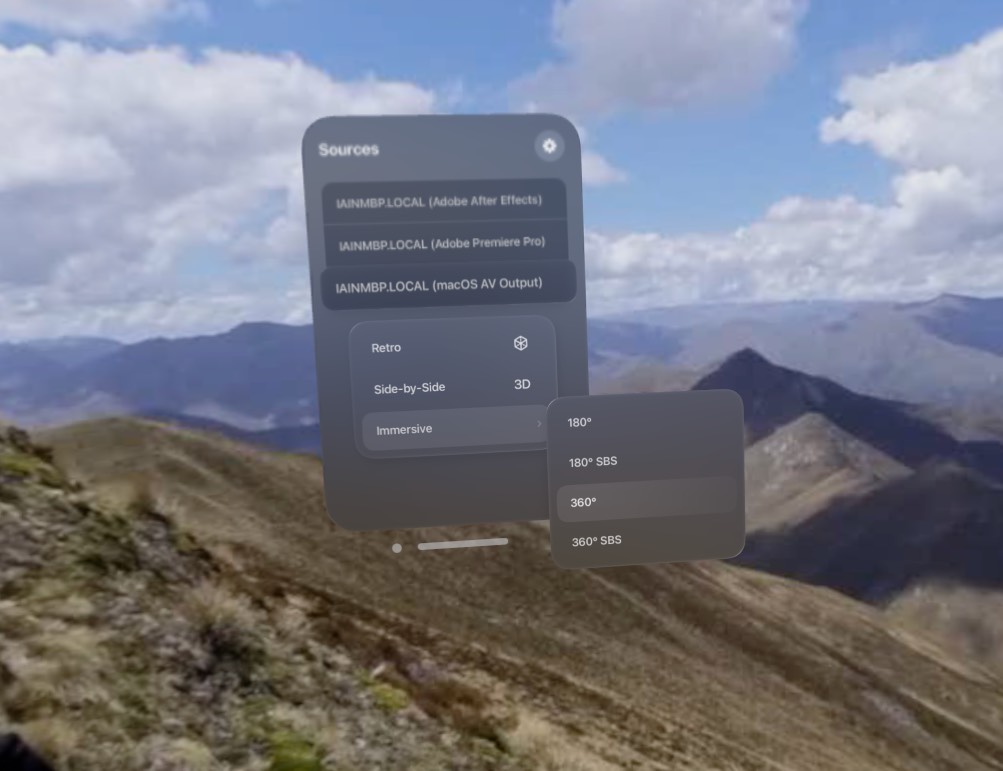
Custom project settings are the key to setting up unusual 3D timelines, but there are no hard limits in place, and many things are possible. Hugh Huo has teased a 3D 180° VR workflow in FCP in his next video, and I’m not going to guess at what he’s got in store, but I’ll update this article when that video is released with a link.
What about existing 3D hardware?
Because Apple support side-by-side workflows, it’s pretty straightforward to work with existing 3D media and tie into existing 3D hardware — you just need a device that can understand a side-by-side signal, or an app that can interpret it correctly. I’ve been told that if you have a hardware output device and a 3D-capable TV, that should simply work too, and I’m keen to check out the glasses-free Acer SpatialLabs display devices to see if they’re supported.
What about DaVinci Resolve?
Blackmagic have announced that a future version of DaVinci Resolve will include support for 3D Immersive editing and a live timeline preview. Of course, Immersive (180° VR) needs a live preview more than Spatial (in a window, with a narrower field of view) but it’ll be great to see official support there soon. Hopefully all types of 3D will be supported.
Conclusion
Live 3D previews are a big step forward for 3D editing, and will make it much, much easier to produce good-looking Spatial content. Live editing support really is something we needed, and because Mac Virtual Display is so capable, I can actually see myself using the Apple Vision Pro from start to finish for any future Spatial jobs. Many thanks once again to Hugh Huo for sharing his original workflow, and do subscribe to his channel if you’re interested in 3D and/or immersive content.
All we need now is for more people to own and use 3D-capable playback devices — but it’s still early days. Living on the bleeding edge is as fun as ever.

Filmtools
Filmmakers go-to destination for pre-production, production & post production equipment!
Shop Now


