Expressions in After Effects are a powerful tool for animation, but while they can be as simple as the ‘wiggle’ function, working with more complex expressions can begin to get cumbersome.
Expressions are straightforward if you are only dealing with one property – for example, an opacity expression to automatically fade a layer up and down. However they can get messy when you want to use the same expression code for multiple properties – for example, a physics simulation that calculates position, scale and rotation. In this case, each time you make a change to the code you need to manually copy & paste the expression to each different property, and also manually change the output value for each one. This can quickly get tedious.
In this article I’m sharing my approach to dealing with complex expressions in After Effects, and while I’m not going to suggest it’s the best or the only way, it might help as a starting point for anyone else who’s faced similar frustrations. When I say “complex” I mean an expression that is calculating values for multiple – different – After Effects properties.
To put it simply, the solution is to work with one “global” expression applied to a text layer, and then have each individual property look at the same text layer and extract their respective value from the text. This not only provides a single, central repository for the expression code but because you’re using text, it also means you can see the exact results of the code on screen. This itself is useful, because many After Effects properties limit the range of values they can show, making it more difficult to debug expressions. The opacity property, for example, only shows values from 0 to 100, so even if your expression is returning values outside of that range then you won’t see the exact numbers – they’ll be clamped between 0 and 100. However by applying your expression to a text layer you can see the full value being calculated.
Text layers can also allow you to display additional variables as well as your final result, which again is an invaluable debugging tool. For example, if you are writing an expression to automatically fade the opacity of a layer up and down, the opacity control only shows you one final value – a number between 0 and 100. Even though your expression will include other variables such as time values, in and out points etc, you won’t be able to see what those variables are doing as the expression is being executed. You might be in the habit of switching the output value to one of the variables so you can check what’s going on, but that doesn’t help when the values are being clamped between 0 and 100. But by working with a text layer, you have the potential to see all of the variables in action, as the code is running.
While I’m not the first person to use text layers to calculate expressions, there’s a fair bit of flexibility in how to do it – mainly to do with how to extract the results for each property from a single, large text string.
My own approach is to also have expression controls applied to the text layer for each property being calculated, which do the extraction. The relevant layers in the composition then link to these controls (just pickwhip them) rather than directly to the text source. There are two benefits of doing this – firstly, you can toggle the expression on and off if you want to experiment with manual values, and secondly- if your main text expression breaks then all of the affected layers in your comp still maintain their link. If they all linked directly to the “master” text source, then any time the main expression “breaks” then all the individual layers will return errors and disable the expression, which gets very tedious very fast, so additional expression controls act as a sort of “buffer”. (N.B. the more recent versions of After Effects are much better at re-enabling expressions when they start working again, but older versions can be very frustrating)

As a demonstration of this technique, let’s use an expression that calculates position, scale and rotation to animate a bouncing ball. I’ve borrowed and modified an expression from Dan Ebbert’s MotionScript site, so if you’re interested in the actual expression then please head over to Dan’s site. The point of this article is not the actual expression itself, but how we can apply it in After Effects so there’s only a single source for multiple properties.
Before I go further, I need to clarify one important thing. The point of this article is to show how text layers can be a powerful tool for developing and debugging expressions. This is not the same as using sliders and other controls to adjust properties in your expression. In the example below, there are several parameters that are fun to change – velocity, elasticity and so on. It’s possible to set up sliders to make it easier to adjust these parameters and get immediate feedback on how they affect the animation.
But while that’s a valuable workflow in itself, it’s a different topic. Setting up sliders and other expression controls is something you can do AFTER you have your expression working. The technique I’m discussing here is a valuable approach for getting the expression right in the first place – you only have to debug or adjust the code in ONE spot.
I’m going to step through the process I use. Experienced users may have their own, alternative approach to solving the same problem – if so, please share how you do it in the comments below!
Cool for concatenation
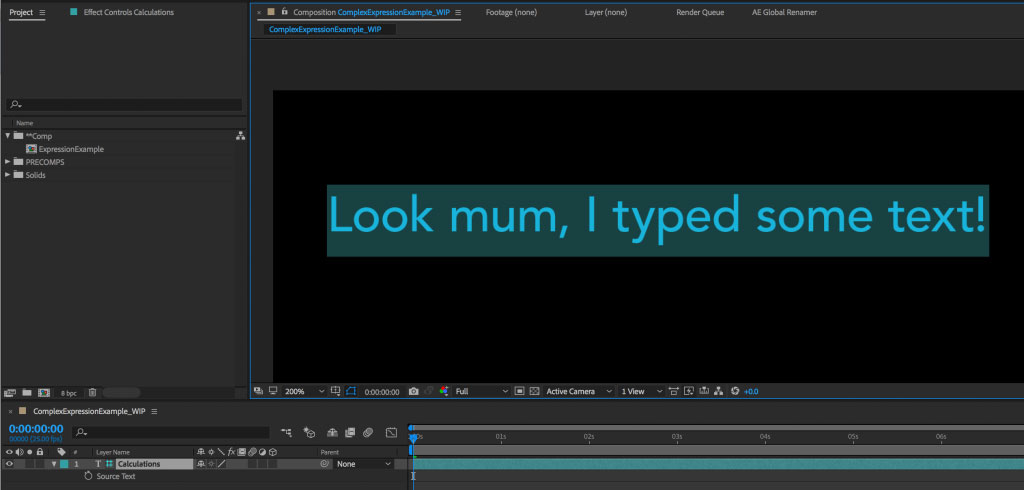
The first step is to create a text layer, it doesn’t matter what you type as you’ll be replacing the content with your expression. But position the text wherever you want to be able to see it on screen, and adjust the size and colour to suit- just as you would for any text layer. I usually name the text layer something sensible, like “Controls” or “Calculations”, and colour label it accordingly.
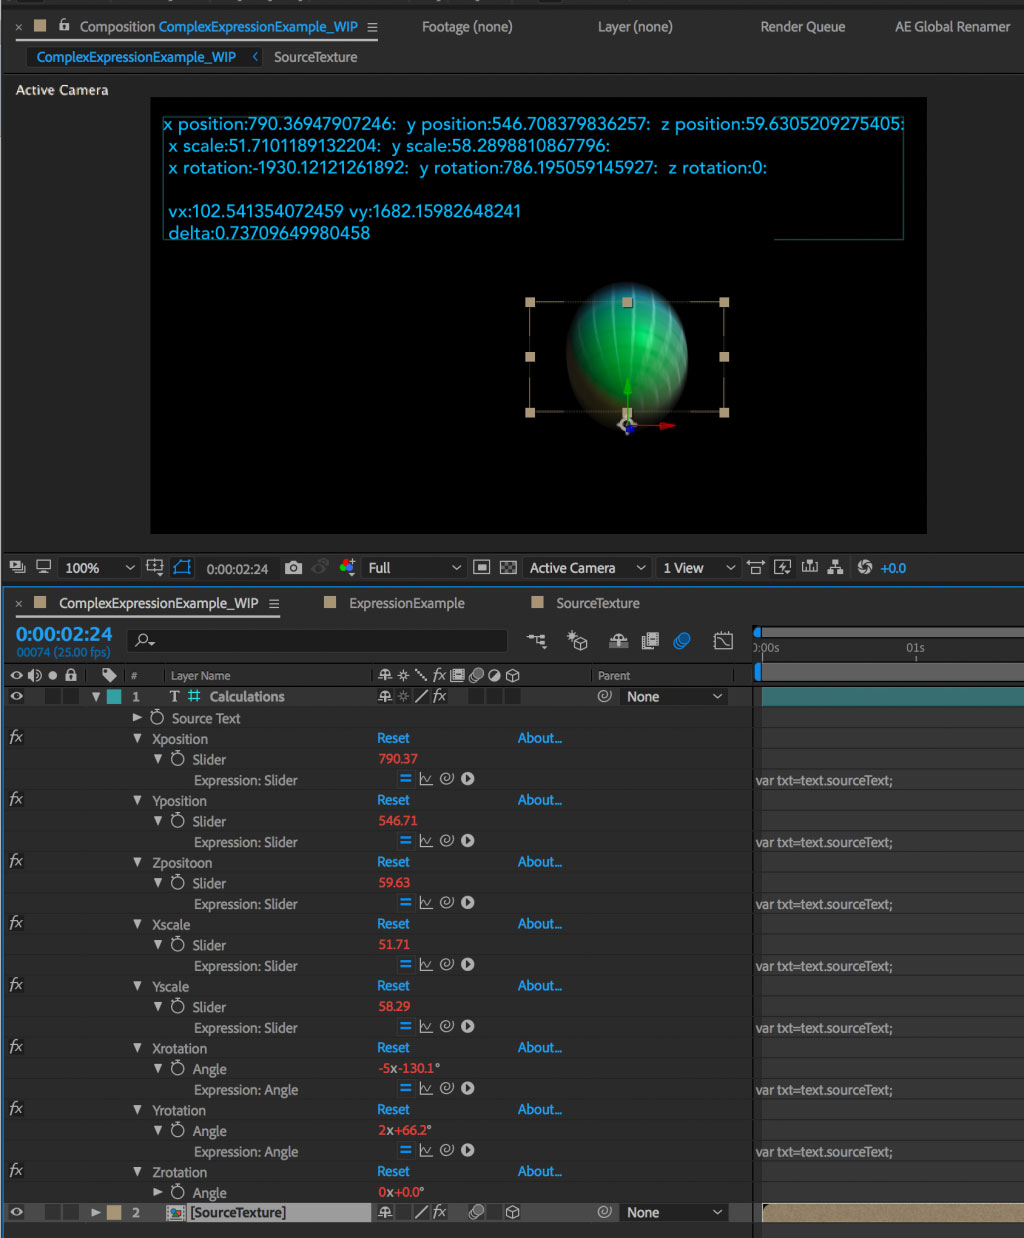
The next step is to look at the properties we want the expression to calculate, and then add an expression control to the text layer for each one. With properties that have multiple dimensions – such as position – you could use a 2D or 3D point control. Sometimes I prefer to give each property its own individual controller, which helps with debugging. For this example, I’ll use three sliders for position, two for scale, and then three rotation controls for the angle.
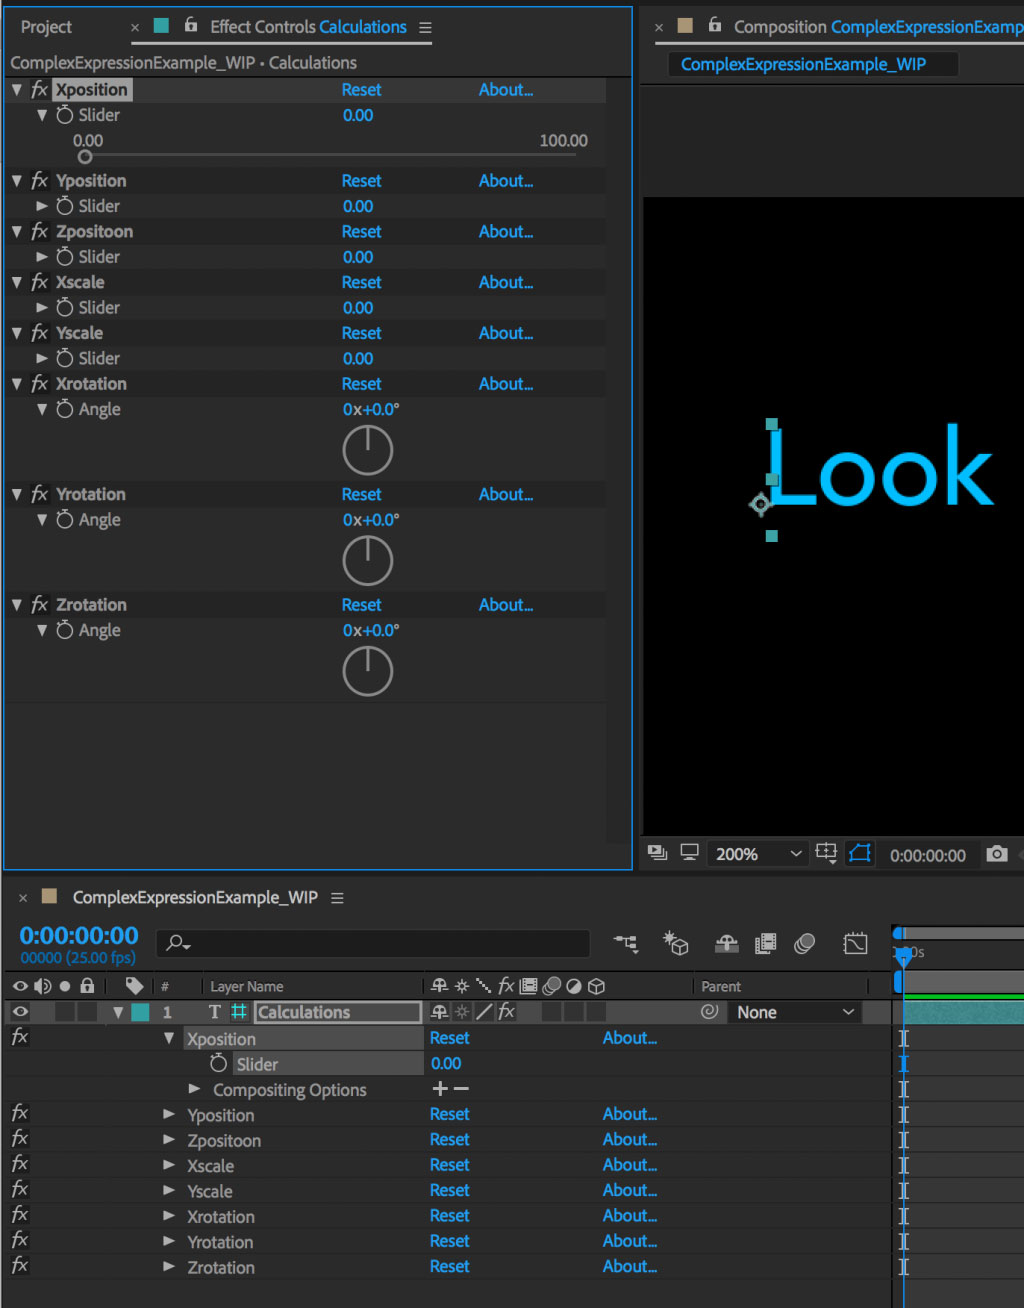
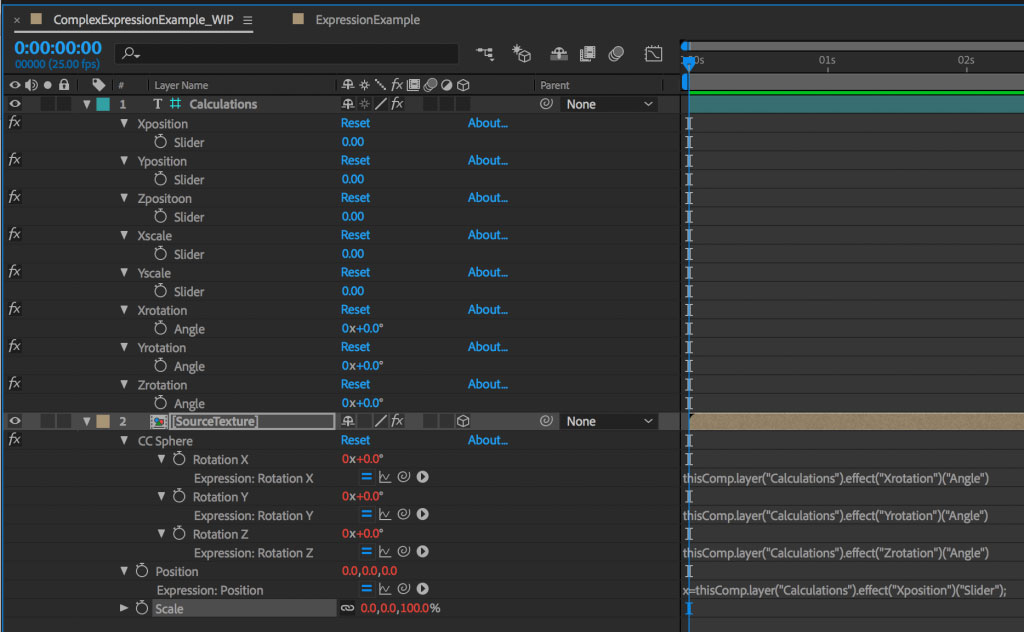
Once I’ve applied the expression controls and named them accordingly, I can link these properties to the relevant layers in the timeline just by using the pickwhip. As I said above, our focus isn’t the expression itself, but how we extract the results. To keep things interesting, I’ll use the CC Sphere effect and apply the rotation expression to the sphere, to give everything a nice 3D look.
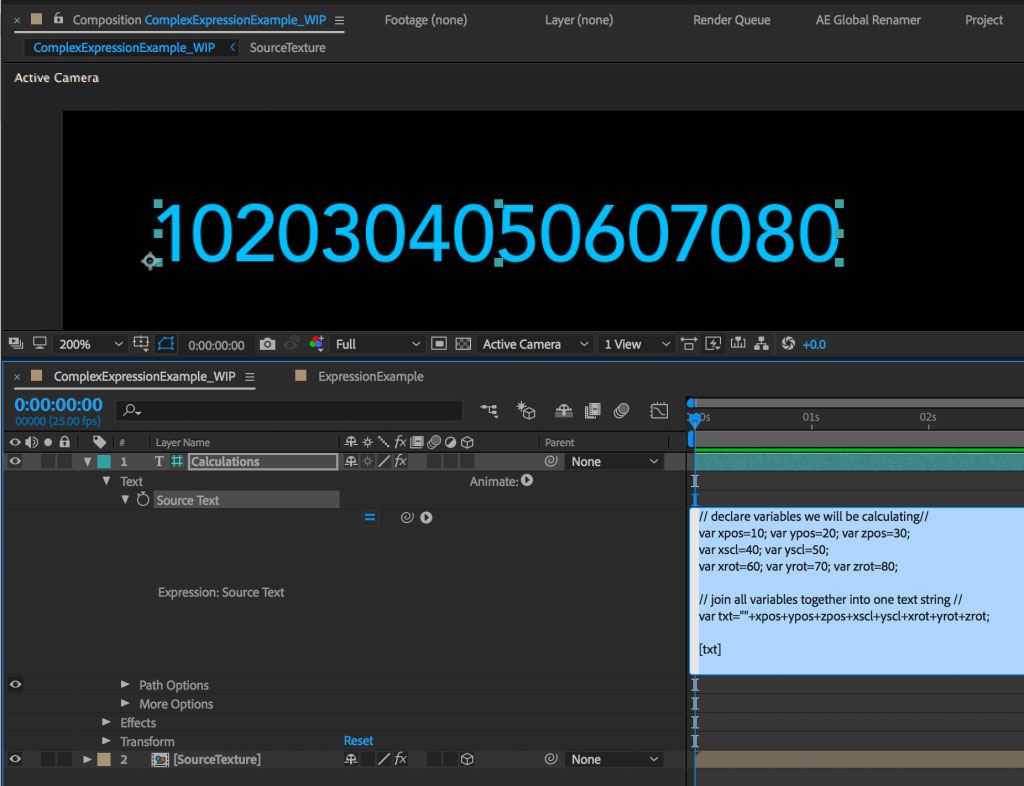
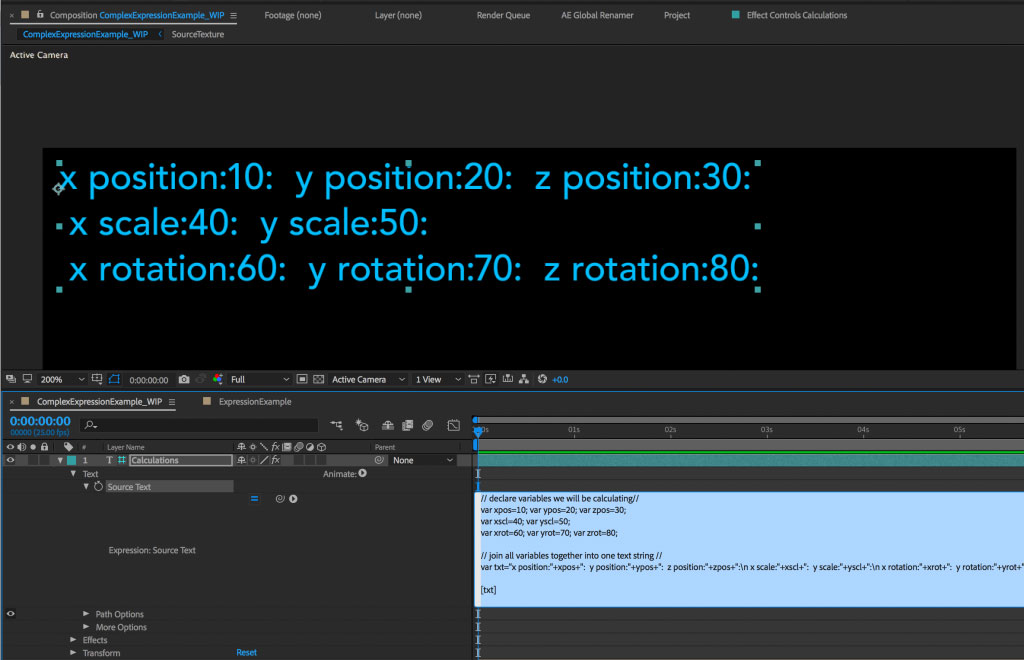
To get things started, we add an expression to the “source text” of our text layer, and then declare variables for the properties we know we will be evaluating. Without worrying about the actual physics in our expression, we can add some dummy numbers – using a different number for each variable will help us test our links are working later on.
// declare variables we will be calculating//
var xpos=10; var ypos=20; var zpos=30;
var xscl=40; var yscl=50;
var xrot=60; var yrot=70; var zrot=80;
The next step is to format all of our variables in a way that each property can be extracted. Because text is a string variable, we’ll look at JavaScript string functions, and there are several to choose from. But to start with, we’ll just join all of our variables together using a +, to produce a single text string as an output.
// join all variables together into one text string //
var txt=””+xpos+ypos+zpos+xscl+yscl+xrot+yrot+zrot;
[txt]
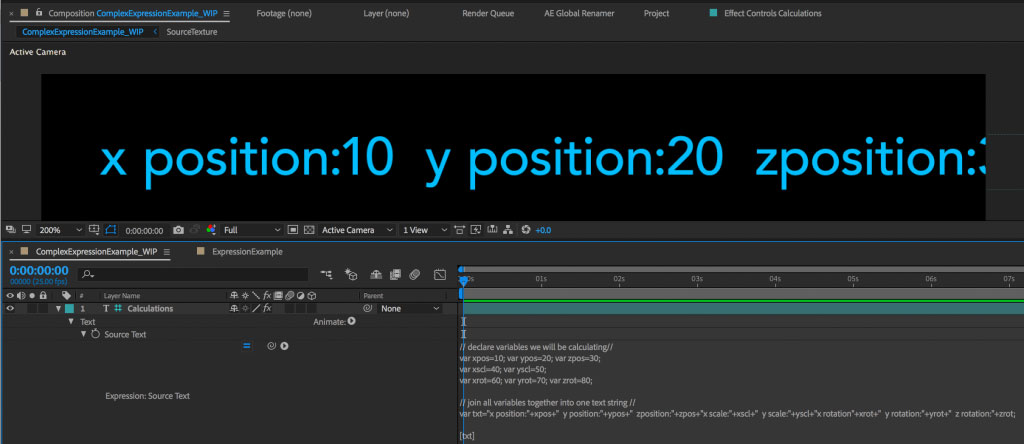
This isn’t very readable, and readability is one of the main benefits of using a text layer. So let’s insert a prefix for each property, just by using descriptive text in quotation marks, with a space at the front too for added legibility.
// join all variables together into one text string //
var txt="x position:"+xpos+"  y position:"+ypos+" zposition:"+zpos+"x scale:"+xscl+"  y scale:"+yscl+"x rotation"+xrot+"  y rotation:"+yrot+"  z rotation:"+zrot;
[txt]
This is much better, but the problem is that our text string is now so long that it disappears off the right of our screen. We can add a line break where we want by using a backslash-n. I’ll use a line break for each different transform group – position, scale and rotation.
// join all variables together into one text string //
var txt="x position:"+xpos+"  y position:"+ypos+"  z position:"+zpos+"\n x scale:"+xscl+"  y scale:"+yscl+"\n x rotation:"+xrot+"  y rotation:"+yrot+"  z rotation:"+zrot;
[txt]

This looks much more readable. Because we’re looking at a normal After Effects text layer, we can adjust the font, size and leading of the text to suit, and I’ll quickly make a few adjustments to position the text where I want it to appear.
Now that we have all of our variables collected into a single text string, and formatted to be readable on screen, we need to extract each individual value for our layers to use. JavaScript has several string functions that we could use to do this. It’s possible to use the substr function to split text after a certain number of characters. The problem with substr is that if your values include decimal points (and they usually will) then the actual number of characters in the text string will vary all the time, so it needs additional calculations to work reliably.
To avoid this problem, we can use an alternative JavaScript string function called split, which will split a text string whenever a designated character is detected. The split function creates a new array that contains the separate parts of the original string. In this example, I’ve added a prefix to name each variable (eg “x position”), but we don’t want that to interfere with the numbers – so we need to split the string before and after each variable. While we could choose a special character, we’ve already got a colon at the end of each prefix. So we may as well use the colon as our split character, and just add another colon afterwards to isolate each value from the text.
// join all variables together into one text string //
var txt="x position:"+xpos+":  y position:"+ypos+": zposition:"+zpos+":\n x scale:"+xscl+":  y scale:"+yscl+":\n x rotation:"+xrot+":  y rotation:"+yrot+":  z rotation:"+zrot+":";
[txt]
Now that there’s a colon separating each variable that we’re using, we can extract the values for each different one, using the split function.
Split it real good
The first property in our list is a slider which I’ve called “X position”. Add an expression to the slider, and use the pickwhip to create a variable from the source text on the text layer. If you just hit enter, you will get an error – as the expression is returning a string, but the slider is expecting a numerical value. It’s here that we extract the numbers using the split function, with a colon (“:”) as the split character. I’m using the variable name “txt” to get the text result of our main expression, and I’m using the variable “nums” as the new array for all the split up pieces:
var txt=text.sourceText;
var nums=txt.split(":");
The new variable “nums” is an array, starting at 0, so we just use an index number to identify which value we want to use. The start of our text layer is the text prefix “X position:”, so it will have the index value of 0. The actual numbers for the x position will be next in the array– so we use an index of 1 to identify them.
var txt=text.sourceText;
var nums=txt.split(":");
nums[1];
And voila, we have now got a value of 10 being returned. It’s working!
After Effects – and JavaScript – is pretty flexible when it comes to mixing up strings and numerical values, but even though we have a working expression it doesn’t hurt to make it a little more robust. I’m going to add the parseFloat function to convert the string into a floating-point number. This is also a point where you could add some simple filtering, eg. clamping the value to a certain range, rounding numbers up or down, or truncating values to a set number of decimal places. It all depends on what your expression is and what you’re using it for. Personally, I like to do all those sorts of operations in the “global” expression, and to keep the expression on the controllers as simple as possible.
var txt=text.sourceText;
var nums=txt.split(":");
var n=parseFloat(nums[1]);
[n]
Now we can copy & paste this expression to each one of our expression controls, and adjust the index of the array accordingly. Every second string in the “nums” array will be a text prefix that we don’t want, so our index numbers will increase by 2. So our X position will be nums[1], our Y position will be nums[3], and Z position will be nums[5]. This is where using those unique dummy values for our variables comes in handy – we can check to see that all of the links are working correctly.
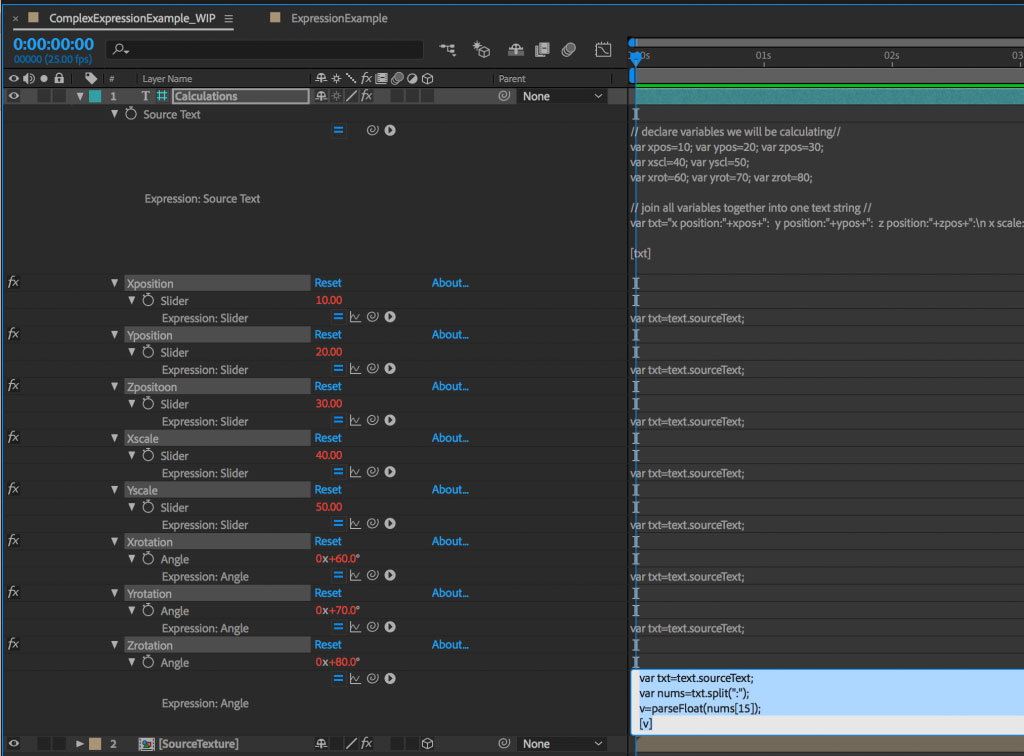
We’re all done! Mostly, anyway.
We have one single repository for our “master” expression, which allows us to calculate the position, scale and rotation together. With our text and expression controls set up, we can get to work on the actual animation. This example is pretty simple, as it’s designed to show the process used to set everything up. The next step would be to add some more controls to adjust the variables in the expression, so you can adjust the elevation, gravity and velocity etc just by using sliders. But I’ll leave that step up to you…
If you’ve found this article interesting, please take the time to check out my other ProVideo Coalition posts.

Filmtools
Filmmakers go-to destination for pre-production, production & post production equipment!
Shop Now