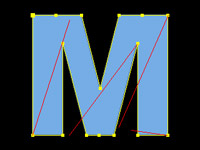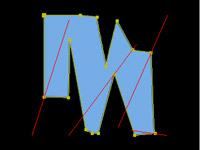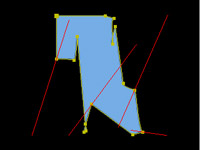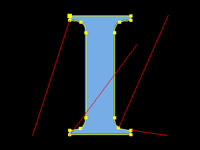


In After Effects, each mask vertex (the yellow squares) interpolates in a straight line from old to new positions. The red lines illustrate some of these paths. The First Vertex is the largest box – in this case, the one in the upper left corner of the M and I.
Masking is one of the core features of After Effects. Most know how to create and edit Mask Shapes; fewer how to control the way these shapes animate – which is important, especially with the popularity of creating cel or Flash type animations these days.
After Effects can seem to have a twisted mind of its own when interpolating between two different Mask Shapes. In reality, it has a very narrow, simple mind. However, there are some tricks you can employ to coax it down a path closer to the one you want. When you need even more precise control, you can employ the Smart Mask Interpolation keyframe assistant, included in the Professional edition of After Effects (including CS3 Professional).
Vertices Unmasked
When you create a Mask Shape in After Effects, the points that defines the mask’s outline are known as the its vertices. When a Mask Shape is keyframed, After Effects attempts to interpolate between shapes by making each vertex travel in a straight line from its old to its new position. Refer to the figures at the top of this page to see this in action – the red lines have been added to better illustrate the movement of a handful of the vertices.
Those familiar with morphing software can think of each vertex as a “correspondence point” which would normally be set up by the user to ensure the outline kept its desired shape during interpolation. However, After Effects sets up these correspondences for you automatically. If you aren’t aware of these correspondences, complex mask shapes can seem to have a mind of their own as they interpolate, rotating and inverting in unexpected ways.
The most important mask point is the First Vertex. This is where you started the mask shape when you created it. After Effects always interpolates from the First Vertex of the first shape to the First Vertex of the second shape, regardless of how many other vertices exist or what order they were drawn in. If the correspondence between these vertices doesn’t make any sense – for example, at the top of one shape and at the bottom of the other – your mask shape is going to twist and turn in usually undesirable ways between keyframes.
The First Vertex can be identified by selecting the mask, and looking for the vertex box that is ever so slightly larger than all of the other ones. To change it, select any other vertex (with no other vertices selected), and use the menu command Layer > Mask > Set First Vertex. You can also context-click on it and select Set First Vertex from the menu that appears.
Setting up good First Vertex points is the single most important thing you can do to ensure masks interpolate more as you expect. To get smoother interpolation, study your mask shapes and look for a good “anchor” the shapes have in common, such as the center point along their top or bottom. Make these points your First Vertex. If you need to add mask vertices to your shapes to create these more suitable anchors, go ahead!
After looking at the First Vertex, After Effects will then attempt to line up additional vertex points, working clockwise around the mask shape. If the mask shape was imported from elsewhere – say, from an Adobe Illustrator outline – it is possible that the vertex points are numbered in a counterclockwise direction, which will make shapes appear to invert (turn inside-out) as they animate.
After Effects does not allow you to directly change a mask path’s direction, but there are a couple of workarounds. The time-honored one is to use Illustrator to change it. In After Effects, you will need to select just the keyframe for the mask shape (not the shape itself, nor the entire layer). Copy, and then paste this shape into an Illustrator document. Then press Command+8 on Mac (Control+8 on Windows) in Illustrator to convert it into a Compound Shape. If needed, use the Reverse Path Direction buttons in Illustrator’s Attributes palette (although the simple act of enabling Compound Paths in Illustrator 10 will give you the reversed result). Then copy the shape in Illustrator, return to After Effects, make sure the Mask Shape keyframe is still selected, and paste.
If your First Vertex or Path Direction are set up wrong, nothing can help you – not even the Professional version’s Smart Mask Interpolation (SMI) keyframe assistant. Fixing the vertices and path direction are often enough to get mask shapes to behave. But if you need more control, then Smart Mask Interpolation is the tool you need.
Might Makes Right
The title “Smart Mask Interpolation” might make you think this is an option to make masks in After Effects interpolate…well, more smartly. In truth, SMI does not change the way After Effects interpolates mask vertices. What it does is create a lot of additional mask vertices, as well as Mask Shape keyframes, to force After Effects to “interpolate” in the desired manner.
Before using SMI, make sure you have set up good First Vertex points for your shapes, and that the shape isn’t inverting upon itself during normal interpolation (which would mean the path direction of one needs to be reversed). It is a good idea to duplicate the layer at this point, so you always have your original to go back to if SMI doesn’t help. Turn off the Video switch for the original, and select the Mask Shape keyframes for your duplicate.
In many cases, the default settings will work fine. If you feel there’s room for improvement, Undo back to your original Mask Shape keyframes, and get ready to dive into those optional settings.
The simplest setting is to increase the number of mask vertices created. To do this, make sure the Add Mask Shape Vertices option is enabled, and change the popup underneath to Total Vertices. We often use a value of 100 or 200 Total Vertices with SMI.
Tweaking the other parameters will take a bit of thought as to what you want your mask shape to do, as well as some trial and error. Here’s an overview of what they are and how to use them:
- Keyframe Rate controls how often new keyframes are created. More keyframes mean a more controlled interpolation; a lower rate creates a looser interpolation. If you’re field rendering, set Keyframe Rate to the frame rate used for rendering, and enable Keyframe Fields. Otherwise, you will get odd shape jumps at the start and end of interpolation. Regardless of this setting, SMI will also always create additional keyframes just before and after the ones you set, which it uses to establish its additional mask shape vertices.
- Use Linear Vertex Paths causes SMI to move all of the mask points in a straight line between its first and last keyframes – good for very geometric transformation; not so good for more organic interpolations. Disable this option to allow curved paths, including allowing shapes to appear to rotate. Be warned, however, that disabling it can cause wild swings in the mask shape.
- Bending Resistance decides how fluid the mask shape is during interpolation. Lower settings allow the shapes to bend more; higher settings maintain more rigid, geometric shapes. The default of 50% is a good compromise. Don’t go above 99%; setting it to 100% will occasionally yield odd results, regardless of how the other parameters are set.
- Matching Method controls the inner logic SMI follows. Leaving this set to Auto works most of the time; change it only if you’re having problems. Use the Curve setting for organic interpolations; Polyline for more rigid ones.
- First Vertices Match is crucial for having interpolations proceed in a predictable manner (especially after you’ve gone through the trouble to set them up properly in the first place) – keep this enabled.
- Quality and Use 1:1 Vertex Matches decide how the rest of the mask vertices interpolate. Usually, you want to let SMI decide how to move one vertex to another; that means disabling Use 1:1 Vertex Matches, and if necessary, increasing Quality.
This sequence of figures shows the difference between using the normal mask interpolation system in After Effects (the red shape) and Smart Mask Interpolation (the green shape). The secret to making this work is to align the First Vertex Point to the top or bottom center of the shapes.
Mask Speed
One “gotcha” that’s not immediately obvious with Smart Mask Interpolation is the issue of animation speed: SMI ignores any work you’ve done with the velocity curves controlling the speed of your Mask Shape’s interpolation, replacing them with a linear progression. This is a bummer if, say, you’ve decided it would be best to ease between shapes.
It’s possible to remedy this using Time Remapping. After you’ve applied SMI, select the layer and Pre-compose it, choosing the “Move All Attributes” option. Then apply Layer > Time Remapping to the resulting nested precomp (not to the original layer, which now resides inside the precomp). Edit the Time Remap keyframes as needed to get your desired pace of animation.
Great – but now you have a new problem that shows up if you try to ease into or out of your shapes: The Mask Shape goes absolutely wacky between the first original keyframe and the first SMI keyframe, and equally wacky between the last SMI keyframe and the last original keyframe. This is because After Effects gets completely confused as it tries to interpolate between the original shape, which had relatively few vertices, and the first SMI shape which has a ton of vertices.
There are a couple of workarounds for this. Your first instinct might be to increase SMI’s Keyframe Rate to as high as possible. This would reduce the time gap between the original and SMI keyframes, reducing the chance you will see this odd interpolation. However, After Effects does not allow you to set a frame rate higher than 99 fps; in practice, you may need a frame rate roughly 15 times normal to hide any glitch that would appear with a simple ease in/out. The better approach is to set up your original Mask Shape animation to take far longer than you will eventually need – say, 20:00 seconds between keyframes instead of the desired 01:00. Then when you Time Remap, speed up the overall animation to finish when you need it to. This will also reduce the time gap between “real” and SMI keyframes, hopefully burying the glitch (as always, RAM Preview before committing to a final render!).
The content contained in our books, videos, blogs, and articles for other sites are all copyright Crish Design, except where otherwise attributed.


