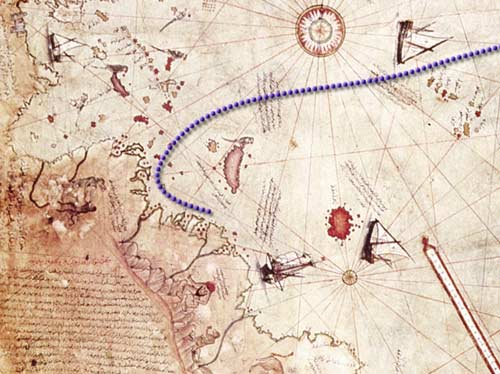
A common task is navigating around a map-like image. In this column, we’ll discuss three different approaches to this challenge: stroking a line, animating text elements along a path, and auto-orienting an object of your choosing along a path.
These techniques use features that are spread around Adobe After Effects. Our goal is to pull them together for you, and show the different approaches and options. We’ll be assuming a basic working knowledge of the program; you can also download and explore our final After Effects project (created for AE 6.5 and later) by clicking here (12.5 MB .zip file). Movies of the three techniques are included with the download.
Common Paths
We started with an image of a map created by Piri Re’is in 1513, and imagined a trade route that an ancient mariner may have taken. Our map is 960×1380 in size: considerably larger than our final output of 648×486. If you want to travel further or zoom in more on the details, you could start with an even larger map.
Our project includes four folders for Maps A through D. Each folder includes two compositions: Comp 1 holds the map and the animated element tracing the explorer’s route; this is then nested in Comp 2 where a motion control move is performed.
In each case, we started by drawing a mask shape that defined our path. First we dragged the map source image to the New Composition icon at the bottom of the Project window. This created a comp the same width and height as the image. We then set the comp’s duration to a touch longer than we thought we’d need in Composition > Composition Settings.
We selected the Pen tool in the Tools palette, and enabled the RotoBezier option to ensure smooth curves. We then drew a mask shape directly in the Comp window by clicking along our desired path, in the direction we intend to travel. When the RotoBezier option is checked, mask points don’t have handles as do regular Bezier masks; curves are created automatically to arc between the points you create.
To change the angle of the curve, press the Option key on Mac (Alt key on Windows) and drag your cursor to the left while hovering over a mask point. (For more on editing this flavor of mask paths, search for “rotobezier” in the Help > After Effects Help system.) When done, remember to press V to return to the Selection tool.
If the path has already been created in Photoshop or Illustrator, you can copy and paste the path as a Mask Shape in After Effects. For best results, set the image resolution to 72 ppi in Photoshop so that the size of the path remains the same when you paste, then move it into position as needed. If you are using Illustrator, open Preferences>File Handling & Clipboard and make sure that the AICB option is checked before you copy a path – otherwise it won’t paste into After Effects.
Using the Stroke effect
The first technique involves using the Stroke effect to animate a line tracing the route. This is shown in the MapA-1/setup comp in the accompanying project.
After creating the mask path, apply the Effect > Render > Stroke effect. Stroke draws a colored line along a mask shape (check that the Path popup is set to Mask 1 in the Effect Controls window if you don’t see a white line). Set Color, Brush Size, Brush Hardness, and Spacing to taste (high Spacing values give dotted lines).
To animate the line, turn on the stopwatch for the End parameter in the Stroke effect, and set the first keyframe to have a value of 0%. Then later in time, set the End keyframe to 100%. The line now draws on over time.
If the move is being narrated, the duration as well as any starts and stops will be dictated by the voiceover, but in general, you’ll find a move on a large map takes longer than you might expect. We usually also allow a second of “handle” at the head and tail of the move so that the duration can be extended in the editing stage by duplicating the handle.
The set of comps in the Map B folder show a variation on this technique. We set the Stroke effect to Paint on > Transparent, giving us just the stroke and no background image. We then used a copy of the map as the background; this is Layer 2. This allows us to apply effects such as Bevel Alpha and Drop Shadow to the stroke in Layer 1, as seen in the figure at the top of this page. This variation also demonstrates some starts and stops to match an imaginary voiceover.
Using Text along a Path
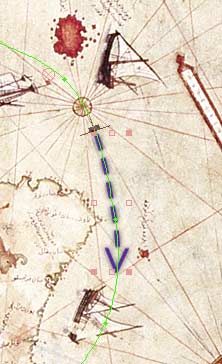
Our next technique involves creating text symbols (bullets, hyphens, and so on), and moving them along a path to indicate the explorer’s route. In the project file, open the MapC-1/setup comp to see this in action.
With the Text tool, we typed some symbols (<-----) that we wanted to move along the route. We copied the Mask Shape from the map layer, then selected the Text layer and pasted the mask. To get the text to follow this path, we expanded the Text > Path Options in the Timeline window, and set the Path popup to Mask 1. Animating the First Margin property in Path Options makes the symbols “link” along the path.
To have text elements follow a mask shape, choose the mask in Text > Path Options > Path, and animate First Margin.
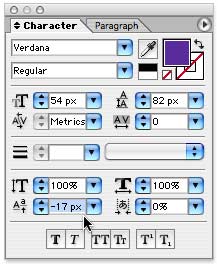 To center the symbols vertically on the path, we selected the text and edited their Baseline Shift in the Character palette (the highlighted value the cursor is pointing at in the figure at right).
To center individual text elements onto the path, edit their Baseline Shift in the Character palette.
Auto-Orienting Objects
Our final option (Map D folder in the accompanying project) involves tracing our explorer’s route by auto-orientating a small boat icon along a motion path. We first created the boat in a precomp by masking a solid layer, then nested this precomp in the MapD-1/setup comp.
We again started by tracing our route on the map layer as before using the Pen tool. We copied this mask shape, and pasted it to the boat layer’s Position property at time 01:00. The trick here is not to simply select the boat layer when you paste, but to explicitly click on the word “Position” in the Timeline so that the Position property receives the path. The mask shape will then become a Position motion path, with a duration of 2 seconds. The first and last mask points appear as linear keyframes, while the intermediate mask points appear as “roving” keyframes (keyframes that have a position in X and Y, but no fixed point in time). We simply dragged the last keyframe later in time to extend the duration of the move.
To make the boat layer automatically rotate along this motion path, we selected Layer > Transform > Auto-Orient and set the Orient Along Path option. The only problem now was that the boat appeared upside down! This was easily fixed by setting Rotation to 180 degrees. Collapse Transformations was enabled for the nested precomp layer so that transformations would be calculated before effects; now the direction of the Drop Shadow is not affected by rotation, as shown in the figures below.
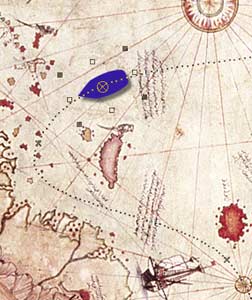
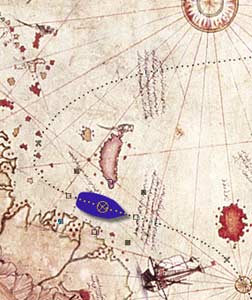
Collapse Transformations renders the rotation before the effects so that the drop shadow retains the same direction no matter how the boat is oriented.
Panning around the Map
If your map is low resolution, you may be able to complete your project in one comp. In our case, we had a tall map and decided to pan around the image using a 2D motion control move – the same technique you’d use to pan around a large photograph (often called the “Ken Burns” effect). This was covered in an old column we wrote called “Anchors Away.” To introduce a little camera shake using The Wiggler or the wiggle expression, refer to our previous column “More Motion, Less Control.” If you want to take this to the next level, try performing a motion control move using the 3D camera and lights!
No matter which technique you use, ease in and out of keyframes for smoother moves, and reduce strobing by enabling Motion Blur for layers that move.
Postscript
After Effects CS3 introduced Shape Layers, which includes a very flexible system for stroking paths including the ability to create dashed lines with custom patterns. You can read an introduction to Shape Layers in our column “The Shape of Things to Come.” We also discuss Shape Layers extensively in our two books, After Effects Apprentice and Creating Motion Graphics 4th Edition.
The content contained in our books, videos, blogs, and articles for other sites are all copyright Crish Design, except where otherwise attributed.

Filmtools
Filmmakers go-to destination for pre-production, production & post production equipment!
Shop Now


