According to the What’s New Document the list of new stuff in MC7 is 25. I think we can whittle that down a bit by eliminating all of the ISIS-related ones (most people are not on ISIS, though those who ARE on it certainly will find them all critically useful), combining a few similar ones and dropping some other little used ones. My list of the Top 10– in MY order of importance – would be:
1. Editing High Resolution Media – FrameFlex ™ allows you to work with the full resolution of 2K, 4K and higher media, including reframing that media
2. Audio Improvements – The new mixer is pretty sweet plus Adjusting Clip Gain in the Timeline and Waveform caching. That’ll be the subject of today’s post.
3. Background Transcode/Consolidation – frees up the Avid editing app during the tedious process of transcoding and consolidating
4. Consolidate/Transcode ONLY AMA clips – this is a huge workflow improvement and goes along with AMA Timeline Clip Color
5. Color Management – Allows use of customized looks via CDLs (color decision lists) and LUTs.
6. Dynamic Media Folders – letting you automate ingest of media outside of the editing app
7. AMA Managed Folders – Avid is great at media management, but this did not extend to AMA until now
8. Alpha support for AMA QT clips – which is self-descriptive
9. Spanned Markers – already discussed in previous post
10. Timeline Navigation changes – use of “vertical scrolling” and mouse wheel
Clearly, other editors will flip some of the order of this list around. In actuality, this list order is more about what I see myself using in the future than what I currently use. For example, I don’t currently have any 4K media. I don’t have any media that uses a LUT. So my current order might be more like: 2, 4, 3, 7, 6, 9, 8, 10, 1, 5. Depending on what your workflows are and what kind of media you work with, your list will be in a different order. And if you work on an ISIS, clearly all of the ISIS stuff could be at the very top of the list.
Let’s check out the Audio Mixer and Timeline audio improvements.
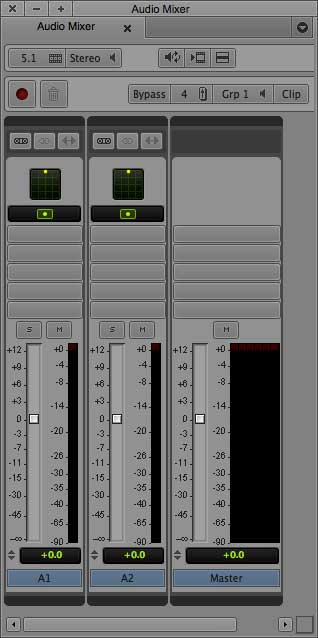
Starting with the mixer:

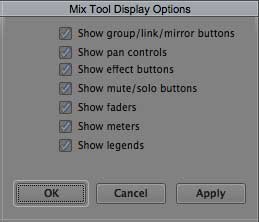
The Audio Mixer also gets the full “Avid customizability” treatment. Instead of providing a one-size fits all solution, Avid allows you to right-click on the Mixer and toggle a number of displays to save screen real estate or visual clutter. 
Applying RTAS effects to the tracks is as simple as clicking on one of the gray rectangles (indicated by the red arrow) and selecting the effect from the pulldown menu in the resulting RTAS Tool. The RTAS Tool also gives you pulldown menus to change the track (including the Master) and which “insert” (gray RTAS box) you want to apply the effect to. The order of RTAS effects does make a difference sonically because the effects at the top of the track apply downstream to the effects below them. And the effects in the Master track will be applied downstream of the individual track effects.
The Master Fader also has its own Mute button in case you’re working on a two hour Fran Drescher special.
One of the other cool things that was added to the audio functionality of MC7 is the ability to adjust levels in the timeline with much more precision thanks to the addition of a little “mini-slider” that can be viewed on every clip in the timeline.
To turn on this capability, first expand the Track Control Panel using the little right-facing arrow next to the timecode number in the timeline.
You can now click on the mini-slider icon on any segment in the timeline to control the level using the fader that appears next to it, or you can click and control the volume with a numeric entry that can include decimal points for incredibly precise control if you want it.
Note: The RTAS effects that I set up in the new Audio Mixer also appear in the RTAS “boxes” in the expanded Track Panel. And, be careful with RTAS effects in the Master track. I dropped them on as a test and forgot about them and as I added a bunch of new cuts to my sequence, I was trying to figure out why everything had an echoey delay to it… duh! That was the effect I’d added to the Master Track!
Clearly, this is one of those things that you probably will want to set up a Timeline View for because the visual clutter of all those little sliders is simply not necessary most of the time. If you’ve never saved a Timeline view, let me walk you through that:
Avid also made some changes to the Audio Settings. The monitor volume used to be in the Audio Project Setting’s Output tab, but it’s been moved to Audio Settings. It also now retains whatever level you set it at even after shutting down the app. The bad news for almost everyone is that this new functionality does NOT apply to software mode or if you are using a third party I/O device, like a KONA card.
And last but not least (not least by a long-shot), is cached audio waveforms in the timeline. This is a huge timesaver. What surprised me is that when I added new audio tracks, there wasn’t an initial delay as the waveform was at least drawn the first time. The waveforms were there as soon as the new audio was cut in. Pretty awesome.


