One of the most misunderstood concepts in Media Composer is Transcoding vs Consolidating and really, Avid “friendly” media in general. I wrote an article about it a long time ago, that I still send to people and the students I teach, who are still confused by the topic. The other biggest confusion in Media Composer is relinking. Not that the concept is confusing but, to be honest, it’s probably been the absolute worst feature in Media Composer since its inception. It’s horrible, awful, and something that has done nothing but aggravate editors to the point of never using it, as it never works. Well, I’ll say that everyone has been half correct. Yes, it sucked. For a long time. But, it’s gotten better. Much better, and if you follow some simple workflow procedures, the process will be pretty smooth and, dare I say it, you might actually come to like re-linking, and start using it on a semi-regular basis.
What got me thinking about this article was an e-mail from Scott Simmons, asking me if I had any tutorials or articles about mixed resolution/mixed frame rate workflows, but more specifically, relinking with archival footage that comes in different frame rates. Funny enough, I’m actually working on a pretty major project right now, that uses 25p, 29.97i and 23.98 footage, all in the same timeline, that I have offline and online and have become pretty comfortable with the entire process, so I thought, for this article, I’d share my findings with you. Here we go!
The first thing that’s exceptionally important is getting your footage into your project properly. Now, I have to make some assumptions before we get rolling. I’m going to assume you know the difference between Consolidating and Transcoding, and when to use either/or. We’re going to assume that Transcoding proxies/low-res media will be all you’re doing for this project, and we’ll be walking through things accordingly.
First, please don’t make different projects for different frame rates. Yes, I know, we had to do that in the past, but we don’t have to do that any more, and good Lord, what a mess that creates. All of your different frame rates can be put nice and easy into one project with no issues. So, first thing’s first. Project creation. You’re creating the projects in the format of how you will be outputting. I’m going to assume for this article that you’ll be delivering 1080p 23.976.
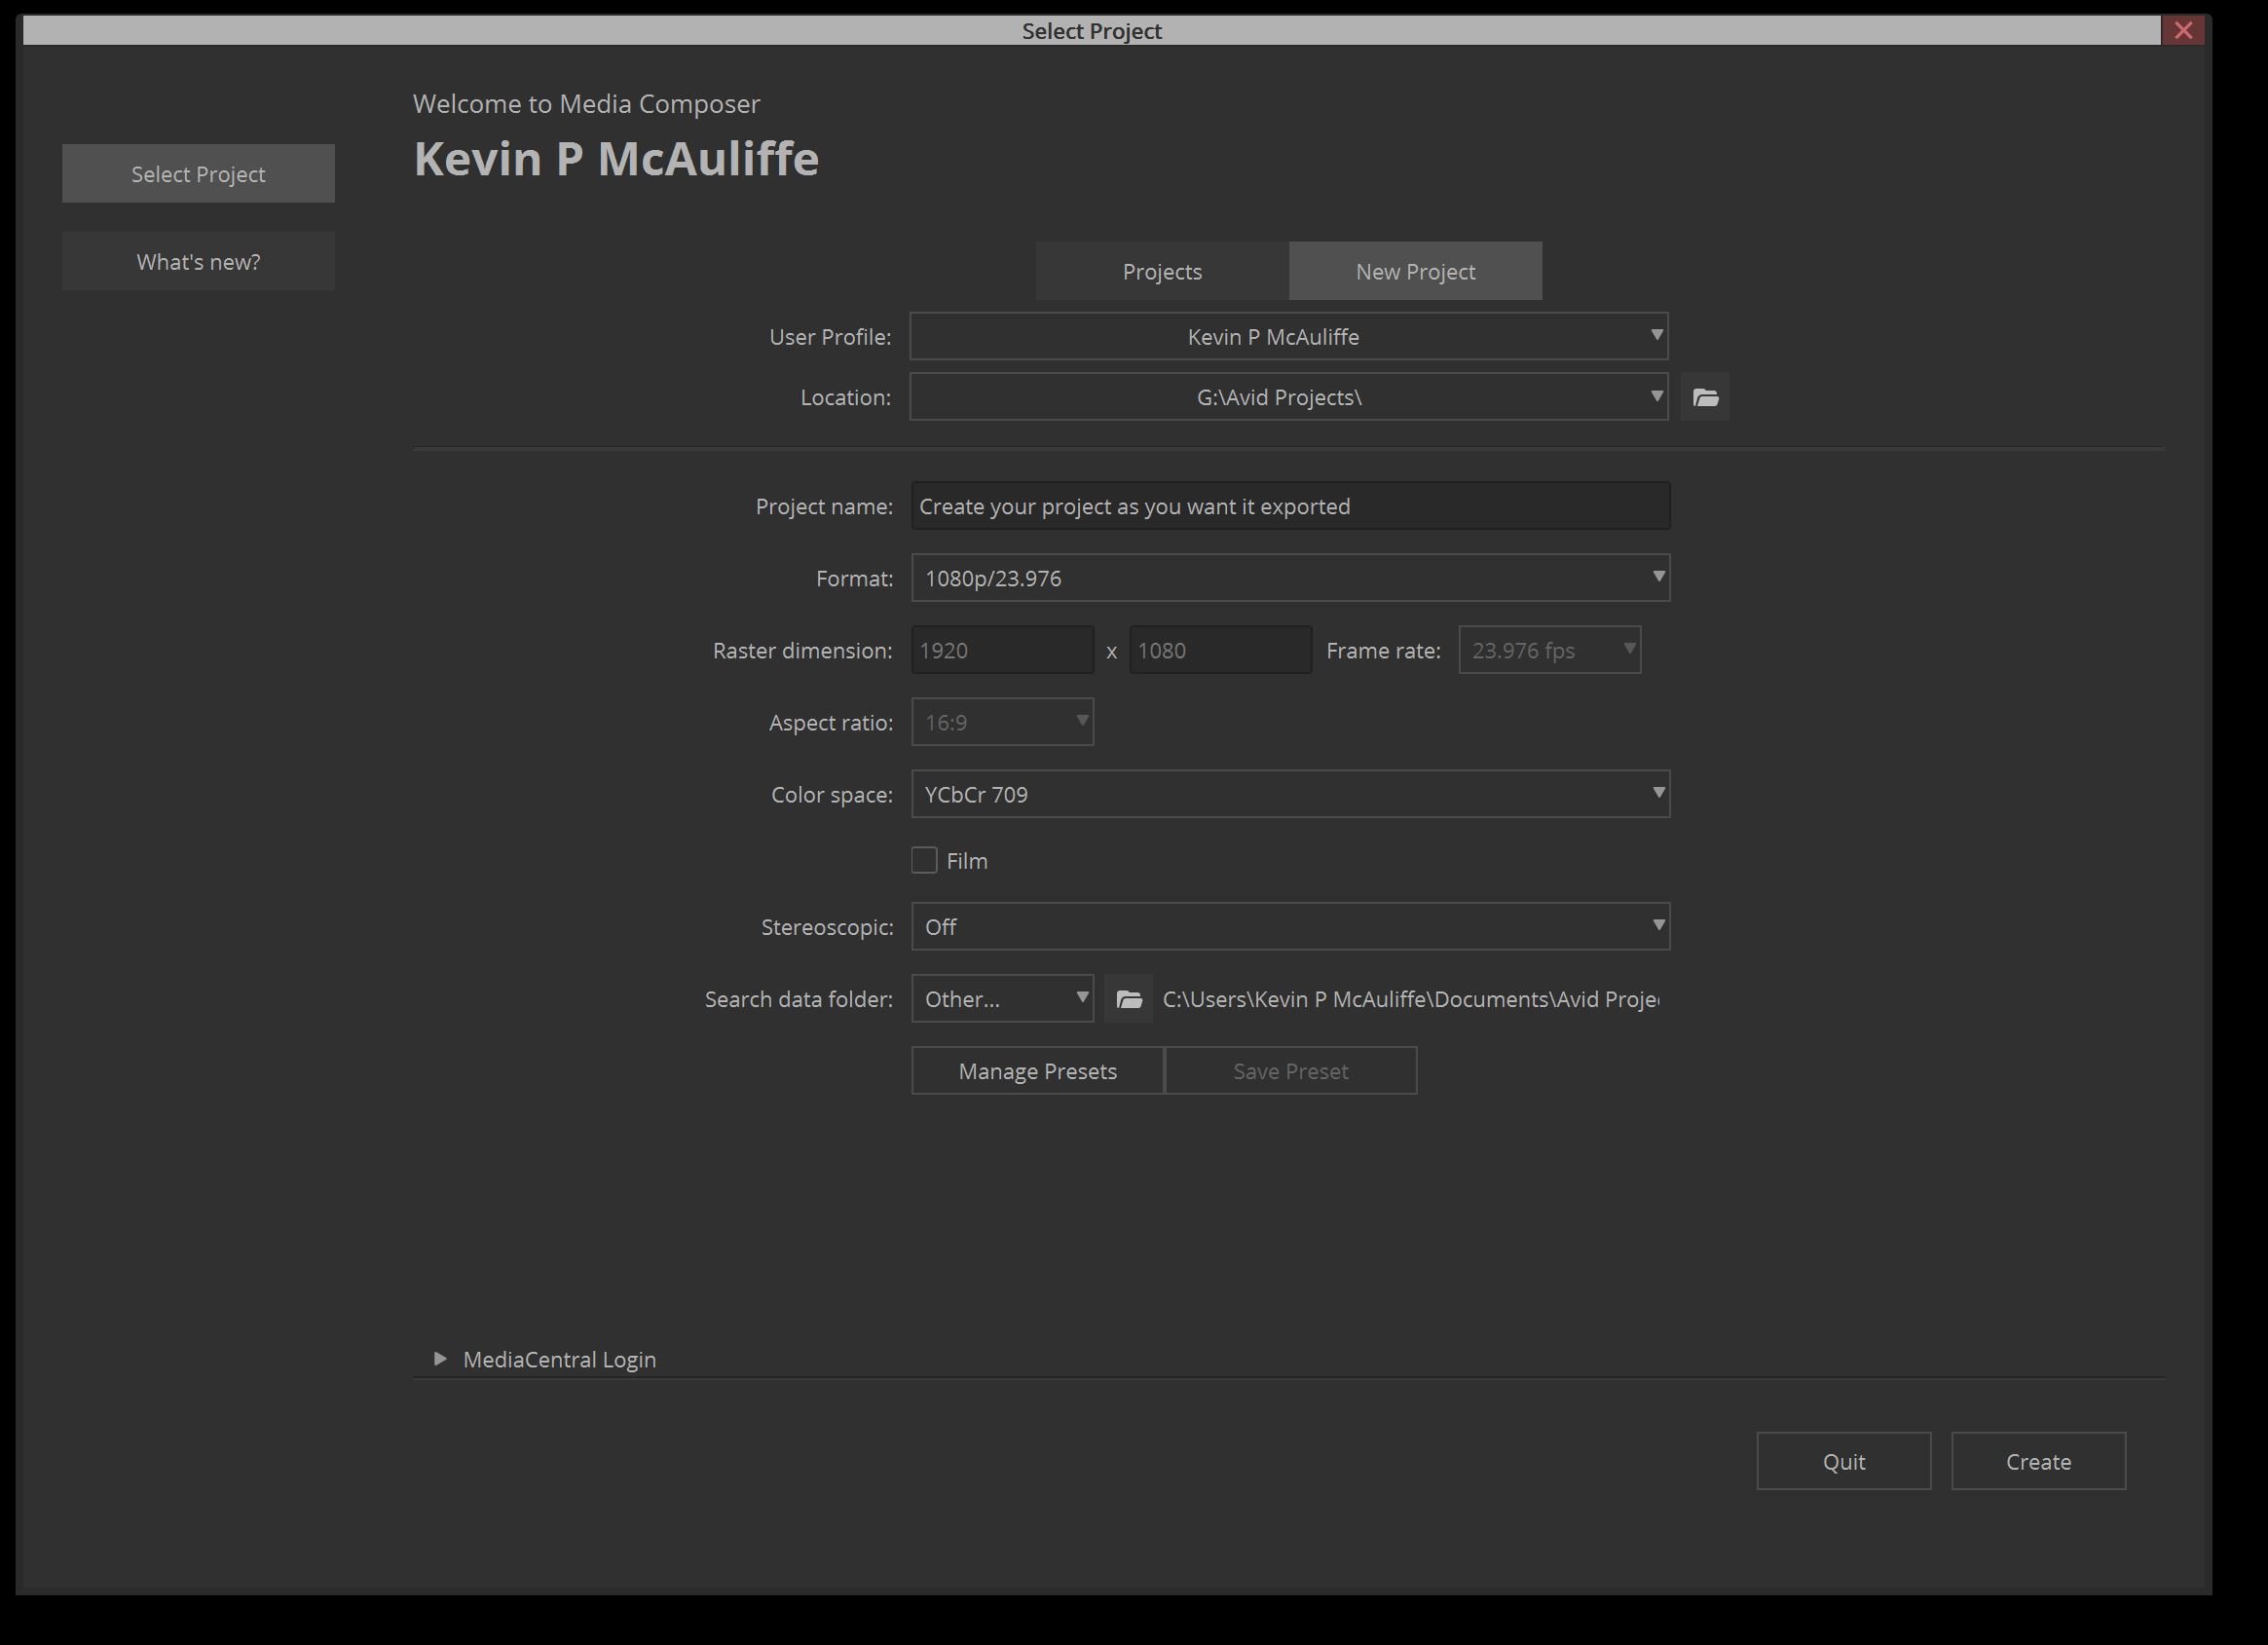
STEP 1 – LINKING TO YOUR FOOTAGE
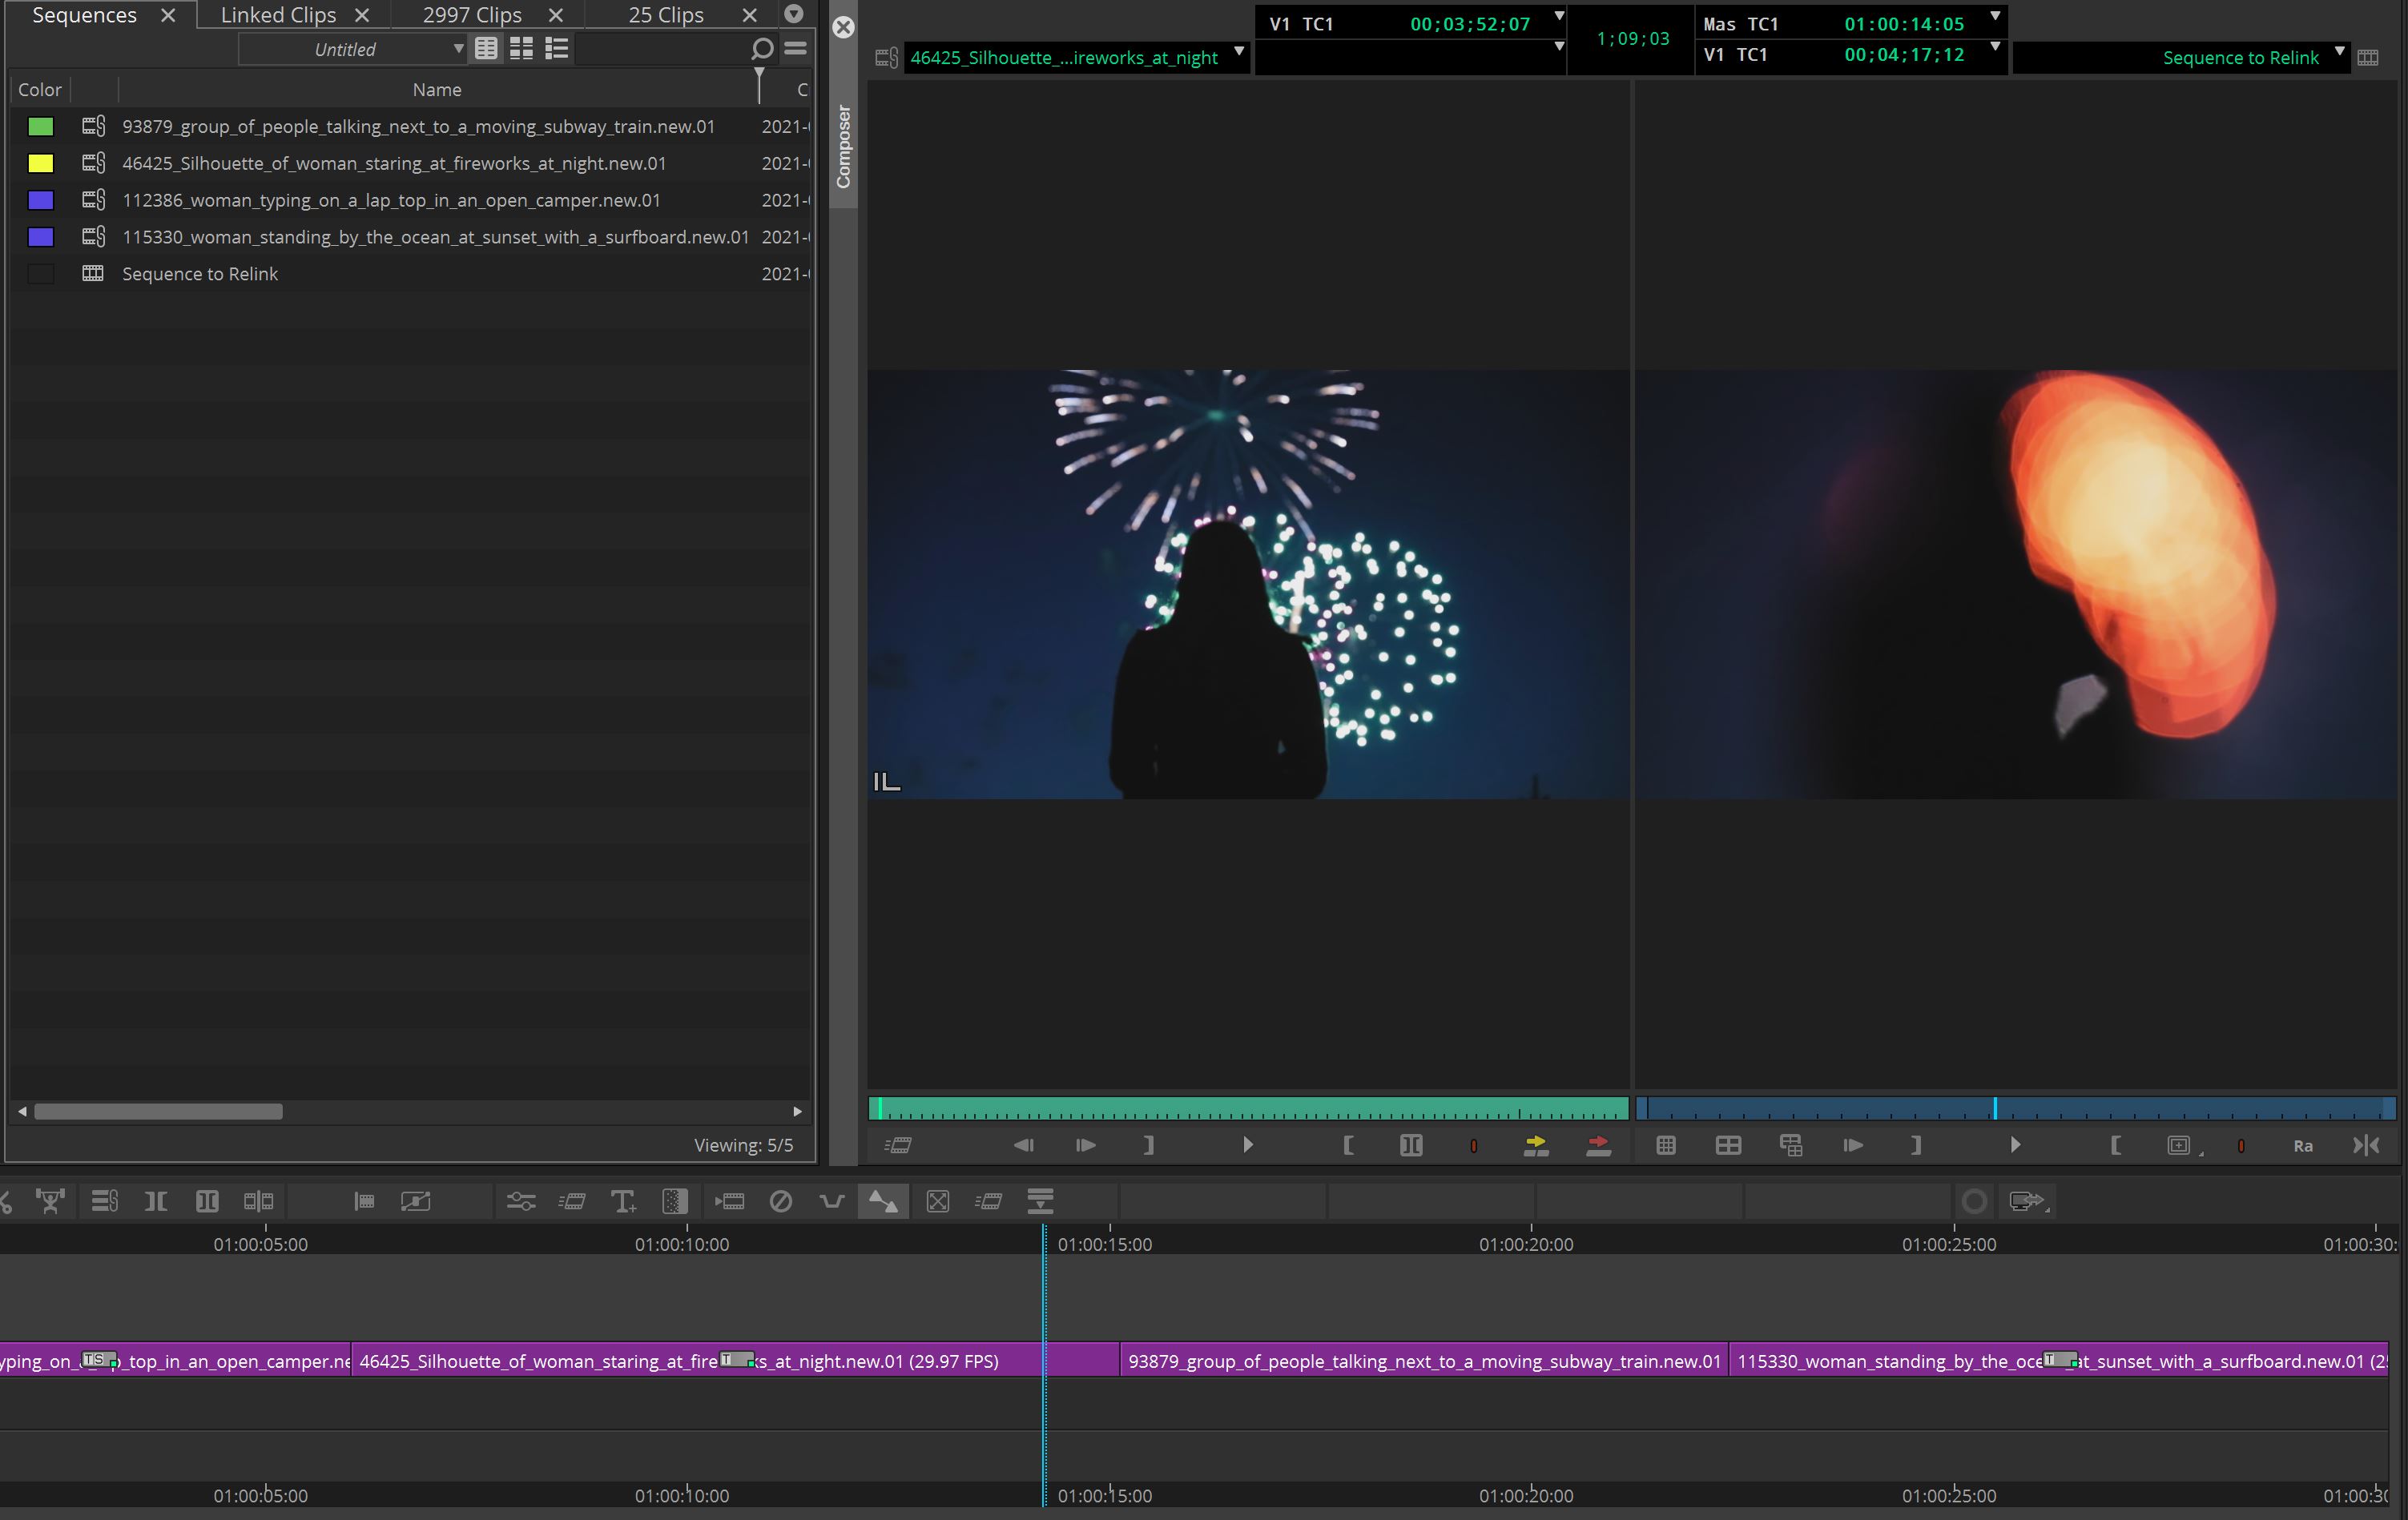
Once you’ve created your project, and entered it, you’ll have an open bin, ready to link to your footage. For the purposes of this article, we’re going to dump everything into one bin, and organize it after the fact. To be honest, that’s really how I do things. So, using the Source Browser, navigate to all the clips you want to link to, and bring them into that bin. What I normally like to do is bring things in “source by source”, meaning that a camera card is a source, and archival footage is a source. What I do is each source that comes into a bin gets flagged with a color so that after I’m done transcoding, I can place everything into the appropriate bin, and nothing gets confused. As you can see below, the three colors represent three different sources. I try to stay away from the color RED, as RED normally means there’s an issue with the shot/footage, and is a DNU.
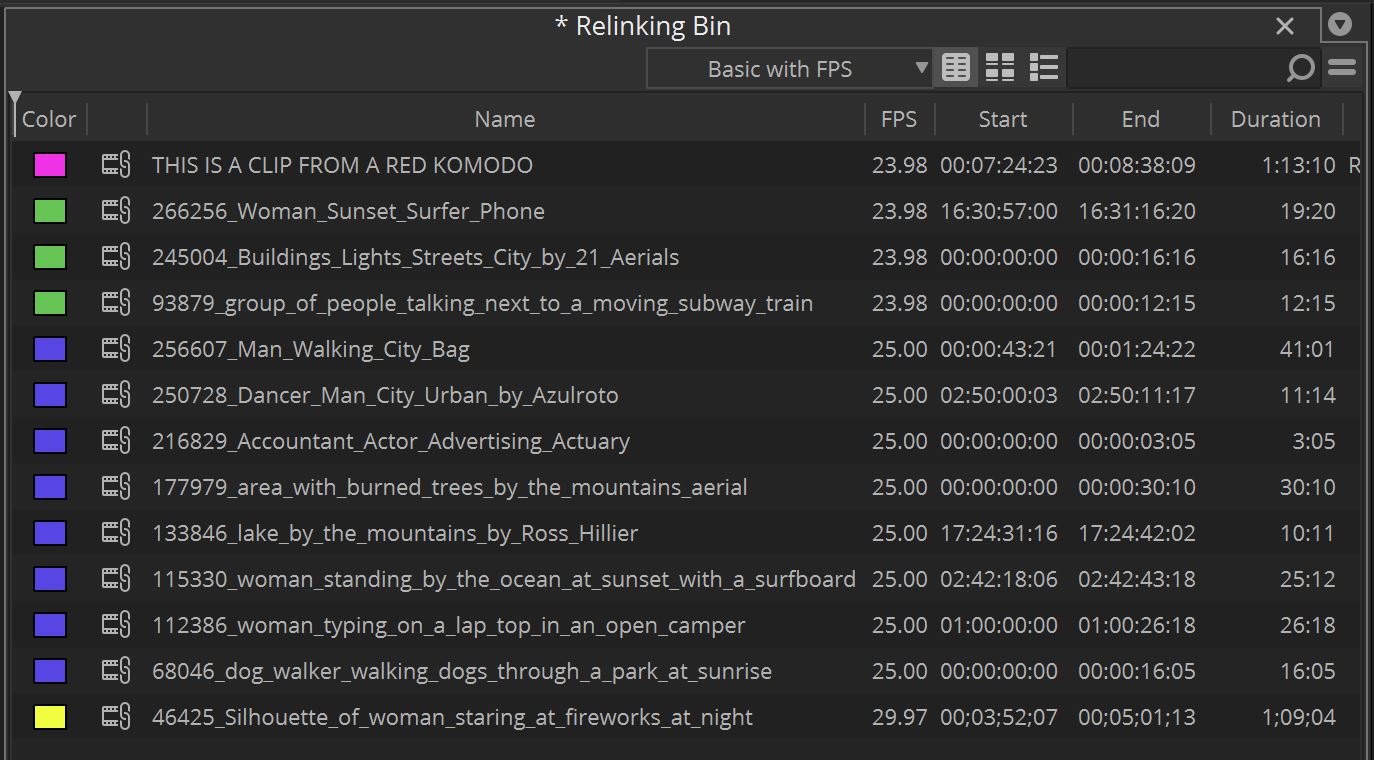
Please keep in mind that this process, depending on how much footage you have, could take hours to do properly. Don’t rush this. Take the time to do it properly now, so you don’t run into problems later. Also, chances are that clips coming from the same sources will have the same frame rates, so I normally tell people that if you don’t have a bin view to show you the FPS, it might be a good idea to create one now. The reason I suggest this type of strategy is that you can set up your transcodes, which traditionally are brutally slow, to run all day, or overnight, without you having to come back to the application each time you have to start a new source Transcoding.
STEP 2 – SOURCE SETTINGS
Next, it’s time to check out the Source Settings for each source you’re bringing in. This can be done a source/clip at a time or, in situations where you might have a ton of RED footage that was shot, you can do all of those at the same time. Keep in mind that can be done over all like sources. As you saw from the image above, I’ve brought in a RED clip, to show you how your Color Adapters and FrameFlex come into play. So, select the clip(s) you want to adjust the source settings to. Right click and at the top select “Source Settings”. You’ll be brought to the below window.
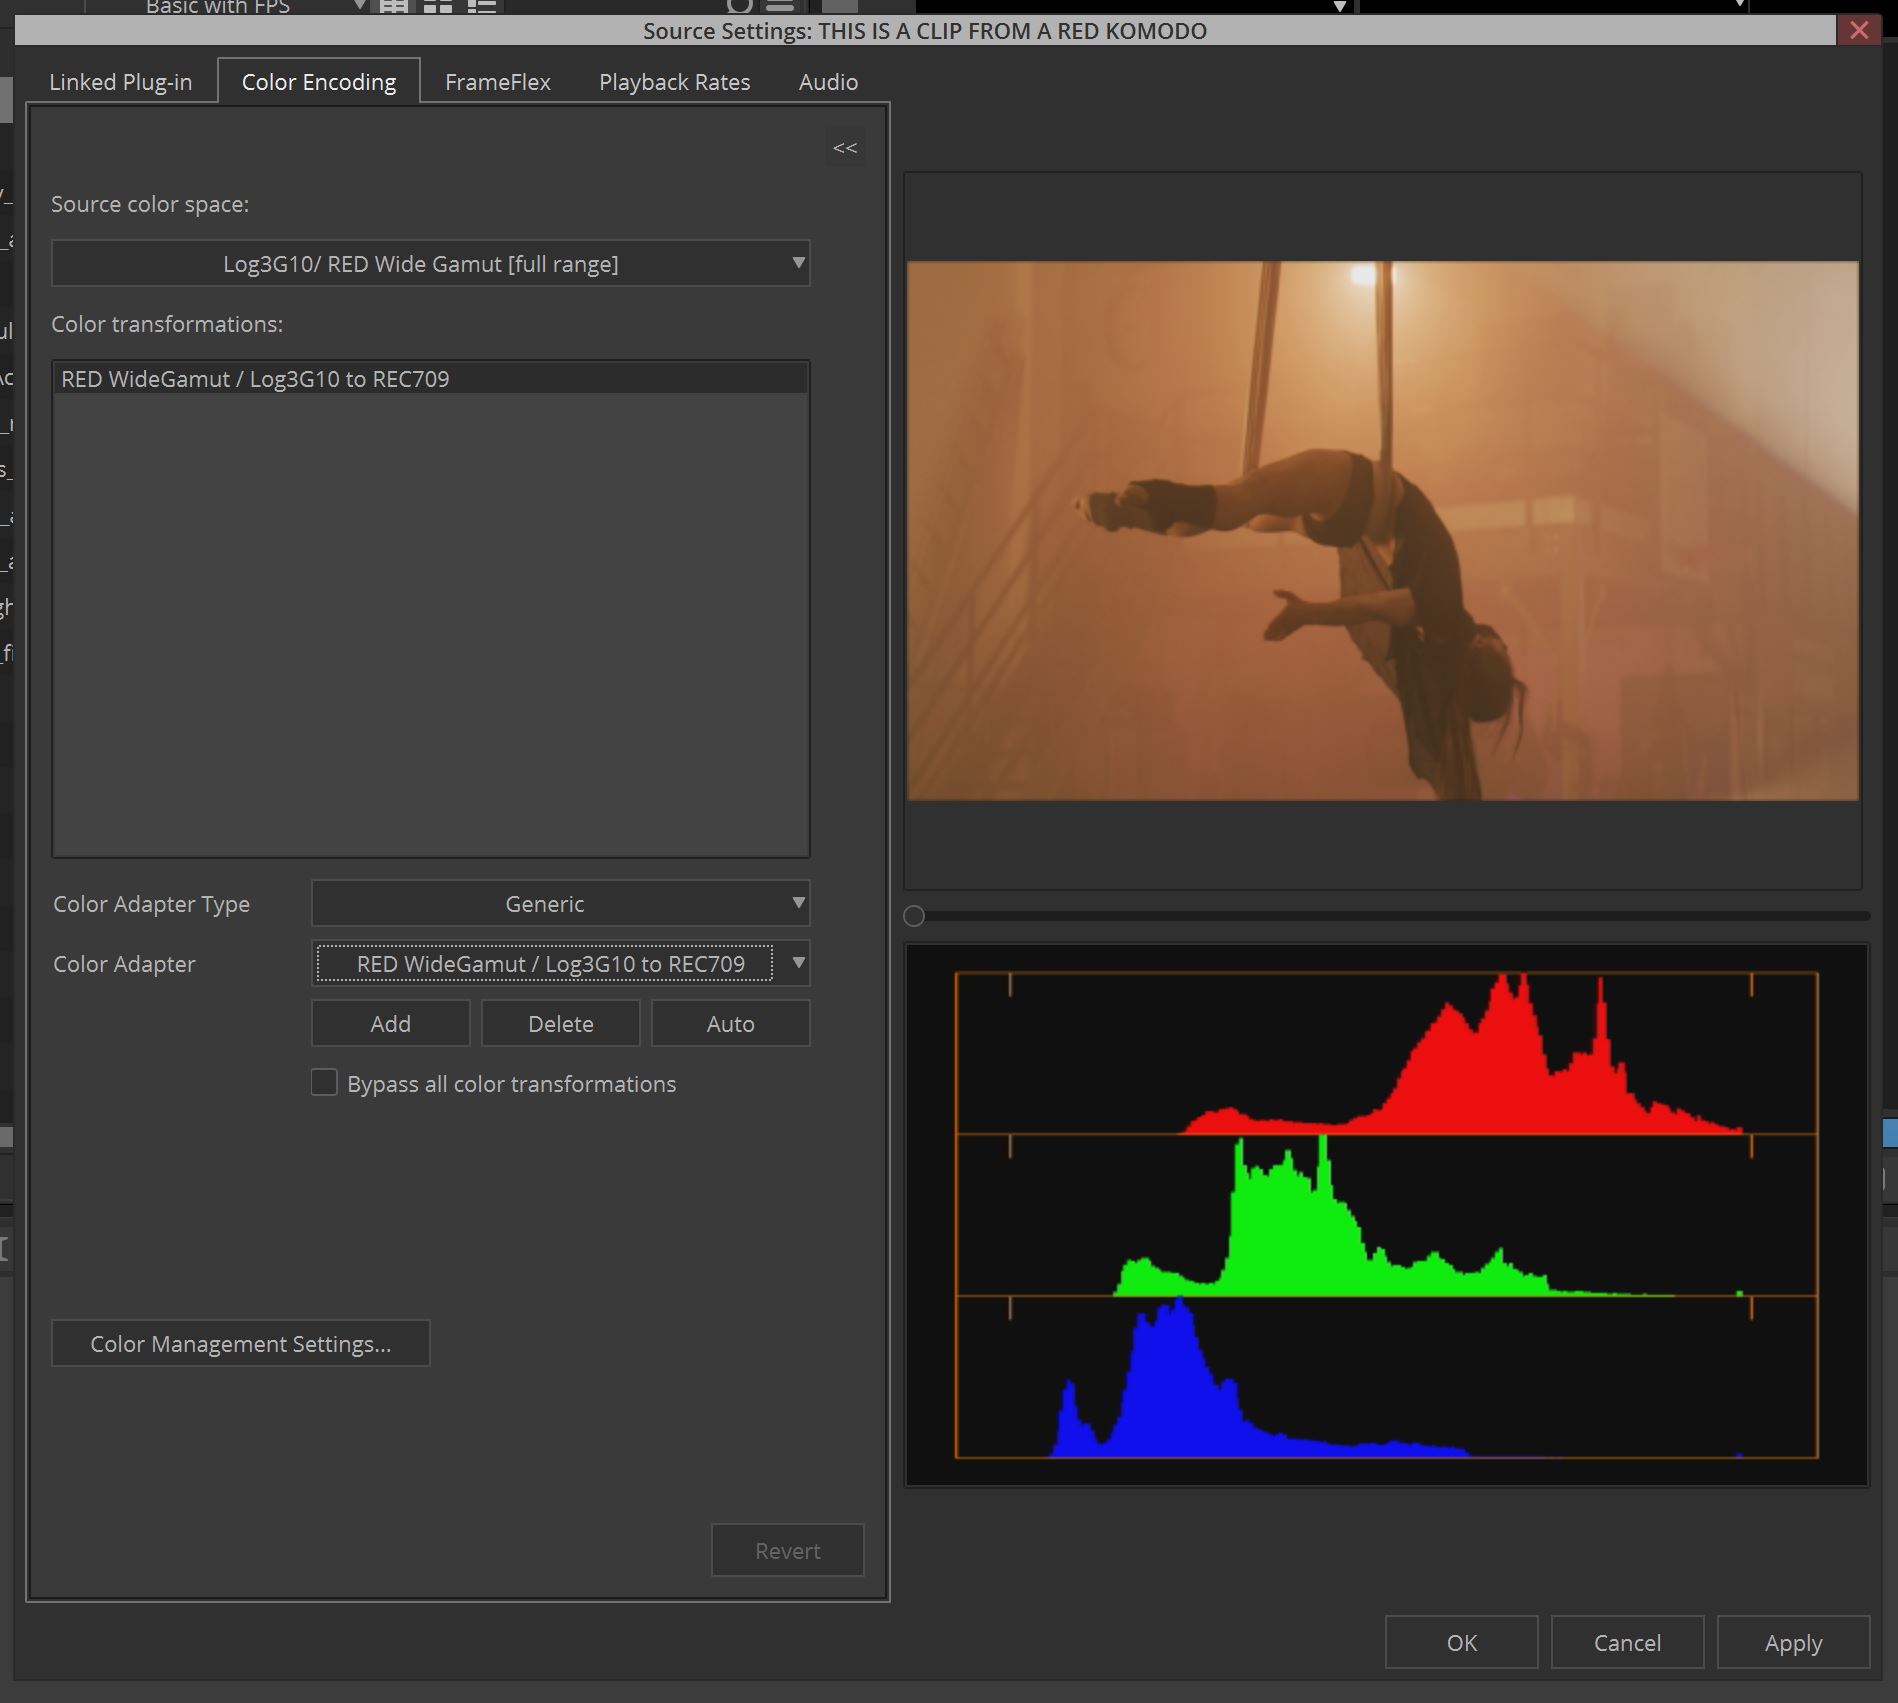
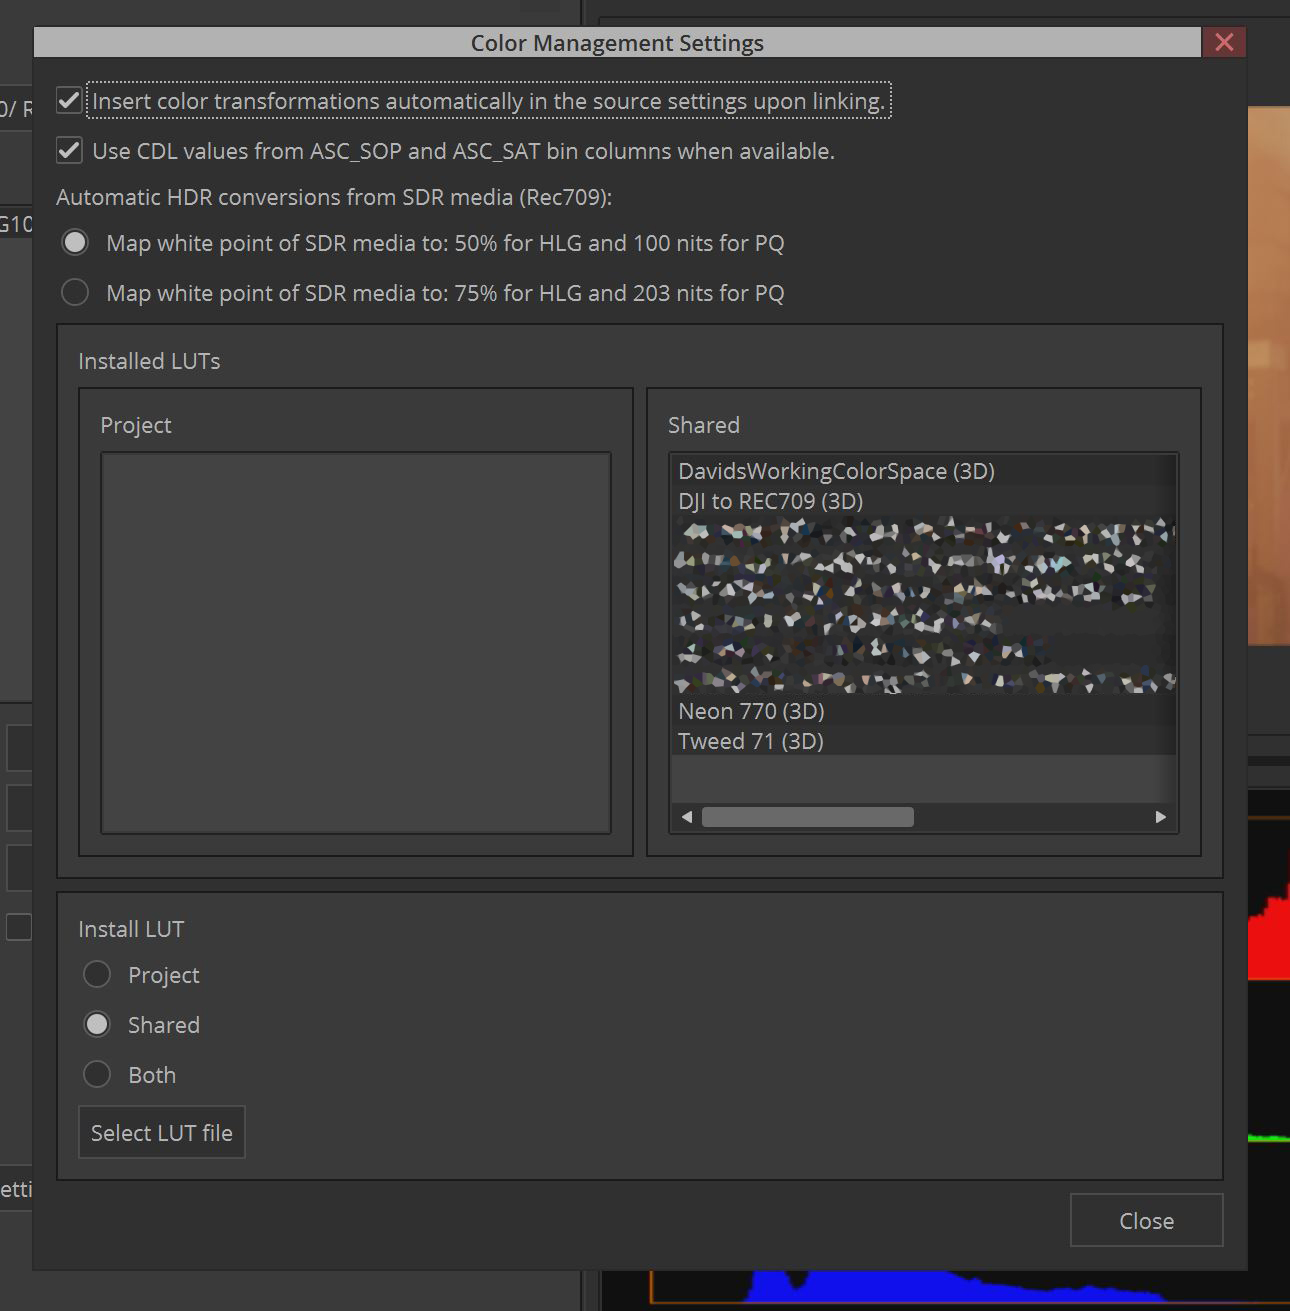
You’ll notice in the image that Media Composer has figured out that the metadata with the clip is tagged to show that it needs a LOG3G10 to REC709 LUT added to it, so it has done it on its own. Depending on your footage (Alexa, etc), you might need to add a LUT in this window if necessary. If you need to add a LUT to your system, you can click on the Color Management Settings at the bottom of the window, click on “Select LUT file”, choose whether you want it available across all projects, or just the current one you’re working on, and then import to use in the Source Settings window, or in your timeline via the Color LUT effect.
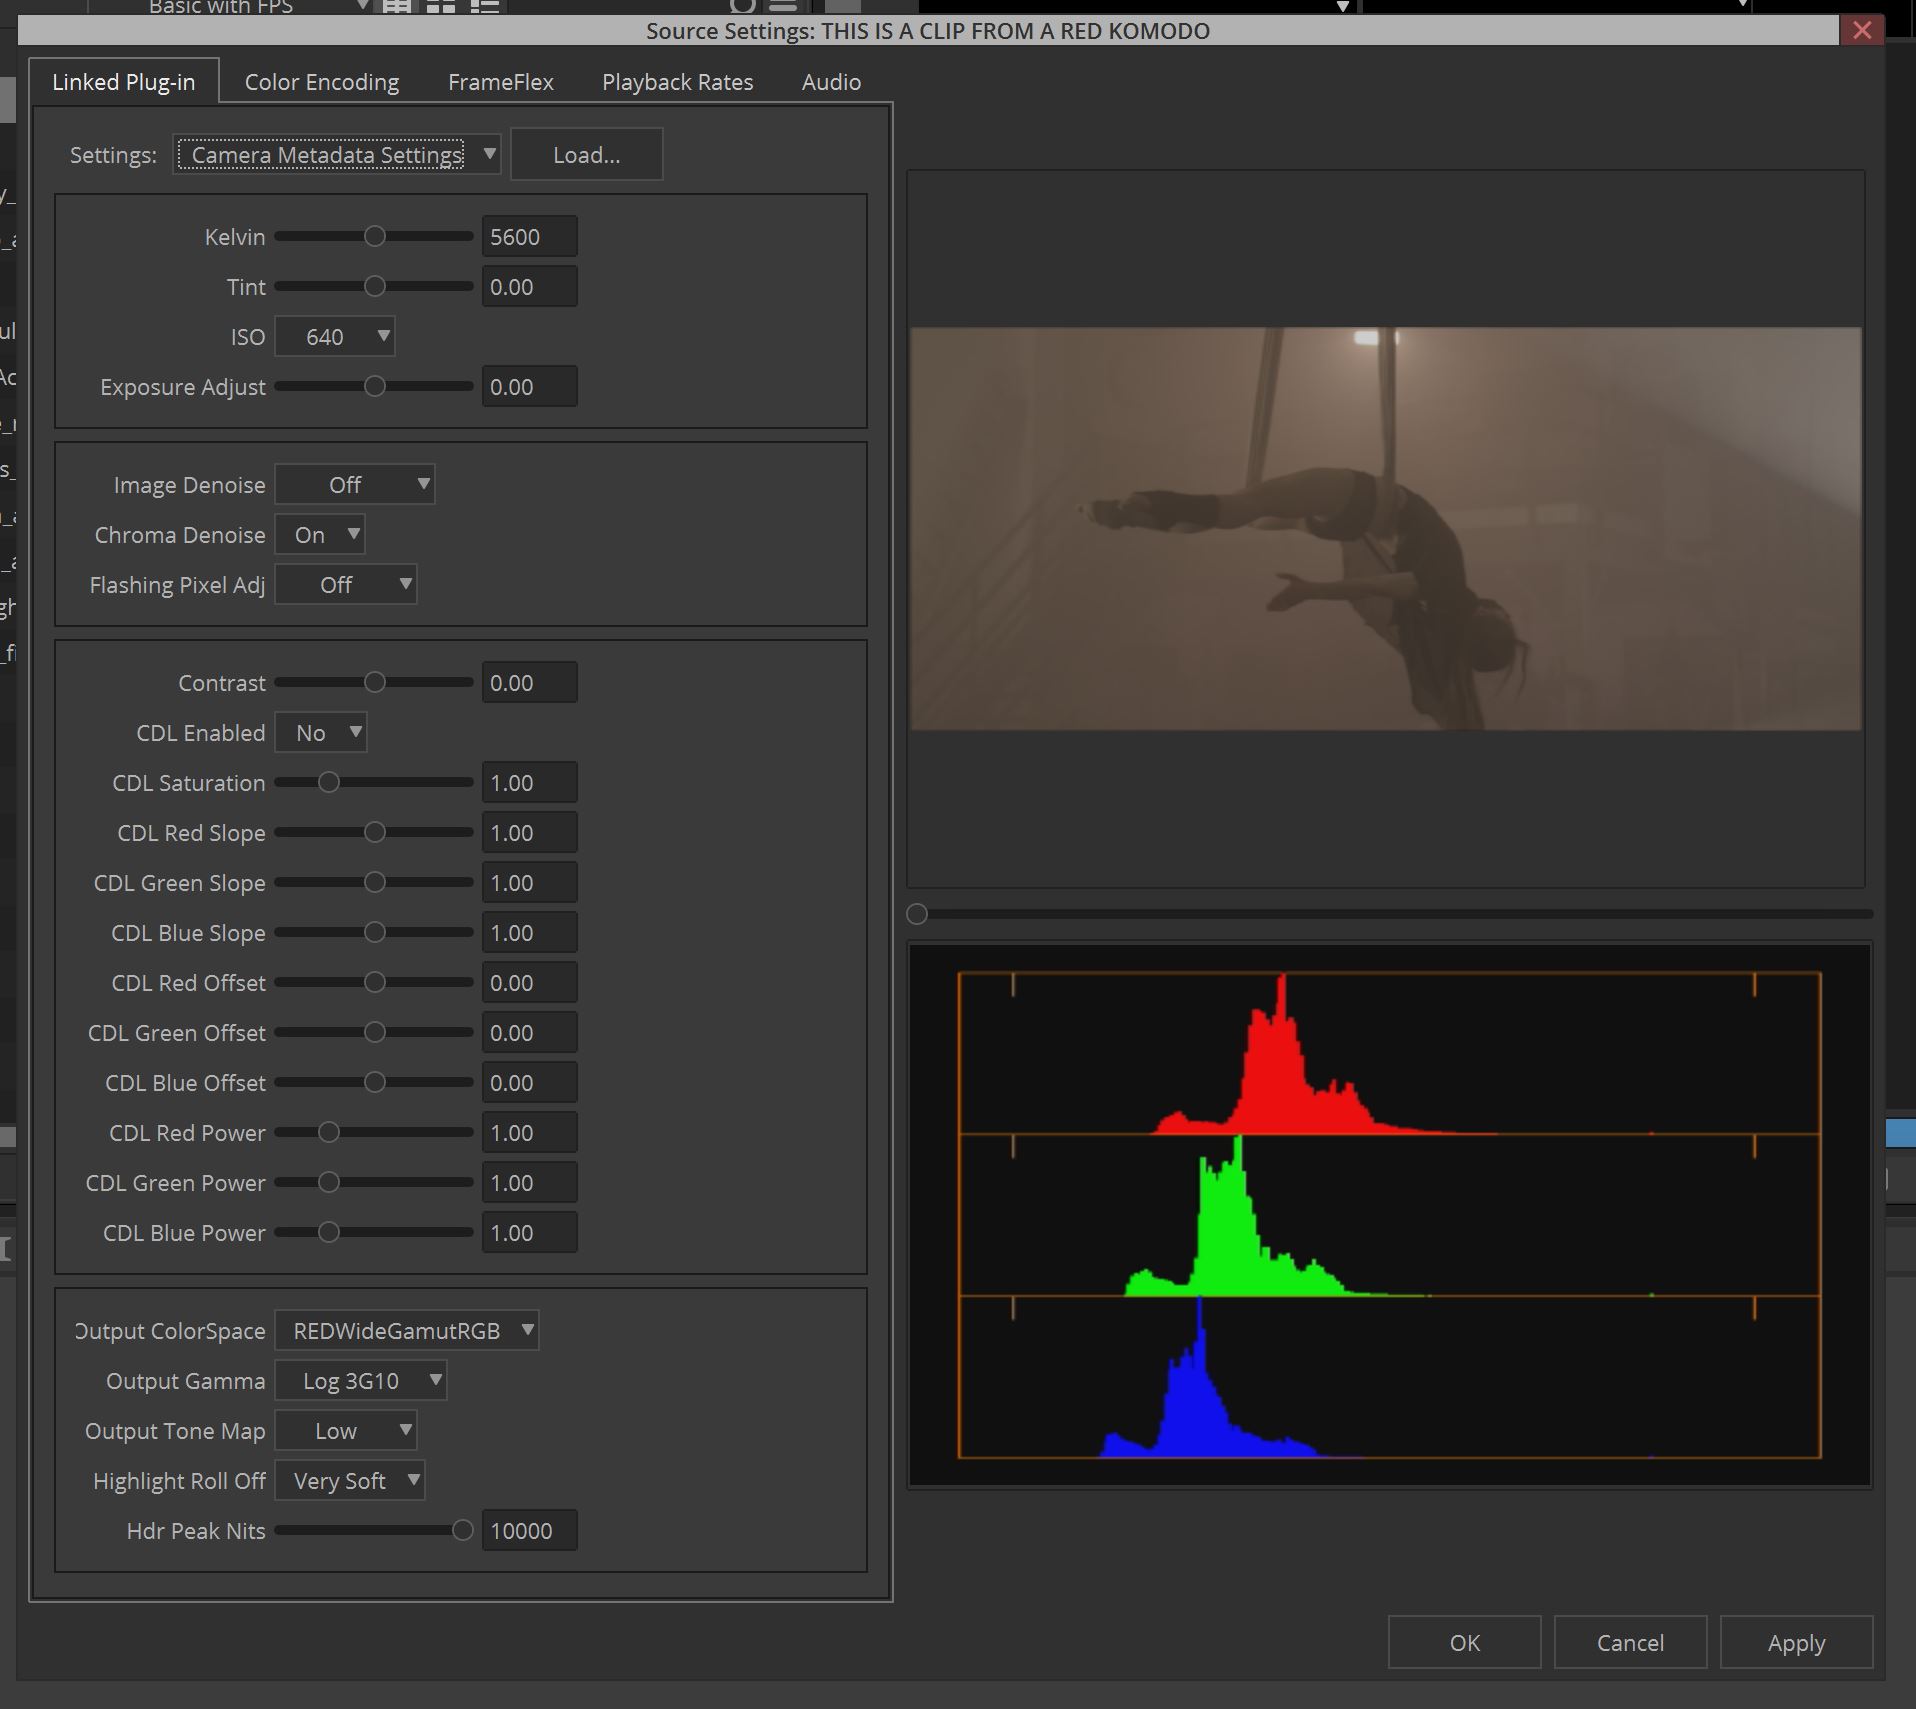
The next thing you’ll want to do, assuming your adjusting the parameters of RAW media (Blackmagic, RED, etc), is head to the “Linked Plug-In” tab to adjust any necessary parameters, before you transcode.
Last, but certainly not least, you’ll need to head to the FrameFlex window. If all the footage you’re working with is 16×9, you’ll be able to skip over FrameFlex here, as Media Composer will default to working with Frameflex in a 16×9 workflow. If your footage, like the RED footage here, is a different aspect to your timeline, you’ll want to make sure that your Frameflex window matches the aspect of your timeline. You can do that by making one simple adjustment. Keep in mind that you can change the framing after the fact in your timeline, but it’s best to get things 90% of the way there here in your Source Settings, so little to no work is required later on.
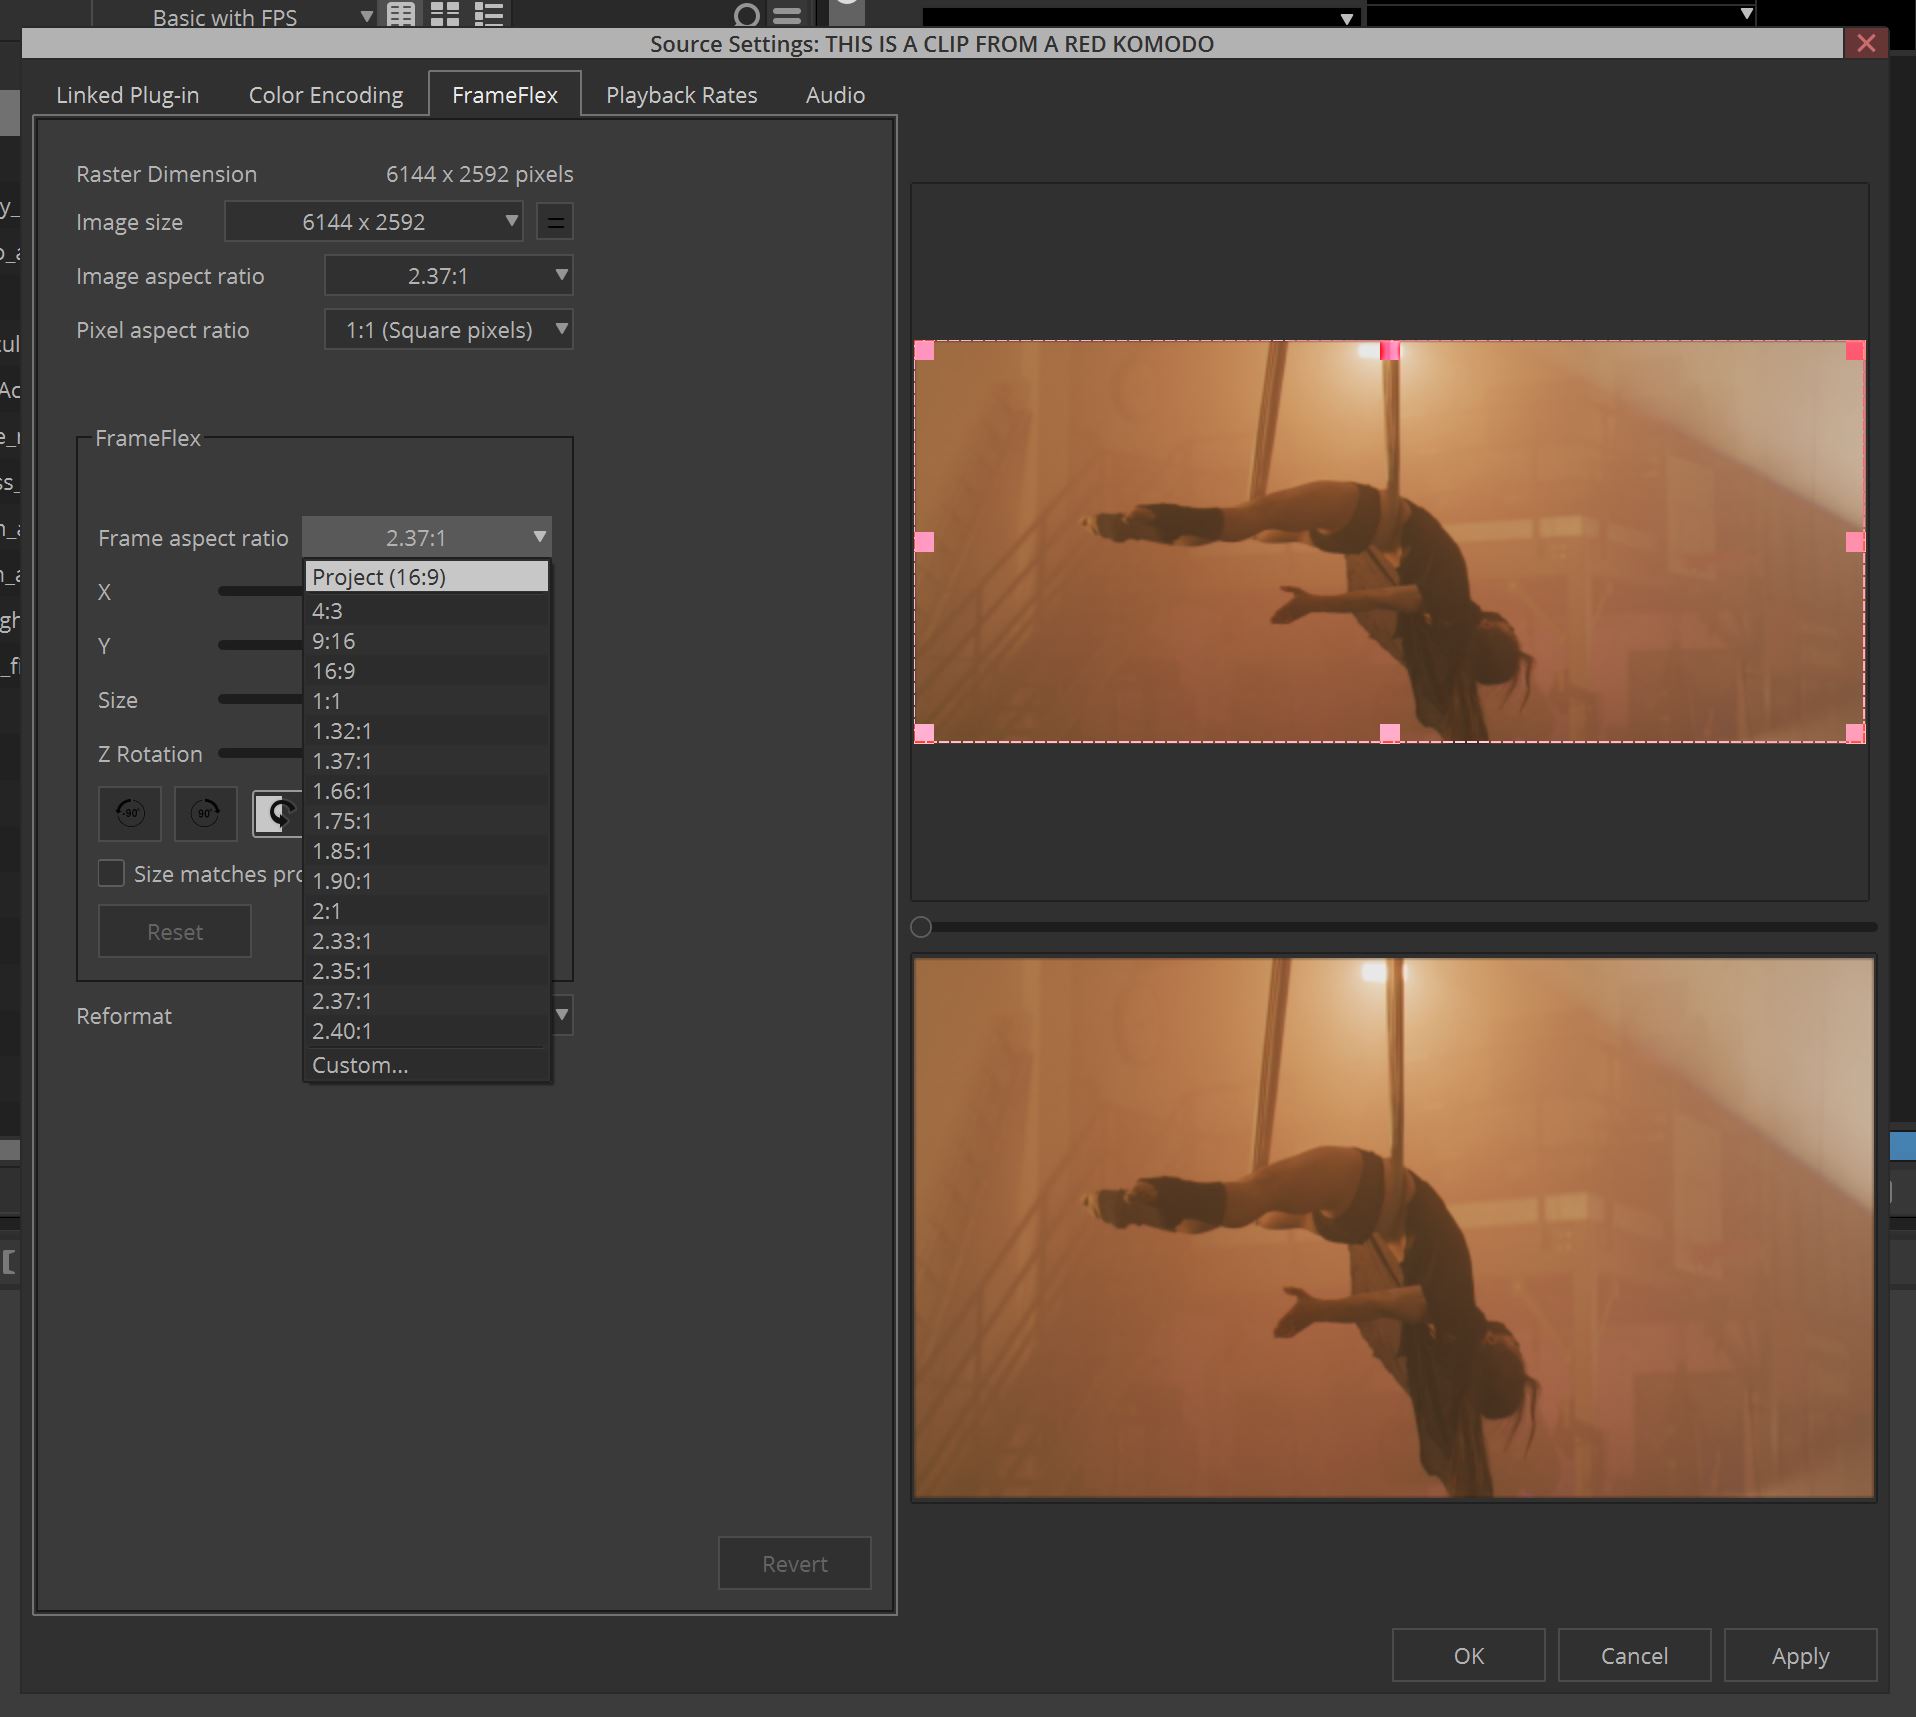
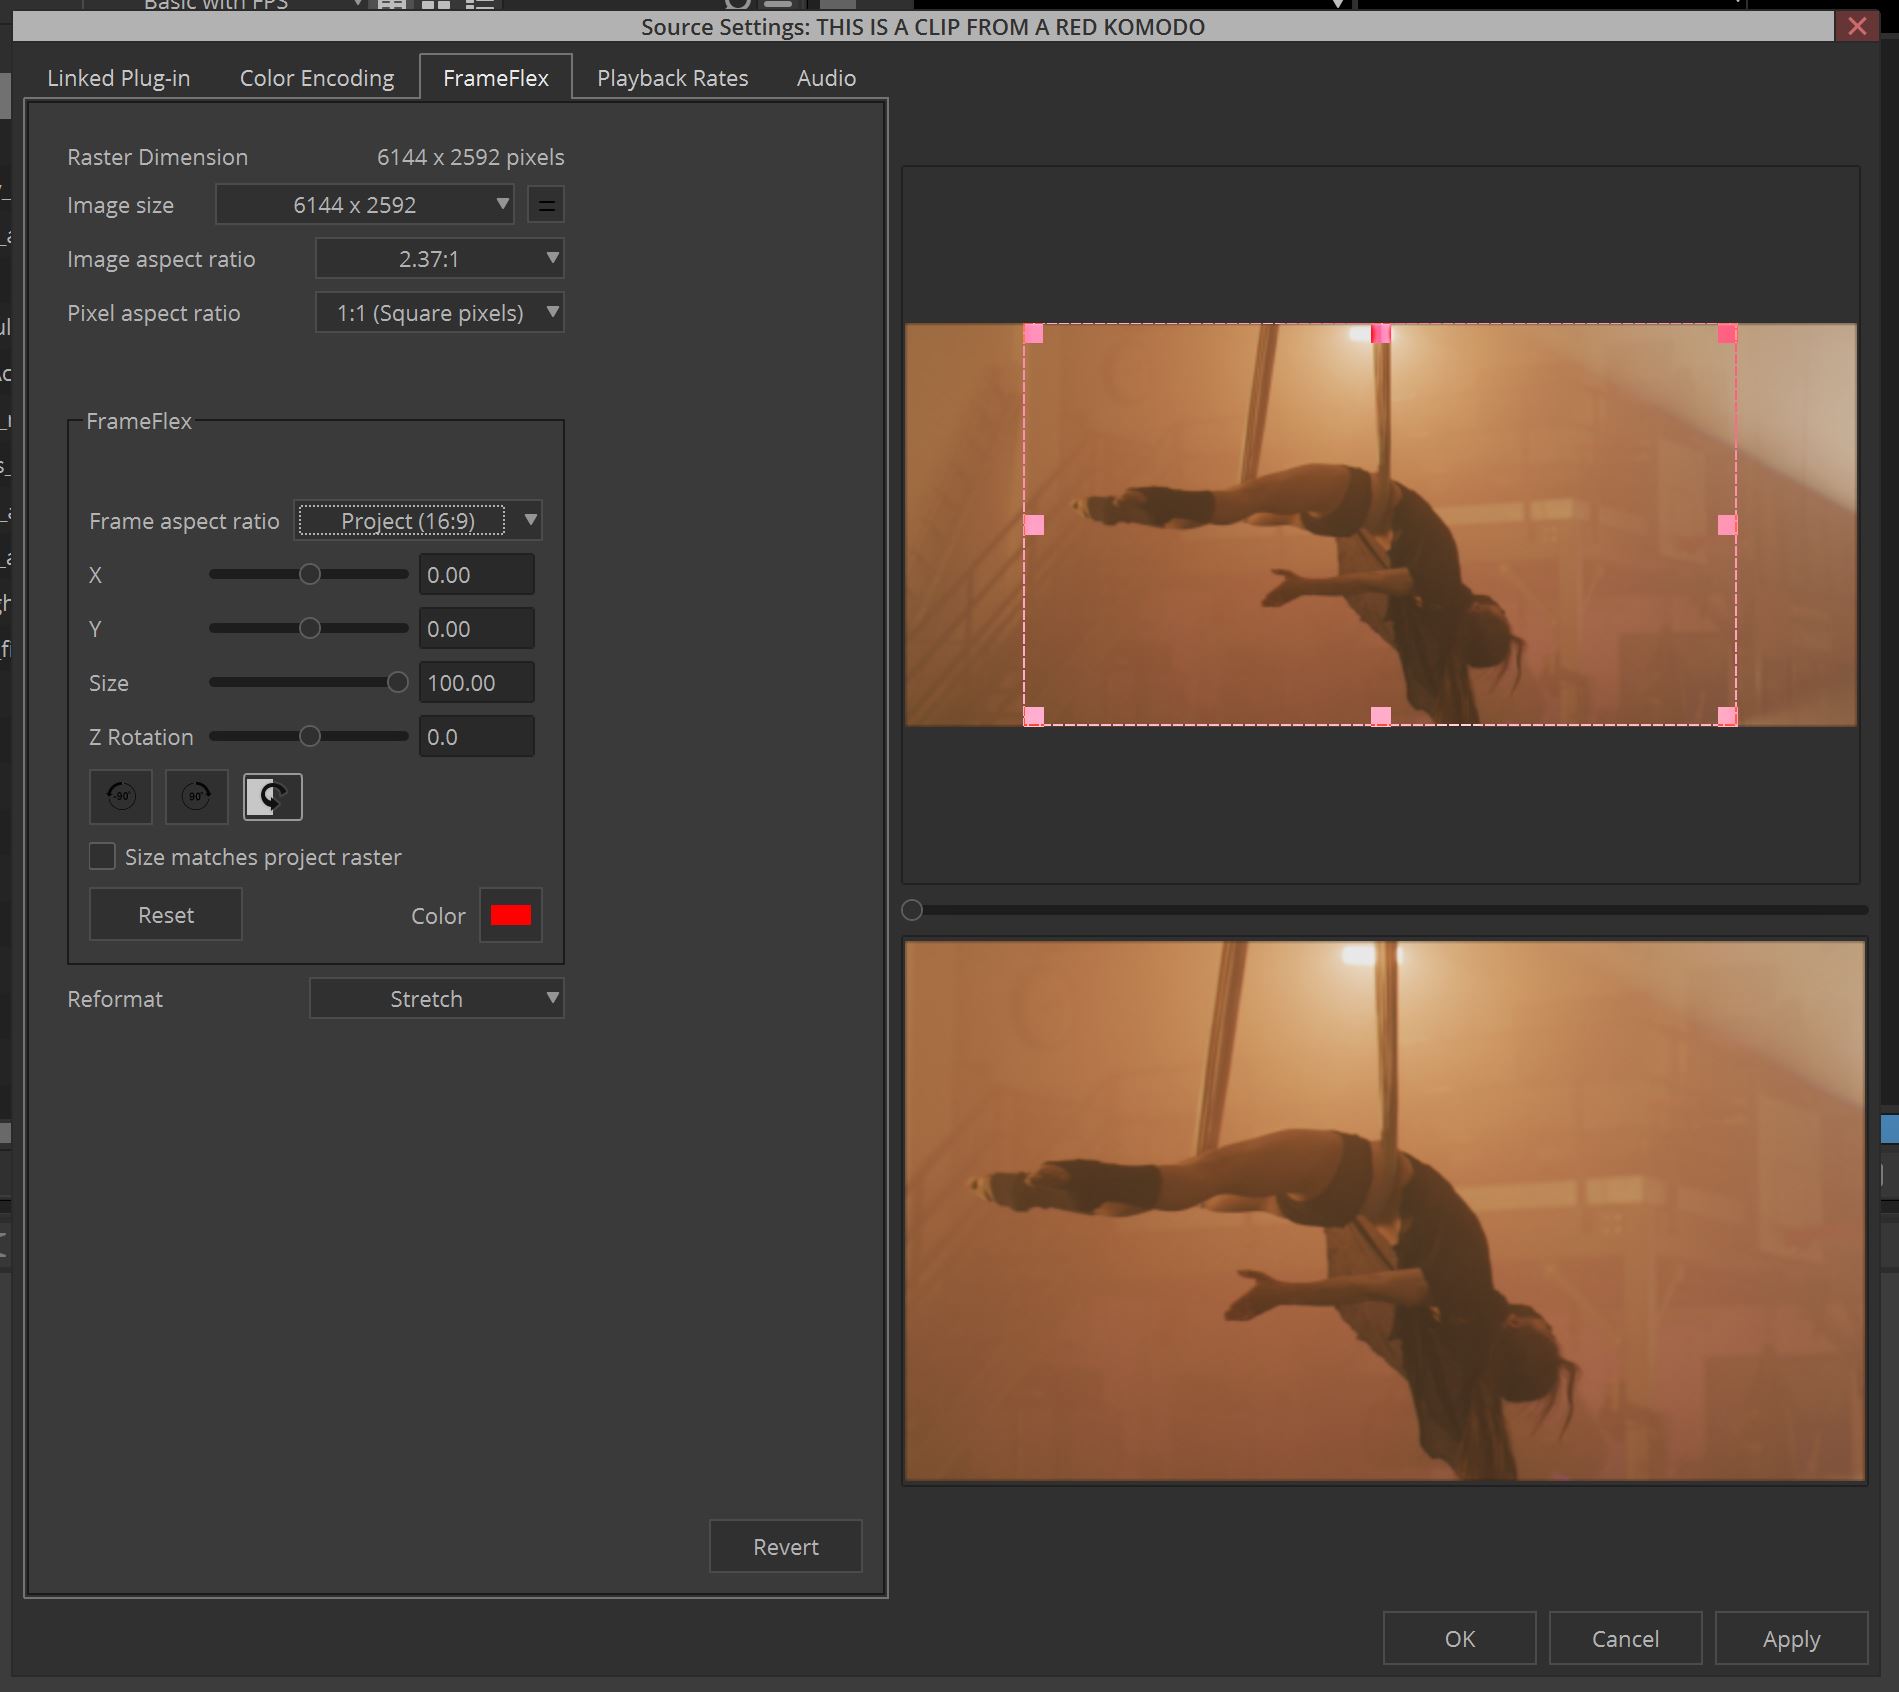
If you’re doing this clip by clip, you can simply hit Apply, and get back to your bin, or if you’ve selected multiple clips, “Apply” will change to “Apply to All”, to add any parameter adjustments across all selected clips.
STEP 3 – TRANSCODING
Ok, once you’ve set all your Source Settings, it’s time to Transcode. Let’s select all the clips, and transcode them. Select All>Right Click>Consolidate/Transcode. You’ll now be greeted by the window below.
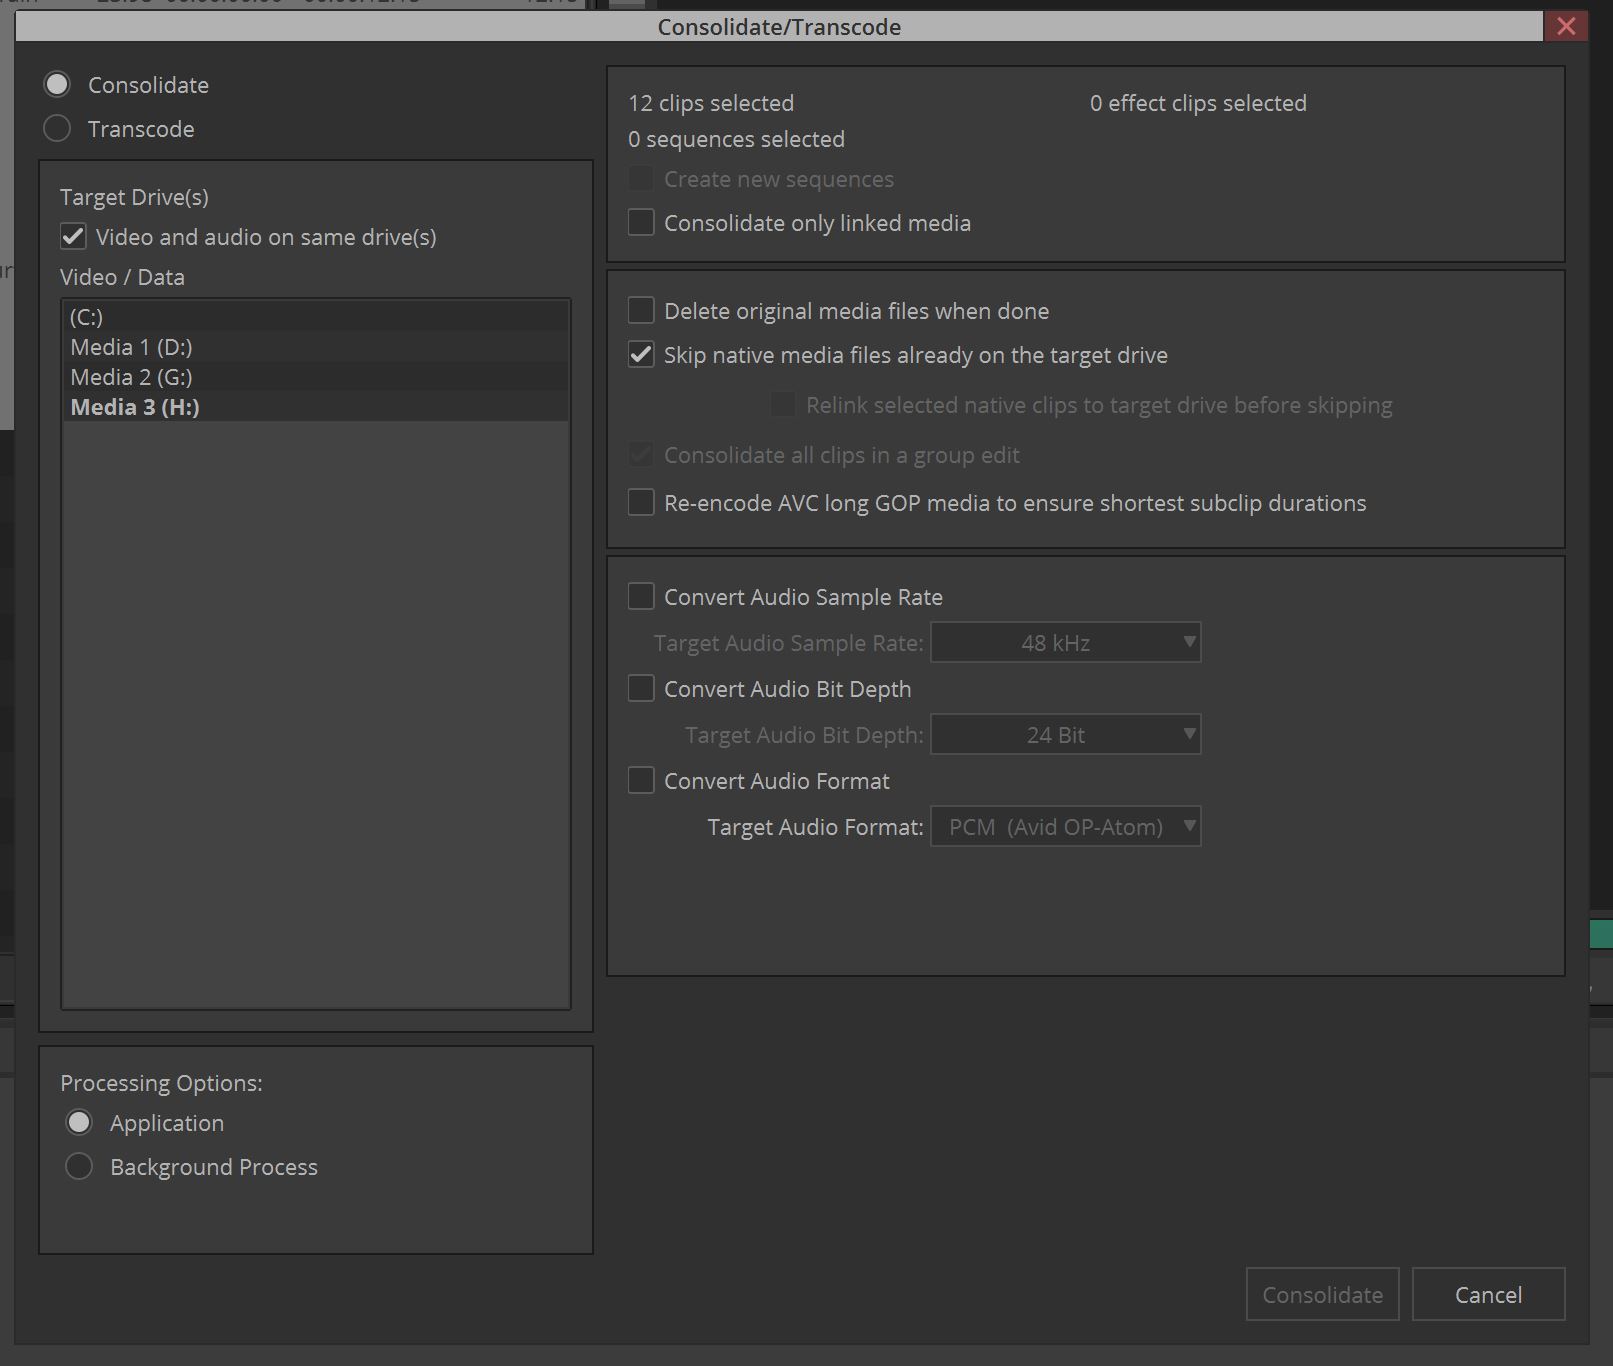
First thing to do is to change from Consolidate to Transcode, and choose the drive you want to Transcode to.
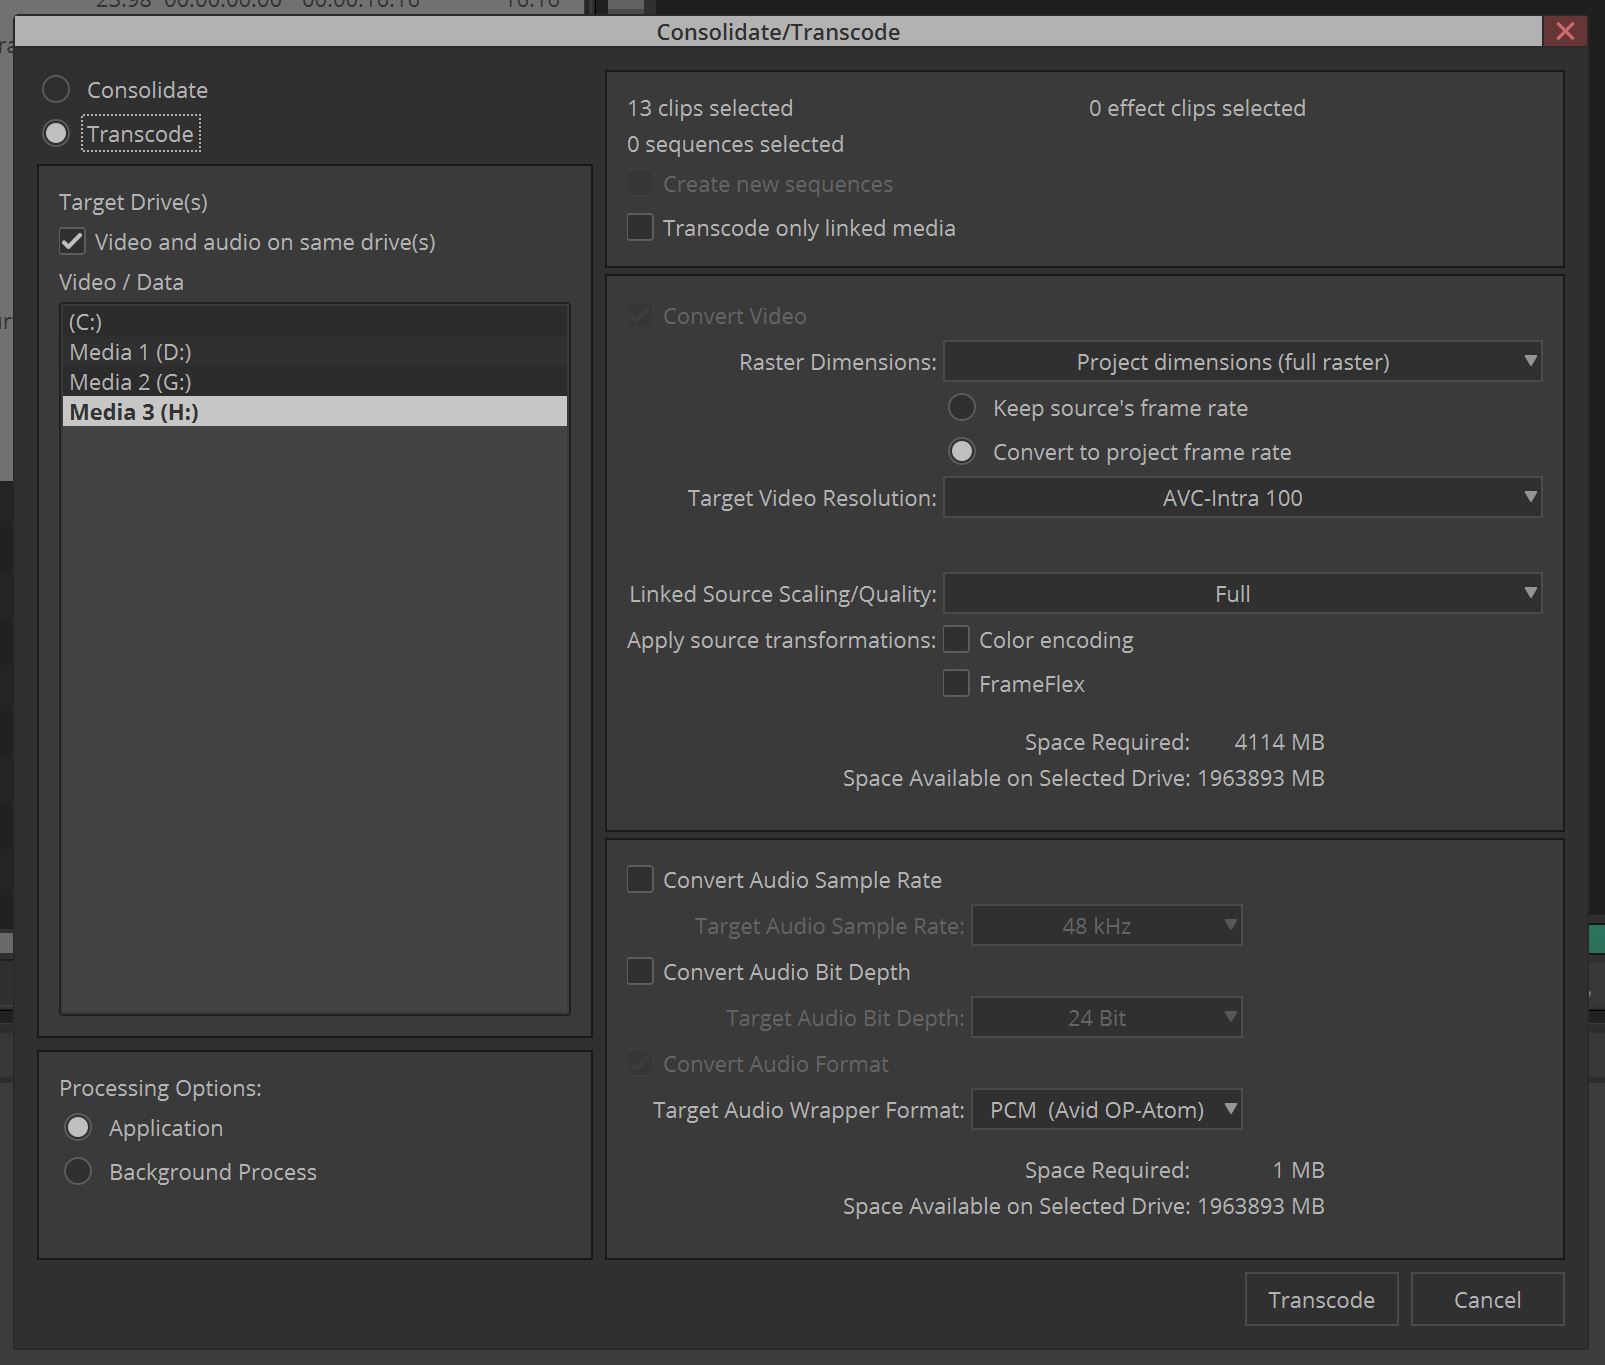
This is where things can fall off the rails, if you’re not careful with what you’re doing. I’m going to break things down here to how you’ll want to set things up, and then I’ll give you a snapshot of the Transcode window, so there’s no confusion. First, “Raster Dimension”. Most people, mistakenly, leave the raster dimension set to “Project Dimension”. What this means is that no matter what the size of your footage is, it will be crushed down to match the 1920×1080 size of your project. For me, I want the footage, since it’s being transcoded at low-resolution, to be at the original raster dimension. Make sure you drop down the menu to select the “Source Dimension”. By doing this, you’ll be able to utilize FrameFlex to adjust the framing of your shots, either on a clip by clip basis in your bin, once you’ve transcoded or inside your timeline, via the Effects Editor.
Next and here’s one of the big ones……. Keep Source’s Frame Rate or Convert to Project’s Frame Rate. If you want to be able to Relink to the master clips later, to transcode your final timeline at its highest resolution, please, please, please select “Keep Source’s Frame Rate”. Next, since we’re going Offline here, our Target Video Resolution will be DNxHR LB. You might be wondering “Why not DNxHD?”. What’s important to keep in mind is that Media Composer is assuming that you will be working with non-project native raster dimension & frame rates, so DNxHR is your main codec of choice.
Assuming you’re working with RAW footage you can choose “Full” for the linked source quality, and if you’ve set up your footage to look correct in the Color Encoding window, you can bake that information in, by selecting the check box. I would recommend against checking the Frameflex box, as if you do, you can’t make any framing adjustments after the fact. Something else important to keep in mind is that any RAW adjustable clip parameters will always be baked in, once you transcode. Your “ideal” setup should look something like the image below.
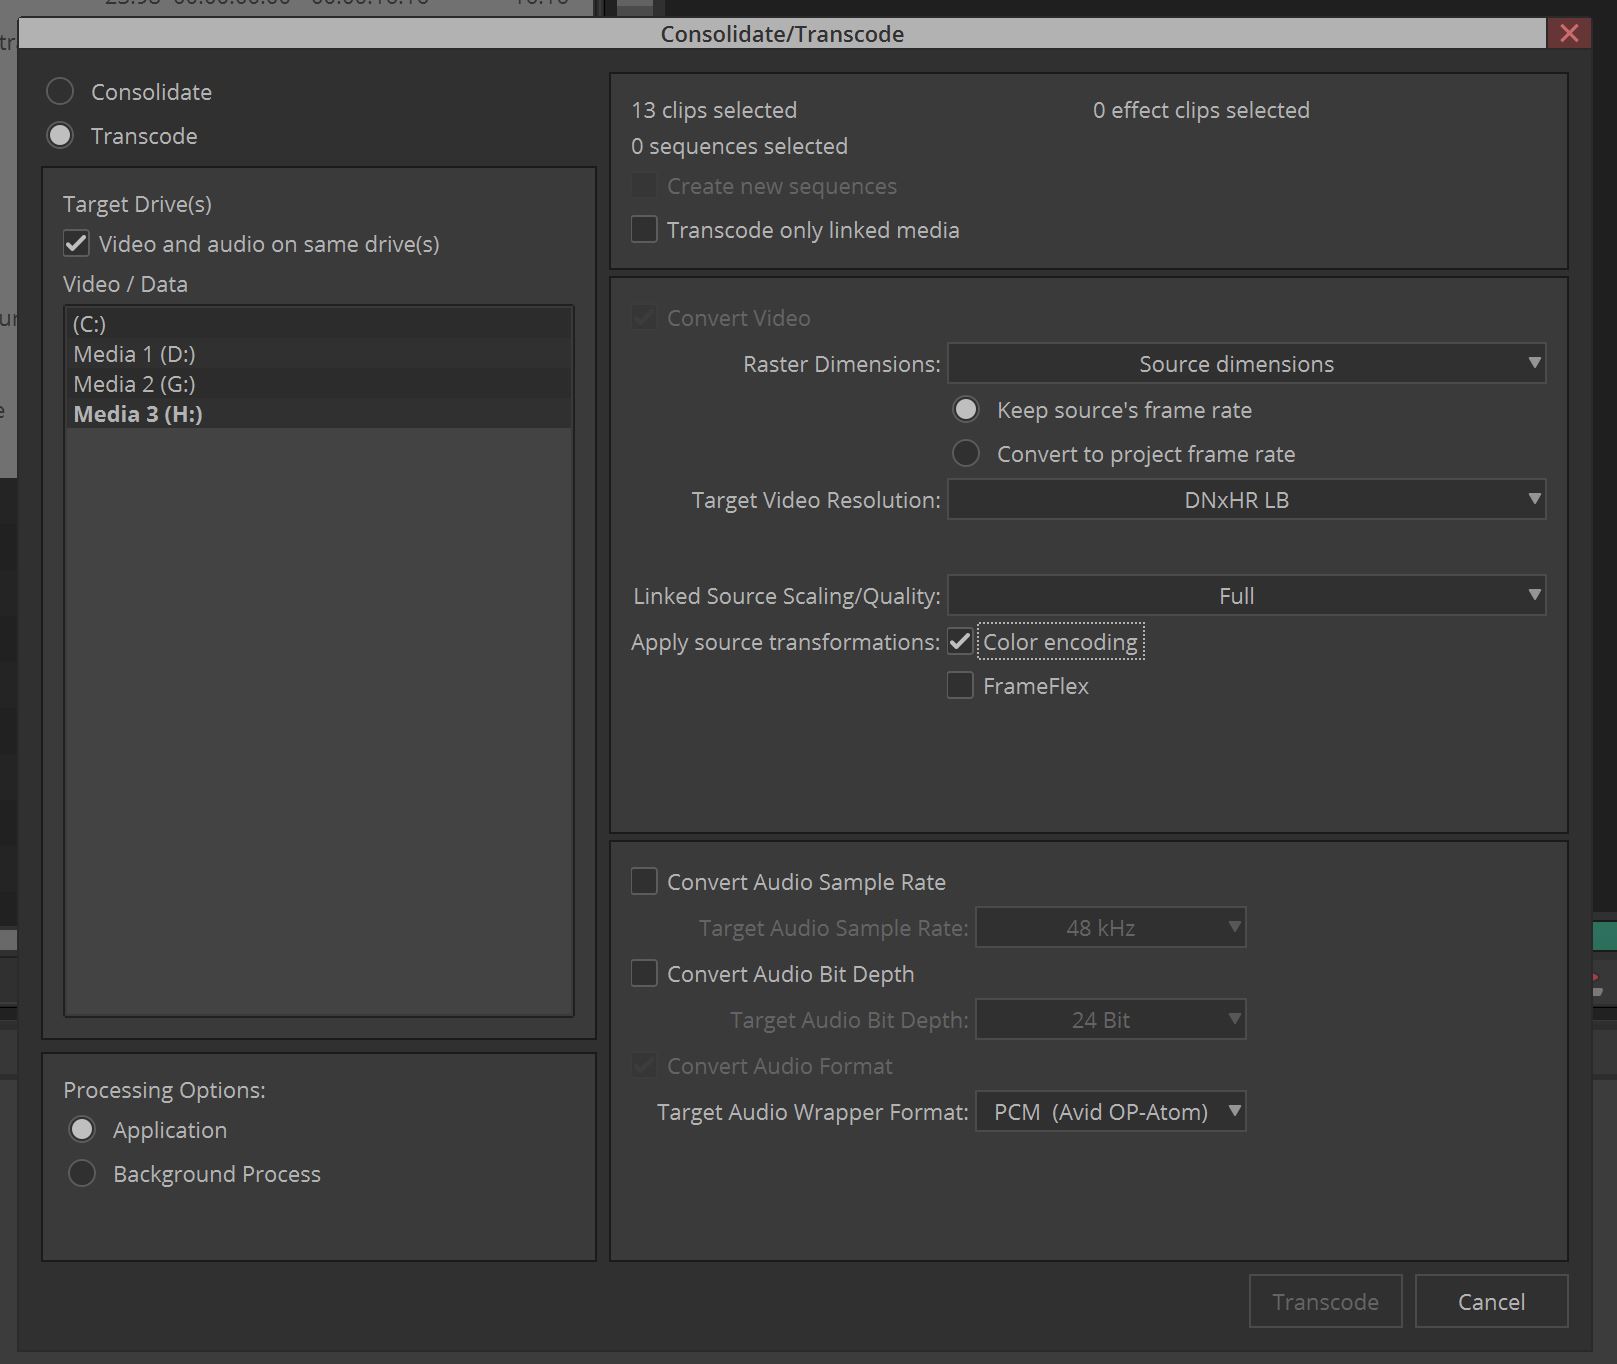
Keep in mind that there are some transcoding options I didn’t discuss like sample rate conversion, etc, as I never normally am converting that, that is why it’s been left out. Once your footage is transcoded, your bin will look a little like what you see below.
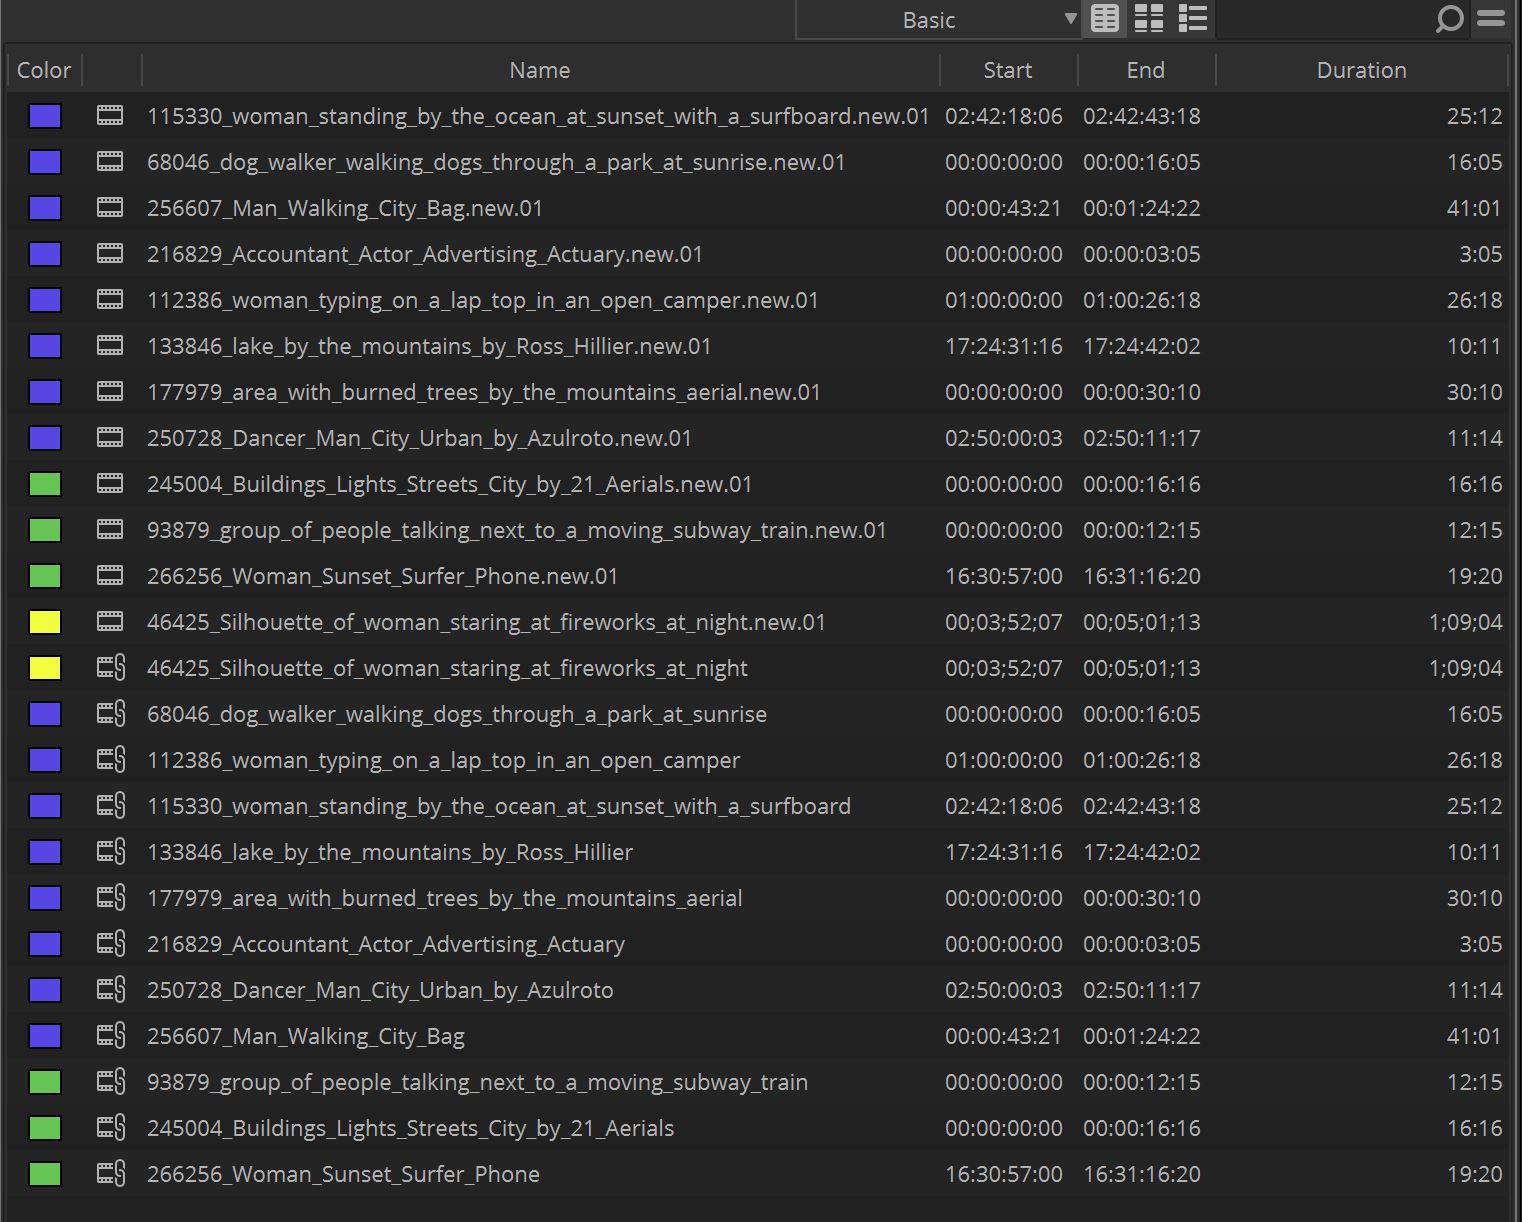
The beauty part with this method, as you can see from the above image, is that we now have actual Avid encoded Media in our project, and it has been tagged with the same color tag we applied earlier, so it’s easy to now move that media into whatever bin we want to have it in. Something else that is exceptionally important to note is that we have the newly created media, but we also still have the linked media. Many people think that we can remove it by deleting it. I would recommend against that, as Media Composer will need that linked media, to know where to link your transcoded clips back to, to create your high resolution master timeline. What I normally do is simply create a bin called “Linked Clips”, and drop them all in there. As you can see from the below image, I’ve created bins with names based on frame rates, just to keep things as simple as possible.
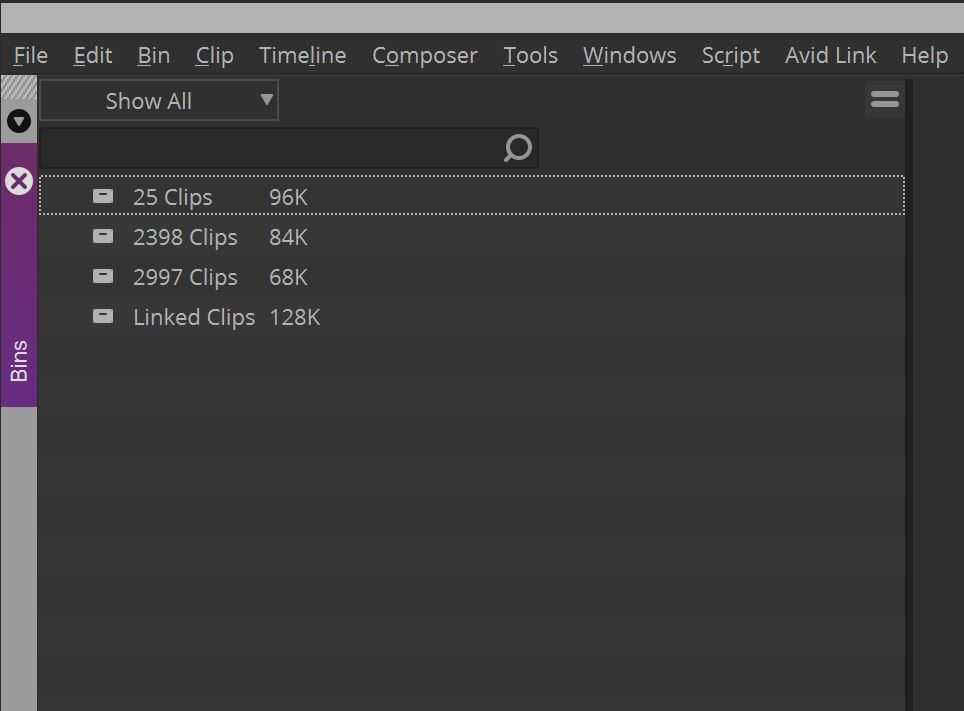
If you don’t like seeing the .new.01 at the end of every clip name, you can feel free to delete it, as it really has no impact on the relinking process. Well, that’s pretty much it for the first of the two hard parts. The setup. The easy part is the editing. You will have to consider some things, so let’s talk about those now.
STEP 4 – EDITING TIDBITS
Adapters are super helpful when editing in your timeline with different raster sizes and different frame rates. You can use them to quickly see what is happening with any specific clip. “T” stands for Temporal, meaning that a time change has happened with that specific clip. Meaning it has been converted from one frame rate to the other. “S” stands for Spacial, meaning that the raster size of a clip has been changed from its original size, to match that of your timeline. Obviously a clip can have one, two or even none of the adapters on it. There is another adapter, “C” representing Color, if you have made a change to the Color Encoding settings in your Source Settings.

Speaking of Spatial changes, if you have clips in your timeline with a “S” adapter on them, you can access FrameFlex via the Effects Editor, to quickly adjust the framing of a shot.
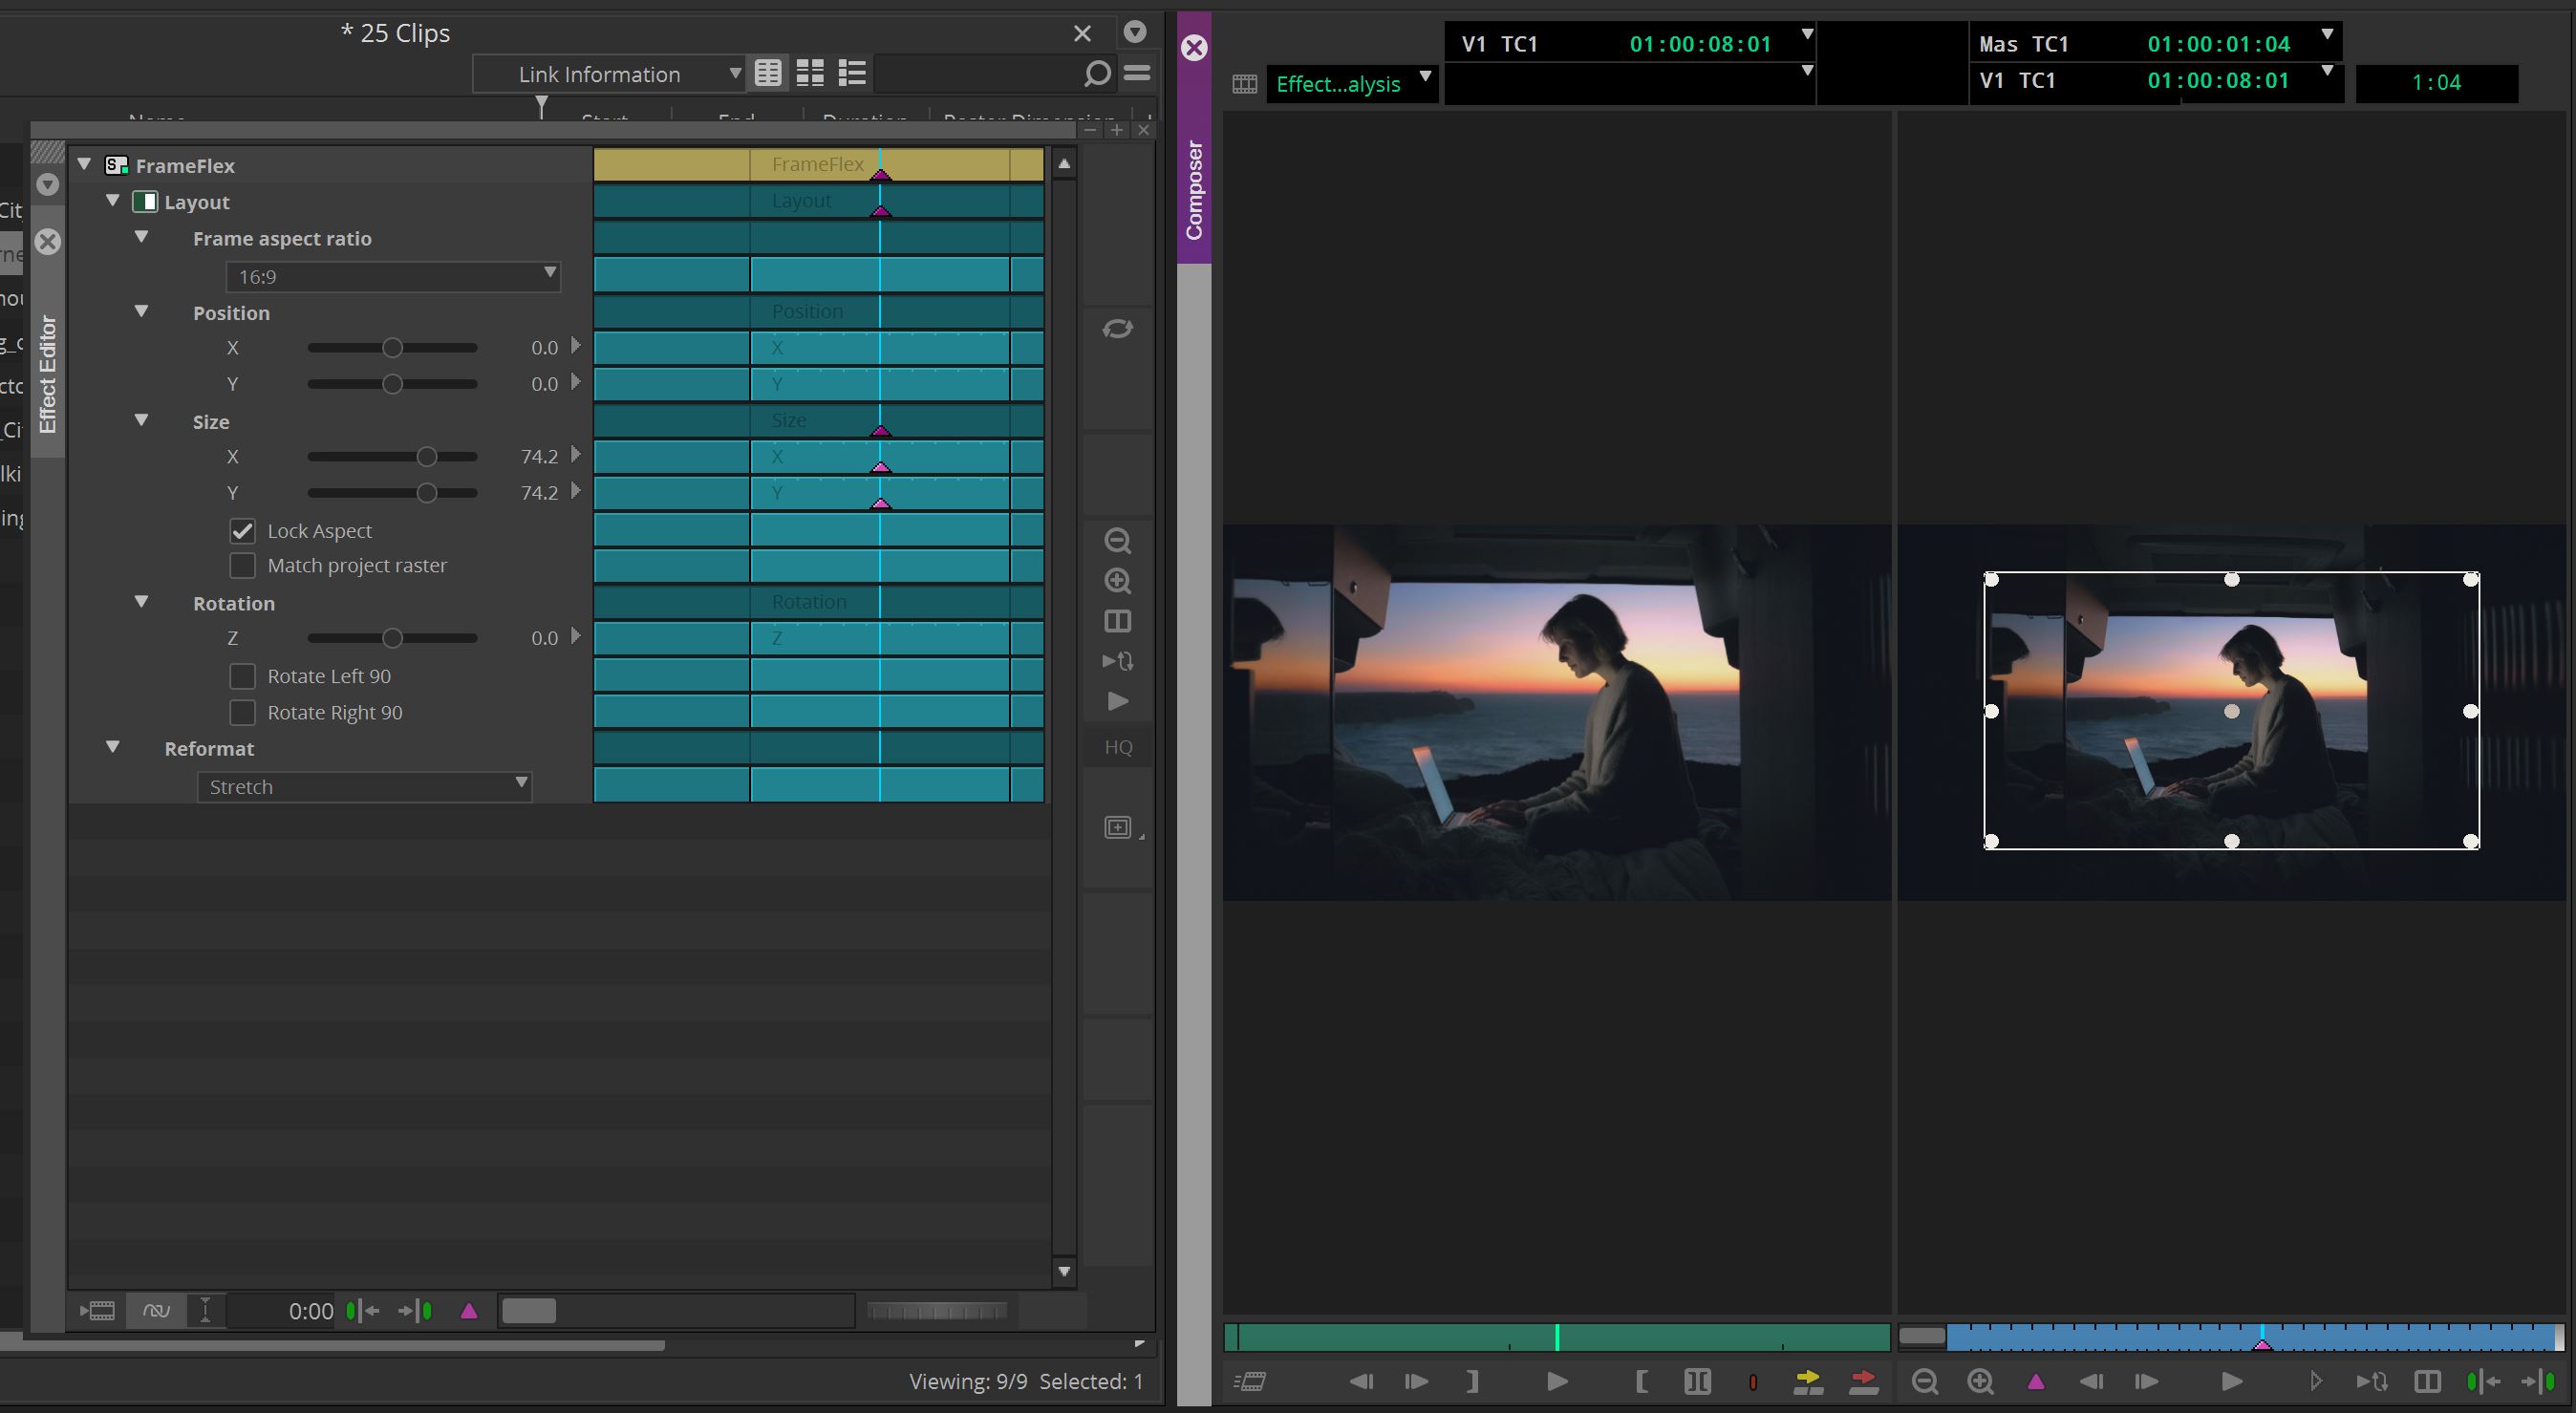
Now, there is one last thing that I want to mention, and that is that depending on the type of footage you’re working with, you may need to step into your Motion Effects Editor to adjust the type of motion conversion that is happening. In most cases, you’ll want a “Both Field” adjustment, especially if you’re dealing with interlaced to progressive frame conversions.
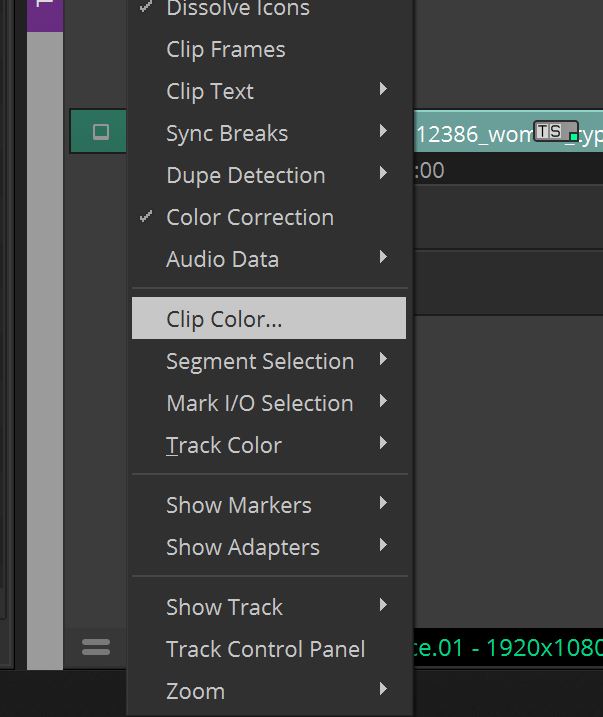
The last thing I want to mention is that what I normally like to do is to identify frame rates by color in my timelines. Media Composer does this by default, but the color changes are very subtle, and might not readily stand out. To adjust the clip colors, you can navigate to the timeline fast menu and head up to Clip Color.
Once there, you’ll see that Media Composer has colors set for a variety of clip types including Offline, Proxy, Linked Clips, etc, but what we’re interested in is the “Mixed Rates” section. Here, I will change the colors to something more noticeable, and something that I’ll be able to recognize right away, like below.
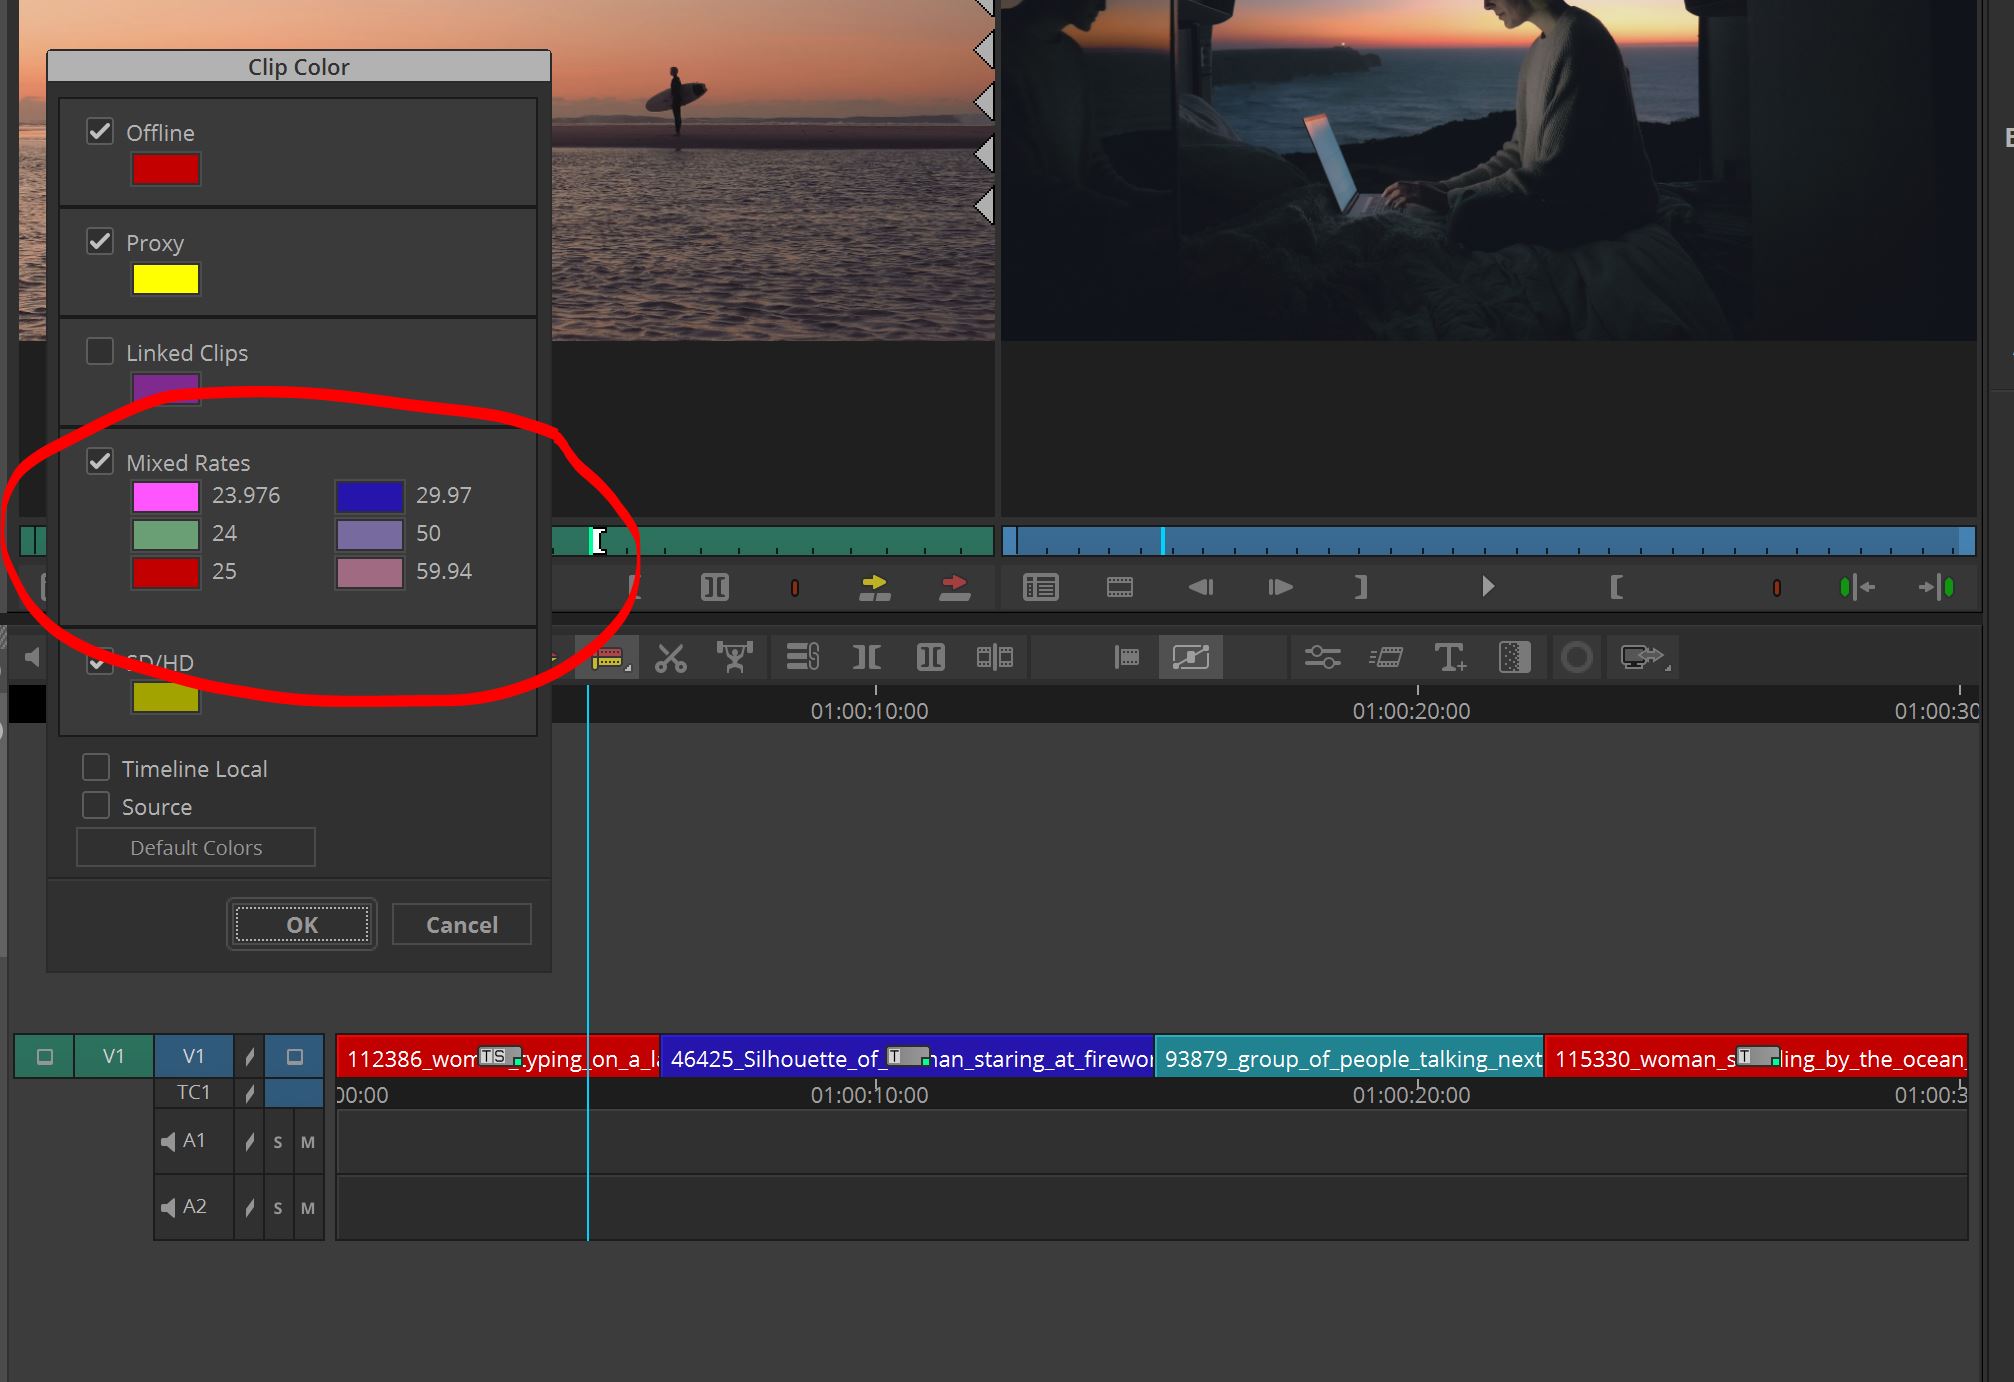
Now I can easily see what is what in my timeline. This might be a little much for some editors, so you can adjust the colors as little as needed to differentiate between the different frame rates
STEP 5 – DELETING THE MEDIA FOR RELINKING
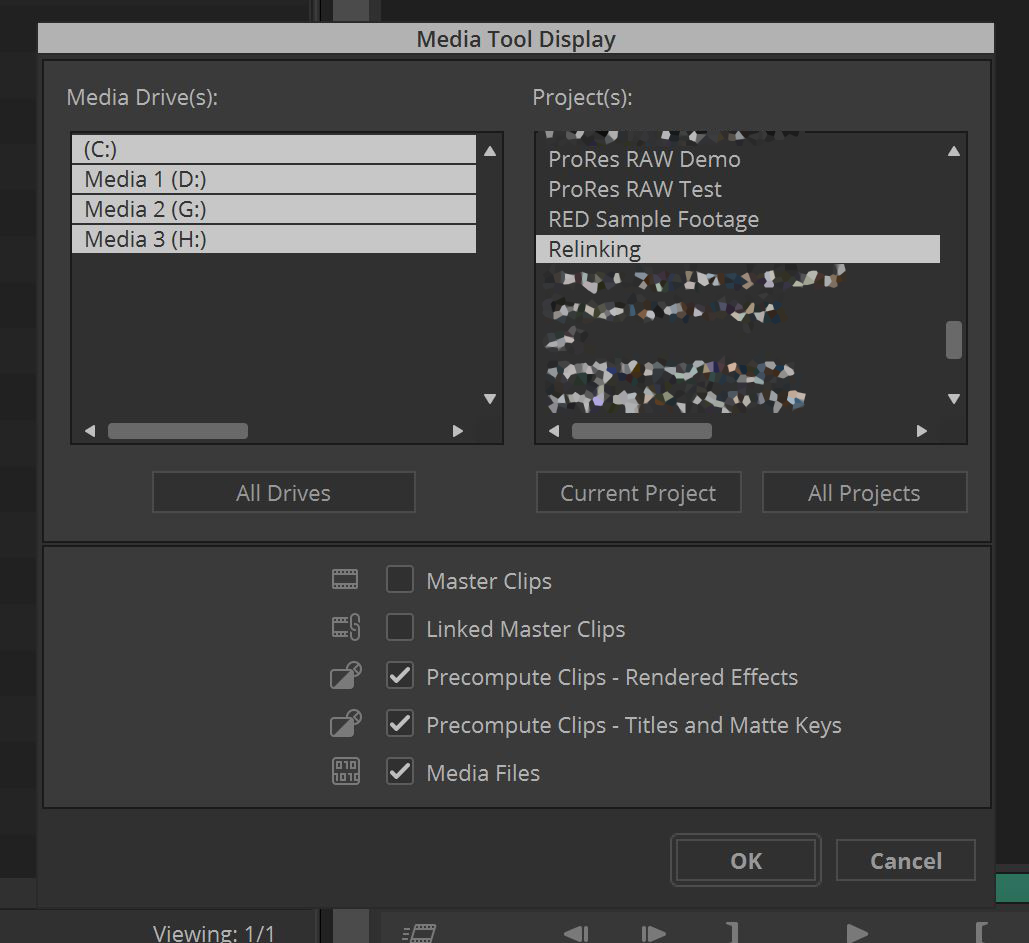
This is a step that I take. Some editors might choose to take the next steps with media in their project, but what I normally will do is either create a mixdown with timecode burn of my entire timeline (locked offline), or export it so I can relink to it if necessary. Next, Call up the Media Tool, and choose to show the Precomputes (both) and the Media Files.
You might think that this point you can just blow everything away, and you’re good to go, except take a look at what has also been populated in the Media Tool window. Files called “Linked Metadata Files”, and they are referencing the location of the files on my desktop that I originally linked from, to get the footage into Media Composer.
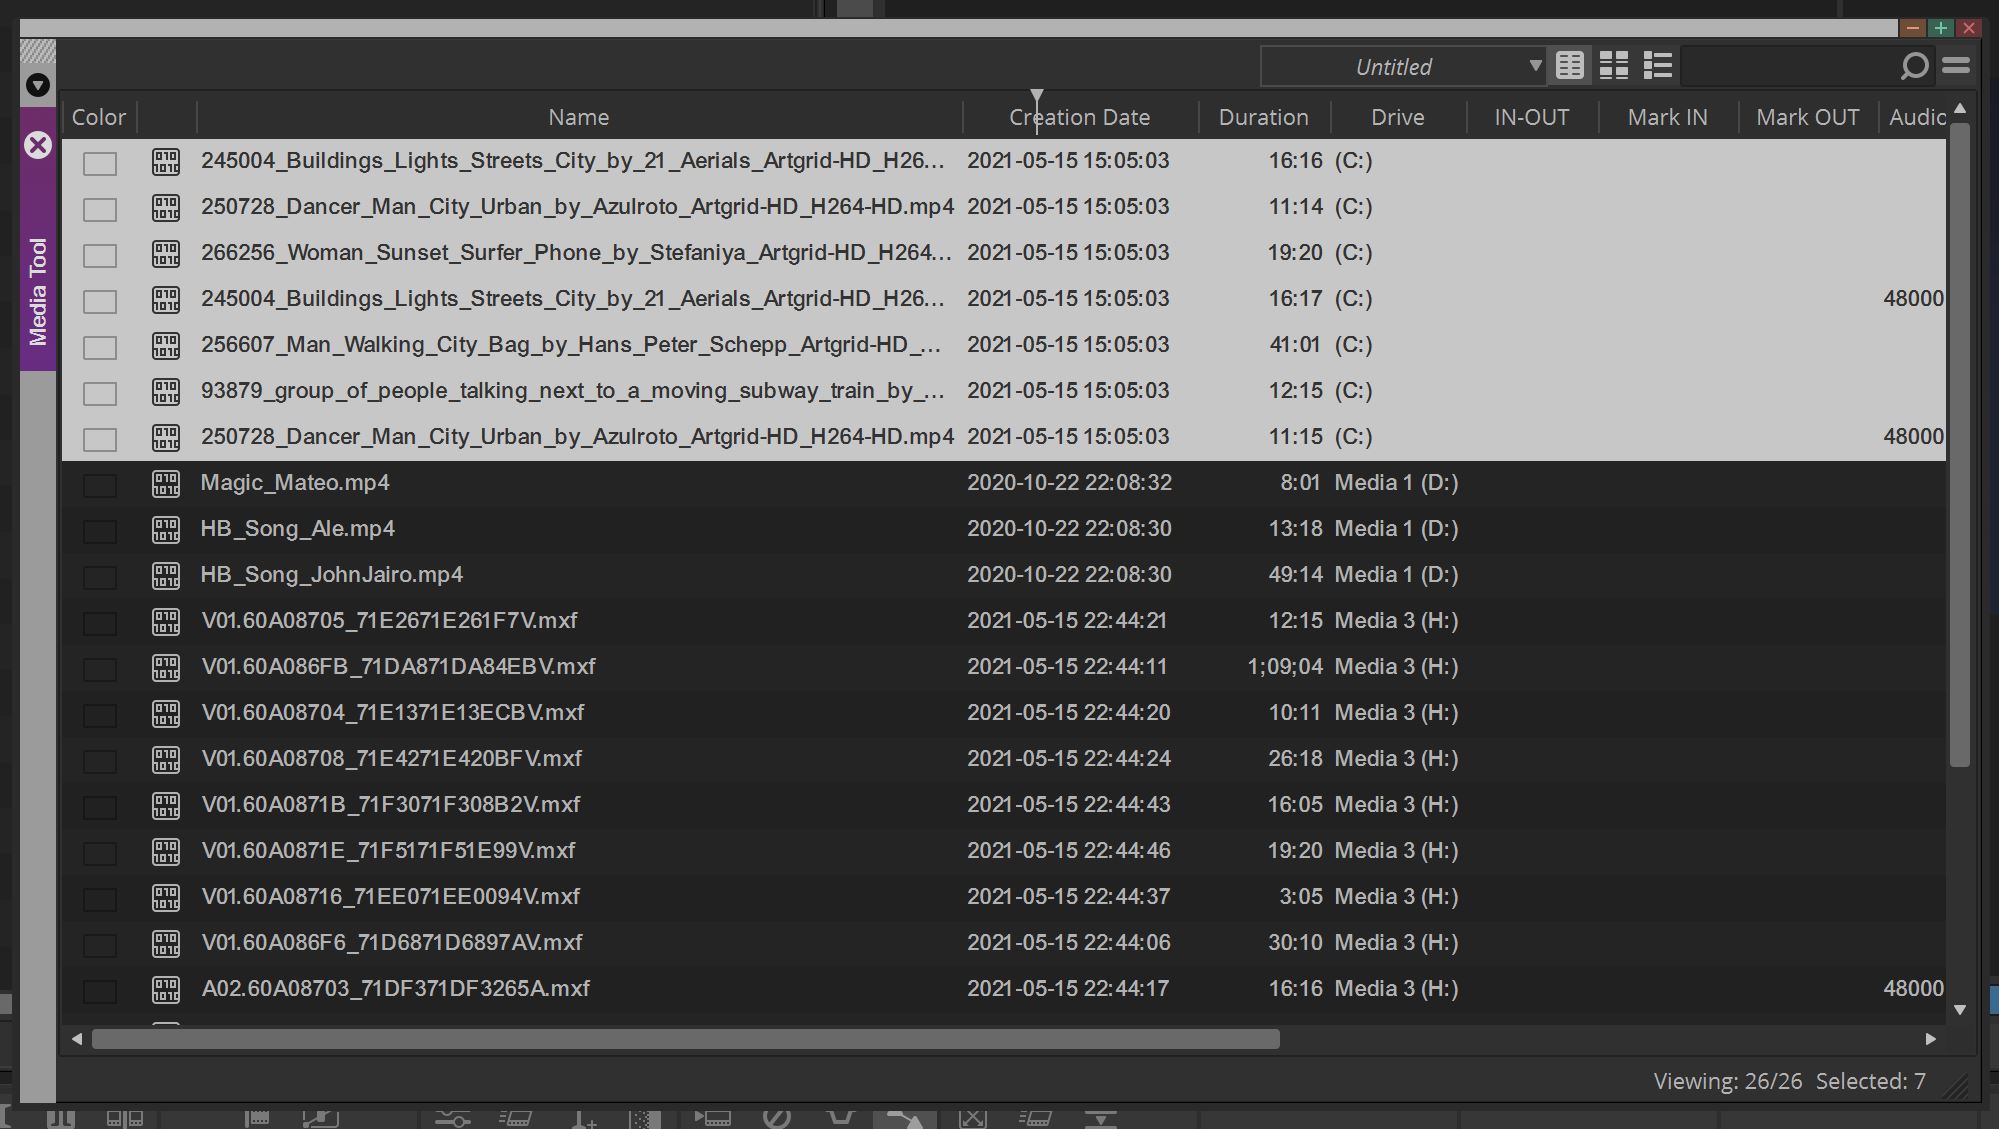
Now, I’m going to assume, since I haven’t been able to find any information otherwise (but if someone updates me, I’ll be sure to add it to this article), that this is the information telling Media Composer where the originally linked files live, so I’m not going to delete this information. Only the actual media files.
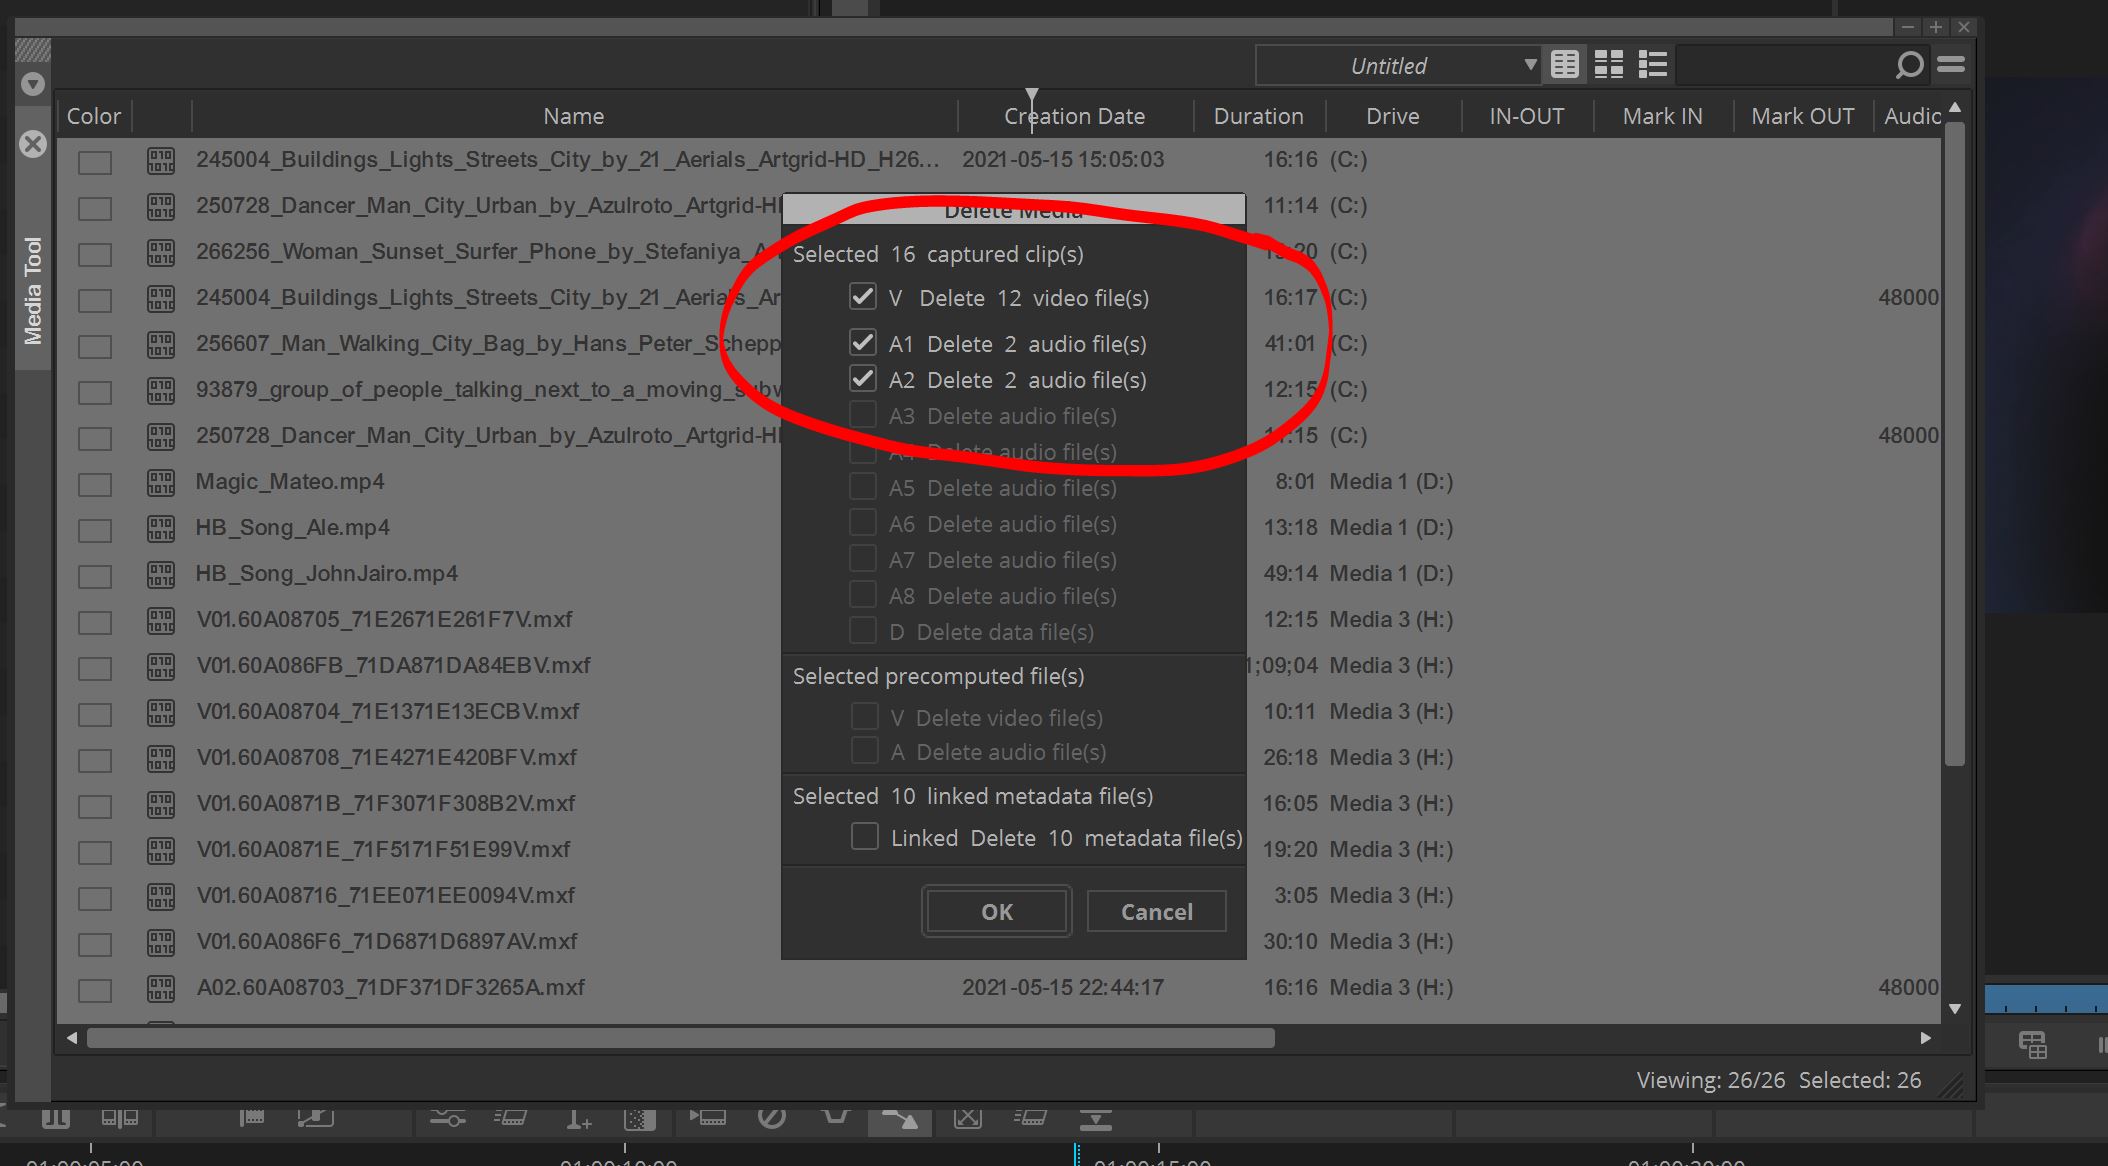
So, with that metadata still intact, along with the linked files still living in our project in a bin, we’re good to go to relink.
STEP 6 – RELINKING
A common misconception at this point is that you need to go back, bin by bin, and relink everything to have it appear in your timeline. You could do that, but for me, since this timeline is locked (yeah right, when is anything ever REALLY locked. LOL), I only want to relink to the clips that exist in my timeline. So, to do that, I first make sure my sequence is in a bin by itself. No other clips, sequences, etc in there with it. Then, I head to the bin fast menu, and navigate down to “SET BIN DISPLAY”.
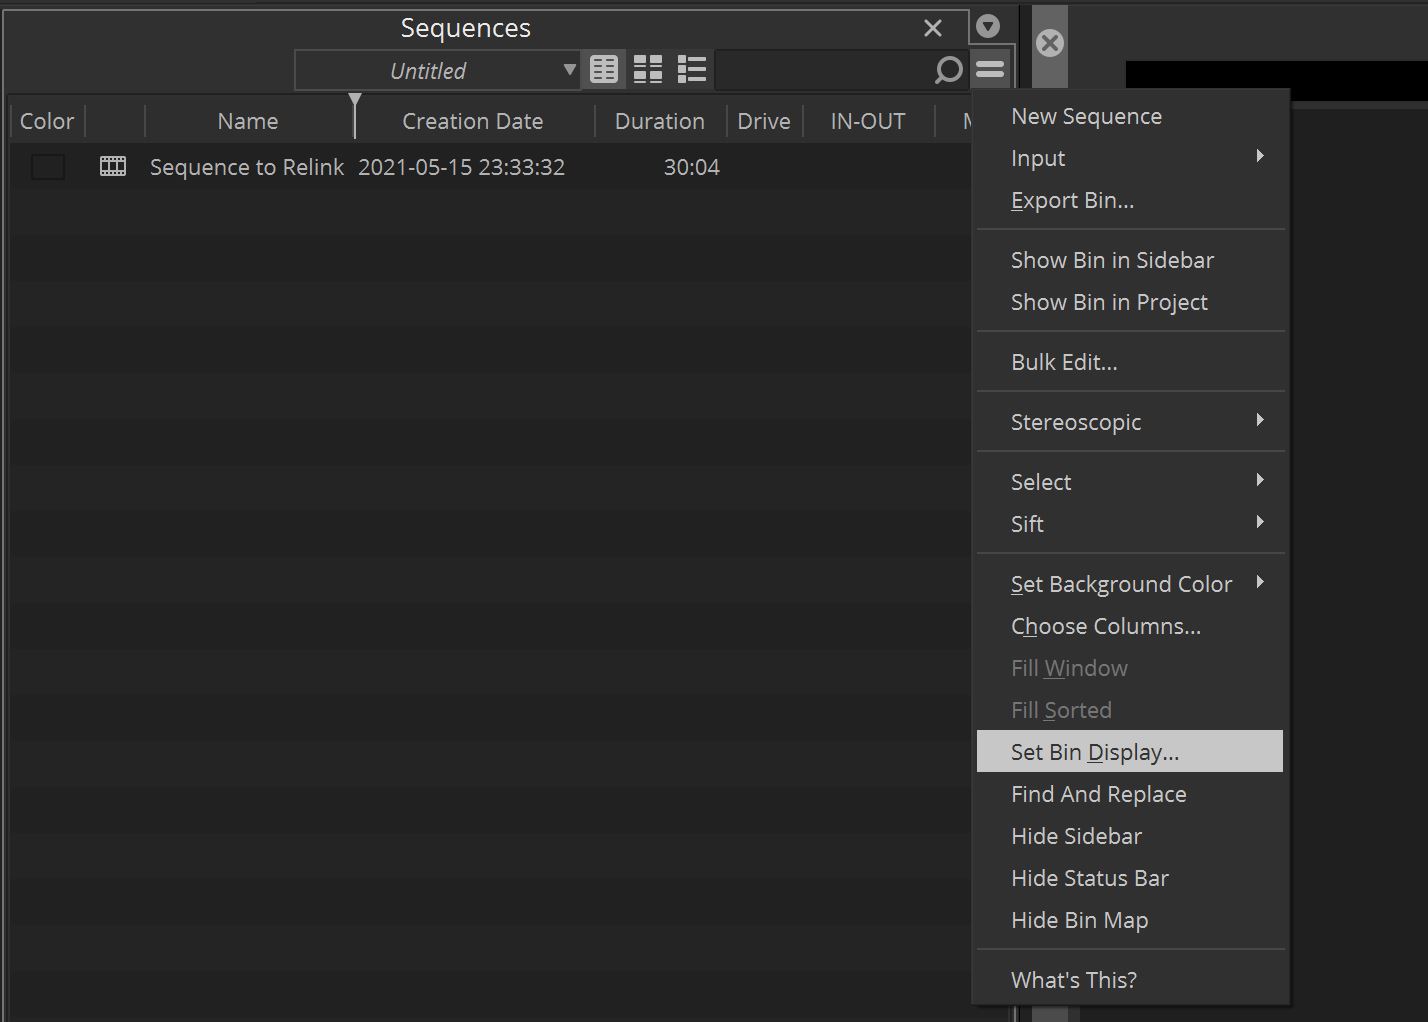
Once there, check “Show Reference Clips”.
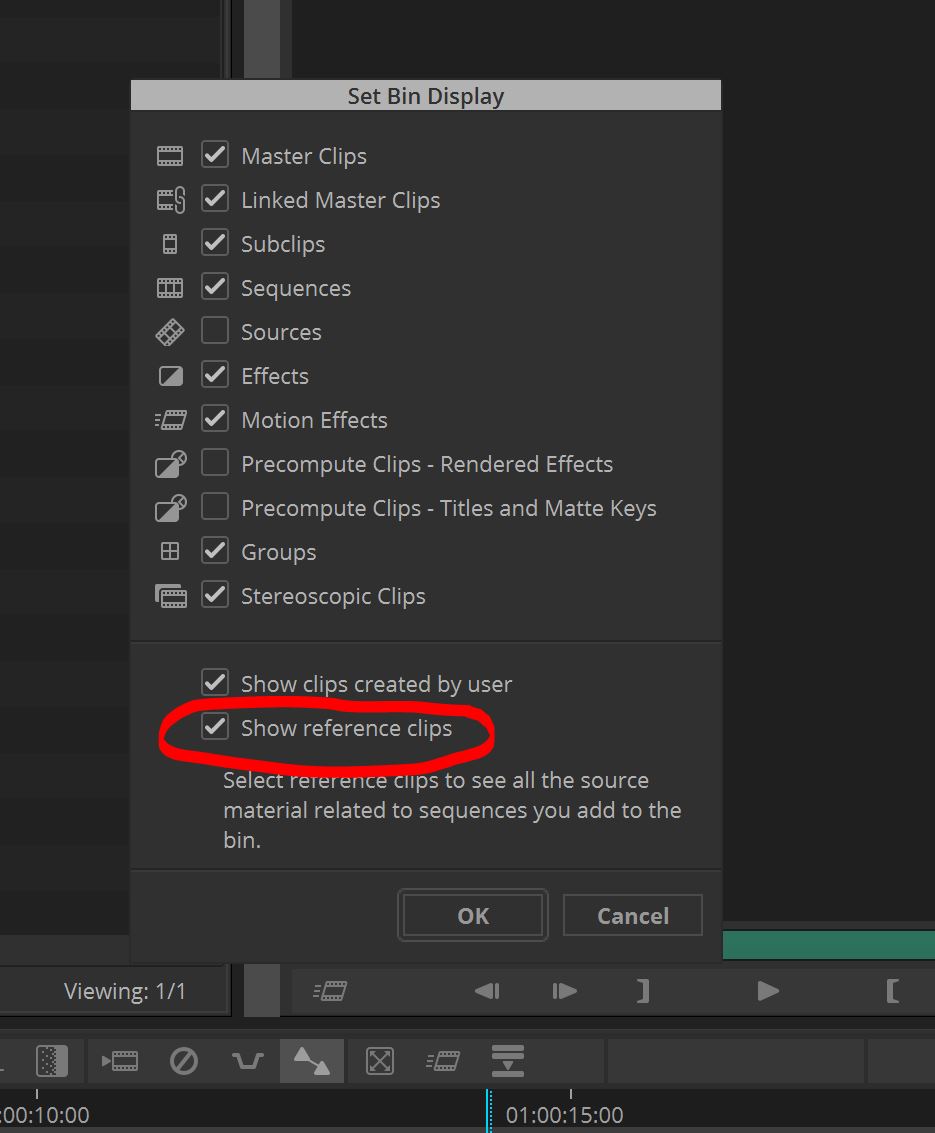
Now, you’ll see that Offline Master Clips have now appeared in your bin. The clips that have appeared represent only the clips that appear in your timeline, so please keep that in the back of your head. Alright, let’s relink to the master files. First, select the clips, right click and select Relink.
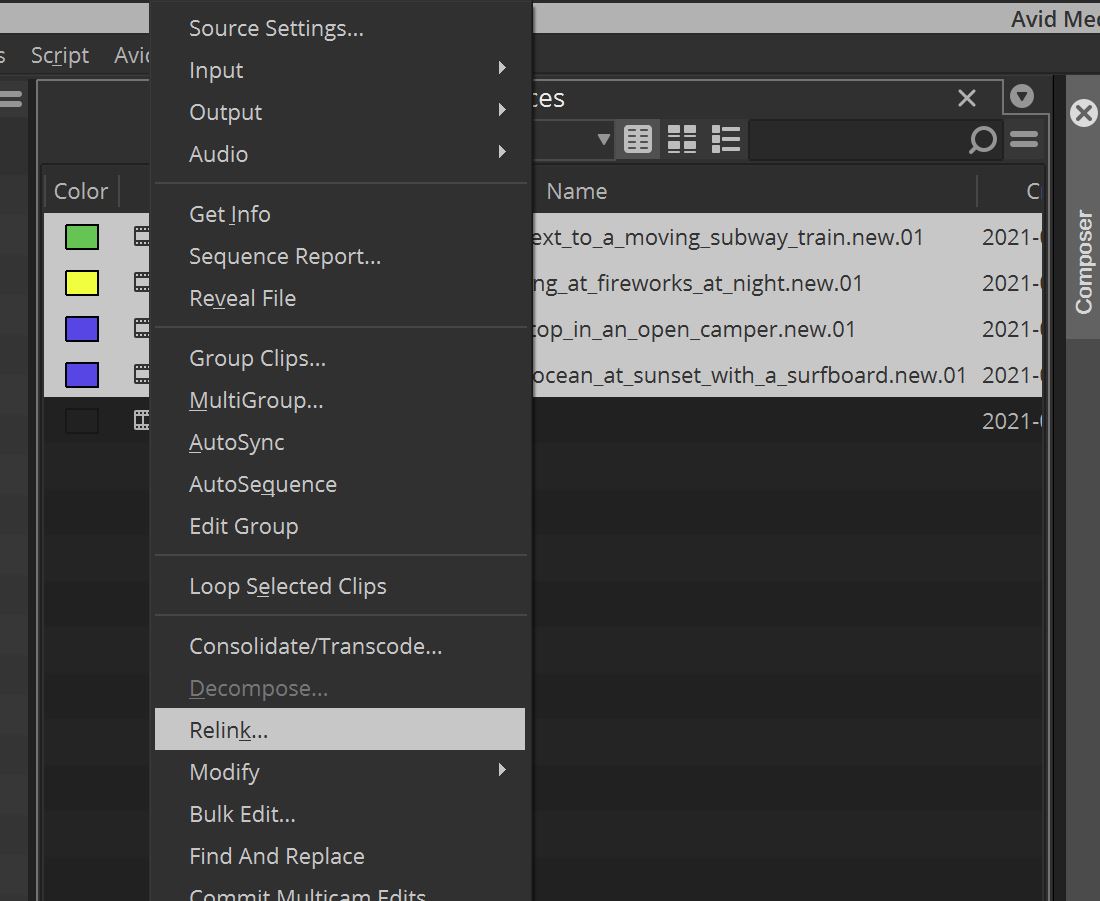
Ahhhh, the window that drives fear into the hearts of editors everywhere! The dreaded Relink window.
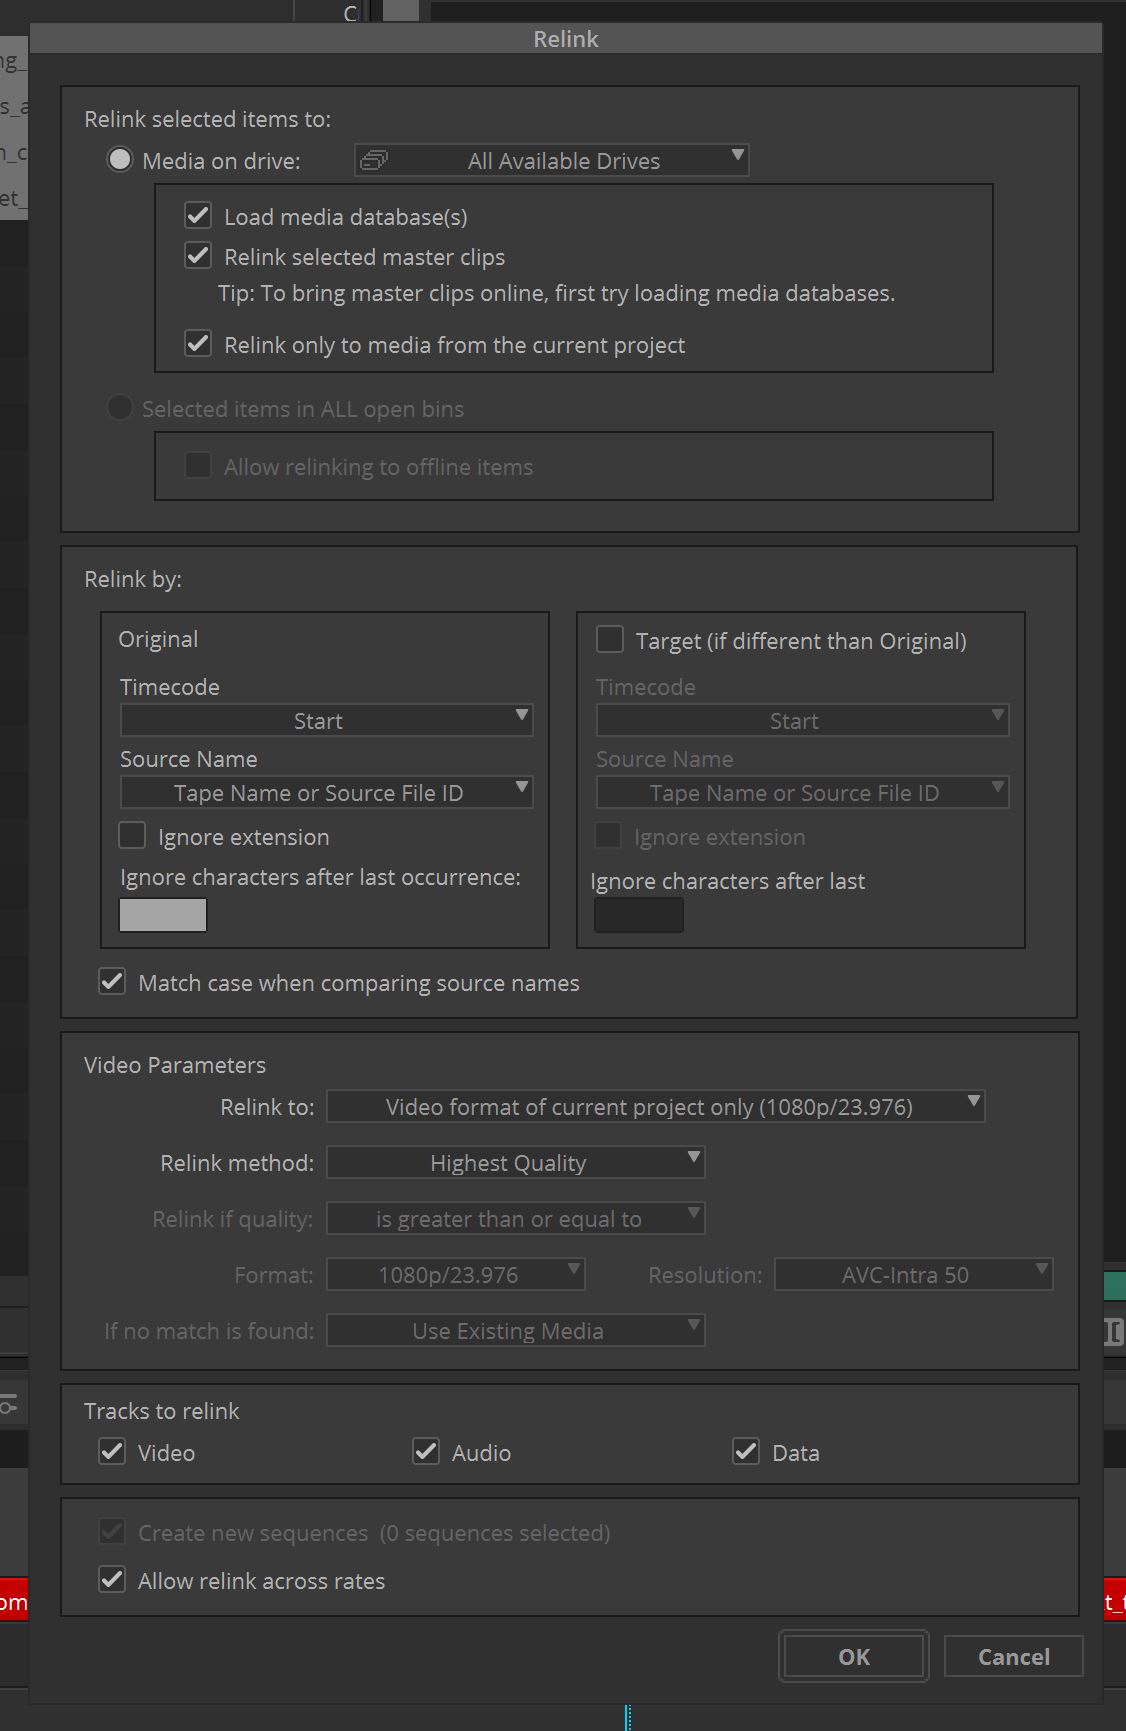
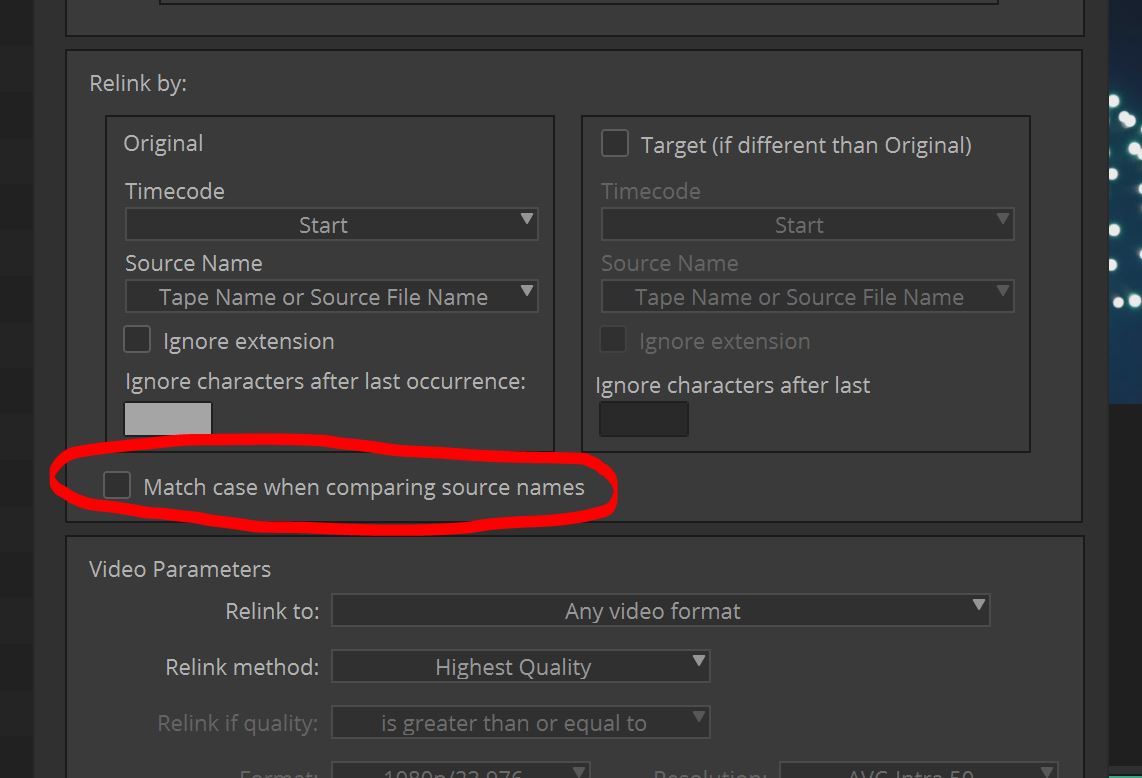
The funny thing is that as daunting as this window appears, there’s only a couple of things that need to be set. You want to make sure the “Source Name” drop down is set to “Tape Name or Source File Name”, you want to make sure that you’re relinking to “Any Video Format”, and by default, the Relink tool is set to relink across frame rates, but just to make sure, there’s a checkbox in the lower left corner. Here’s a snapshot of the relink window with only the parameters you should need to adjust.
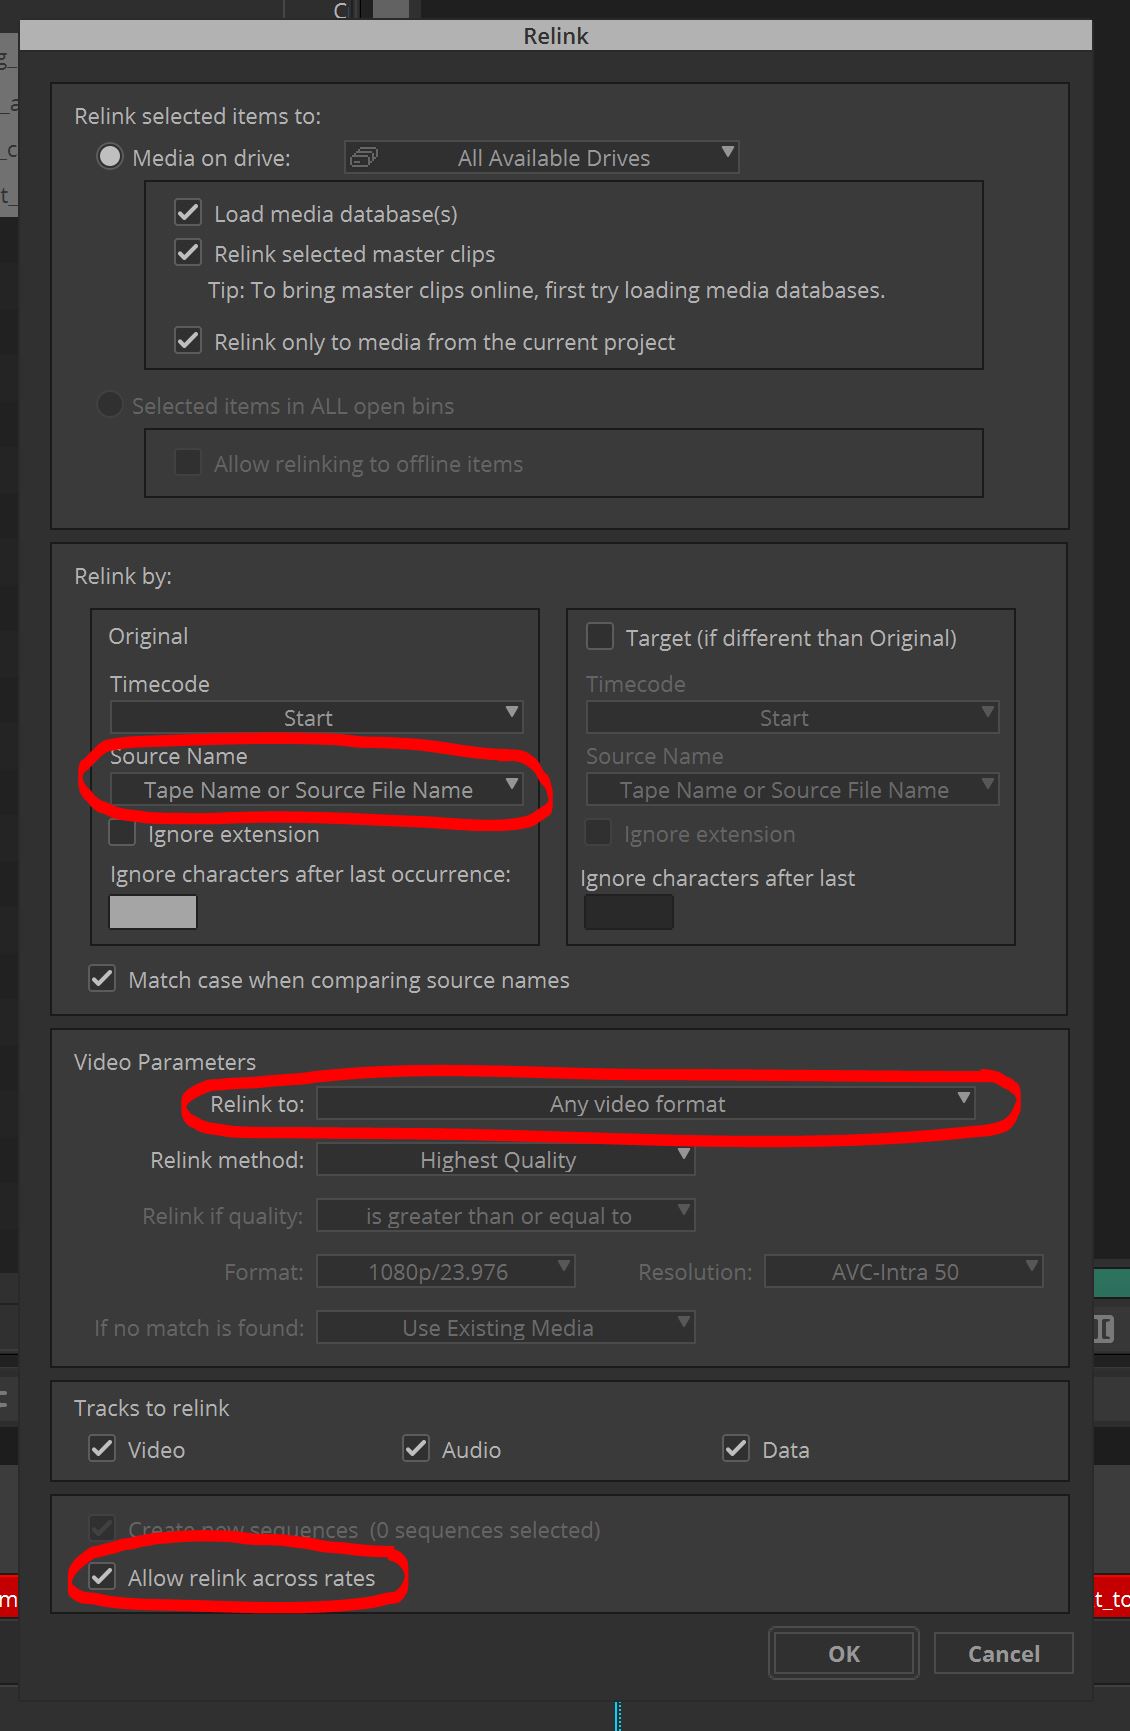
Woo Hoo! That’s it! What you will notice is that the master Reference clips that are in the same bin as your sequence have switched back to linked clips, and all the clips in your timeline are now relinked to the originally linked clips, and your timeline is ready for online.
HOWEVER, with that being said, WHEN HAS IT EVER REALLY BEEN THAT EASY????? I can tell you that on more than one occasion, some clips have relinked, and other haven’t, and there’s really no method to the madness as to why some do and some don’t, so if you run into this problem, the first thing I recommend doing is to select the clips that didn’t relink, head back to the Relink window, and there is one option that is turned on by default, that I always recommend turning off if you run into relink problems, and that is “Match Case When Comparing Source Names” checkbox. Uncheck this box, make sure your options are set as we discussed above, and you should now see all your clips relink as they should.
Now, I would suggest going back into your “Set Bin Display” settings and turning off Show Reference Clips, as we’re ready to transcode our footage for online.
STEP 7 – TRANSCODING FOR ONLINE
Now that the footage is relinked in your timeline, you’re ready to transcode it in high resolution, assuming you’re finishing in Media Composer. First, select your sequence, and head back to the transcode window. You’ll now see that it looks a little different with a sequence selected, as opposed to your dailies. I normally recommend creating a new sequence, as you’ll have one that is referencing your linked clips, and one referencing your newly transcoded master clips. Also, I recommend two second handles on either side of the used media, just as a safety. As far as the quality of your transcodes, that’s really up to you. I normally will recommend DNxHR HQ or HQX depending on the footage that was show. Your transcode window should look a little bit like the image below.
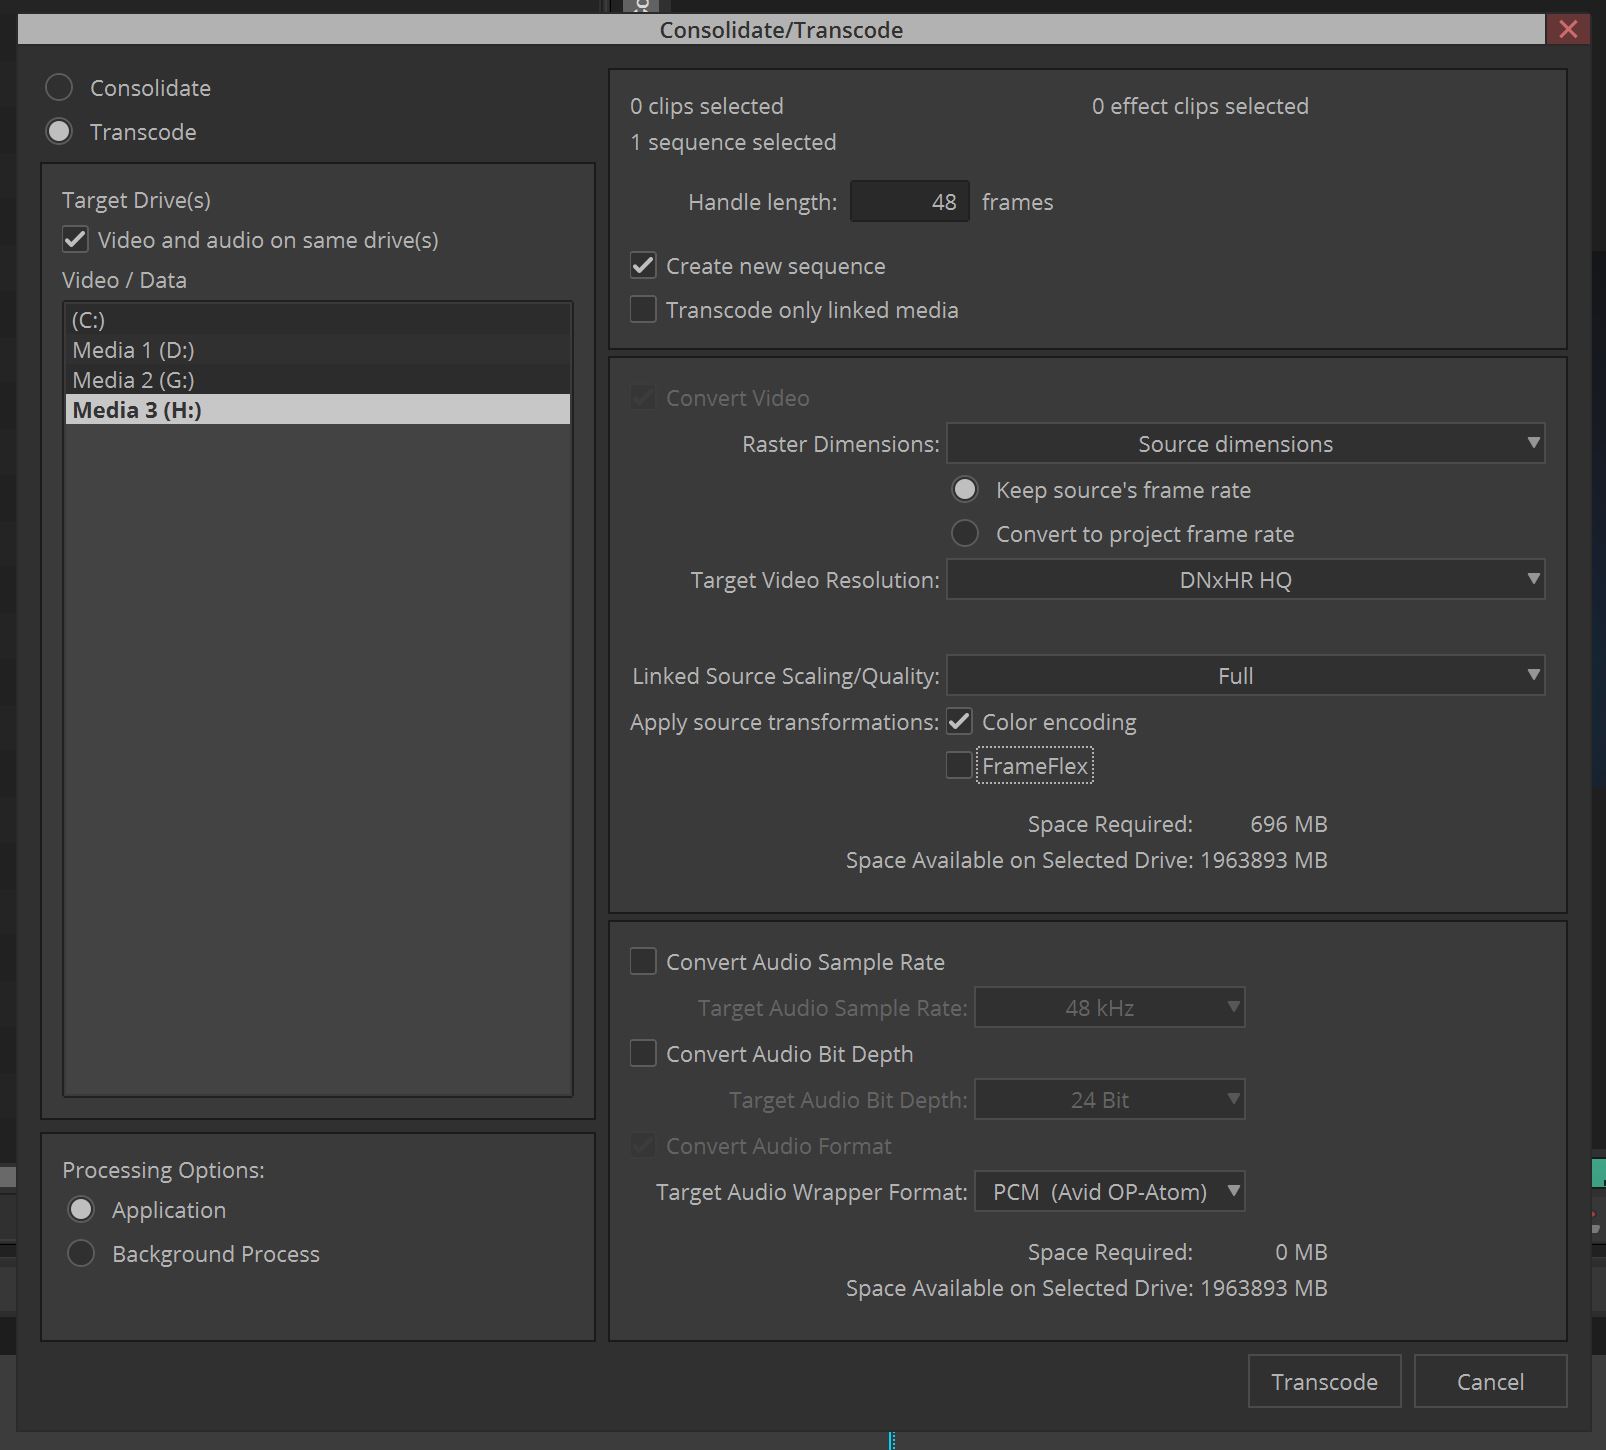
As you can see in the above image, I didn’t bake in Frame Flex, as I always have clients changing framing right up to the very end, so I like having that flexibility.
That’s it. Your Relinking masterclass is now over. However, there are a few little options that I do want to point out, before we wrap up
STEP 8 – HIDDEN BELLS AND WHISTLES
Have you ever had an issue with trying to link to a file that you know you should be able to link to, but Media Composer just won’t let you do it? Well, Media Composer can be dumb sometimes, and it often helps for us just to tell it how we want the footage linked to. Via the Universal Media Engine, or via Quick Time. You can always head over to the Plug-In column in the Source Browser, right click and tell Media Composer which one it should use. You’ll also notice the options here changed based on the footage type (RED, BMD, etc)
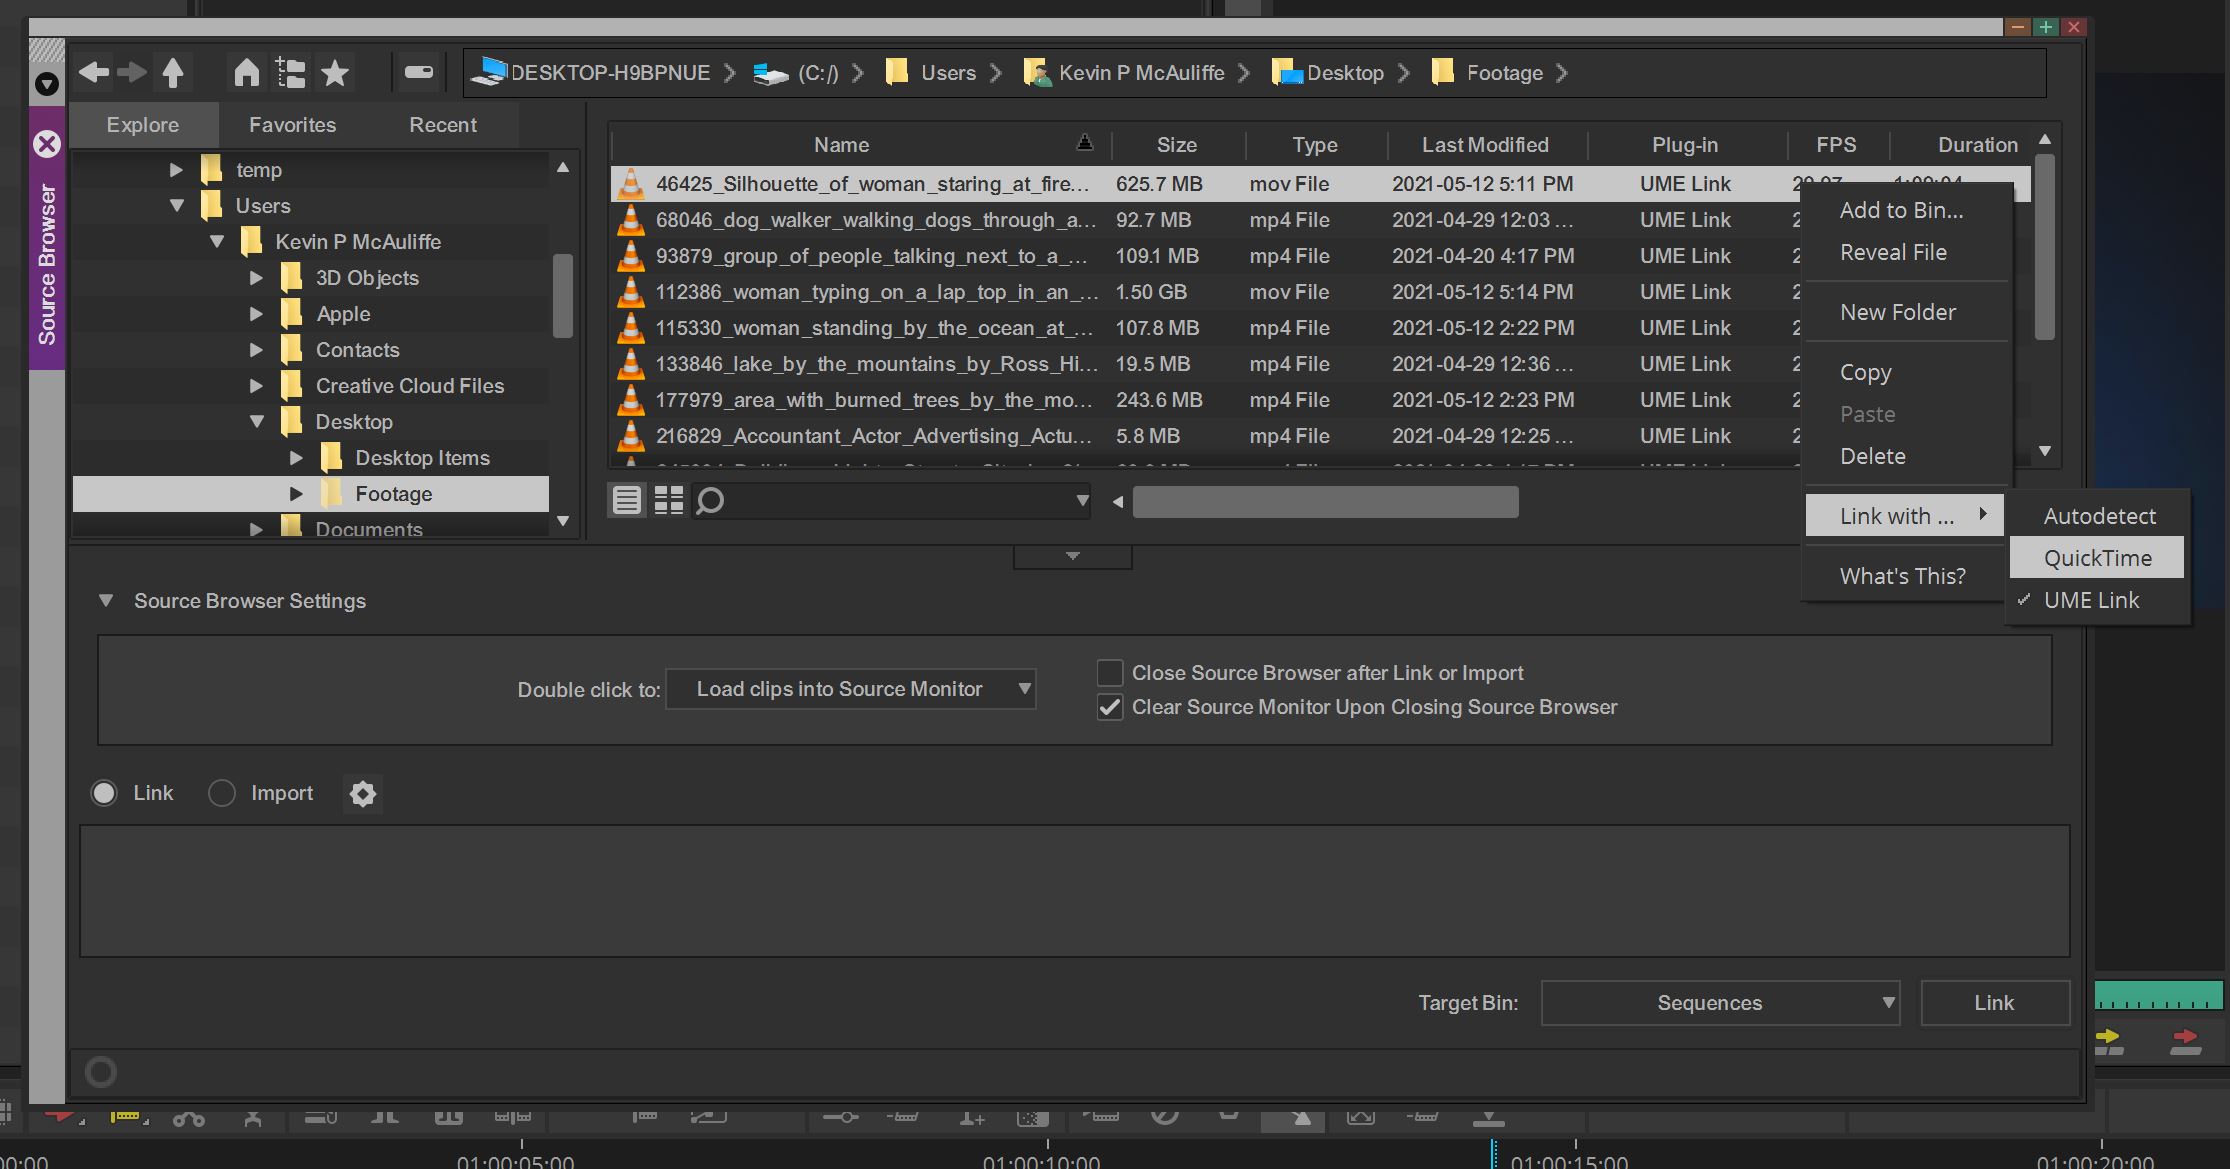
Have you moved your footage that you linked to, from one drive to another and now it comes up as offline in Media Composer? You don’t have to relink it all, just point the Source Browser to where the footage has been linked to, and it will automatically relink the footage to it’s new location in a matter of seconds. Super helpful.
Well, that’s it. Our Masterclass is done. Please keep in mind that this document is designed to be an ever evolving lesson in how to relink, so if you have suggestions, improvements, etc on what can make it better, send it to me at kevinpmcauliffe@gmail.com, and we’ll keep it updated for the benefit of experienced and new Media Composer editors alike.

Filmtools
Filmmakers go-to destination for pre-production, production & post production equipment!
Shop Now