Editor’s Note: “28 Weeks of Post Audio” originally ran over the course of 28 weeks starting in November of 2016. Given the renewed focus on the importance of audio for productions of all types, PVC has decided to republish it as a daily series this month along with a new entry from Woody at the end. You can check out the entire series here, and also use the #MixingMondays hashtag to send us feedback about some brand new audio content.
Mixers or a mix console have a number of inputs and outputs and a number of different types of tracks used to route signals. Although a mix console that has 48 audio channels (or more) can look intimidating, in fact, it is just a redundant bunch of channel faders lined up in a row. If you know what one of them does, you know what most of them do.

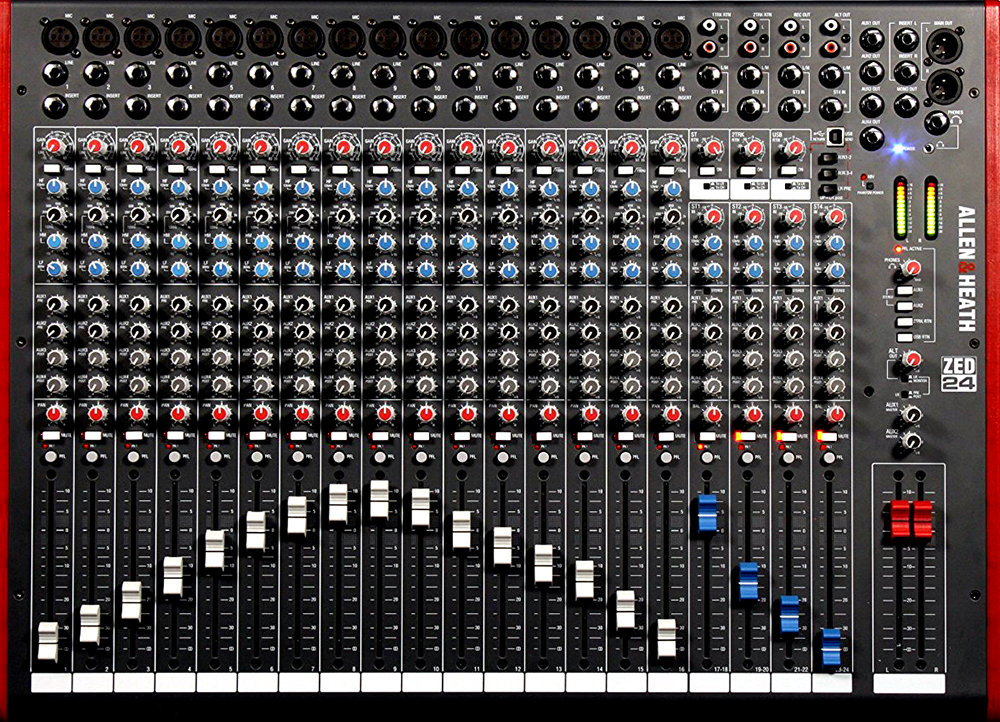
Looking at the mix console above you’ll see that cascading down from the top are a number of different knobs, each affecting the signal in various ways. In this Allen & Heath, ZED 24 mixer, you can see a simple layout of the essential elements. Signal path runs from top to bottom, starting with a plug panel to connect a cable carrying signal.
The top panel has the inputs and inserts. The very top is an XLR input, followed by a line level input, followed by an insert input. XLR uses a mic level signal and a line input takes a line level signal. Depending on the hardware input plugged in, the console knows what to do with the signal. The insert is to add/insert a hardware device, like a reverb unit, that you can insert into that particular channel’s signal chain.
Working down from there is a gain knob in red. This will add or subtract the gain needed for the signal. Below that are four different type of EQ knobs, each affecting a different part of the frequency of the signal. Below that are four send knobs, which can be used to send signal to wherever else it needs to go, other than the output of the fader strip. The next red knob is for the panning of the signal – mono, left or right, or anyplace in between. There is a rectangular mute button and there is a round PFL button. The PFL stands for pre-fader listen, engaging this button allows you to hear the signal without the fader, just the signal as is. In other words, moving the fader makes no change in the signal level. Finally there is the fader slider itself. This is the final part of the signal chain that is used for the actual mixing of signal. Full down is no signal and in this mixer, full up adds 12 db of gain.
The blue faders are the auxiliary tracks of this mixer. They get their signal from the four knobs in the send section. If the send knob on a strip is full left then it is not sending any signal, parked full right is full signal. Once the signal is sent to the aux faders, then the signal is passed like the other faders, down is no signal and up is more signal. The two red faders are the final stereo outs of this console – left out and right out and again the signal corresponds to the fader position, down is no signal and up is more signal. The additional buttons in the master section are for further routing of signal.
All mix consoles have a “0” point, located about 1/4 of the way down from the top of the fader. This is called “unity gain.” Unity gain is the neutral point of the fader and is not acting on the signal at all. In this mixer, there are 24 audio faders so although it looks like a lot, if you understand one strip, then you understand all 24.
That in a nutshell is the basics of every mixer out there, hardware or virtual. The additions are adding to the effects sections, perhaps compression and limiting along with EQ, or perhaps some type of reverb or delay effect. When folks are starting out learning digital audio I always encourage them to take a simple mixer and run a mic and some music in and see how all the parts affect one another. You can get so lost in so many aspects of the digital world – preferences, driver updates, operating system updates and the like – that one can easily get lost in that before ever getting a handle on the virtual mixer.
I use sends and receives for creating the split tracks that I discussed in this prior post. The way that Pro Tools works allows for easy track creation and subsequent ease of routing and effecting the signal. I route these sends and receives through aux tracks where I can further effect (and affect) them.
Busses are the path that signal is sent through. Think of the aux tracks as the “bus station” where the signal get rerouted to other places. Pro Tools allows for the aux tracks to also have inserts. This allows for additional processing of the signal to its new route.
An example from Pro Tools below, for instance, there are 4 dialog (DX) tracks. We can send the output of these tracks to a mix send bus. That signal can then be sent to a mix aux track. That mix aux track can have a limiter on it to make sure the signal’s level hits the right amount, as well as other processing inserts. If you look at the send section in this Pro Tools mixer you can see each track is being sent to the mix send. The 4 tracks on the left are dialog tracks. These are being sent to the mix send as well as the dialog send. Next to those are 4 sound effects (SFX) tracks. Those tracks are being sent to the mix send, and they are also sent to an M&E send, an FX send and a Nats send. Each one of these are discrete bus paths and each is assigned an aux track and then those auxes are sent to separate record tracks.
By following a similar pattern you can create the separate split tracks that are required for the mix deliveries. In this case we have a full mix split, an FX split, an M&E split, a Nats split (natural sound or production effects) and a dialog only split. If we were to see more of this mixer we’d also see a Music split and a Mix Minus split. If you study the sends you’ll find that every track gets sent to the mix, however only dialog goes to dialog, only FX go to FX etc.
This workflow can easily create all the required splits and recordings in one fell swoop. Many mixers offer different variations and track counts of audio tracks, aux tracks, master faders and other types of tracks as well. Pro Tools, which is a virtual mixer, allows for very complicated mixers to be built, depending on the version of the program being used.
This mixer workflow is in no way meant to be exhaustive or authoritative. There are many useful ways to route and effect signals, however, the send and return is a very effective way to route signals and is included with just about any mix board out there.
This series, 28 Weeks of Audio, is dedicated to discussing various aspects of post production audio using the hashtag #MixingMondays. You can check out the entire series here.
Woody Woodhall is a supervising sound editor and rerecording mixer and a Founder of Los Angeles Post Production Group. You can follow him on twitter at @Woody_Woodhall


