Continuing on an article in the last Pro Video Coalition newsletter, The Basics of Avid Media Composer for a Final Cut Pro Editor, this article will look at a number of other functions and how they differ from Final Cut Pro to Media Composer. One of the main reasons why I’m writing these articles is that Avid offers a free, full-featured demo of Avid Media Composer 4 available for download. When I wrote the first piece that demo was only for 14 days. They have since upped the time for this trial to 30 days. That’s great as it brings this demo in line with most free demos and even affords enough time to try to learn the in’s and out’s of the application a little bit better any maybe even use it on a real job.
Last time I looked at a broad overview of Avid Media Composer and it’s main features. This time I’ll talk about more specific features. Since the first article was written Avid has updated Media Composer to version 4.0. I haven’t upgraded yet so this article was written under version 3.5.
The Project Window, Bins and Bin Column Layouts

The Avid Project main project window
Bins are the backbone of a well organized edit project. The more media you stuff into an edit project the more bins you might need. In FCP, bins look like folders and that’s pretty much what they are, folders where you can organize stuff within the project. I never understood why FCP calls them bins when they look like folders. In Avid you have both bins and folders. Creating a new bin creates a little icon that looks like a it has little film strips contained inside. The origin of calling it a bin comes from the days of cutting film when cutting rooms had big, physical bins where editors would store strips and trims of film. All media imported into Avid and sequences created must be stored in a bin. I’ve never encountered anything that can reside in the “top” level of an Avid project other than bins, folders, scripts and a trash can icon that appears if you delete an item from the main project window. (Scripts, FYI, are actual text-based scripts for using with Avid’s script based editing and ScriptSync function) Folders can be created as a way to organize bins.
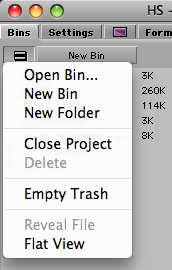
The Avid project window Fast Menu
Go under the project Fast Menu (or Hamburger Menu as many call it since it looks like a hamburger) and choose New Folder. Bins and scripts can then be organized into those folders. There’s also a function called called a Flat View under the Project Fast Menu as well that shows the Project without Folders. It’s a fast way to see all of your bins without having to dig through a lot of folders. In the above image of the Project Window the Other Bins folder is in italics because I opened that bin from another project using the File > Open Bin command.
One handy screen organization operation in FCP is opening a bin so the tabs dock across the top of the Browser window. If you option+double click a bin in FCP it automatically opens as a “docked” tab or you can drag a bin into the dock by dragging its tab. The Avid equivalent of this kind of organization is the Super Bin. Super Bin has to be turned on in the Bin Settings by checking the Enable Super Bin button:
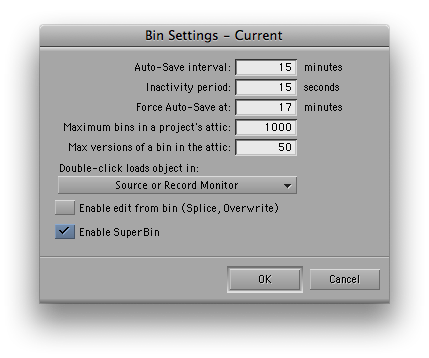
Normally to open a bin you double click on the bin icon. With SuperBin enabled a single click on a bin and it will open it as a SuperBin. Each single click on a bin after that will open those bins into the same bin window. You can toggle through the different SuperBins by clicking on the new SuperBin icon in the top left corner and toggling the different bins from the pulldown menu:
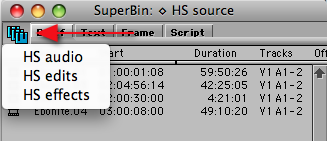
A SuperBin is also identified with the SuperBin name in the window’s title bar. The Super Bin is handy when screen real-estate is at a premium, say when working on a laptop.
Once an Avid bin is open you have very similar column headings to those that a bin in FCP will have. I’ve always thought that FCP has a very cumbersome way of selecting the columns you want to display: Right+click on a column heading in FCP and you can toggle headings on by selecting show-heading and then hide a column one at a time by using the hide column option.
In Avid you access the Headings… menu from under the bin Fast Menu. You must be in the Text display mode of a bin to change and customize column headings. These different modes are selected via tabs at the top of a bin and include Brief for a few set columns, Text for customizing and saving columns, Frame for an icon display and Script for an list-like icon display that includes information and a place to take notes on each clip :
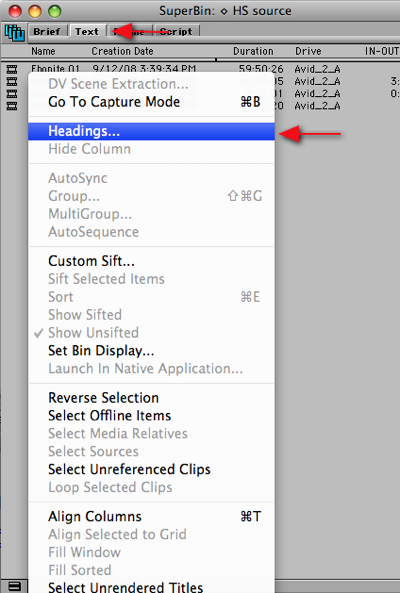
Once selecting Headings you get the Bin Column Selection pop-up menu where you can select multiple columns at once:
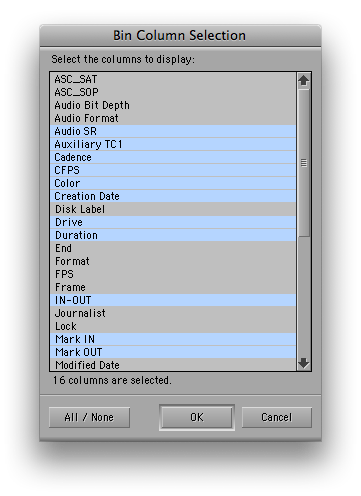
Saving a particular column layout is handled with the save menu in the lower left corner. If no heading has been chosen then it will probably have Untitled as the title. Click and Save As… and name the chosen layout.
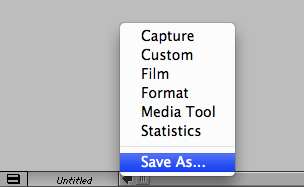
Choose Save As… to save custom bin headings
These different saved layouts can then be accessed with the same menu. The saved layouts are managed back in the Avid settings tab where they can be renamed and deleted. You can also make a custom column by just clicking in an empty space and the end of the headings, where you will get a cursor. Just type a name and then there’s a new, custom column. To sort by a column, click on the column heading (it will turn blue) and choose Bin > Sort, or hit command+e on the keyboard. Command+option+e will reverse the sort.
Consolidating Media
One operation that is often needed is the transcoding, consolidating and moving of editing projects. This is accomplished in FCP with the Media Manager. Early versions of the Media Manager were nicknamed the Media Mangler as the operation often ended up with incomplete projects and missing files. The Avid equivalent is the Clip > Consolidate/Transcode menu item. Like FCP this function gives an editor the ability to move a project and consolidate media from any number of media drives on to one single drive. You can choose handle length, delete and skip media files and convert audio in the process.
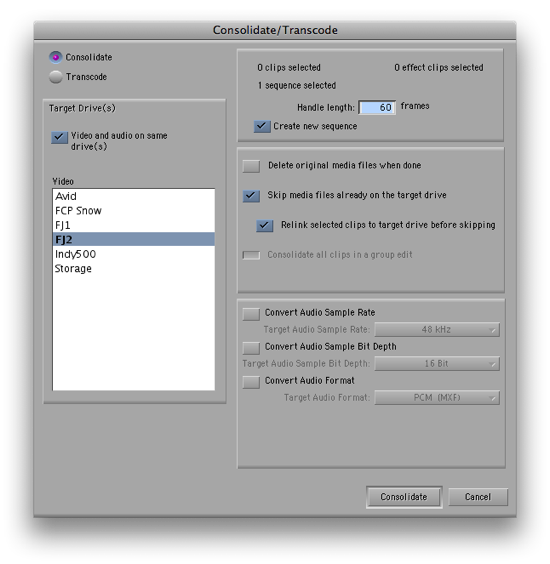
The Consolidate window making a copy of 1 edit sequence
There’s also the option to transcode media files from one format into another, handy for creating an offline, low-resolution version of a job. Like the Media Manager in FCP, you can select any combination of sequences, master clips, subclips, graphics, whatever, in a bin and consolidate just what is needed. Once the operation is complete Avid creates a new bin with clips linked to the new media.
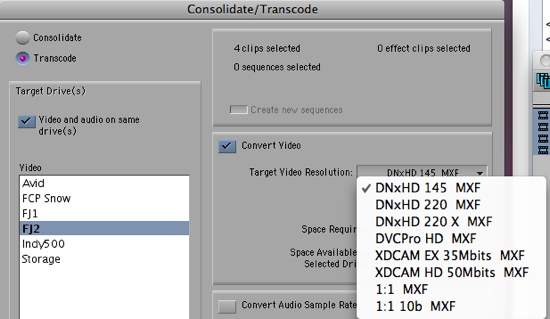
The Transcode option selected
The FCP Media Manager is also the tool where an editor can create an offline version of an edit sequence for recapture from tape for an online session. In Avid this is called decomposing a sequence. This is done via the Clip > Decompose… menu:
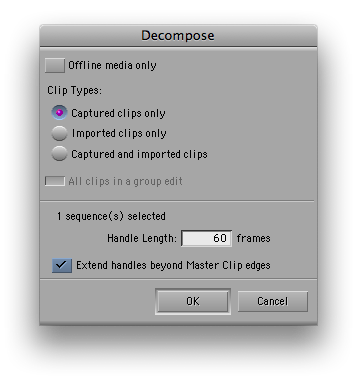
There you will choose the amount of handles you want for each clip, clip types and if you want this operation performed only on offline media. In FCP you will be asked to specify the format when recompressing or creating an offline version of the sequence via Media Manager but in Avid you won’t as you choose the desired format upon capture.
Mixing Formants in a Timeline
One advantage that FCP has long had over Media Composer is its ability to mix different formats, resolutions and frame rates in a single timeline. In FCP, format specifics are set on a timeline basis. In Avid it’s on a project basis. While Avid has had the ability to mix resolutions for some time Avid has finally added the ability to mix frames rates as well with the introduction of the Mix and Match timeline in version 4.0. Anyone who has worked with Avid for any length of time has experienced the frustration of trying to load a clip from a bin, often times just to view and not even for the edit, only to have Avid tell you it can’t load the clip into the Source monitor because the frame rate doesn’t match the project. FCP’s ability to do this has always been a bit of a blessing and a curse. A blessing in that you can mix and match at will but a curse because it often meant little to no planning for formats on a shoot. And FCP’s final output of mixed frame rates was often less than perfect with improper pulldown added or frames removed in such a way that the footage wasn’t very usable. To be fair, changing frame rates isn’t the easiest thing in the world but Avid’s attempt with version 4 of Media Composer is apparently getting good reviews. I haven’t used this new feature as of yet but it is a very welcome addition. Here’s a video on the feature from Avid, on You Tube:
Next up: the Timecode Window, BITC, and modifying clips
Floating Timecode Window
With the introduction of Final Cut Pro 7 Apple finally added a floating timecode window that had been available through the 3rd party add-on Big Time for some time or by a few crude workarounds. I consider it a good starting point for future updates as it at the very least it displays the master timecode in the edit sequence or source timecode in the Viewer along with some bin information as well as durations. Avid has long had a floating timecode window located via Tools > Timecode Window:
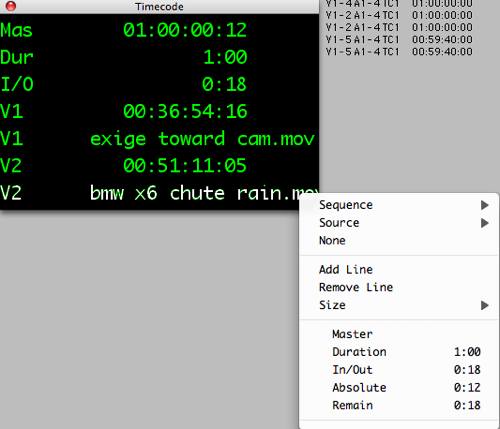
The Avid Timecode Window with pop-up menu used to add items and change detail
It’s a very refined tool as it allows the editor to customize the size and add line after line of display information. You can use the Timecode Window to display master timecode information, durations, IN to OUT durations and source file information in frames as well as regular SMPTE timecode. One of the more useful things about the Avid Timecode Window is that it allows you to see source timecode and clip names for clips edited into a video track. By turning on multiple display lines and then setting them to Source Video track, that source timecode is always viewable for the clips you have edited into the timeline. You can see source clip timecode in FCP as well by turning on Overlays but IMHO the Avid method is better in that it doesn’t truncate as you add more and more video layers and, more importantly, it doesn’t obscure the Canvas/Record window with display overlays.
Adding BITC (Burned In Timecode)
Avid has always been good at giving the editor access to a lot of information. A great example of that is the Timecode Burn-In generator that was introduced in (I think) version 3:
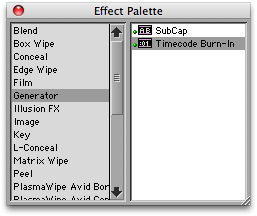
FCP has long had it’s own Timecode filters, both a Timecode Reader and Timecode Generator. The Reader will read the source timecode on a clip or the sequence timecode on a nested sequence. One thing I’ve come to do in FCP is add a slug or really long clip into an upper video layer, add the Timecode Generator and then crop the image down to only see the display. But since the Timecode Generator doesn’t read the sequence timecode I have to dial it into the appropriate start time.
With the Avid Timecode Burn-In it’s as easy as dropping the Generator onto an unused video track in a sequence and … you have BITC. It’s a very customizable display in that it can add a lot of useful information, including many things that can be displayed in the floating Timecode Window, drawing on the extensive metadata that is available in Avid media clips. And there’s also a notes display as well which can be useful for watermarking:
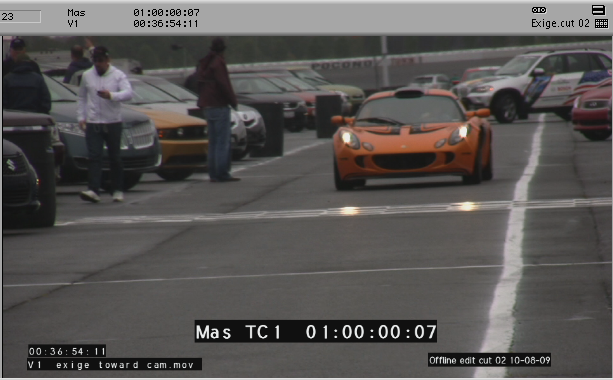
And the Timecode Burn-In achieves all of this often in realtime as it is a realtime effect. That’s very handy for creating quick BITC screeners; just drop the Timecode Burn-In on an empty video track and hit the play button. Once the Timecode Burn-In is applied it can be customized by opening the Effect Editor. There you’ll see all of the parameters for changing the BITC. You can customize size, color, opacity and position for all of the displays as well as the information that can be displayed in each info box. And it plays all of that in realtime. I especially like the ability of the Timecode Burn-In to display the Source Clip Name as well as having the customizable notes track:
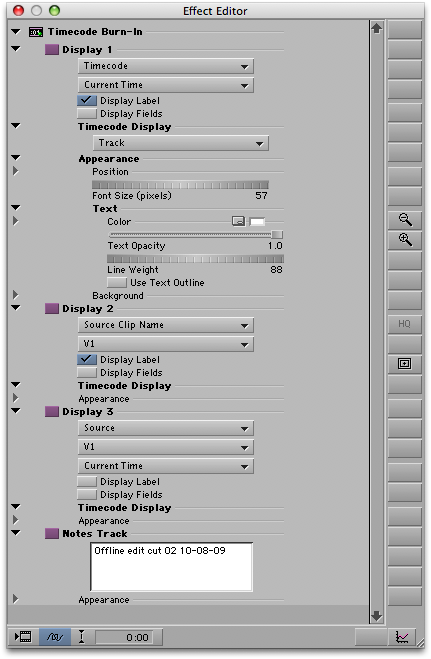
Enter the Effect Mode to open the Timecode Burn-In’s parameters in the Effect Editor
Modifying Clips
When editing it’s often necessary to modify the properties and attributes of master clips. FCP has a number of different places to modify clip attributes. There’s the Modify > Timecode command for changing the source timecode, reel name and adding auxiliary timecodes. Changing the reel name associated with a clip can also be accomplished by retyping a new reel name in a browser column or selecting a clip in the timeline and bring up the Logging tab with command+9. Avid achieves a lot of the same tasks via Clip > Modify. There you can change source timecode, source reel name, keycode numbers (if you are working in a film project for matchback), the tracks of a clip and a sequence format among other things:
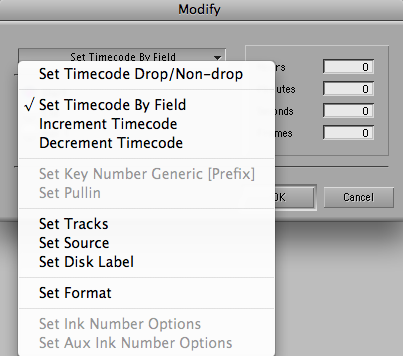
The Avid Modify command for changing clip attributes and metadata
Not every modify command will work for every clip. For example, you can’t change the tracks (video, audio 1, 2, 3, 4, etc) associated with an online clip as it already has set video and audio tracks associated with it. If you have an offline clip in which you need to change the tracks you can UNLINK the offline clip (it’s a strange operation since there is no media associated with an offline clip) and then change the tracks via Modify. Unlinking is a more advanced feature I won’t get into here but I mention it because whenever you use the Modify command you should be aware you are changing the metadata associated with the clip which could cause problems recapturing or relinking in the future. The Avid will warn you of this with a pop-up window or two that you have to confirm to make a Modify command take. Though it can be a more destructive operation to change clip attributes it’s often necessary and the Modify command makes a good central place to make that happen.
Finally: EDLs, lists and deleting media
EDLs and lists
Believe it or not there’s still often the need to generate an Edit Decision List today. If there’s a way to use a more modern and robust list to move a job from offline to online then by all means forget about the EDL but on occasion you may need to generate one. In FCP it’s File > Export > EDL. A pop-up dialog box give you options like what type of list to generate, what types of information and comments you want to include, what the starting timecode should be if it’s different from the sequence timecode and how to handle the audio.
In Avid an EDL is generated via the Output > EDL menu and that launches it’s own application, the EDL Manager:
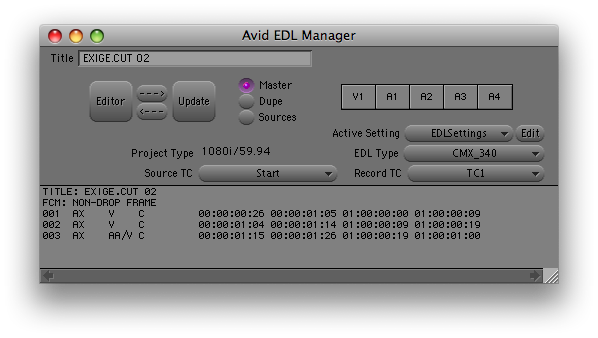
The Avid EDL Manager displaying a small, 3 clip edit
Avid has always been strong at it’s metadata managment and offline to online workflow and you can see that the EDL Manager is a very feature rich application with quite a few more EDL options that the FCP EDL export:
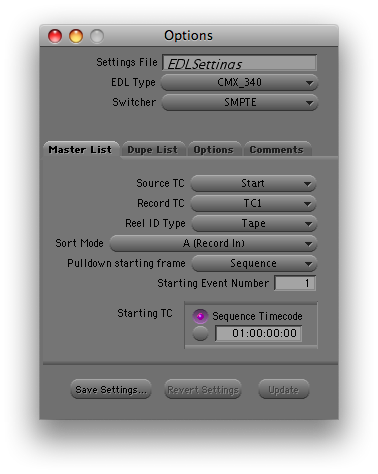
The EDL Manager settings display one of the four tabs
If the EDL manager crashes upon trying to open it directly from within Avid, one option is to open the EDL Manager from the Finder and then choose File > Open Bin. Navigate to the appropriate bin and the EDL Manager will prompt you to open a sequence. This has pretty much always worked when the EDL Manager crashed from within Media Composer.
There’s also the option to create an Avid sequence from an EDL via the EDL manager under the File > Create Composer Sequence. In FCP this is handled with the Import > EDL menu command but if you’re exchanging FCP sequences you’re going to use an XML if you can’t exchange a project directly. Avid can also generate AAF and AFE files for sending to various online work stations. The are created by the File > Export and then clicking the Options button:
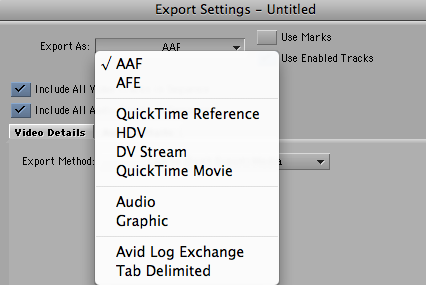
There you can choose an AAF or AFE as well as any number of different outputs.
Deleting media
When you’re done with an edit and you want to clear off all of the media and renders to free up drive space it’s usually a step through several different tools or command in FCP. The Render Manager is where you can clear off old renders on a per-sequence basis. To delete the media from master clips the editor might select all the clips in a project and use the Modify > Make Offline command that will allow you to delete the media from disk, leave the media on the disk but take the clips offline or move the media to the trash. In Avid these tasks are accomplished through the Media Tool; Tools > Media Tool. The Media Tool is kind of a central clearing house for all of the media you bring into Avid. Unlike FCP, Avid will copy all media into its designated media folders on the media drives, unless you are using the new AMA architecture. The media isn’t kept in individual folders per project like FCP so there’s no way to dig into the media folders in the Macintosh Finder to delete media. It might seem like a very hap-hazard way to manage media by throwing everything into a single folder or two as opposed to organizing media by project but Avid uses a very sophisticated database to track the media.
When you open the Avid Media Tool you specify what Avid projects you want the Media Tool to load media from and what hard drive volumes:
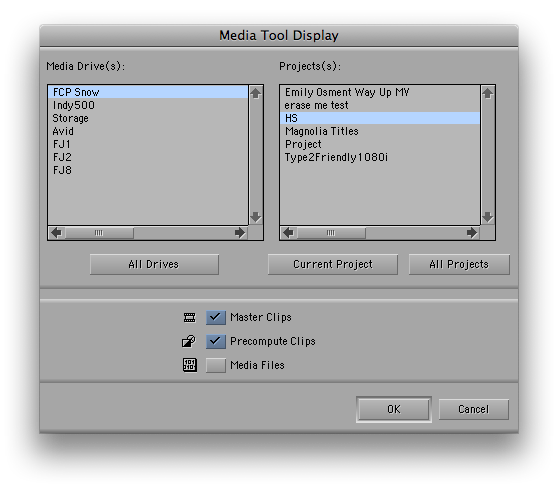
Then you can choose what media to load; media from the master clips, pre-computes which is Avid’s term for renders or Media Files for the individual media files. The Media Files option will really break the media down. For example, a video clip with stereo audio is really 3 media files; the video track and two individual audio files. You can choose to load all of these different media files at once or, say, only the pre-computes. The Media Tool is a very organized overview of all of the media that lives on your Avid media drives, being able to view by project, drive or both. Once the Media Tool has found the media you can load and edit media right from the media tool or drag clips into the bin of a project. It looks just like a regular bin with the title Media Tool and you can use your saved column headings to examine the media. It can be particularly useful to sort by the Drive and Project columns while in the Media Tool to see where a project’s media files are located and what project clips are associated with.
Once you’ve found media you want to delete then you select it and hit the delete key. You’ll get a pop-up dialog box that looks like this:
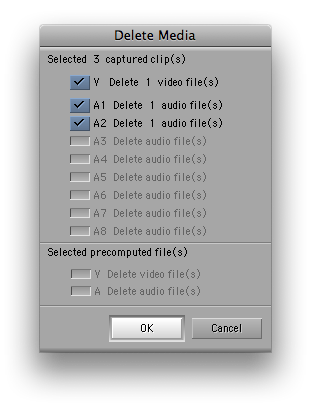
This is a handy thing to have in that you can delete only the audio associated with a clip (and vice versa) and leave the video behind. This isn’t possible when deleting clips right out of a bin via the delete key as you only get this option:
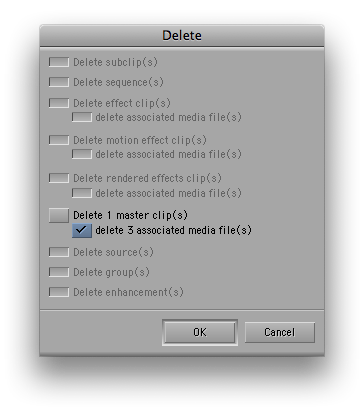
As you can see, deleting directly from the bin won’t allow you to only delete the audio or video from a clip but it will allow you to leave the offline master clip behind, handy if you need to recapture later. The offline clip is only a tiny pointer file anyway so there’s not really a good reason to delete them as you never know when you might need to return to a project.
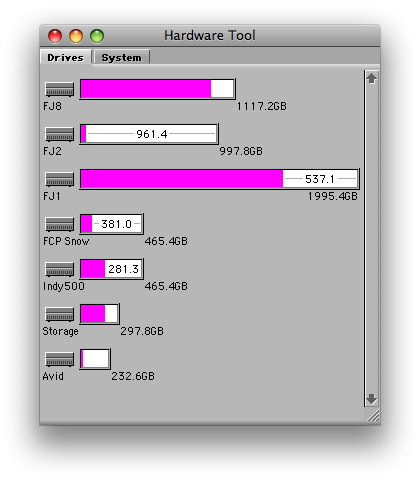
You can also use the Avid Hardware tool (Tools > Hardware) to get “fuel gauge” type view of all your hard drives and how much space is available:
Wrap up
If you’re coming to Avid as a completely new user, you can see that a lot of the tools, functions and commands are very similar. Often they are somewhat similar commands with buttons and menus in different places. Some functions Avid handles better, IMHO, and for some it’s FCP. It’s great to have the free 30 day Avid Media Composer demo so a new user can download the software and hopefully find some use in this guide as well as the first Avid Media Composer for Final Cut Pro Editors article when trying to learn the basic of Media Composer. Happy editing!

Filmtools
Filmmakers go-to destination for pre-production, production & post production equipment!
Shop Now