After Effects features a 3D Camera Tracker that examines already-shot footage and attempts to reverse-engineer where the camera was during the shot, creating a 3D camera to match. This allows you to add new objects in 3D space that match the movement and perspective of the underlying footage.
After Effects features a 3D Camera Tracker that examines already-shot footage and attempts to reverse-engineer where the camera was during the shot, creating a 3D camera to match. This allows you to add new objects in 3D space that match the movement and perspective of the underlying footage.
After Effects has a limited 3D implementation of its own that allows you to add text and shapes, but the real fun comes when you can add a fully rendered 3D model of an object into the scene. There are several 3D plug-ins for After Effects that can follow its 3D camera, including Video Copilot’s Element 3D or Zaxwerks’ 3D Invigorator Pro or 3D ProAnimator AE. There are also ways to export AE’s camera to external 3D applications.
Another alternative – that comes bundled with After Effects CC – is to use MAXON CINEWARE and CINEMA 4D Lite. This is obviously the preferred option for those without a budget to buy additional software, or has to use the already-installed software at their employer. We’ll step through that workflow in this article.
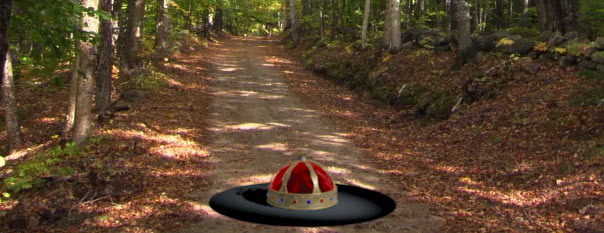
The crown is rendered by CINEWARE and C4D; the camera movement was tracked in After Effects. The video clip is available free from Artbeats.
What is CINEWARE?
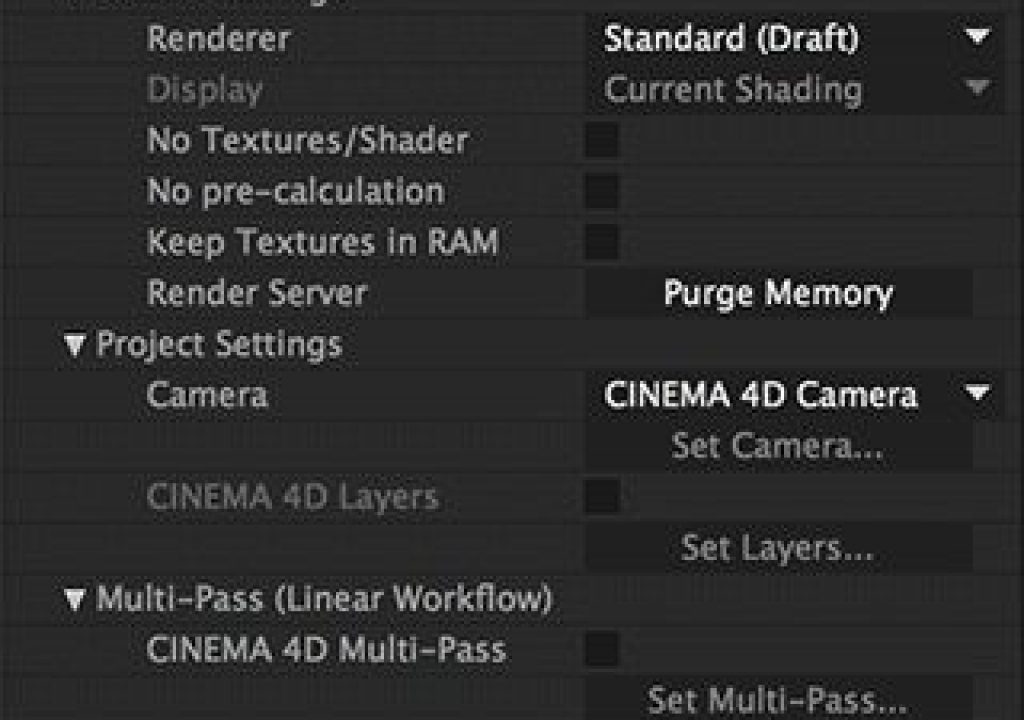
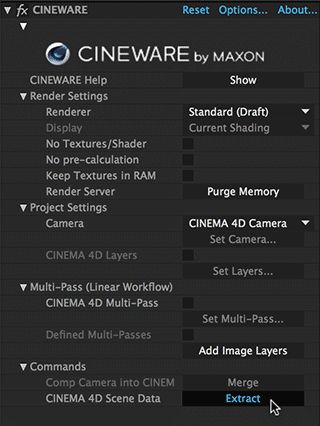 After Effects CC added a pipeline to integrate CINEMA 4D directly into the After Effects timeline through the inclusion of CINEWARE. This is an effect applied to a 2D layer inside After Effects that connects to the C4D rendering engine. When you move to a new frame in the After Effects timeline, CINEWARE renders the requested frame from a corresponding C4D project and presents its contents inside the After Effects layer.
CINEWARE can use either your own copy of C4D, or the copy of C4D Lite that comes bundled with After Effects CC. You can build 3D objects from scratch in C4D, or “merge” in existing models or projects. CINEWARE offers a number of useful options, including deciding which Layers you’ve grouped in the C4D project or portions of the 3D render that you want to see , and whether to use the C4D or After Effects 3D camera – all of which we’ll take advantage of in this project.
Setting Up Projects
Although the link between AE and C4D is somewhat automated, there are some project parameters you need to set manually in both programs to make sure they are on the same page.
In After Effects you need to open Edit > Project Settings, change the Color Working Space to sRGB to match C4D’s default, and enable Linearize Working Space to match how C4D blends light and color. You will probably want to change the color depth to 16 bits per channel (bpc) when you render to avoid banding (this can be done in the Render Settings dialog); it’s faster to work at 8 bpc before that point.
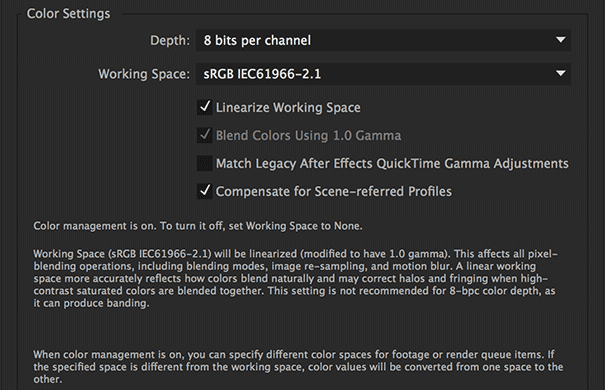
Then make a note of your comp’s frame rate, frame dimensions, and duration in frames. The latter is shown as a smaller number under the SMPTE time display in the Timeline panel. Frame rate is tricky, as C4D still does not support fractional frame rates such as 29.97; after you create the .c4d layer inside After Effects, you need to open it’s File > Interpret Footage dialog and conform its frame rate back down to the original fractional rate, especially if you have video-based texture maps or carefully-timed animations. Keep a note of the rest of the information for when we first enter C4D Lite.
3D Camera Tracking
First, choose your shot that you want to place a new object into. For the 3D Camera Tracker to work, there must be camera movement in the scene; it sometimes fails on simple horizontal pans, but we’ve had good success with on pan downs, aerial shots, and steadicam walking or driving scenes. In this example, we’re using Artbeat’s clip FCL220 – which is now available free, thanks to the good folks at Artbeats – of a slow pan down to reveal a path through a forest. To create a scene from a fairy tale, we’re going to place a king’s lost crown on that path.
Add the clip to a comp in After Effects, and choose Animation > Track Camera. There will be a pause while After Effects analyzes the clip to detect items to track, and then solves the results to recreate the 3D camera. Once After Effects is done, a series of colorful Track Points will appear overlaid on top of the footage whenever the 3D Camera Tracker effect is selected.
3D Camera Tracker works best when it is tracking stationary objects in the scene (such as tree trunks in this example, or the walls of an office, etc.), and can go astray when it tracks objects that are moving relative to the scene (such as fluttering leaves in this scene, a person walking across the room in an office scene, cars driving by, etc.). It’s best to scrub through the timeline and look for Track Points that are attached to these items that are not nailed down in a scene and delete them; this will improve the accuracy of the track.
In this example where we want to place a 3D object on the ground, we want to define where that ground is. We moved to a point in time where we had a clear view of where we wanted to place the crown, and then selected a large number of Track Points around this point on the ground. 3D Camera Tracker can locate a point in 3D space with as few as three Track Points, but the more you can use, the more accurate the results will be as they are averaged together.
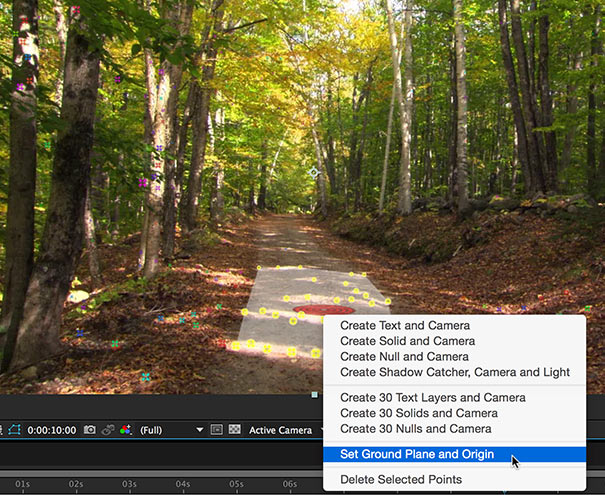
When you select three or more Track Points, a red bull’s eye Target will appear, laid down on the plane defined by your selected points. Clicking and dragging the center of the target moves it along this plane. Move the target to the position you want to define as 0,0,0 in 3D space, right click on it, and choose Set Ground Plane and Origin. Then click the Create Camera button in the 3D Camera Tracker effect, and it will create a 3D camera using the same coordinate system as your origin.
Creating the C4D Project
Next, you need to create a C4D layer. In After Effects, choose Layer > New > MAXON CINEMA 4D File. This will create a blank C4D project; give it a name that makes sense and save it alongside your After Effects project file so you can find it later.
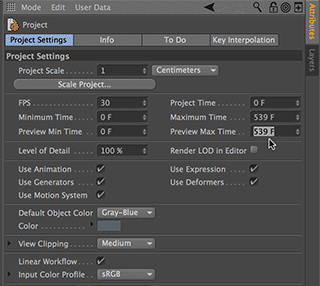 Inside C4D, choose Edit > Project Settings from its main menu. It will open in the Attributes Manager in the lower right. Set the Maximum Time and Preview Max Time to equal the last frame number in your After Effects comp. Copy your Frame Rate into the FPS field. Again, note that CINEMA 4D does not support fractional frame rates; 29.97 gets rounded to 29(!) – so set it to the nearest whole number (60 for 59.94, 30 for 29.97, or 24 for 23.976).
Then click on Edit Render Settings from the main icons above the Viewport, or choose Render > Edit Render Settings. Choose Output along the left, and change Output > Width and Height to match your After Effects composition in pixels so that its Viewport displays the correct image aspect ratio to help in framing the shot.
If you have the skills, you can now create your 3D model inside C4D, being careful to rest it on the default ground plane and center it at X & Z = 0. This way it will appear exactly where you defined your origin in After Effects. If that’s not in your current skillset, it’s not uncommon that a separate 3D modeler will be hired to create your objects. There are also a number of web site that sell 3D models. To import a model into C4D, in the Objects Manager in the upper right choose File > Merge Objects and select your model file.
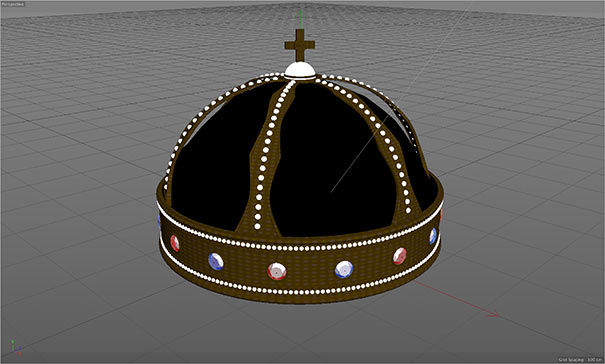 In this case we found a crown on Pond5. We simplified it a bit as C4D Lite did not support all of the plug-ins that its creator used; we deleted layers until we no longer received warning messages when you typed Cmd R (Ctrl R) to render a test.
While we were at it, we also chose Create > Light > Target Light and roughly positioned it to match the way light appeared to be falling in the original scene. This helps make it look more believable, and will become important later for creating shadows.
Matching Scale
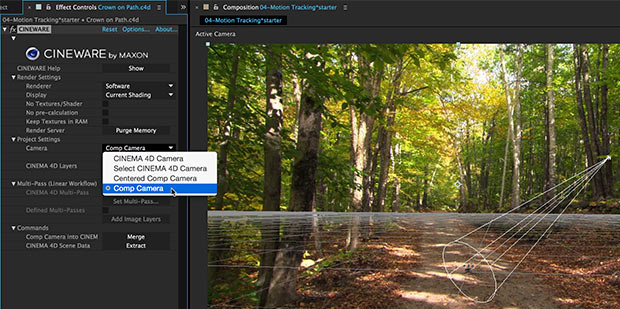
Chances are pretty good that your model will not initially be the right size to match your tracked scene. Save your C4D project and switch back to After Effects to see an initial draft render. CINEWARE defaults to using the camera it found in the C4D file; in its own Project Settings section click its Camera menu and select Comp Camera. Now the C4D file will be rendered from the perspective of the 3D camera in After Effects. You’ll see in the image below, our crown is initially way too small:
 Although it’s not necessary, you can embed the After Effects camera into the C4D file. Close the project in C4D Lite. Back in After Effects, select the C4D layer, and in CINEWARE click Commands > Comp Camera into CINEMA 4D > Merge. Then type Cmd E (Ctrl E) to re-open the C4D project. You will need to click on the Camera Object tag in the Objects Manager to enable viewing your scene through that camera.
Anyway, back to matching sizes: Return to C4D Lite, select your 3D object, and choose its Coordinates (Coord.) tab in the Attributes Manager. Scale it uniformly by editing the S.X, S.Y, and S.Z to the same value. Save, return to After Effects, and see if you like your new size. Repeat until you have a size you like.
The default Software rendering engine that CINEWARE uses is fast, but does not show a lot of detail. In CINEWARE, change Render Settings > Renderer to Standard (Draft) or Standard (Final) to see your 3D object rendered with more fidelity. We move between Final to check quality, and Draft to perform previews as it renders faster.
Preview and make sure your 3D object is tracking nicely in the scene. If it isn’t, make sure you have set CINEWARE to use the Comp Camera; if necessary, you might need to tweak 3D Camera Tracker’s settings (including deleting more false Track Points), re-set the origin and ground plane, and create a new 3D camera.
 Shadows
That was the mechanical bit; next comes the artistry of convincingly blending your new object into your existing scene. For example, color matching is important; lightly feathering the alpha edges (try Channel Blur for starters) or using light wrap effects such as Digital Alchemy’s Light Wrap Fantastic are also a big help.
In this scene, the trees and leaves are casting strong shadows across the path; it would only make sense that the crown would too. You will need to create that shadow in C4D, and then composite it on top of your 2D footage.
Return to C4D Lite. We need to create a surface to catch our shadows; click on the Objects icon above the Viewport (the cube) and choose Disc. Although it appears in the Object Manager, you may not see it initially in the Viewport because it may default to a size that is smaller than your object. With Disc selected, in the Attributes Manager click the Object tab and increase the Outer Radius until it extends far enough beyond your object to comfortably catch your shadows.
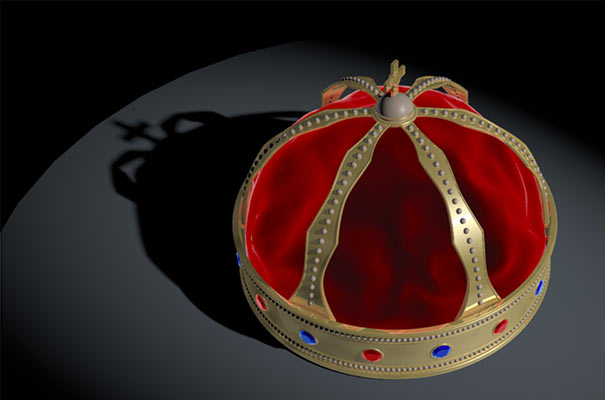 CINEMA 4D offers three types of shadows, set under the Shadow tab for a light: Shadow Maps, which generates a shadow that is slightly soft all around its edges; Raytraced, which is hard around the edges, and Area (our favorite), which gets progressively softer the further away the shadow falls from the source object. If you choose Shadow Maps, watch for rough edges; increasing the Shadow Map’s size will improve a mapped shadow’s quality.
Save and return to After Effects. Now you have a crown, a shadow…and a big black disc. You need to separate these from each other.
 Layers and Multi-Pass Renders
Return to C4D, and let’s take advantage of Layers: the ability to assign different objects in C4D to their own render groups.
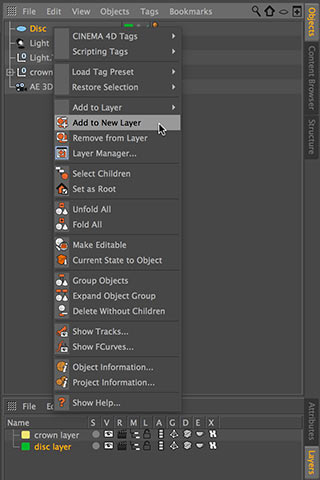 Your model probably contains a hierarchy of many individual pieces. You want to make sure you add every single piece of that hierarchy to the same layer. To do that, right-click on your object, and choose Select Children. Then right-click on it again and choose Add to New Layer. In the Attributes Manager section, click on the Layer tab along the right edge. Double-click Layer and re-name it something unique so you can keep track of it later. Then right-click on your ground plane, and again choose Add to New Layer. Down in the Layers Manager, double-click on Layer, and re-name this something memorable such as Shadow Layer.
Return to After Effects. In CINEWARE, enable Project Settings > CINEMA 4D Layers. Then click on the Set Layers button, and choose the layer that holds your main object, plus “items not on Layers” (which includes the light). Make sure you leave out your shadow layer. Click OK, and just the object should render, without its shadow.
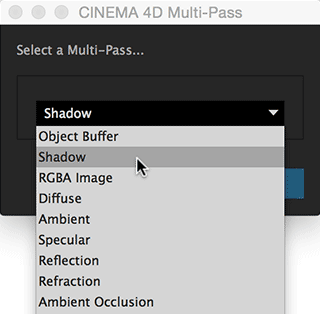 Duplicate your C4D layer in After Effects. Select the copy underneath and rename it “Shadow” to keep track of it. In the CINEWARE effect for this new layer, disable Project Settings > CINEMA 4D Layers, and enable Multi-Pass (Linear Workflow) > CINEMA 4D Multi-Pass. Click the Set Multi-Pass button and choose Shadow: You will see a large field of white with a dark shadow falling away from the crown:

In the Timeline, make sure the Mode panel is visible (F4 toggles it), and set Shadow’s mode to Multiply: This will drop out the white and leave the shadow. The 3D shadow appears much darker than the other shadows in the scene; with Shadow selected press T to reveal its Opacity and blend to taste.

 Final Tweaks
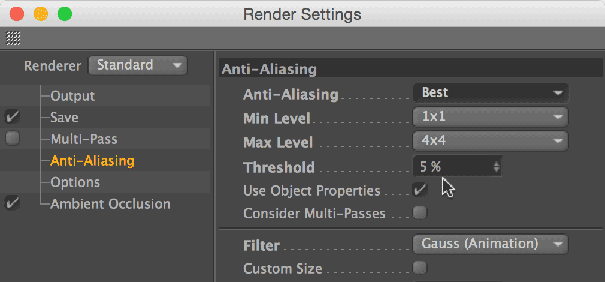
Render a Final quality preview to check the results at full quality. We often find the default anti-aliasing in C4D leads to rough edges and some shimmering during motion. To fix this, Return to C4D Lite, and click the Render Settings icon. Select the Anti-Aliasing option down the left side of the dialog that opens. First, change the Filter setting to Gauss (Animation).
The default method of Geometry only cleans up the outer edges; change Anti-Aliasing to Best. Then either increase the Min Level to 2×2, or lower the Threshold to 5% to increase the chances it will use the Max Level (4×4). The preferred settings change on a project-by-project basis; you will need to experiment to see what works best each time without increasing the rendering time unacceptably.
 One other trick we like to take advantage of is Ambient Occlusion, which can add definition to shadows, and make them appear more realistic when an object is touching the ground (as it is in our case). To enable it, return to Render Settings, click Effect, and choose Ambient Occlusion. The Contrast value affects how dark these new shadows are; we 5-10% as a starting point and perform test renders under we’re happy.
Your final step is to restore your original frame rate. To do that, return to After Effects and nest your composition into a second comp. Set that comp’s frame rate to your original speed such as 29.97 fps. Then select the nested comp with your C4D scene, and choose Layer > Time > Time Stretch. In this case, set the Stretch Factor to slow down 30 to 29.97 (the same ratio is used for 23.976 and 59.94). Render this second comp, not the first one.
Here again is the final scene, before we performed the final color correction and light wrap. Although it took a lot of words to explain, in reality it took an hour or so to execute, including tweaking the model:
This is admittedly a simple case where nothingin the original footage – such as, say, a branch from a tree – is supposed to move in front of your new object. To make that work, you would duplicate the footage, place a copy in front, and use masking or Roto Brush to cut out the object that is supposed to be in front. We provide an example of that in Lesson 10 of our book After Effects Apprentice.
Speaking of that book, a more detailed, step-by-step version of this example with project files will be included in the upcoming 4th Edition of After Effects Apprentice, which we’re working on now. Part of this update includes a new lesson dedicated to working with C4D Lite, which has a pair of motion graphics oriented examples in addition to this visual effects one. It should be available early next year; we hope you enjoy it!

Filmtools
Filmmakers go-to destination for pre-production, production & post production equipment!
Shop Now