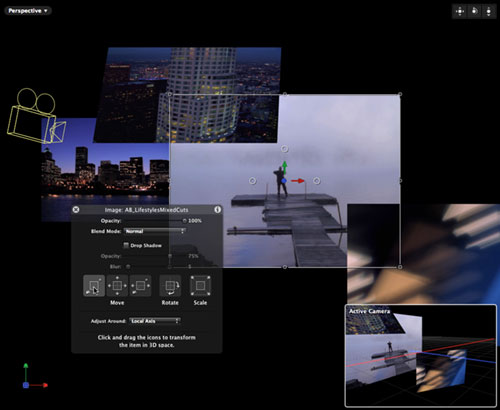
Motion 3 – part of Apple’s Final Cut Studio 2 suite – has experienced a major update, including the addition of motion tracking and stabilization, optical flow (smooth slow motion) technology, a gorgeous particle-based paint system, enhancements to their Keyframe Editor, and interesting new Audio Parameter and Retiming behaviors. But the big headliner is the addition of 3D space – including 3D animation for 2D layers, 3D cameras and lights, and 3D enhancements for their particle and text animation systems.
A New Dimension
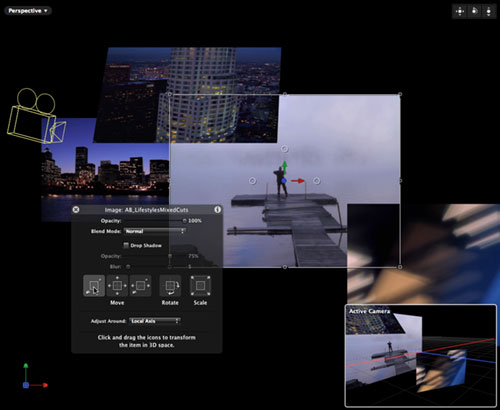
You can combine 2D and 3D layers (“objects” in Motionspeak) in the same project. To place a layer in 3D space, you toggle a 2D/3D switch for the layer’s group, which then affects all layers inside that group. To move a layer in 3D, select it, and switch from the normal Select/Transform tool to the Adjust 3D Transform tool (shortcut = Q). You can freely drag and spin a layer by dragging on its axes in the viewer, or you can use Motion’s HUD (Heads Up Display – shortcut = F7).
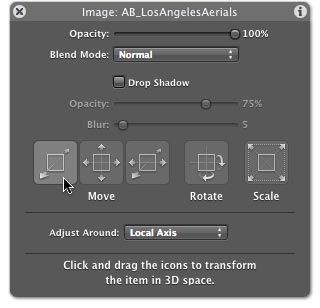 Dragging on various icons inside the HUD constrains your movement to specific axes; holding the Command key while dragging yields useful alternatives. For example, Command+dragging the Z Axis Move icon also adjusts the layer’s Scale so that the layer appears the same size in the active camera view, even as its moves closer or farther away. The same HUD can be used for 3D cameras and lights. The HUD also contains other parameters relevant to the selected object – such as the camera’s Angle of View or a light’s Intensity and Falloff. A subset of these move icons for the camera also appear in the upper right corner of the viewer, even when a non-camera object is selected.
Apple is good at building special tools to perform common tasks. For example, you often want to move a camera to center a layer in its view. To do this in Motion 3, select the camera, click Add Behavior, and choose Camera > Zoom Layer. Then drag and drop the desired layer from the Project pane to the HUD for Zoom Layer. You can adjust the timing of the move through a combination of the HUD’s parameters (which are duplicated in the camera’s Inspector > Behavior’s tab) and the length of this behavior’s bar in the timeline, as shown in the figure below. To then move to another layer, add a second copy of this behavior to the camera and set it up as desired.

To have a 3D camera automatically move to aim at a chosen layer, use the Zoom Layer behavior. The Sweep behavior adds rotation to the mix. To move from layer to layer, employ copies of these behaviors at different points in time.
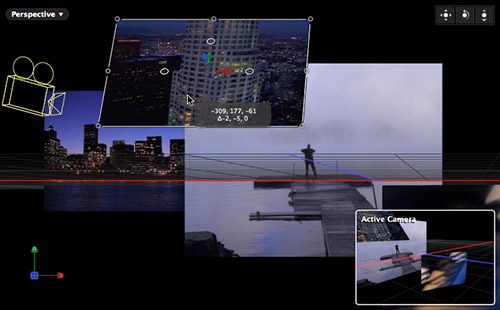
When you manipulate layers in 3D, an inset view appears that displays your world from a second useful angle – such as from the active camera’s point of view as you work in the Perspective view
There are numerous interesting touches. For example, you can switch the Camera Type between “viewpoint” and “framing” which determines whether it rotates around its lens or its point of interest. When you’re manipulating an object, an inset viewer appears that displays a second angle, such as a perspective view of the scene or through the active camera. If you are having trouble reaching through a complicated scene to select a specific layer, tap X to bring up Apple’s Expos, which spreads the layers out, and then select the desired layer. Also, a small button to the right of a selected layer in the Project pane centers the viewer on that layer.
Motion 3 contains a few other nice shortcuts to creating sophisticated 3D animations. For examples, lights have a falloff parameter, as does the camera – you can have layers automatically fade in and out depending on their distance from the camera. The already exceptional particle system can be toggled to work in 3D space, including having the layers it emits automatically orient to face the camera. There is also a new set of 3D text behaviors. And we don’t even have time to talk about the new paint engine…
But We Wish
There are two major shortcomings in Motion 3. The first is that the 3D implementation lacks 3D shadows: There is currently no way to cast shadows from one object to another where the size of the shadow changes depending on the space between objects. Although we miss this feature, it may not be a big issue for you – especially if you are going for a web-inspired dimensional flat look. Regardless, we expect this feature to appear in the future, especially as graphics cards become even more powerful so they can calculate the shadows in real time. In the meantime you always have traditional 2D drop shadows, which are an acceptable cheat in many situations.
Second, you can only get Motion as part of Final Cut Studio. Apple long ago discontinued the ability to buy Motion – or for that matter, their excellent audio editing and composition program Soundtrack Pro – as a separate product. Even though we’re primarily Adobe After Effects artists, we’ve always considered Motion to be a must-have accessory (especially when it was available as a stand-alone for $300); as of version 3, Motion is becoming a very strong all-around graphics application in its own right. We hope Apple returns to selling Motion separately so that more users get the chance to play with it in the future.
The content contained in our books, videos, blogs, and articles for other sites are all copyright Crish Design, except where otherwise attributed.

Filmtools
Filmmakers go-to destination for pre-production, production & post production equipment!
Shop Now