A fellow user recently asked about problems he was having with motion stutter when slowing down 24p (24 frame per second, progressive scan) footage. This led to a series of musings about using motion blur – including some new options in After Effects CS3 – that we thought would be good to share.
Camera Issues
The lower the frame rate, the more potential problems there are with motion stutter – especially if the camera or the objects in the frame are moving fast. (This is why we prefer using 30p instead of 24p when possible: It has fewer motion problems, is still below the dream/reality frame rate threshold or 48 frames or fields per second, and as a bonus has no pulldown issues to deal with.)
This phenomenon is also why you need to pay particular attention to shutter speed and motion blur in your camera’s settings. Motion blur helps smooth over some of the problems with stuttering. If you have a fast shutter speed when shooting 24p footage (particularly prone to occur if you are using an “auto” setting in a bright environment), you’ll exaggerate the problems. To simulate a true film camera, try a shutter speed of 1/48th of a second when shooting 24p.
Software Issues
The motion blur/frame rate issue also comes up when creating graphics from scratch in a program such as After Effects. The higher the frame or field rate, the shorter the motion blur trails – and vice versa. When rendering for interlaced video, we often increase the amount of motion blur (defined by the “shutter angle” in After Effects, with 180 degrees being a typical film camera) to make the blur noticeable, which offsets the blur-shortening effects of a high field rate.
Problems often arise when you try to convert an After Effects project designed originally for interlaced output to a 24p project (common when going from standard-def video to film or HD). If you cranked up the motion blur so that it looked good at 50 or 59.94 fields per second, and then render at 24 frames per second while keeping the motion blur shutter angle the same – the result will be motion blur trails that are roughly two to two and a half times longer than before! Needless to say, your blur will look different now.
The next question becomes: Is this a good thing or a bad thing? On the one hand, these longer trails help offset potential stuttering problems. On the other hand, generous amounts of blur can reduce the clarity and readability of objects such as text. We have found we need to tweak the shutter angle on a per-project basis to get the best tradeoff. Make sure you try out different values and either preview or render the results, rather than relying on a set formula.
After Effects CS3 Improvements
After Effects CS3 has made some significant improvements to its internal motion blur. Previously, it was limited to 16 sub-frame samples between rendered frames, which could result in visible echoes on fast-moving objects when the shutter angle was set high.
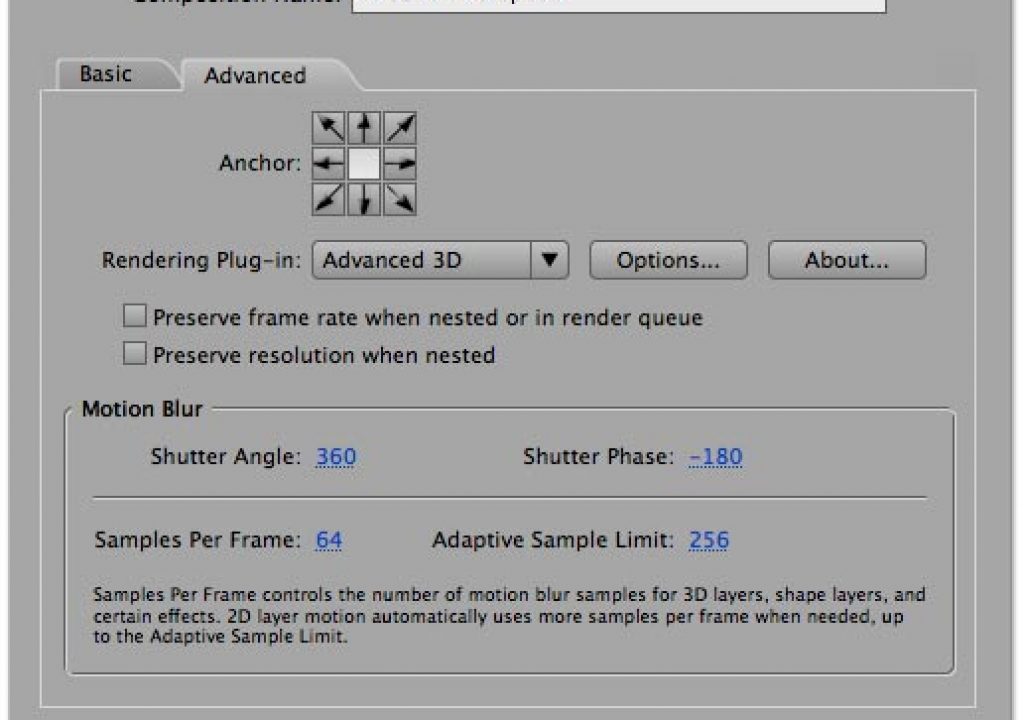
In CS3, open the Composition > Composition Settings dialog and click on the Advanced tab (shown above). There are two new values at the bottom:
- Samples Per Frame, which sets the default number of sample subframes used for 3D objects, shape layers, and some effects which use motion blur. The old value was 16; the new maximum is 64.
- Adaptive Sample Limit, which sets the maximum number of subframes calculated for 2D layers. After Effects can now look at a layer and decide how many subframes it should use to avoid echoes, up to the maximum you set here. The upper limit is 256.
Normally, the price for more blur samples is much slower rendering, Fortunately, the blur engine was also optimized in CS3, resulting in little noticeable change in performance. But if your comp suddenly seems sluggish, try backing off on these values.
There’s one other change in CS3 that we should point out. Previously, the Shutter Phase value would default to 0 degrees. After Effects calculates time from the start of a frame forward, meaning the blur trail would start at this frame and go forward in time. This would sometimes result in blur that seemed to stop suddenly on a keyframe or which might not match the motion in a video backplate. The new default is to set it to half of the Shutter Angle, and to make it negative so that the motion blur subframes will straddle the current frame in time: half before, and half after. This yields a more natural result.
Like the rest of the Composition Settings, After Effects remembers the last-set values when you create a new comp. However, note that if you open a pre-CS3 project in After Effects, it will plug in default values of 16 into these parameters. This maintains the old look…but this is a case where you may want the new look! So if you’re having motion stutter and blur echo problems, open this dialog and experiment. And don’t forget to set Shutter Phase to “minus half” of the Shutter Angle value you selected.
More information on motion blur in After Effects – including plug-ins which simulate blur by rendering multiple frames – is contained in Chapter 8 of our book Creating Motion Graphics 4th edition
The content contained in our books, videos, blogs, and articles for other sites are all copyright Crish Design, except where otherwise attributed.

