
Maxon released it’s latest version of the Cinema 4D (C4D) late in 2011. The R13 Studio version is their flagship product and it’s loaded with a ton of new stuff. C4D has been a popular platform for Motion Graphics artists for a while now, probably due to it’s ease-of-use, plug-and-play capabilities. Motion Graphics folks could install the app in the morning and by the end of the day be knocking out elements for use in their existing After Effects-centric workflows. C4D was really the non-3D artists 3D program and that’s why I was so inspired to go ahead and give it a spin for a few weeks.
Enter 2011 and R13, now C4D is looking a lot like a high-end, Hollywood movie 3D package. R13 has a whole new Physical Render system for highly photorealistic renders; Stereoscopic tools and workflows for S3D 3D; an amazing array of new character animation tools; and a ton of Modeling, Animation, File I/O and UI improvements. This is a very big update that takes Cinema 4D to a new level.
HIGH END IS WHAT YOU DO, NOT WHAT YOU BUY
It is an interesting time for the development of 3D animation software packages. Names that were once exclusivly for the high end market like, Maya and Softimage, have long since been acquired by Autodesk and been drastically reduced in price. While the traditionally more budget friendly apps like Lightwave 3D and 3D Studio Max (also an Autodesk product) have seen their toolsets and capabilities grow to challenge the market heavyweights. The idea that “high end” 3D capability was something you bought with a pile of money has really gone the way of SGI machines. “High end” isn’t what you own anymore, it’s what you do with what you have.
It’s in this crowded, competitive marketplace that a product like Cinema 4D R13 Studio (C4D) has to be evaluated. C4D has been around since 1991. The 1.0 was released for the Commodore Amiga — the early ’90’s DIY video platform of choice. C4D’s roots run deep in the anti-big iron movement of desktop jockeys and one-person shops. C4Ds origins are mirrored closely by Newtek’s Lightwave 3D.
Since then, C4D has expanded to Windows, MacOS and Linux (for Studio only, and only by request, BTW), while also growing and keeping pace with the developments and trends in 3D animation. Like Lightwave 3D, C4D has been picked up and used by VFX houses on big budget Hollywood effects films — the measure by which a product is judged “high end” if you go by the product literature.
This pressure from below — rapidly developing multipltform desktop tools combined with the explosion of cheap CPU and GPU power — has defined all aspects of post production technology for the last two decades, 3D is no exception. The myriad of uses (and users) of 3D in motion pictures and motion graphics have exploded. This hashappened as in-camera effects and miniatures have retreated to a very narrow niche in the industry. The number of people using 3D applications for day-to-day, non-Hollywood work has greatly expanded as well. There are a lot more people shopping around for really great, easyish-to-use, powerful 3D applications. Further, this application has to be plug-and-play with the Adobe CS Suite and run on everyone’s hardware.
This has changed the 3D landscape in a big way. Rather than the divergent markets of “high end iron” versus “desktop rebels”, it’s all become one big pie. The app that started out on the Amiga in 1991 (C4D) now costs 3500 bucks, while the app that started out on IRIX in 1998 (Maya) also costs 3500 bucks. Both apps are chasing the same buyers, and both offer free or teaser versions to try and win over market share. With no difference in price, buyers must consider the larger equation of Total Cost of Ownership for a 3D package. Which is my way of saying that the cost of a 3D app is far more than the sticker price.
THE AUTO ASSEMBLY LINE VS. THE MAKER-BOT
Big budget 3D apps were built to live and work on a highly-skilled VFX assembly line, they have a legacy of robust programming/scripting tools, complex animation capablities, network rendering and integration with other high end pieces of software. At the same time, the desktop apps were made for a more single license, end user market — they had to be friendly enough to use and be able to run on off-the-shelf hardware. The desktop-born apps have had to play catch up in terms of feature set, power and scalability. The genesis of the high end 3D apps is the automotive assembly line to the relative “maker-bot” style DIY origins of products that ran on the highly prosumer platforms of the early 1990’s. C4D lives the legacy of a user friendly 3D application that has grown up to a full-fledged CGI modeling, animation and rendering suite of tools. Along with these tools, a vibrant and active user community has grown up with it.
THIS IS GOING TO TAKE SOME TIME
3D packages used to be like a religion, you could really only join one. But the reality in today’s post environments, and parity of feature sets among packages, means most artists are versed in multiple programs
This brings me back around to Total Cost of Ownership and other things to consider when learning a 3D application. Learning a 3D Application, no matter how user friendly, means tackling a huge, steep curve. Any package you learn now should be building up a base set of skills that are transferrable to whatever comes out tomorrow. Many 3D artists also use multiple 3D packages in the course of a project — balancing the relative strengths and speeds to maximize workflow efficiency. So a 3D app has to work with other 3D apps, while ideally being similiar enough in concept and execution that skills translate between packages. Call it a compatibility litmus test.
This is a test that C4D R13 meets. With support for a ton of 3D and 2D file formats, and a plug-in SDK that let’s developers create their own paths into the app, C4D R13 is plug-and-play.
Bottom line, If you’re going to be a working 3D artist, then you’ll have to learn multiple 3D apps and workflows.
But what if you’re not going ot be a 3D artist, but you still want to create CGI for your projects?
This is the boat that I am in.
I am not a 3D artist. I am a writer/ director of independent and commercial projects with enough understanding of post-production pipelines to work with VFX professionals. From time to time, I will use apps like Poser Pro, Google Sketch Up and Photoshop to pre-visualize sequences and shots. However, the last time I personally created CGI was a decade ago in Lightwave 7 on a G4 tower.
I have been working with computers and cameras for the last twenty years, which makes me allergic to reading manuals or instructions of any kind. I have a brain filled with useless keyboard shortcuts for applications that “end of life’d” years. I’m constantly terrified that any new knowledge or skill will suddenly be rendered obsolete by some other new knowledge or skill.
My aversion to having to learn anything new to do something I want to do on a computer borders on the pathological. To me, the Arri Alexa is the perfect camera not because of it’s pretty image and wide latitude, but because of it’s simple menus and big candy colored buttons. 3D apps have always looked like the geekiest of geekery to me. To be clear, I have nothing but mad respect and admiration for the artists who work in the 3D, but I am not one of them. So why am I diving into a full-on serious 3D application like C4D?
C4D MAKES ME WANT TO BE A BETTER ARTIST

To be totally truthful to you, I really want to know about this stuff now. I’ve never shaken the experience of watching “Monsters” and thinking that it’s the last best hope for American Independent cinema to finally break through to wider audiences. Every time some broke filmmaker in Brooklyn makes a movie about three friends in an apartment talking to each other, all of indie film gets lambasted as boring exercises in entitled, mumbly navel-gazing. When in reality, broke filmmakers are doing the best they can with very limited resources and growing restrictions on where and how you can shoot.
Part of the appeal of DSLRs is that a filmmaker can shoot in public and not arouse the suspicion of the populace or draw the ire of the authorities. The high cost, in money and time, of permits, permissions and exceptions is more than enough to drive most broke filmmakers back into their apartments to see what they can pull off. And yes, mostly it’s boring, mumbly and well-trod.
Along comes Gareth Edwards, who packs up his EX3 (and Letus adapter) two actors and a buddy. He flies everyone down to Southern Mexico, rents a cargo van and sets off to shoot a no budget, indie road movie. He’s already one step ahead of the game by shooting it outside his apartment, but still pretty close to a thousand other “indie road romances” unspooling every year at festivals. He shoots his movie; enlists non-actors in key roles; composes great shots with nice scenery, then goes home back to his studio apartment and shuts the door for a year.
He comes out and blows everyone’s mind by taking his road movie into After Effects and a 3D app (3DS Max, not C4D). He pulls down some pre-made 3D models off the internet, does some modeling and animation on his own. 250 effects shots and a year later he’s done. All effects, animation, compositing and rendering done on two computers in his studio apartment. And what could have been a boring, mumbly “road-romance” is suddenly a suspense-filled, dystopic sci-fi rumination on loss, love and survival after unimaginable disaster. No zillion dollar effects budget, no dozen VFX companies put out of business overnight by flat-rate bids — just indie spirit and execution of a genre that was supposed to be off-limits to broke filmmakers.
When I watch the feature demo reels of what Cinema 4D R13 can do, I am also awestruck and inspired by what I can do on my laptop. Armed with an accessible, affordable piece of 3D software and After Effects.
MOTION TRACK + 3D ANIMATION TEST 2012 = DSLR + MAGIC BULLET TEST 2010
Clearly a whole new generation of filmmakers are realizing that combining live action footage with CGI elements is suddenly, easily, available to them. Take a look at “Another Earth” and you can see what some inspired filmmakers did with motion tracking and compositing still images from NASA — a far less technically challenging project that Edwards’ monsters.

THE INFINITE VIRTUAL PROPS DEPARTMENT
As I ventured into the wilds of 3D animation, I found an amazing community of generous over-sharers. So much has changed since I made a half a dozen CGI shots for my short film. The internet is now a warehouse of both beautifully detailed 3D models and crude, rudimentary geometry. Pricing varies from free to the hundreds of dollars, as far as I can tell, there is no rhyme or reason on how prices are set. I found gorgeous stuff for free and some pretty janky looking stuff that cost real dollars. Fortunately, there’s C4D cafe and CGTalk, among so many others. Honestly, I know I’ll need to learn to model at some point, but I can build cities, drive cars and fly planes all with free or really cheap models downloaded in seconds.
And as far as my aversion to reading manuals, it turns out I don’t have to. It seems, to me, that every 3D artist is also an eager producer of screen-capture how-to videos. And no one is more eager than the creators of 3D apps. Maxon has something called Cineversity, a collection of screen-cap how to videos on every aspect of Cinema 4D as well as workflows for modeling, animation and VFX. This is a subscription service that I got a 90 day pass to use. The content is very helpful, but there’s also a ton of free training on YouTube and Vimeo that’s equally as helpful. In 3D-land, there is no shortage of training available.
MY NARROW WORKFLOW AE TO C4D AND BACK
Inspiration: Oakland from PrepShootPost on Vimeo.
My mercenary desire to combine live-action footage with 3D elements from the internet backlot really allowed me to focus on some narrow and specific parts of C4D R13. I still don’t know what a NURB is, I’m kinda hazy on UV coordinates and I know that hair is really cool in 3D, but I’ve yet to put it on anything.
I love After Effects, I have since 1995. And I love products from The Foundry. I beta-tested Camera Tracker, and I am a loyal user and evangelist of just how stupid-easy it is to use. Camera Tracker makes match moving so simple that I don’t really remember my workflows before.
So when I found out that C4D had a plug-in for After Effects that let me export my camera data, I was kind of smitten. And it’s just that easy — track my footage, create camera, export to Cinema 4D. In C4D, I can open up my camera track as a new Cinema 4D project. Once inside C4D, I can drop in 3D objects, animate, add lights, render my animation and then composite back in After Effects. One of the real breakthrough features of C4D R13, is the inclusion of the Physical Render system — a kind of real-world physics model of an optical system for rendering highly photorealistic, detailed CGI. Part of that TCO thing I talked about, was how in previous versions of C4D, you’d need to buy a seat of VRay for a thousand bucks if you wanted that kind of rendering quality. Now it’s included in the sticker price.
MY FIRST C4D PROJECT
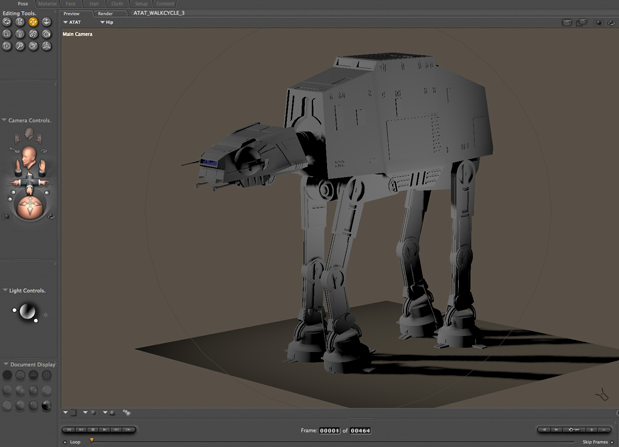
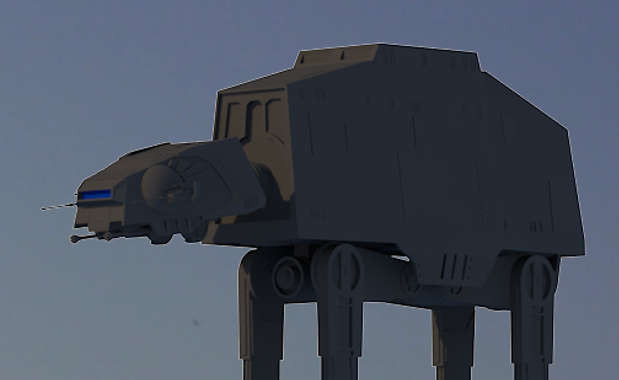
I created a project for this review called “Inspiration: Oakland”. It’s my attempt at the DIY SciFi workflow and a nod to one of the more well-known Bay Area Star Wars legends about the origins of the AT-AT design . The footage was shot with a hacked GH1 (shooting 60mbit, 4:2:2 MJPEG) and then tracked with The Foundry’s Camera Tracker in After Effects CS 5.5. The AT-AT was a freebie Poser model off the internet, and the animation was done in Poser Pro 2012.
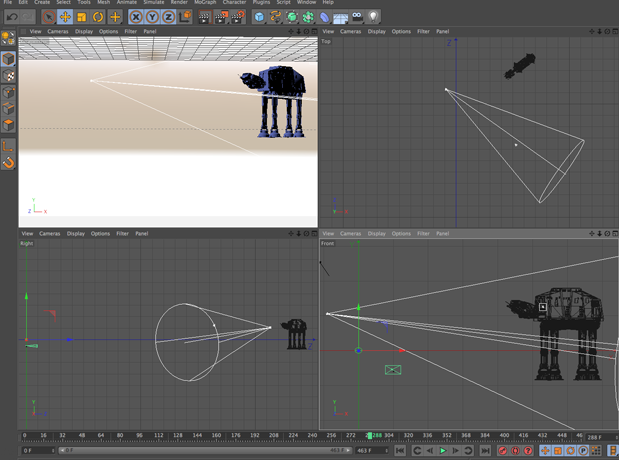
A note about Character Animation in C4D R13 and why I chose Poser Pro 2012. While the new character animation in C4D R13 tools are amazingly powerful, I was dumbstruck when I tried to build my own quadriped rigging in them. This isn’t to say that it’s hard to do necessarily, but it would have required more learning than I had time to do. I already knew how to do it in Poser Pro. Thankfully, C4D plays nice with a lot of apps, including supporting a plug-in from Smith Micro (PoserObject) that lets me bring in complete Poser scenes. And yes, I kind of love Poser, I use it a ton for previz work.
Step 1: Import the shot into After Effects, track with Camera Tracker. After a little clean up of the track, I had Camera Tracker build the camera solution and create the scene. I inserted a still image of the AT-AT to test how well the track would “stick” objects to the footage.
Step 2: File > Export > Cinema 4D Exporter. I mean, really, could it be any simpler?
Step 3: Launch C4D, open the C4D file I created from the After Effects export.
Step 4: Go to Plug-Ins > Poser Object, C4D drops an instance of the Poser Object right into the center of the work area. In the Attributes Box, I can just select whatever Poser Scene I want. A note, this is a specific workflow for me, if I was a real C4D jockey, I could just as easily rig a downloaded model from the internet right here, no need to go to other apps.
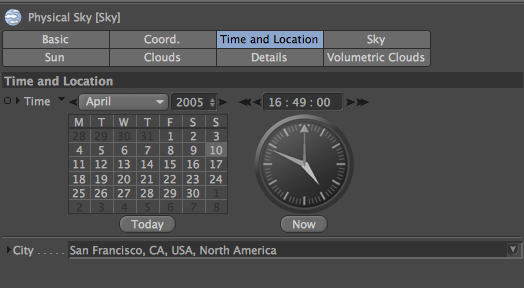
Step 5: Compose elements in front of my virtual camera. Really easy, I can preview in real-time, move lights around, etc. I added a “Sky” object, which let me enter in the location (in easy to use “San Francisco, California, USA” or I could just enter in map coordinates), the date and time. This is really handy if you’re doing shot matching between real world scenes and virtual objects. It’s also another example of the need for someone, or something (camera) to keep track of this kind of metadata (the Sony FS100 has a built-in GPS, for example).
Step 6: Pick my renderer — here I have everything from “Standard” which is really fast but makes things look really “3D”, on up to “Physical” which is really slow on my outdated Early 2008 MacBook Pro but makes things look really “real”.
In terms of format options, I can render to anything. I chose 8 bit (per channel) PSD. But I can render out file formats that also support 3D channel info like RLA. And I can render out Quicktime movies, but who does that?
Results: Perhaps it was the internet sourced model or the less-than-detailed texture work on my part, but the Physical Renderer produced some funny artifacts on my AT-AT’s head. Most notably a flickering polygon. This artifact was not present in a “Standard” render of the same scene.
After Rendering, I brought the image sequence in After Effects where it snapped perfectly into place, and I got to see how I premultiplied the sky object with my AT-AT, placing a nice perfect blue outline around it. Rather than rendering again, I use the tools in After Effects to fix it. Then I went about compositing (the flickering polygon error, meant some painting, but other than that it was pretty painless), color correcting and rendering. That was it. Easy integration between a hacked GH1 clip, After Effects, a 3D model from the internet and Cinema 4D.
CONCLUSION
Cinema 4D R13 is an awesome program filled with power, speed and depth. After years of development, Maxon has released a mature, stable and robust application that is easy to use and powerful enough for high-end, professional work flows, while accessible and fun for new users to start working right away. After a few weeks of some serious noodling, I was barely able to scratch the surface of what this product has to offer end users. However, it’s already hard to consider going into another project without Cinema 4D on my dock, wedged in between After Effects and Final Cut Pro.
If you’re looking for an easy-ish to use all around modeling, animation and rendering application, that plays nice with other post tools, then C4D is a great choice. It comes with a network rendering engine as well in case you want to set up your own home render farm. There are also a ton of on-line render farms available in case you don’t want to invest in a ton of hardware, but will need power from time-to-time. Although plug-in support can be kind of limited when “farming out”.
C4D comes in 4 flavors, starting at the low end with C4D Prime for about a thousand bucks (even cheaper than that if you have some other app that qualifies for a “side grade”) and going up to the all to the fully loaded C4D Studio for around 3500 dollars. I like this strategy, so I can get started in 3D, and when or if my needs change, I can upgrade and get new and more esoteric tools working in an environment I’m already familiar with. C4D also has a ton of 3rd party plug-ins that let you do everything from growing virtual plants to doing 3D motion capture with an XBOX Kinect, there really is no limit.

Filmtools
Filmmakers go-to destination for pre-production, production & post production equipment!
Shop Now


