Adobe Premiere Pro has been back in the post-production public consciousness for quite a while. Now at version 5.5 it feels like Adobe began really pushing it when the Mercury Playback Engine was added in 5. I’ve been toying with it off and on for quite a while now but with the recent release of Final Cut Pro X I wanted to give it a real-world, client in the room test. In the end it was both very good, kinda bad … and a little bit ugly.
Before we discuss how Premiere Pro performed there’s a number of questions that I’ve been asked about finally using PPro in a “real world” edit.
First is the question I’ve been asked most often: Why now?
With the arrival of FCPX came the end of future development of Final Cut Pro 7. In my opinion and my workflows, FCPX isn’t ready. Besides missing “pro” features like I/O and 3rd party hardware support I think the basic editorial tools are a step backwards from Final Cut Pro (but that’s a different discussion for a different day). Many say “FCP7 didn’t stop working when FCPX arrived” but personally I don’t want to keep using a end-of-life NLE as I want my tools to continue to evolve and get better in both functionality and performance. Hearing that argument we’d be expected to continue to use FCP7 forever or at least until FCPX gained needed features. That may be years from now … if ever as I doubt some of the basic editorial tools in FCPX will ever change. I want to give my time and energy to tools that I know have a future and sadly FCP7 doesn’t have a future beyond where it sits now.
The second most common question is why not edit with Avid Media Composer?
That’s an easy answer in that I do work in Avid … all the time. But I like to have multiple editors available for different tasks. This job happened to be a more flashy promo-type piece that required some After Effects work as well as mixing of the audio. I often feel these types of things are easier achieved in a studio suite of applications like Adobe Creative Suite (or what would’ve been Final Cut Studio). Plus I’ve found it easier for me to do some of the more flashy stuff with the PPro/FCP way of working with effects.
The final question has been this: what’s the learning curve from Final Cut Pro to Premiere Pro?
There are some pointed differences as they are different applications but overall they are VERY similar. They are nearly identical in a lot of general tasks and operations. The major editorial differences come mainly in where a certain task or button is located. The origins of FCP and PPro come from the same people so it’s no wonder they are so similar. Unless you have a deathly fear of change moving to PPro shouldn’t be a fear that keeps you awake at night.
The Project
This edit was a mix of Sony F3, XDCAM EX and Canon 7D. It was refreshing to have a camera like the F3 selected for the main interviews as that meant sound was recorded directly to camera so no dealing with double-system sound for DSLR. PPro 5.5 introduced a new Merge Clips command to make this easier but even easier still is not having to worry about it at all.
7D media was converted to ProRes LT before we began but the Sony media was imported natively. PPro relies on the Mercury Playback Engine for it’s amazing performance and this MacPro was running an NVIDIA Quadro FX 4800 for Mac.
The other thing that made this move possible was the release of AJA Kona drivers for CS5.5. This was absolutely critical in a client focused environment as I often had the client in the room as we worked the edit and without display on the client monitor he would have had nothing to look at. Yet another reason this missing feature from Final Cut Pro X is so baffling.
Matrox actually beat AJA in availability of their CS5.5 drivers but testing both an AJA Kona LHe and Matrox MXO2 Mini revealed better performance on my system from the Kona card (or so I thought). Premiere is interesting in its monitoring in that to use 3rd party hardware you choose a dedicated sequence preset for the hardware you want to use. And just looking at the playback settings for each reveals a big difference.
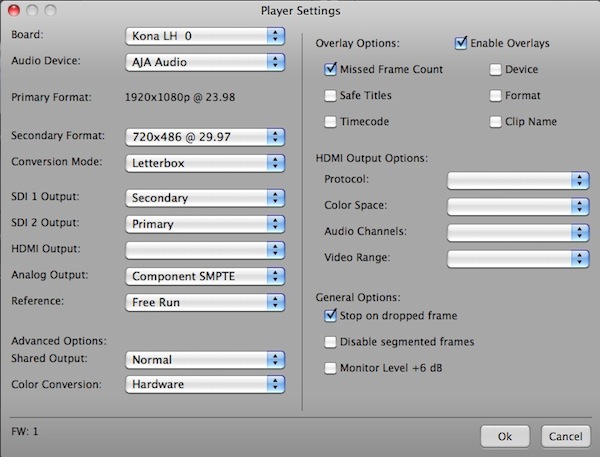
The AJA player settings in PPro offer a lot of choices of formats and monitoring.

The Matrox player settings in PPro are rather … simple in comparison.
UPDATE 7-27: Andy made a great point in the comments below that the Matrox video settings that parallel the AJA settings are located in the System Preferences under the Matrox MXO2 Mini tab. This is where you would change your video monitoring options like output resolutions and downconverts. Matrox uses the same system preference between PPro and Avid Media Composer (and I’m guessing Final Cut Pro as well) but when you check the video output preferences in Avid it actually launches the Matrox System Preference. It might be worth Matrox adding a button in their PPro setting that launches the Matrox system preference right from within PPro.
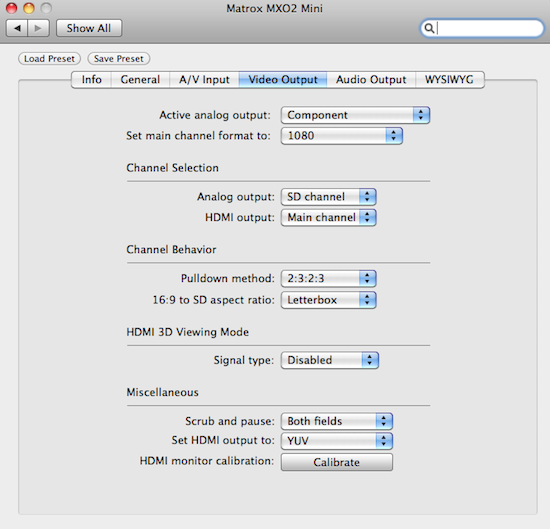
Options for Matrox hardware are handled within the Mac System Preferences.
This article isn’t intended to be a “how to” switch article nor is it intended to teach an editor how to use Premiere as there are many resources for just that. Instead this article is intended to convey the good, bad and the ugly when working with PPro for the first time in a real world post house with a client in the room. With that I’ll break this into three sections with bullet points and notes in each. Some of these comments are on big issues, some on small things I noticed as I worked. And the ugly was definitely ugly though that’s really no fault of Premiere Pro itself.
The Very Good
• A short learning curve from Final Cut Pro
Premiere Pro is very much like Final Cut Pro (that’s FCP7 and above, not FCPX) in that it all beings with a project. That project files contains bins of media, sequences, imported graphics, audio and all the stuff that goes into making up an edit. In fact, IMHO, it will be easier overall for an editor to move from FCP7 to Adobe Premiere than it will be to move to FCPX.
PPro uses the familiar Viewer/Canvas 2-up layout (in PPro it’s called Source monitor and Program monitor) for editing. The Project window is like the FCP Browser and that’s where you’ll organize things like bins, sequences and pretty much anything you import into a project. Keyframing of effects and motion parameters takes place in the Source/Viewer in a timeline just like FCP7.
It’ll be an instantly familiar environment to FCP users since they are so similar. Window layouts can be arranged and saved, bins have columns of different metadata, there’s an audio mixer and level meters and a toolbar. If you realize that conceptually they are very similar but recognize things will be in different places (and steps to achieve a goal will be different steps) then that will go a long way toward making an FCP to PPro transition easier.
• Mercury Playback Engine
We had mixed codecs and a few mixed frame rates in this job so the Mercury Playback Engine performed well. The only things I had to render were two sequences that I Dynamic Linked over to After Effects to do some beauty work on one of the subjects. Sometimes they felt like they wanted to play realtime but other times they did not. Other than that no render was required on things like titles and transitions that were built out of several layers of video and blend modes.
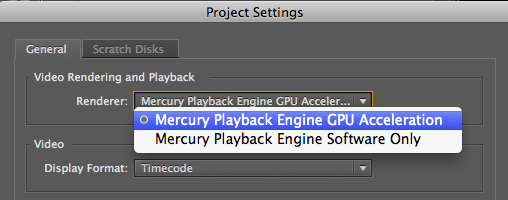
With a supported NVIDIA GPU the Premiere Pro performance screams.
There’s been some discussion on whether Mercury playback is enabled when using 3rd party hardware like the Kona card but I can confirm that it does work. I tried the usual picture-in-picture, stacked clips with filters test and the Mercury acceleration does work in conjunction with hardware i/o. I didn’t get as many realtime streams playback on the PPro monitor only but certainly enough for most of what I encounter in day to day editing.
• Interface
I had been skeptical at first about the PPro single-window style interface (as in all the PPro windows are gathered into one large, resizable window) as it seemed too structured when compared to FCP’s free-floating windows. Once I really got into PPro I made two large windows for my two 24 inch monitors and it actually works really well. Workspaces can easily be saved and accessed by keyboard shortcuts.
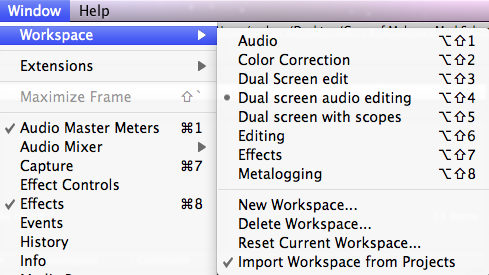
Different window layouts are easily saved and recalled, ala Final Cut Pro.
Each window has a pop-out menu that lets you undock, close or maximize the frame. Once you figure out just where to dock a window to get the desired result when you move it then it’s easy to build just the workspace you want. FCPX could learn a thing or two.
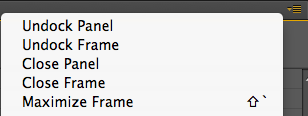
All PPro windows have this panel menu for docking and organizing windows.
• Per track audio adjustments
PPro is quite strong in the audio mixing category. Things like separate gain and volume controls are great but PPro moves a step beyond with per track (not just per clip) levels, effects and automation control. You can turn on rubber banding for either individual clips or an entire track. When using automation via the audio mixer there’s Read, Latch, Touch options that will be familiar to anyone who has worked in audio editing applications. You can also assign audio filters to an entire track. This was very handy when applying a compressor to the interview subject’s audio.
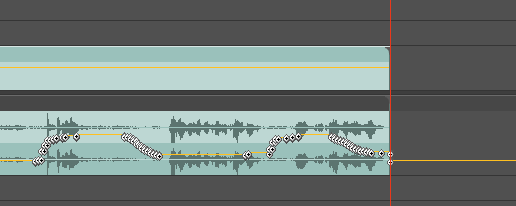
It’s nice to have both per clip and per track audio adjustments in Premiere Pro.
• History menu
If you want to see an undo menu the way it should be done look no further than PPRo’s History menu. It’s a step-by-step listing of the actions that have been performed. Adobe says you can “undo as many as 32 recent changes made to the project in any Premiere Pro panel” and while that’s not unlimited it’s very usable thanks to the History panel. The History panel gives a count of how many Undos you have left available. Now if we could just get it higher than 32!
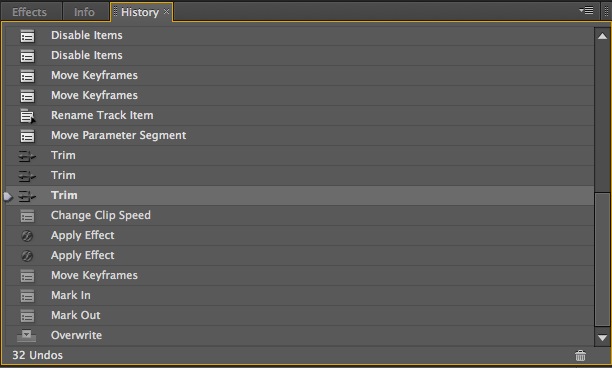
Seeing your last 32 actions in a list form makes for easy undos and redos.
• Subframe audio editing in the timeline
If you want to edit audio at a subframe level it’s as easy as selecting Show Audio Time Units from the Timeline, Audio Mixer or Program monitor panel menu. With that the timecode display changes to subframe units. If you remember how difficult subframe editing was in FCP then this will be welcome.
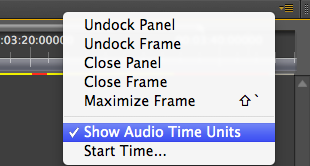
No shift+dragging to subframe audio edit in Premiere Pro, it’s just a menu item away.
• Best in class title tool
PPro’s title tool beats its competitors hands down. Once created in WYSIWYG form over a frame of the video a title is then saved into a bin to it can be loaded and edited into a sequence. I once asked WTF Title Tools ?!?! which declared that PPro beat FCP and Avid when it comes to simple titling. It still does.
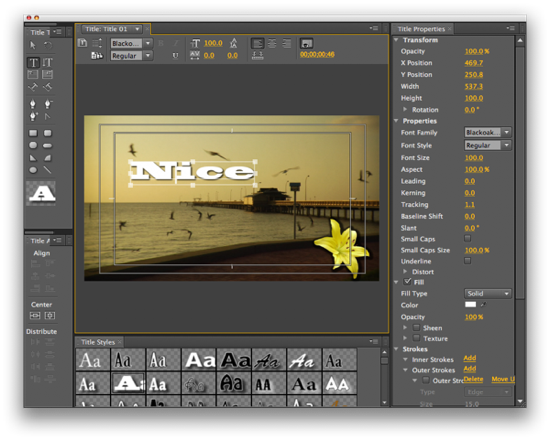
That’s a nice title tool.
• Project Manager
PPro uses a Project Manager to do a lot of what FCP’s Media Manager does. It works on an entire project basis as opposed to being able to use it on a per sequence basis. But if you look at the image below you can see that all edit sequences in a project show up so you can choose how many or how few of your cuts you want to manage. It’s a pretty nice way to archive at the end of a project and it worked well archiving this edit when we were done.
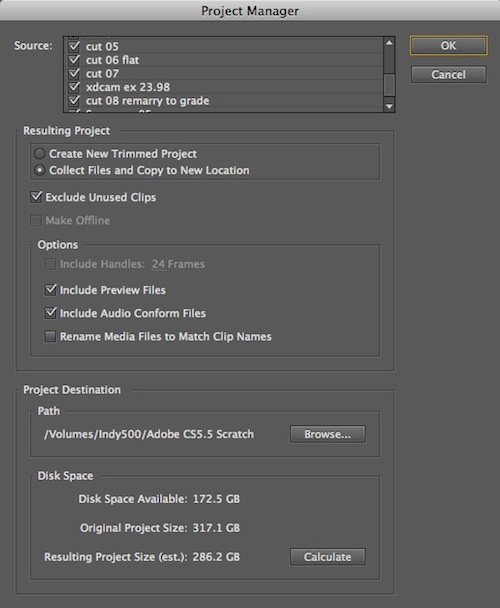
There’s quite a few archiving options available using the PPro Project Manager.
Next Up: The Kinda Bad and the Little Bit Ugly
The Kinda Bad
• Premiere Pro really needs some kind of automated search for relinking items
If you ever have to reconnect media you’ll do it in a similar fashion to FCP but with one big problem, there’s no way for Premiere Pro to search out a file. Any searching will be a manual search for what might be some cryptic file name in an XDCAM folder structure. PPro desperately needs the ability to scan a folder or volume for a specific file rather than having the editor do it manually.
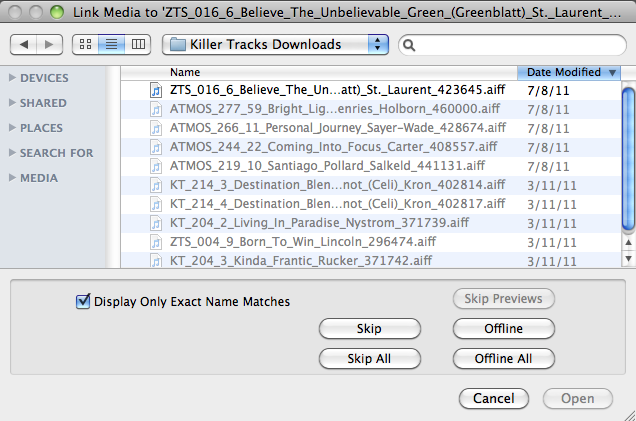
You can see from the image above they while there is the ability to “Display Only Exact Name Matches” you still have to manually find the file.
Yes you can use the Spotlight search box in the above window and that helps but if you haven’t indexed your media drives that won’t work. Why oh why there isn’t a more robust relinking method in a version 5.5 product is beyond me.
• Better visual identifiers for a quick glance
There’s a few places where I wish PPro had a bit more contrast between interface elements as I often found myself having to really look and see what I was searching for. First would be when you disable clips in the timeline. Disabled clips change to a lighter shade of color with both the clip and the clip text. A bit more contrast would be nice.
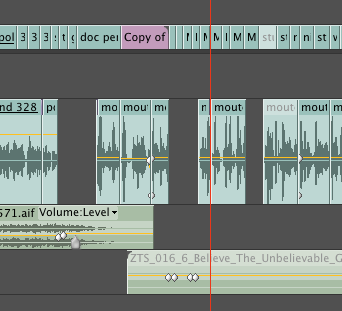
Can you tell which clips are disabled with a quick glance?
The other more pressing place where there needs to be more contrast for a selected item is when in Icon View in a bin display. I found myself spending entirely too much time looking for the selected clip in icon view. You might not think it would add up to much but having to hunt the selected clip out over and over became frustrating.
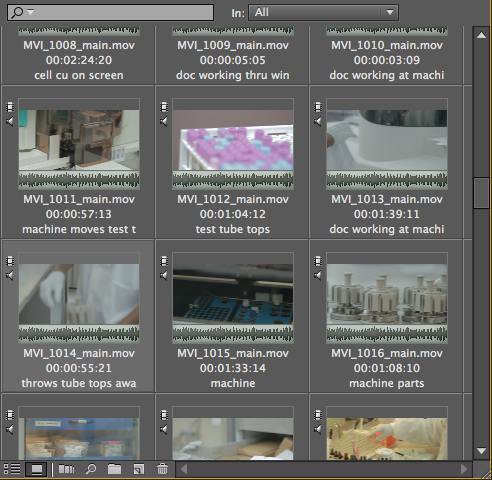
It takes an eagle eye to quickly spot the selected clip when in icon view (though it is nice to see those comments when in thumbnail view).
There also needs to be more distinct shading for what clips are selected between an IN and OUT point in the timeline. Like FCP7 you can have a clip directly selected with the Selection tool or have a different kind of selection between IN and OUT points. It’s nearly impossible to see what’s selected between IN and OUT points. I would often turn on a blank video track just to see the IN to OUT range.
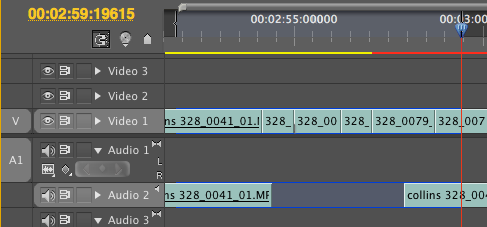
Can you tell exactly what would be removed when using the Lift or Extract command?
• Needs a timecode overlay or timecode viewer
If Premiere Pro wants to really play in the pro market there needs to be some way to view source timecode while working in the timeline. You can always match frame to a master clip and view it there but that’s not a great solution. FCP has long had timecode overlays and Media Composer has the user adjustable timecode window as well as selectable displays at the top of the Program monitor. Both of these are great options that makes it easy to view source timecode.
• Reveal in project from Source monitor
If you use the Find Bin command a lot when working in Avid you’ll miss some of its functionality in PPro. There is the ability to Reveal in Project from the PPro timeline but this doesn’t work for a clip loaded into the Source monitor. Seems like that would be a simple addition.
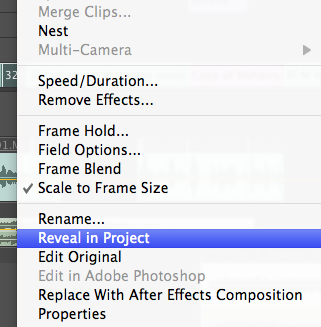
Reveal in Project works from the Premiere Pro timeline but not from the Source monitor, even when it’s mapped to the keyboard.
• Toggle audio scrubbing with a single click
Audio scrubbing is buried in the Audio tab of the PPro preferences. In theory it is a preference I guess but it should be much faster to toggle audio scrubbing, either by a button in the interface or preferably by a keyboard shortcut.

Digging into the preferences just to toggle audio scrubbing takes too much time IMHO.
• Better keyboard shortcut editor
Adobe was proud of the update to the Keyboard Shortcuts editor in a recent update of PPro. At some point it moved to a more prominent place under the Premiere Pro menu and gained a much needed search box. But it still doesn’t have the elusive top-down view of a keyboard that both Media Composer and FCP have. It’s oh so much easier to map a keyboard to your liking when you can see the actual keyboard onscreen. Even better when the keys have a little icon on them to see exactly what has been assigned and what hasn’t.
The Little Bit Ugly
The ugly came not from Premiere Pro itself but from the 3rd party hardware support for PPro5.5 that finally came along to allow me to use it in an actual client-in-the-room edit. I had tested out the Matrox drivers a while back as they were first to support PPro 5.5 between Matrox and AJA. The Matrox drivers have an annoying habit of losing signal when switching between the Source and Program monitors. My large plasma client display would consistently flash and lose the image for several seconds each time when toggling between the Source and Program monitor.
I was excited to see AJA announce their CS5.5 drivers so I gave that a try too. These drivers seemed much less annoying when toggling between Source and Program. The overall responsiveness of the AJA drivers, while not near as buttery smooth as playback that isn’t being piped out of an i/o card, did seem to be usable enough for this job. But I found as we got into the edit and the project got more complex that playback out of my AJA Kona LHe began to suffer.
The lag in my client monitor when switching between the PPRo Source and Program monitors got worse as well and I actually turned it off and viewed source media only on the computer display. As mentioned above, in PPro you choose a sequence preset that will then display using the selected hardware card.
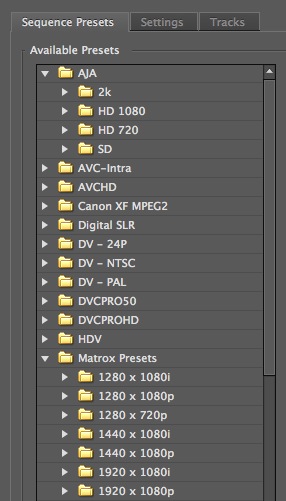
Choosing an AJA or Matrox preset will send video out that video capture card.
Unlike Final Cut Pro you can’t choose a different video output device via a menu setting for the edit sequence. Nor can you just turn output on and off. Viewing media in the Source monitor is different however as you have to choose a Player from the PPro preferences.
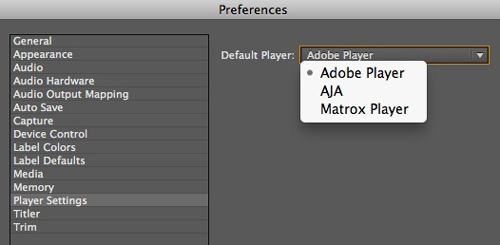
Choosing a player other than the Adobe player will send source video out the selected video card.
So there’s some very specific things you have to do depending on exactly where you want to see your edit and what installed 3rd party hardware you want to use. The ugly problem that I began seeing was that when using the AJA drivers to the Kona card playback would often just stop. That is the edit would be playing along and it would just stop with no warning at all. It might play for two minutes and then stop or it might play for two seconds and then stop. It became very annoying.
I copy/pasted the edit into both a Matrox preset and a non-hardware specific timeline and the playback didn’t randomly stop. I spoke with AJA and while we didn’t directly address the playback stoppage (this started happening after we spoke) they are aware that current scrubbing and playback through AJA hardware isn’t as buttery smooth as it is without AJA hardware. That is something they are working on.
The idea of this being the ugly is that it became quite painful near the end of the edit. We were having to export a self-contained Quicktime just to sit back and watch the edit all the way through without it stopping.
At one point I used Digital Rebellion’s Pro Maintenance Tools and ran CS Repair which “Fixes common problems with Adobe Premiere Pro.” That did seem to speed up playback overall but after a while the random stopping came back. That’s life on the bleeding edge I suppose.
I want to use Premiere Pro more
Overall it was a very positive experience using Premiere Pro itself. I had have used it on a lot of personal projects so I knew the interface well enough that I was comfortable to use it with a client. There’s also a lot of features I still haven’t used like Dynamic Linking to other applications in the Creative Suite and the multicam editor. I’ve already taken a look at version 5.5’s speech to text feature.
There’s really a lot to like in PPro if moving over from Final Cut Pro. If you can remember that it’s very similar but still actually a different program then that will make the transition easier. But if you’ve mastered FCP then you can easily master PPro. Now let’s hope that Adobe keeps working hard to make PPro better and if their performance over the last couple of years is any indication they will. It’s not perfect yet but they’ve got a great place to start from if you consider the FCPX release as a new starting point. The ball is squarely in Adobe’s court.

Filmtools
Filmmakers go-to destination for pre-production, production & post production equipment!
Shop Now