When looking through various forums, blogs and commentary on social media channels, I’m often amazed at how quickly users can jump to conclusions about the causes of their post-production woes.
With my over 18 years of post-production experience, while I am readily equipped with an arsenal of knowledge in dealing with what might be the cause of a particular crash, drive failure, performance issue or workflow hiccup, I’m still learning to this day and tweaking the workflows I’m accustomed to in order to be proficient and move at the speed and pace of our industry.
Premiere Pro is an incredibly robust nonlinear video editor allowing flexible workflows no matter what type of content you produce. If you take Premiere Pro and the Creative Cloud applications, your options for video are almost infinite. In this blog series, I want to touch upon a few hot topics and generalizations that I’ve seen online about Premiere Pro. Let’s look at some comments, dissect them and see as users, there’s a lot we can do to take the power into our own hands and problem solve.
Slow playback for H264 and H265
The first topic I’d like to tackle is slow playback, which can be a key source of frustration for editors. You may experience the problem of slow playback in your NLE, but that doesn’t mean the NLE is the culprit. It makes a tremendous difference what camera you are shooting on and what formats you are using.
H264 and H265/HEVC are highly compressed formats. This is great when:
- Capturing footage, as it doesn’t take a lot of storage and provides you with a cost-effective camera.
- Exporting footage, since it provides smaller files that are easier to upload.
When you take a highly compressed format and try to edit with it, you need a considerable amount of resources to decode the file and optimize it for playback. And that’s before you add effects, transitions, your favorite Lumetri color preset and dynamically link them to an After Effects Comp.
For shorter projects, this might not matter, but if H264 or H265 are slowing you down, consider transcoding your footage to an optimized codec. This allows the file to breathe and requires considerably less of your system’s horsepower. Using ProRres, DNx, or Cineform Codecs are great choices, whether you’re on a Mac or a PC. The transcoding itself happens in the background but the trade-off is that the new files will require more storage, but you can manage that when you’re archiving your finished project. And the payoff during editing is worth it.
Transcoding On Import
- Create a New Project in Premiere Pro by going to File – New – Project
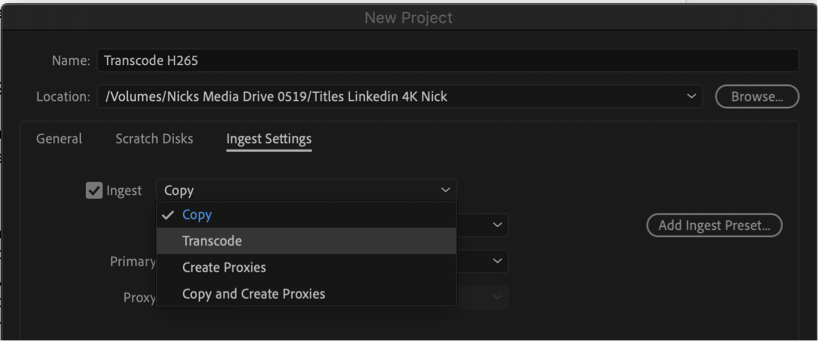
- After setting up the General Settings and Scratch discs, head to the Ingest Settings Tab.
- Click the ingest checkbox. From the Dropdown choose Transcode.
- Under Preset, choose an ingest preset optimized for your system. Since I’m on a MAC, I’ll choose Apple Pro Res 422. Please note: you can actually create your own ingest preset inside of Adobe Media Encoder if you don’t see a format you wish to work with. I have a movie dedicated to this on my YouTube channel.

- Choose a location you wish to save your transcoded media to preferably a fast external SSD. You could also store these in the Creative Cloud folder providing you have enough space, which will put it in the cloud and give you a backup.
- Press Ok to start working in your new project and change your Workspace to Assembly. This will create more real estate for your Project Panel.
- Double-Click in the Project Panel and select H264 and H265 media on your system. Press Import.
- Adobe Media Encoder will launch in the background and start transcoding your clip to the selected Ingest Preset.
- While the preset is still transcoding, Premiere Pro will link to your original file and then automatically switch to the transcoded file upon completion. You can see what Premiere Pro is linking too by right-clicking your clip and choosing Reveal in Finder or Explorer.
- Note: Premiere Pro will transcode everything you bring into this Project from now on. If you are finished go to File – Project – Settings – Ingest settings and uncheck the ingest checkbox. Alternatively, there are also ingest settings available in the Media Browser.
If you prefer, you can also use Media Encoder for this process by importing your H264 and H265 files and choose a format to encode too. In my experience, Premiere Pro is faster, as long as you’re meeting the recommended system specifications for the footage you work with. More on that in another article.
Transcoding on ingest does not slow down your workflow: you can still work with your native footage in the beginning stages of editing. Premiere Pro swaps in the transcoded media in the background as it becomes available.
While we wait for the world of technology to catch up and form a super committee where they align all codec intentions, transcoding is a great option.

