Here’s a really cool Avid Media Composer Reader Quicktip that comes from Evan Schiff. It’s quite clever and I didn’t have a clue you could do this. It can come in handy if you ever have a piece of media that is a self-contained edit and you need to add edit points to that self-contained media that matches the original cut that’s still in your timeline. I could see using this after a color correction has come back for final finishing.
This tip comes from a 2009 post on Evan’s blog and is reprinted with his permission. I’m glad he sent if over for a Quicktip as it’s quite a neat little trick:
Ever needed to add cuts to a clip at the edit points of each shot inside that clip? Yeah, me too. I’m sure this has uses outside of the feature film world, but since features are what I know, I’ll explain this using an example from doing a DI.
Imagine that your DI house has just finished assembling a reel, and they send you a check tape. You ingest the check tape into your Avid, and cut it into your reel’s sequence on the top-most video layer. All is well and good, except that you have one, unbroken 20-minute clip on your timeline. Sure, you’ve got the video tracks beneath it with your dailies, but you’d really like to add edits to that 20-minute clip where each shot starts and ends.
Fortunately, this is pretty easy to do, but Avid has hidden it away inside of the Pan & Scan effect (as of MCA 3.1.2). Here’s how it goes:
Load up the sequence that corresponds to your unbroken clip. For features, this would be loading up the Reel 2 sequence that your Reel 2 DI check tape is supposed to match, for example.
Add a new video track, and cut in the clip you’d like to slice up so that it is in sync with the video tracks underneath
Add a Pan & Scan effect to the clip you just cut in
Make sure that all your track selectors are active
Go to the settings for the Pan & Scan effect, and under the Action menu, click Subdivide. This will add virtual cuts in your clip wherever there is a cut in the active video layers beneath it.
Using the segment tool, select all of the segments on your newly-sliced clip, and click the Remove Effect button. This will remove the Pan & Scan effect from that track, leaving you with one clip and a bunch of matched-frame edits at the boundaries of each shot.
N.B. I referenced this briefly in Step 5, but I’ll explain it a bit more. When you click the Subdivide button, Avid will insert edits corresponding to whichever tracks are active and have cuts beneath the track with the Pan & Scan effect. So if you want to make your virtual edits based on V1, V2, and V4, but not V3, just don’t have the V3 track selector active when you click Subdivide.
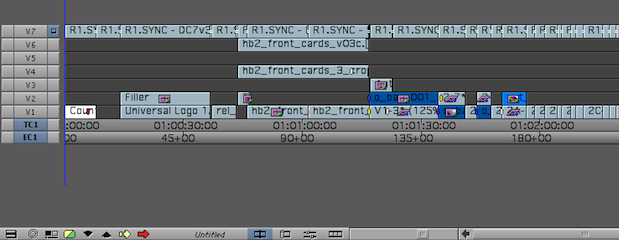
Once you’re finished you should have a timeline looking somewhat like this:

A sample timeline after using the Subdivide effect on the top-most video layer
Very nice little trick. Yet another Quicktip that I need to try. You can follow Evan on Twitter @schiffty.

Filmtools
Filmmakers go-to destination for pre-production, production & post production equipment!
Shop Now


