I came across a little tool in Final Cut Pro the other day that I had never before explored so I thought it was worth sharing as one of the last Quicktips in this 2011 edition of 28 Days of Quicktips (now on day 31). It’s called Change Speed Segment… and I found it when I was mapping the regular Change Speed button to my keyboard. No matter what your opinion is of “speed ramps” changing the speed of a clip very often comes in handy. Change Speed Segment is another way to control speed changes.
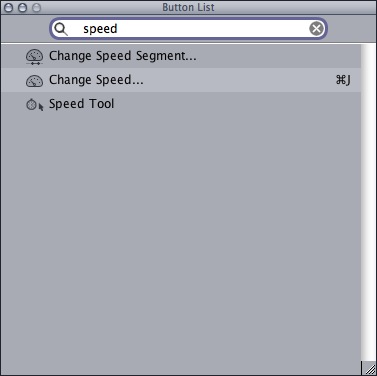
Change Speed Segment… can be found by opening up the Button List or Keyboard Layout and typing speed:

There you’ll find the button that can be mapped to the keyboard or to a button bar. I mapped mine to my Button Bar that lives above the FCP timeline. The Change Speed Segment will allow for time remaps and speed changes to be made (that is making a Variable speed change as opposed to a constant fixed one) right in the timeline. One traditional way to do this is via the Speed graph in the Motion tab of a clip that is loaded into the Viewer. There you can keyframe speed changes but I’ve always found this to be a bit cumbersome and taking a lot of effort to get it just right. Change Speed Segment makes it a lot easier.
First you have to access the timeline Speed Indicators. Do this via the Toggle Clip Keyframes button in the timeline. For a refresher on this see Quicktip Day 24’s video about how to access the timeline keyframe editor as Speed Indicators are there too.
For Change Speed Segment to work you need to add at least one keyframe to the Speed Indicator graph in the timeline (the pointer automatically changes to the pen tool when you hover over the Speed Indicator graph so no need to select the Pen tool). Adding that one keyframe also adds a speed keyframe to both the beginning and end of the clip. You need to park the playhead between two keyframes in the Speed Indicator graph for the Change Speed Segment tool to work.
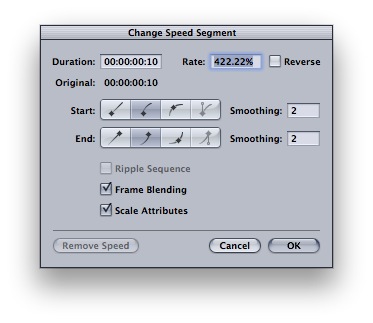
When you’ve got the keyframes set, hit the Change Speed Segment button. What pops up is a dialog box that looks pretty much the same as the command + J Change Speed dialog box:

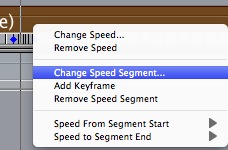
You can also right+click on the Speed Indicator graph and choose Change Speed Segment… from the menu:

This option is grayed out if you don’t have the proper keyframes set in the Speed Indicator graph.
When you change the Change Speed Segment parameters what you’re doing is changing the speed of only the portion of the clip that’s between the two keyframes where your playhead is parked. The rest of the clip stays the same speed. You’ll see this reflected in the changing of the tic marks in the Speed Indicator graph. When done correctly is creates a nice ramp speed.
It might sound complicated but it’s really not once you try it a try. You can read more about it in the FCP user manual. Check out the video below to get an idea of the Change Speed Segment in action (it might take a bit to load as it’s 12 mb Quicktime). Watch the actor’s hand as he puts the cigarette pack on the desk. The idea was to speed up his setting down the pack. In this example I tried two different speeds. Also watch the Speed Indicator tic marks around the region I was speeding up as they still maintain a regular speed.
Remember that FCP has often had problems with Variable speed media when it comes to the Media Manager moving of projects or sending EDLs and XMLs to conform a project outside of FCP so be aware of that if you use this technique. But if you’re finishing right in your own FCP install then it’s quite a handy little tool.

Filmtools
Filmmakers go-to destination for pre-production, production & post production equipment!
Shop Now


