With a background in newspapers and editorial work, my photographs are documents, not works of art. This explains why they are, usually, quite simple to edit. I am not after a special effect, I believe reality is already fantastic enough.
This text centers on two aspects: my photo workflow, and some tips to help new photographers get better photographs. People ask me how do I edit my photographs, which software I use and if I’ve a few tips to help them get better results. That’s what I am trying to achieve here. I hope it will help you, if you’re reading this.
Unless you’ve been living under a rock, your photo workflow has changed over time. I know mine has. I remember using Aldus Photostyler, then Paint Shop Pro and finally Photoshop. Also trying many programs that promised much but never worked as I wanted. Did I stop at Photoshop? Yes, to a certain extent it is my core program. But I may be on the verge of changing again, with new software coming soon that may represent a solution for my needs. Or maybe not. Only trying it when it comes out will tell.
Also because my workflow may be about to change, I decided to hasten publishing this article. It shows a workflow that I am sure others also use, and confirms that we’ve many choices for editing photographs. But let’s explain why I use what I use and then how I use it.
I am one of those persons that decided not to subscribe to Adobe plan for photographers, meaning I am still using Photoshop CS6. I don’t use Lightroom, although I used it for some years. I don’t like the DAM aspects of it, and the tools I need the most are already in Camera RAW, so I dropped LR in version 5.
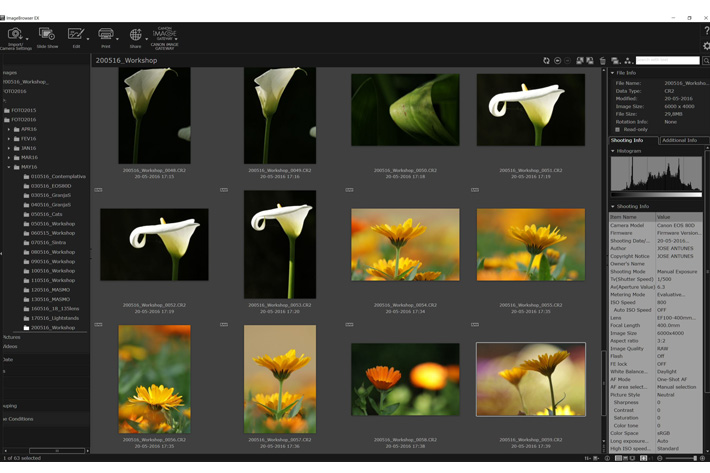
This decision means one thing: as Adobe stopped updating Photoshop CS6 with new versions of RAW, the only alternative is to use its DNG converter… or look elsewhere. I don’t want to use the DNG converter, which is free, but introduces another step into my workflow, and makes me use a format I don’t want to use. Being a Canon user, it was not difficult to choose another workflow. Canon distributes with their cameras a package of software that includes Digital Photo Professional, and, among other things, Image Browser EX that although basic is enough to import images. I’ve to use it now because Adobe Bridge does not recognize the RAW files from new cameras.
In 2016 I started using DPP and Image Browser, which I had used before, in my workflow. I import files with Image Browser and afterwards use DPP for everything in terms of RAW adjustment. Canon’s DPP is a great tool, and it fully understands the RAW files from Canon cameras. Still, I must say I am waiting for Affinity Photo and ON1 Photo RAW to define how my workflow will be in the future. It may well happen that I drop Photoshop altogether, if one or both programs convince me.
Let me, now, take you through a few screen captures that show my workflow. If you want to see more images and full size images of the screen captures, visit Medium. The following text also includes my tips for workflow and some notes I deem important to share with readers.

The import tool from Canon is Image Browser EX. The interface gives you all the information you need about your images. There is one reason for the choice of title for this article: simplicity. If you look at the images transferred from the memory card, they are all well exposed – for what I want. Colour is also there and like what you’ll see in the final photograph. This is the way I tend to work and worked before with transparencies: no margin for – much – error then. If you expose your images properly to start with, it is easier to edit your work afterwards.
Detail of one of the images viewed in Image Browser EX. Although the program offers some editing functions I don’t use them. Once I’ve imported all images, I will open Canon’s Digital Photo Professional software.
Digital Photo Professional or DPP for short, gives you all the tools to edit your RAW files, and it fully understands the specific RAW files from Canon. It is inside DPP that I do the adjustments I need to get the detail and colour I am after. Because you can blow up the image you have exact control over each aspect of the editing process. I adjust tone, colour and sharpness, besides some of the lens correction features present in DPP. Because I expose my images the way I want at the moment of capture, processing them is, in general, quite simple.
Once I’ve finished in DPP I export the image to Photoshop. Most of the time Photoshop works only as a “bridge” to send the image inside either ON1 Photo 10 or Topaz Labs. I use Topaz Labs Clarity as the program to get the final touch to my images. I will use others, like Lens Effects, for removing haze and applying ND filters, if I need to, but my regular workflow is DPP/Photoshop/Topaz Clarity.
Inside Topaz Labs Clarity I select the preset that best fits the image opened, and adjust parameters until I get the results I am after, in a WYSIWYG fashion that works rather well. You can also compare the original with the edited image and the program also allows to see thumbnails of multiple presets. Still, I like checking results in the full image once I’ve chosen a preset.
When I feel I want to have some extra control over one image, I will remove Saturation, so I’ve a full black & white image, and then I control the different parameters while checking the histogram. Removing colour altogether gives you a better notion of the contrast within one image, something that works rather well in some cases. But most of the time, my normal workflow follows the actions described here, making for a “Simple Workflow” based on the fact that I took care of exposure at the moment of capture and aim to create “Real Photographs”.
If your aims in photography are like mine, this workflow may well work for you. Even if I change some aspects of my workflow in the future, what may well happen with the new software coming soon, the essential aspects remain the same: expose according to your aims, so you have to sit for less time at the computer and can spend more time photographing. Because that’s what it is all about, really!
This way of working is not strange to me. In fact I’ve followed it all the time, as the couple of photographs above, from very different subjects, with the original RAWs to compare, show.You’ll find that there are few differences between the original and the final photograph. There is a tendency to vibrant colours i some cases, but that’s nothing new to me, as Fujichrome Velvia and Ektachrome Panther were my emulsions of choice.
Colour has always played an important part in my photography, and that goes back to the 1980’s, when I started to use slide for editorial work and my personal projects. The final images here are from that period, slides converted to Kodak PhotoCD files, some of my first digital archives. Colour was already an essential element of my photography. Now I’ve more control and that’s good!

