I haven’t yet found a manual for working with RED footage. The methods that I’ve discovered have been cobbled together by searching through thousands of posts on Reduser.net (which has a very low signal-to-noise ratio), hundreds of posts on the Cinematography Mailing List, and just making stuff up.
I recently shot two very low budget political spots on the RED, and as our editor was tied up with another project for a week I took a stab at doing the rough cuts. It wasn’t nearly as painful an experience as the first time I tried to cut RED footage, but there are still some basic bugs that have to be worked out of the workflow.
The biggest annoyance is that RedCine, RED’s earliest batch-processing color correction and conversion program, doesn’t do anything with sound. I cut in Final Cut Pro, and Apple has decided that they only want to support RED footage by forcing us to convert it into ProRes. That means using a tool like RedCine to do basic color correction on each clip and then render those clips into ProRes, a process that usually takes several hours.
Unfortunately, RedCine is not completely bug-free. The most annoying bug is one where you discover, after several hours of rendering, that your first clip rendered fine but all your other clips were rendered out as still frames from the first clip. This is a bug that I’ve run into numerous times, and the only apparent solution is to trash that RedCine project file and start again. Not very time effective.
RedAlert is much more stable but only handles one file at a time.
How I solved the batch processing dilemma on the next page…
Introducing RedRushes
Fortunately there is now another tool: RedRushes. Currently bundled with the latest version of RedAlert, RedRushes is a very simple program designed to batch render R3D files into a useable format without a lot of headache. There’s no sophisticated image processing involved so you’re basically getting a one-light transfer: you can create a color profile (.RSX file) in RedAlert and apply that across the board to all the clips or you can use a preset. As my footage is headed for broadcast I used the Rec709 color and gamma settings.
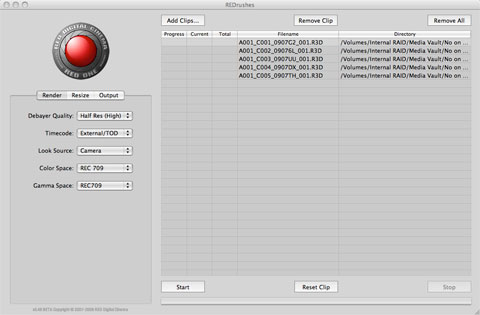
This is the first screen of RedRushes, with five clips loaded and ready for processing. The options are:
Debayering Quality: Deanan of RED suggested that for 1920×1080 I was probably fine using Half Res (High). He suggested I’d save a lot of time over the Full Res (maximum) setting and the difference between the two after scaling wasn’t enough to warrant the extra processing time. He was absolutely right: as an experiment I tried Full Res and watched RedRushes slow to a crawl. Half Res (High) processed clips fairly quickly and there was no noticeable difference after scaling to 1920×1080. (RedRushes processes clips three at a time and gives you plenty of information concerning how far along you are in the process.)
I left Timecode at External/TOD (presumably “time of day”) because the alternative was edge code, and that didn’t apply here. Clip timecode was preserved through the transformation to ProRes.
Look Source was Camera, as I didn’t create an external Look reference (.RSX file). Color Space and Gamma Space were Rec709 as I intended this footage to be broadcast, and as RedSpace (my on-set color and gamma reference) is basically a brighter Rec709 spec I knew I’d be in the ballpark.
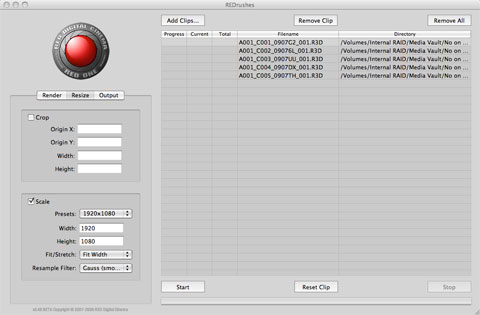
Under Resize I picked the built-in 1920×1080 setting. Deanan suggested using Mitchell or Gauss as a resample filter as they were a good compromise between sharpness and softness, but I ended up going with CatmulRom just to see how sharp the footage got. I didn’t notice any extreme sharpness, and I added some post diffusion anyway to enhance the mood of the spots, so no harm done through experimentation.
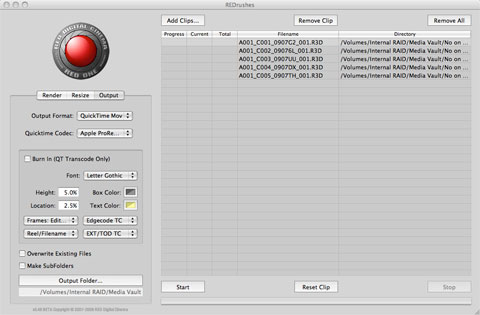
For output I chose Quicktime Movie and ProResHQ. I chose an output folder and let it rip. I processed about two dozen :30 clips in less than three hours. Not bad, and no crashes!
I shot this project very differently from past RED projects: instead of treating it like a film camera, and setting T-stops strictly by metering, I opted to use RedSpace for monitoring and a combination of zebras and RGB histograms for exposure. RedSpace appears to be a brighter version of Rec709; RED’s Rec709 comes across as very dark and RedSpace fixes that. I set my zebras at “103”, assuming that I was working on the usual IRE scale of 0-109, and opened up the T-stop on the lens until I was just clipping the highlights. This gave the chip maximum exposure, eliminating noise issues that I’ve had in the past from putting the shadows and midtones too far down in the mud.
The result was that I was able to run my footage through RedRushes, using the Rec709 settings, and get dailies out the other side that looked very much like what I saw through the camera. In most cases I was then able to do my color correction in Final Cut Pro (using Red Giant’s Magic Bullet Looks) without banding issues, although I did have to re-transfer two shots through RedCine in order to do a more careful primary color correction. (Beware shots with blank, even surfaces. They are a PAIN to color correct without banding!)
RedRushes biggest weakness, however, is that it doesn’t process audio. It’s a mystery to me why RedCine and RedRushes don’t deal with audio, but that’s the reality. We recorded double system sound on this project but there was a delay in my getting the audio files for editing.
I did find a solution, though, so let’s move on to the next page…
When In Doubt, Steal from the Proxies
(UPDATE: Deanan of RED informs me offline that as of 9/2/08 RedRushes DOES now transcode audio. I installed RedRushes on 8/31/08. Missed it by -that- much…)
The RED creates Quicktime “proxies” when it generates a raw R3D clip, and those proxies are great for looking at performances using the Quicktime player. I haven’t been able to use them to do rough cuts as they don’t work well for me in FCP. I was able to drag them into the timeline but once they were rendered the image shifted left by 50% and the right side of the frame was filled with flat green. And Final Cut’s log and transfer function works fine for rough cuts but I wanted to create something that I could color grade reasonably well, and log-and-transferred footage does NOT look that great.
The solution seemed to be to render the selected takes and then match them with their proxies on the timeline, using the rendered ProRes clips for picture and the proxies for audio. I dragged the entire ProRes-rendered take onto the timeline, placing it on video track 2, and then put the proxy–with its audio tracks–directly below it on video track 1. By bringing in the entire take in both forms, and lining them up with each other on the timeline, the audio was instantly in sync, which was confirmed by rolling through and checking the slate. From there I’d shorten the shot to what I needed and drop it into the edit.
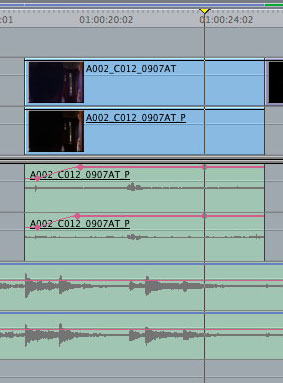
Here you can see the top video layer, a ProResHQ version of the clip rendered through RedRushes, hiding a bottom video layer, which is the “P”-sized proxy of the same shot. The proxy’s soundtrack lies on the first two audio channels with music on tracks three and four.
The proxy video track is tied to the audio such that if one moves the other moves with it. The ProRes track is not linked that way, so in order to retain an easy reference for re-syncing if the tracks slipped I left the proxy video track in place so that I could re-sync the picture and audio tracks by comparing the ProRes slate to the slate on the proxy track. (I’m sure there are much easier, elegant and professional ways to do this, but I’m an accidental editor and I hate reading manuals.)
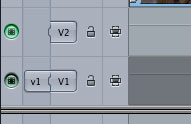
I disabled the proxy’s video track so that it wouldn’t appear during transitions or dissolves.
I wouldn’t recommend doing this for a lengthy feature but for a couple of :30 spots it worked just fine. I’m interested in checking out Adobe Premiere’s newly-announced ability to natively edit with R3D files; that would have made my life very easy indeed.
I’m sure there are lots of post professionals shoving pins into their eyes after reading this article, but hey–one of the promises of the RED was to bring high-quality raw HD to the masses, and now the masses are trying to figure out what to do with it. And once a mass is set in motion it takes some effort to stop it.
A note on slating: as with P2 footage, it is immensely helpful to have the slate in the frame when the camera first rolls. That first frame becomes the thumbnail for your clip, and it’s handy to have the scene and take number sitting right there in your bin.
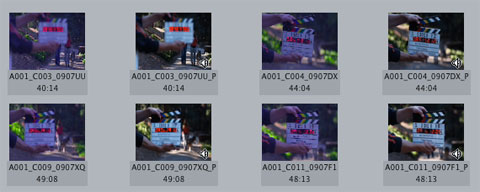
Here you can see a couple of clips paired with their proxies. (The proxies have the little “speaker” icon in the corner, indicating they contain audio tracks.)
I can’t reveal what these spots are about until they start airing, but once they do I’ll post a couple of articles about how I shot them and colored them. Stay tuned!

Filmtools
Filmmakers go-to destination for pre-production, production & post production equipment!
Shop Now