If you have begun to explore Final Cut Studio’s application integration by embedding your Motion project files into your Final Cut Pro sequence, you may have noticed a rather large increase in render time for that sequence.
Part of the cause of the increased render time is due to the level of complexity of your Motion project, but there’s a setting in Final Cut Pro that can dramatically reduce render times with little to no impact on the quality of your Motion project — except for certain types of projects.
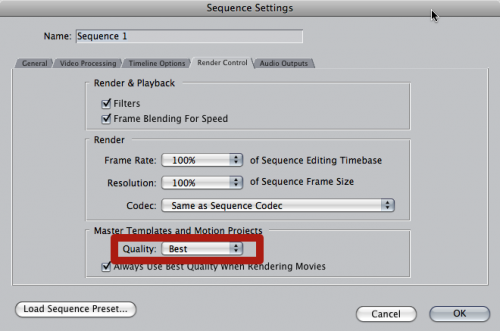
In Final Cut Pro, select the sequence, press Command-0 (zero) to bring up the Sequence Settings, and select the Render Control tab . By default, the Quality setting for Master Templates and Motion Projects is set to Best.

If you change it to Normal, you should see a significant reduction in render time. If you uncheck “Always Use Best Quality When Rendering Movies” you will reduce render times even further.
The only projects that require the Best setting are ones involving vector objects like shapes and text that are increased in size over 100% – for example, flying a camera through some text. Do a test render of a section of your .motn clip in your FCP sequence by setting In and Out points with both the Best and the Normal settings to determine if you need the Best settings – for most situations, Normal will probably be just fine, and will give you much faster renders.
To make all new sequences use the Normal setting by default, press Option-Q to bring up User Preferences, then go to the Render Control tab and change the setting there.

Filmtools
Filmmakers go-to destination for pre-production, production & post production equipment!
Shop Now


