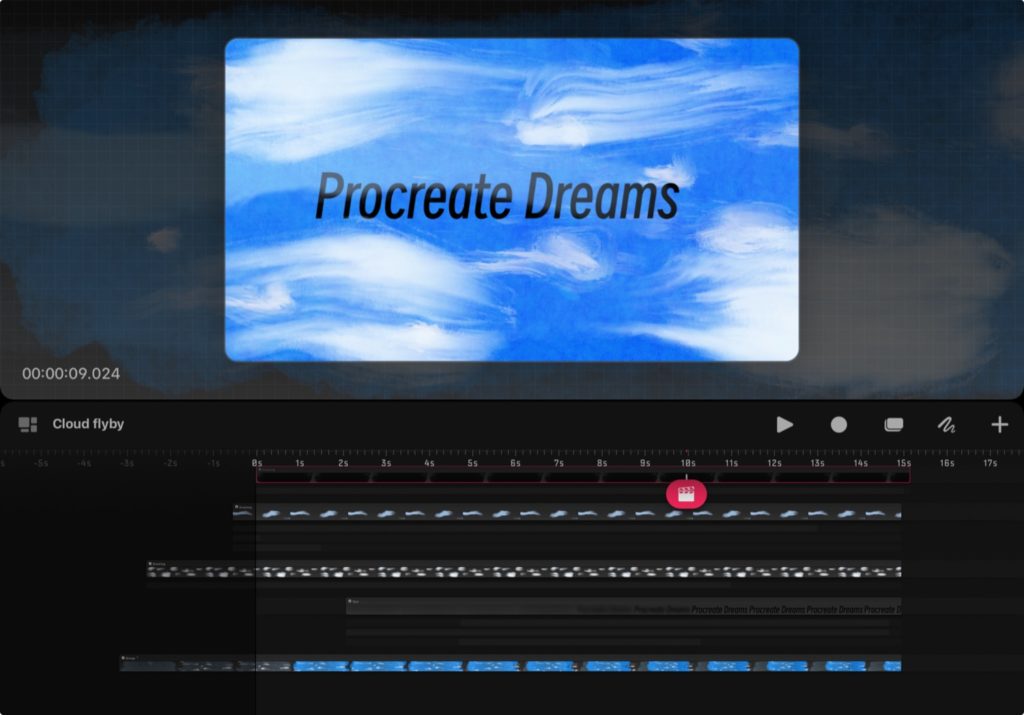
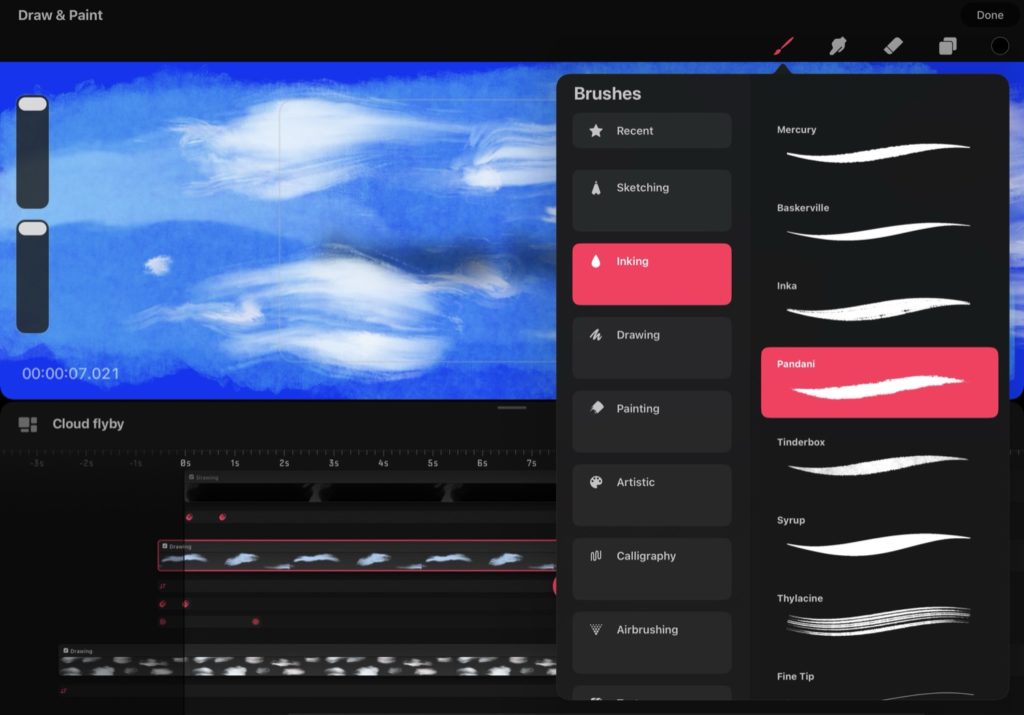
Procreate Dreams is a delightful new iPad-based animation tool for natural media artists. So why should you care if you’re mostly in video production? Because this app can import video, allow you to paint and animate on top, then export it back to your timeline — it’ll even export in 4K ProRes, if that’s what you want. It’s not After Effects, or Motion, or Adobe Animate, or even the painting mode in Final Cut Pro for iPad — it’s a whole new thing. Let’s take a quick dive and see what we find.

Touch first, done right
The original Procreate painting iPad app has long been one of the best designed and most performant apps on the iPad. It’s been fast and fluid for over a decade, and the interface has always threaded that rare needle: the simple stuff is easy, but the hard stuff is possible. Multiple layers, blend modes, masking, and a near-infinite array of paintbrushes have allowed artists to enjoy the creative process rather than fight with the UI.
But we video professionals usually prefer desktop apps with complex interfaces, right? And animation is hard, so how can that possibly be made accessible by a touch UI? Well. Procreate Dreams does indeed manage to expose almost all the key controls needed for animation in a touch interface. You don’t need a keyboard to work quickly, though you will need an Apple Pencil. Knowledge of animation concepts like keyframing will certainly help, but this is a more complex app than Procreate, and you’ll be rewarded for taking a little time to run through a tutorial or two. Everything you’re looking for is here, but it might be a little hidden.
A clean, subtle UI
Once you create a new movie, the stage is at the top of the interface, with the “backstage” around it. Below, you’ll see a central bar with a series of buttons to the right, and below it all you’ll find the timeline.
In the centre, the rightmost “plus” button lets you add new tracks. You can create as many tracks as you need, and drag in the timeline to reorder them. Each track can be an imported still image, an imported video, a text layer, or a “content track”, which can be a static painted or drawn area, or a frame-by-frame cel animation. The size of each content track is essentially unbounded, a million potential pixels in each dimension, so you have as much freedom as you might need to draw outside the lines — essential if you plan to draw a large area and then fly it across the canvas. Drawing layers can still contain multiple layers (with masks, blend modes, etc.) so you retain the flexibility of the original Procreate. Leaving the animation aside for a moment, it’s wild that we have a drawing canvas without limits, and kudos to the developers for making this seamless.

The other central interface buttons allow you to play, record keyframes live (known as performing), use your Apple Pencil to select multiple tracks at once, and let you draw. To the left, you’ll see the name of your current movie, which you can tap to change its name, output resolution or other properties, as well as export. Tap the very leftmost icon to return to the gallery of all your movies, or tap the timecode (aha!) to find onion skinning and background options.
Gestures are important here too. Tap with two fingers to undo, just like in Procreate. Pinch and spread two fingers to zoom. Tap with four fingers to focus on the stage and hide the timeline below, then swipe to play the movie back and forth. In the timeline, you can swipe with three fingers (horizontally or vertically) to change zoom.
Anything you draw can be grouped, and then treated as a single element for purposes of animation. Essentially, this is like FCP’s compound clips, or Premiere Pro’s nested sequences, except that group expand in-place, so you can see them in context on the timeline.
Multiple ways to animate
There are three ways to work here, and first is traditional cel-by-cel frame animation. If you’re working on a drawing layer, you’ll be able to tap in the current frame, or in fact anywhere along the timeline, then press the plus icon to create a new, blank frame. This is the method you’d choose if you want to draw on a layer above video, one frame at a time. (Remember, tap on the timecode to see onion skinning!)
Note that if you’d prefer to duplicate the previous frame, to build up artwork a stroke at a time, you can tap and hold on a frame and then choose Duplicate, but that’s not really what this app is optimised for. For that workflow, the traditional Procreate can record your drawings a stroke at a time, or you can simply record the screen as you work.
The second animation method is keyframing, which should be familiar to existing motion graphics artists and video editors. To access it, you’ll drag the clapperboard to any layer, then tap it once more. The popup that appears lets you choose the type of keyframe you’d like to make: Move and Scale, Warp, Distort, or one of the live filters, including Opacity, Gaussian Blur, Sharpen, Noise, or HSB. Set two different values at different times, and it’ll animate between them. Easing is applied by default, but you can tap and hold on a keyframe to change it, and you can expand a transform’s keyframes to see all the separate parameters (X, Y, Scale X, Scale Y, Rotation, etc.) broken out. Each keyframe can be tapped to type numbers directly, and it’s (thankfully) easy to move or remove keyframes on a single parameter.
The third way to animate is called “performing”, and it allows you to record (lots of) keyframes live, in real time, as you move a layer around or adjust a distortion. Apple’s Motion has a similar feature, with a similar record button to kick things off. This is a great way to make a character swing naturally back and forth, or to record live-scribbled distortion, to make something ripple in a breeze. The only problem here is the same one I have when recording in Motion: with all those keyframes, it can be hard to get a smooth result. If you also struggle to record smooth motion, delete some of the keyframes after recording — half of them or more — and you should be OK.
So what’s this good for?
If you’re an experienced hand at After Effects or Motion, you may be wondering why you should care about an iPad app — surely you need all the controls you’ve learned over the years? Not necessarily. Procreate Dreams integrates natural media in a far more seamless way that either of these apps, and although you won’t find keyframe graphs, behaviors (Motion) or Expressions (After Effects) the interface is solid and approachable. Every time I thought an option wasn’t present, I eventually found it, hidden behind a tap, or a tap-and-hold, or a gesture, or an overlooked UI element.
Procreate Dreams is a great choice if you want to augment a video with drawings, or create an animation from scratch using drawing. You’d like to fake some “cigarette burns” at the end of a reel? Easy. Add some lightning to a superhero’s hands or eyes? Very doable. How about a hand-painted transition? Sure. It’s also probably a great choice if you wanted to import existing animations and trace over them, to see just how an animation is made.
While it’s not going to win any awards, here’s a simple animation I made while testing out the app, animating several layers of hand-drawn clouds, then unblurring and moving text in the middle of the stack. I couldn’t have made this as easily in other apps.
Could you follow a full rotoscoping workflow like that seen in Undone or A Scanner Darkly? Yes, you could, but this would remain a large undertaking. Could you tackle a more traditional motion graphics job here? Perhaps, but the text layers are static, and layers in imported Photoshop files are not split into multiple tracks on import, so it would require a bit more work. The focus of this app is on making art in the app, and that’s fine.
Conclusion
Procreate Dreams does something new — it makes it easy to produce cel-style animation with a full range of natural media brushes. Performing makes animation more approachable for novices, and can give a natural, hand-made feel to motion that you won’t get by dragging points on a bezier path. While I’m looking forward to an animated camera (on the roadmap, according to Procreate themselves) this is an excellent first version. As a US$20 one-off purchase with free updates forever, this is a no-brainer. Grab it, get scribbling, and create something new.

