If you’re a Media Composer editor, and you haven’t checked out Titler Pro 4, you’re missing out on one of the best single plug-ins out on the market today!
Avid Media Composer editors are in an interesting time right now. We are editors without titling, assuming we’re working in larger than HD projects. As we know, the Title Tool and Marquee have not been updated yet, so we’re looking for alternatives. What most editors don’t realize is that whether you’re on the perpetual or subscription license, you actually have access to a third party titling effect called Titler Pro from NewBlueFX. It’s a little bit confusing as to what you get, based on the type of license you have, so let’s break it down before we talk about Titler Pro 4.
WHAT YOU ALREADY HAVE
Now, as I said before, both Perpetual and Subscription license editors using Media Composer 8 will get a “flavor” of Titler Pro (TP), it just varies a little as to which ones you get. Perpetual license holders get access to TP 1&2 and Subscription editors get access to TP 2 and 2.5. Now I know you’re probably thinking “2.5? What’s up with that?” Well, I’ve included a chart below that outlines the main differences between version 2, 2.5 and 4 to show you the real “meat and potatoes” of version 4. At this point I want to stop and point something out that’s very important. If you’ve never used TP, please do not judge it based on version 1 or 2 that you currently get for free, as it has made huge leaps and bounds that we’re going to cover in this review. If you’re not a fan of TP currently (I was not a huge fan of version one or two either), stick with me until the end of the review, and I can guarantee that you’ll be impressed by what you see.
|
Titler Pro Version Features |
Titler Pro 4 |
Titler Pro 2.5 for Avid |
Titler Pro 2.0 for Avid |
|
New Interface Skin Options |
l |
l |
l |
|
Caching choices under Settings |
l |
l |
l |
|
Text Fit Modes |
l |
l |
l |
|
Wide Angle lens control |
l |
l |
|
|
Depth-of-field control |
l |
l |
|
|
Elastic Timeline |
l |
l |
|
|
Blending modes |
l |
l |
|
|
Normal-map Material |
l |
l |
|
|
Export Image |
l |
l |
|
|
Export Movie |
l |
l |
|
|
Export/Import package |
l |
l |
|
|
Quick Edit UI |
l |
l |
|
|
Stereoscopic output (side-by-side) |
l |
l |
|
|
PSD Import |
l |
||
|
Quick Edit library area |
l |
||
|
Library preset context menu |
l |
||
|
Quick Edit color and gradient variables |
l |
||
|
Preview and Render Quality options |
l |
||
|
OpenFX Support |
l |
||
|
Guidelines |
l |
||
|
Flow with Text checkbox |
l |
||
|
Grouping |
l |
||
|
Video Trimmer |
l |
||
|
Diacritics Support (for languages typing right-left and extra symbols) |
l |
WHICH VERSION IS RIGHT FOR YOU?
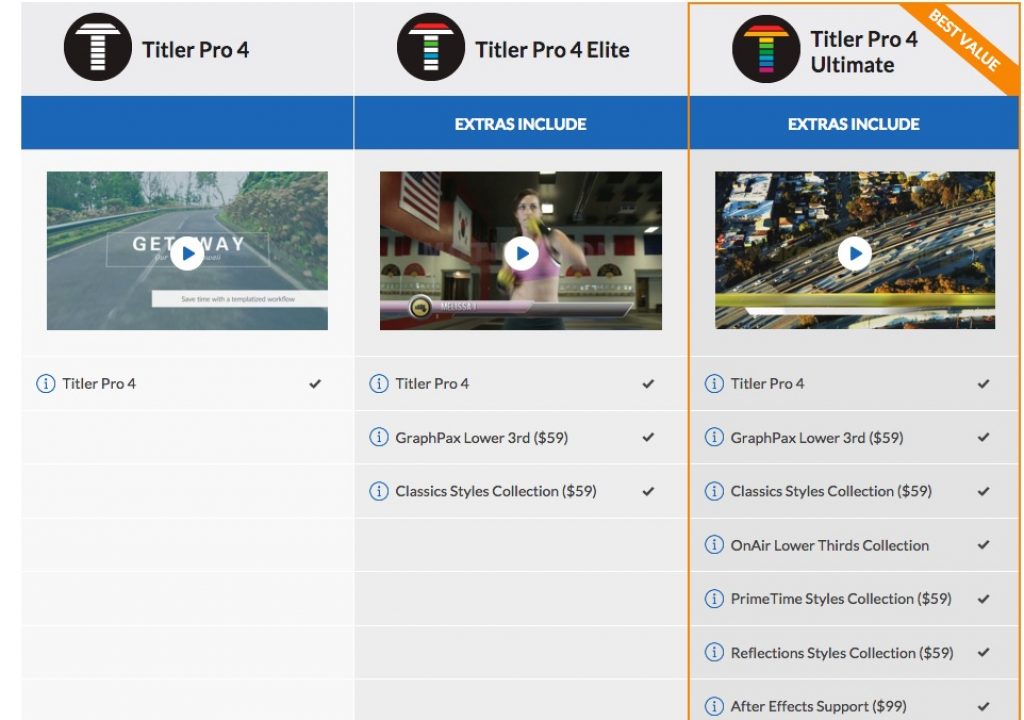
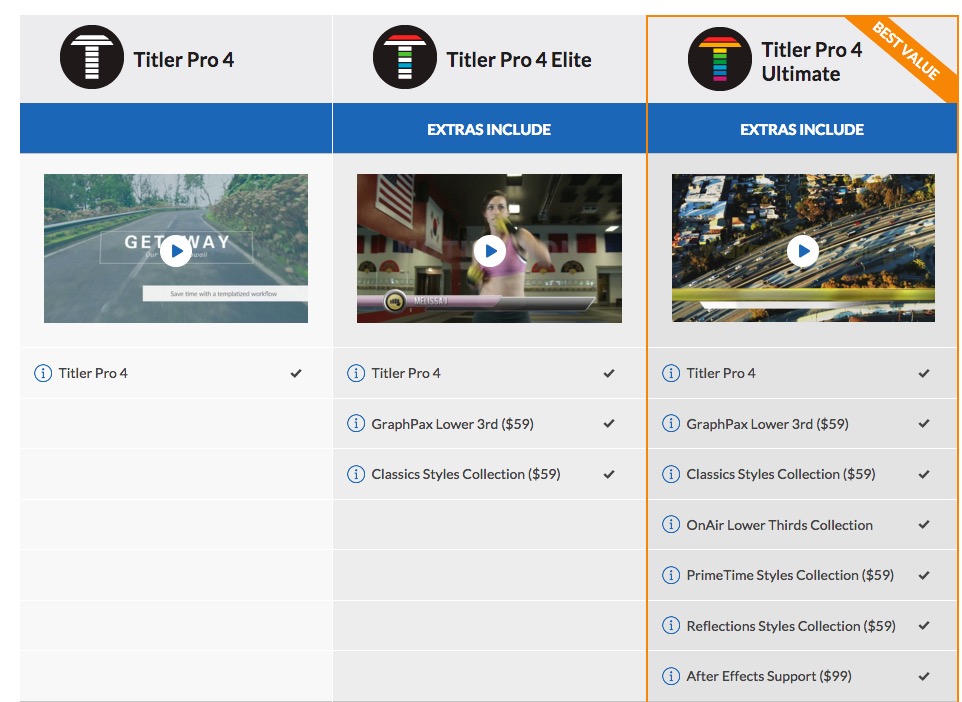
TP4 comes in three varieties. The first is the bare bones “Titler Pro 4” version. You get the effect (standalone and plug-in). That’s it. Now, when I say “That’s it”, there’s a lot more going on under the hood, so don’t just think you’re going to be thrown to the wind. The next version is “Titler Pro 4 Elite” which includes the effect (standalone and plug-in), as well as the Graphpax Lower Thirds and the Classic Styles Collections. Basically these are templates that you can use to get you going in the right direction. Last, but certainly not least, we have the “Titler Pro 4 Ultimate” version that includes the effect (standalone and plug-in), Graphpax Lower Thirds, Classic Styles Collection, On-Air Lower Thirds Collection, PrimeTime Styles Collection, Reflections Styles Collection, and probably most importantly, the After Effects version of the plug-in. This is pretty huge, as any lower third presets you create in either Media Composer, or the standalone version will transfer over to the After Effects version with ease. If you’re considering purchasing, make sure you splurge on the Ultimate version, just to get the AE version. It’s a 1-2 punch you’ll definitely want.
Now, even though we’re talking about the Media Composer version of the effect, it works the same across all supported host applications, which include
- Adobe After Effects 5.5+
- Adobe Premiere CS6/6.5, CC
- Apple Final Cut Pro X
- Black Magic DaVinci Resolve 11+
- Grass Valley EDIUS 7
- HitFilm 3 Pro
- Sony Vegas Pro 10+ (64-bit OpenX)
- Titler Standalone Host
When you purchase TP4 you get all the supported hosts except for the After Effects version, which is an additional charge.
HOW DOES IT WORK
Once installed you’ll find TP4 in your Effects Palette much like your other plug-ins. Apply it, and you’ll immediately see the Sequence window updated with a simple title. “Enter Text”. Well, it seems pretty straightforward, but let’s see what happens when we jump into FX mode. By entering Effects Mode, you’re greeted by something a little unexpected. Not by the Titler Pro 4 Interface, but by a window called the “Quick Edit” window.
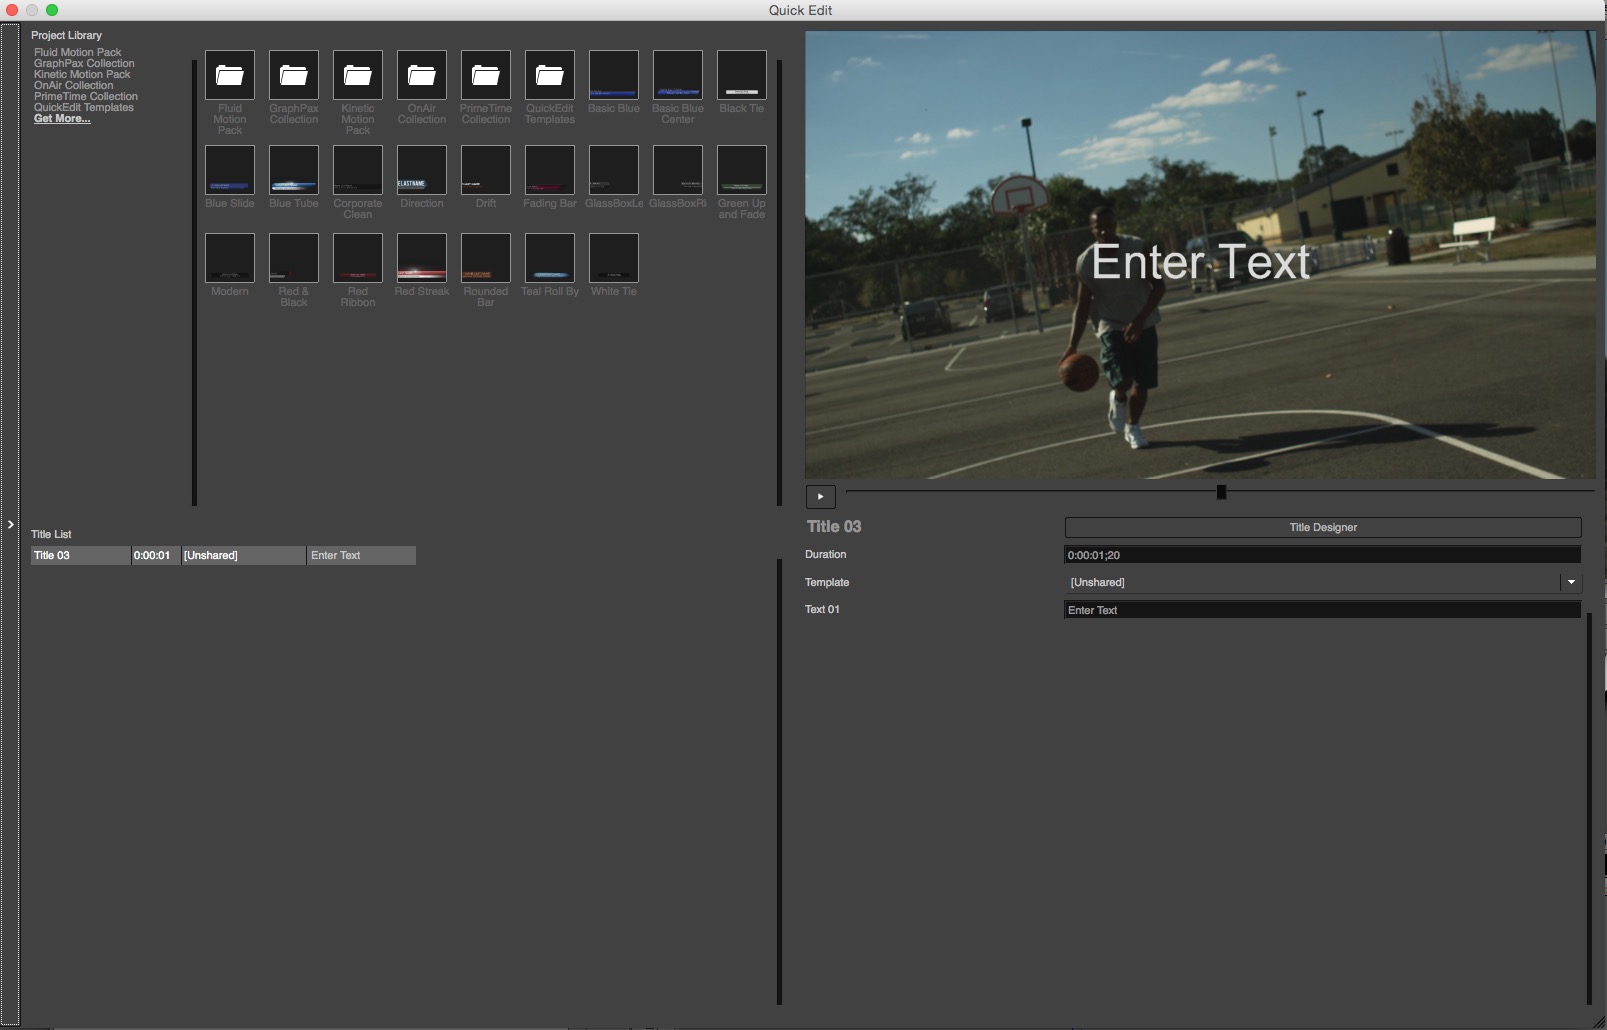
What makes this window unique is the fact that if you don’t want to learn anything about title creation, or anything like that, you can conceivably do all your work right from within this window. You’ll notice in the top left corner, you have the Project Library. This is where any and all add-on packs (like the ones mentioned in the “Which Version is Right for You?” section) will be displayed. To the right of that are the presets themselves. Once you choose a category, all the associated templates will be displayed. You can simply hover your mouse over any one of them to get a preview of exactly what the template looks like.
To the right of that you have the preview window, where you can start and stop previews of your templates, and right below that is not only the Title Designer button, which you can press to get in and start altering your templates or titles, but you have the text input boxes where you can actually edit titles from, so as to avoid having to get into the TP4 interface to do it manually. Some titles will have more than one text dialogue box, and you can simply enter your text, and see it update live in the preview window.
In the lower left corner of the Quick Edit window you have the Title List. Believe it or not, TP4 will keep track of all titles in your timeline, and you have the ability to edit them right from the Quick Edit window, without having to go to each title separately, to make your changes. This window can get pretty clogged, as any title you remove from your timeline will stay in this window, until you quit out of Media Composer.
If you don’t have any templates, fear not. Let’s get into the interface, and look at how to create a basic title.
We’re going to assume that, for right now, you are going to edit the text that is applied by default, once the effect is applied to a clip. We’ll get into templates in a little bit. Once you click on the “Title Designer” button, you’re brought to the main TP4 interface.
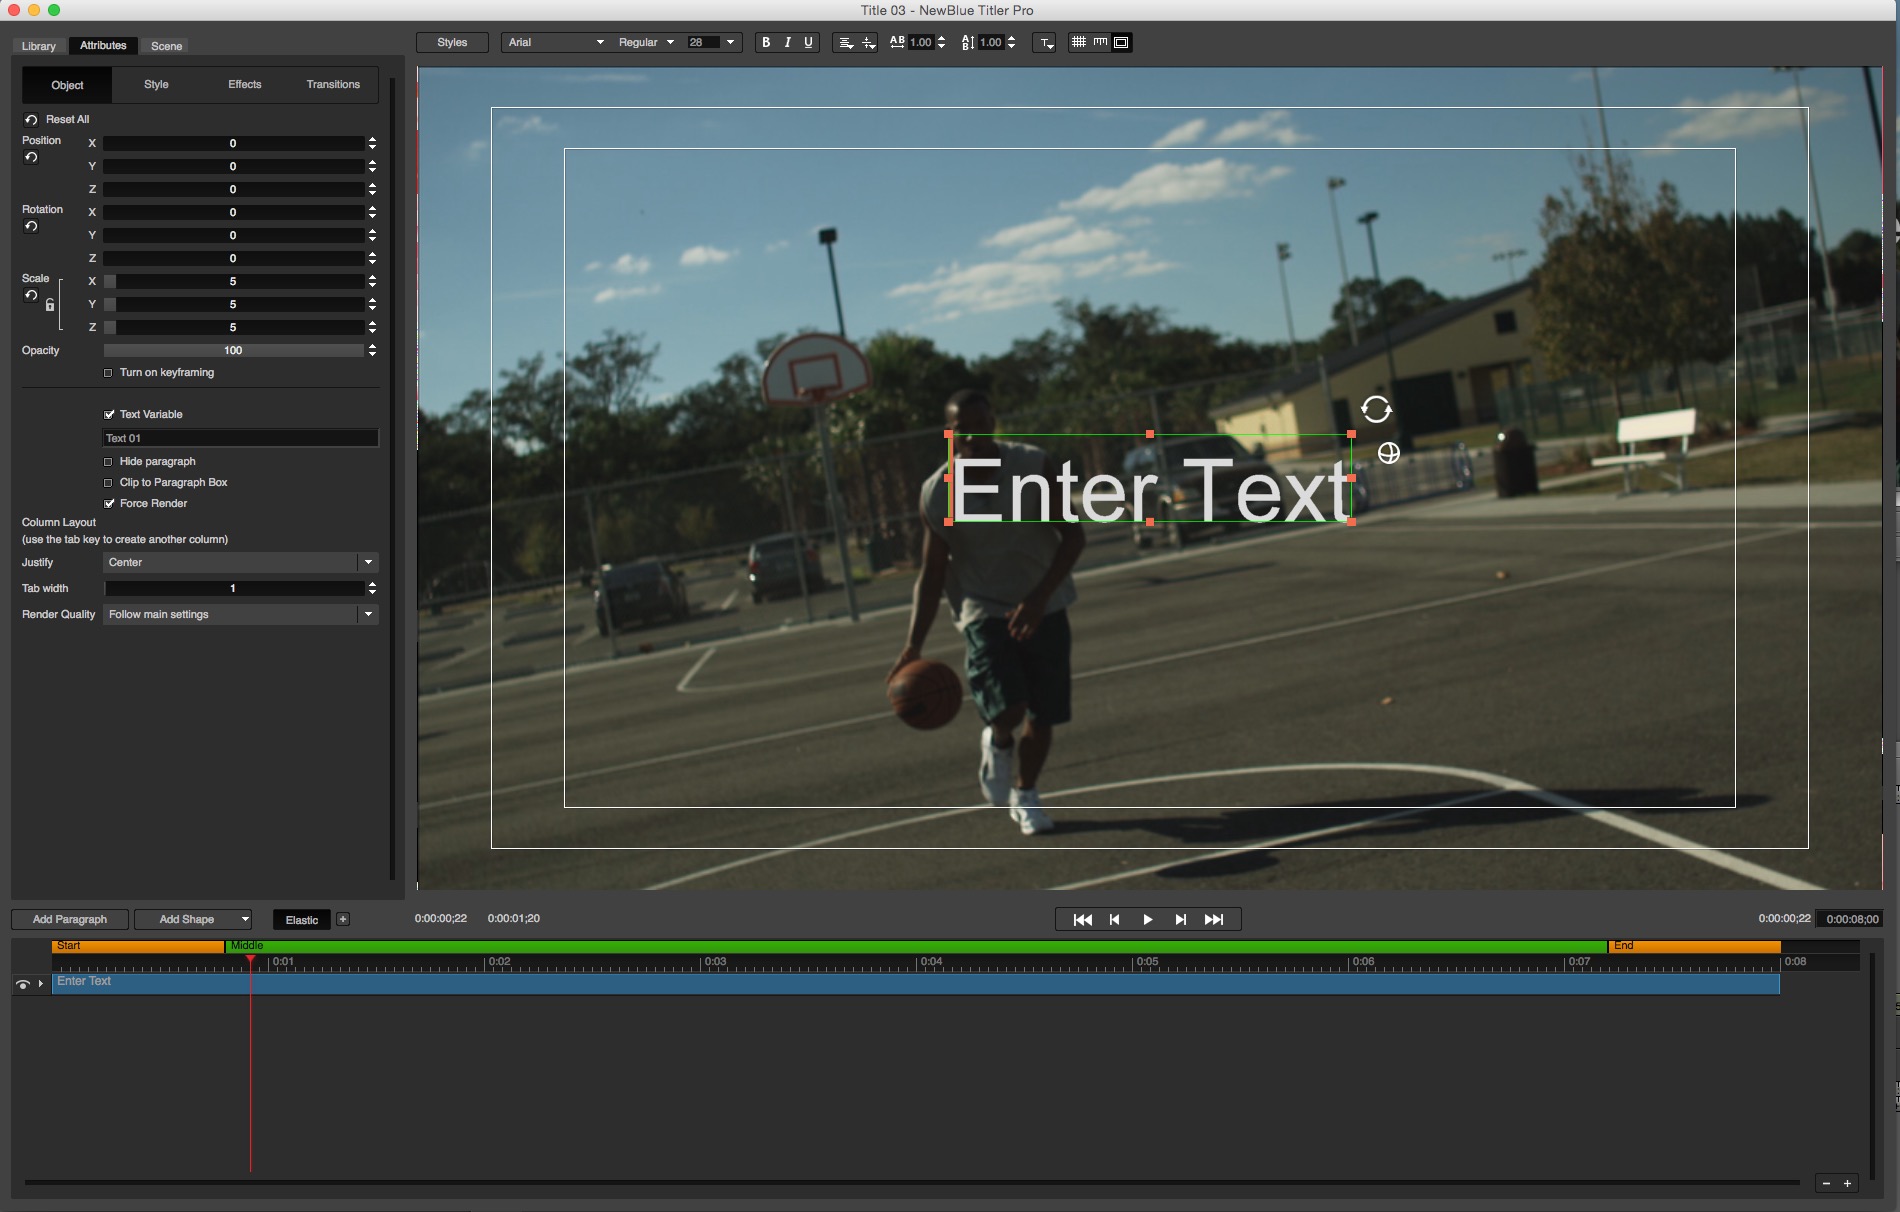
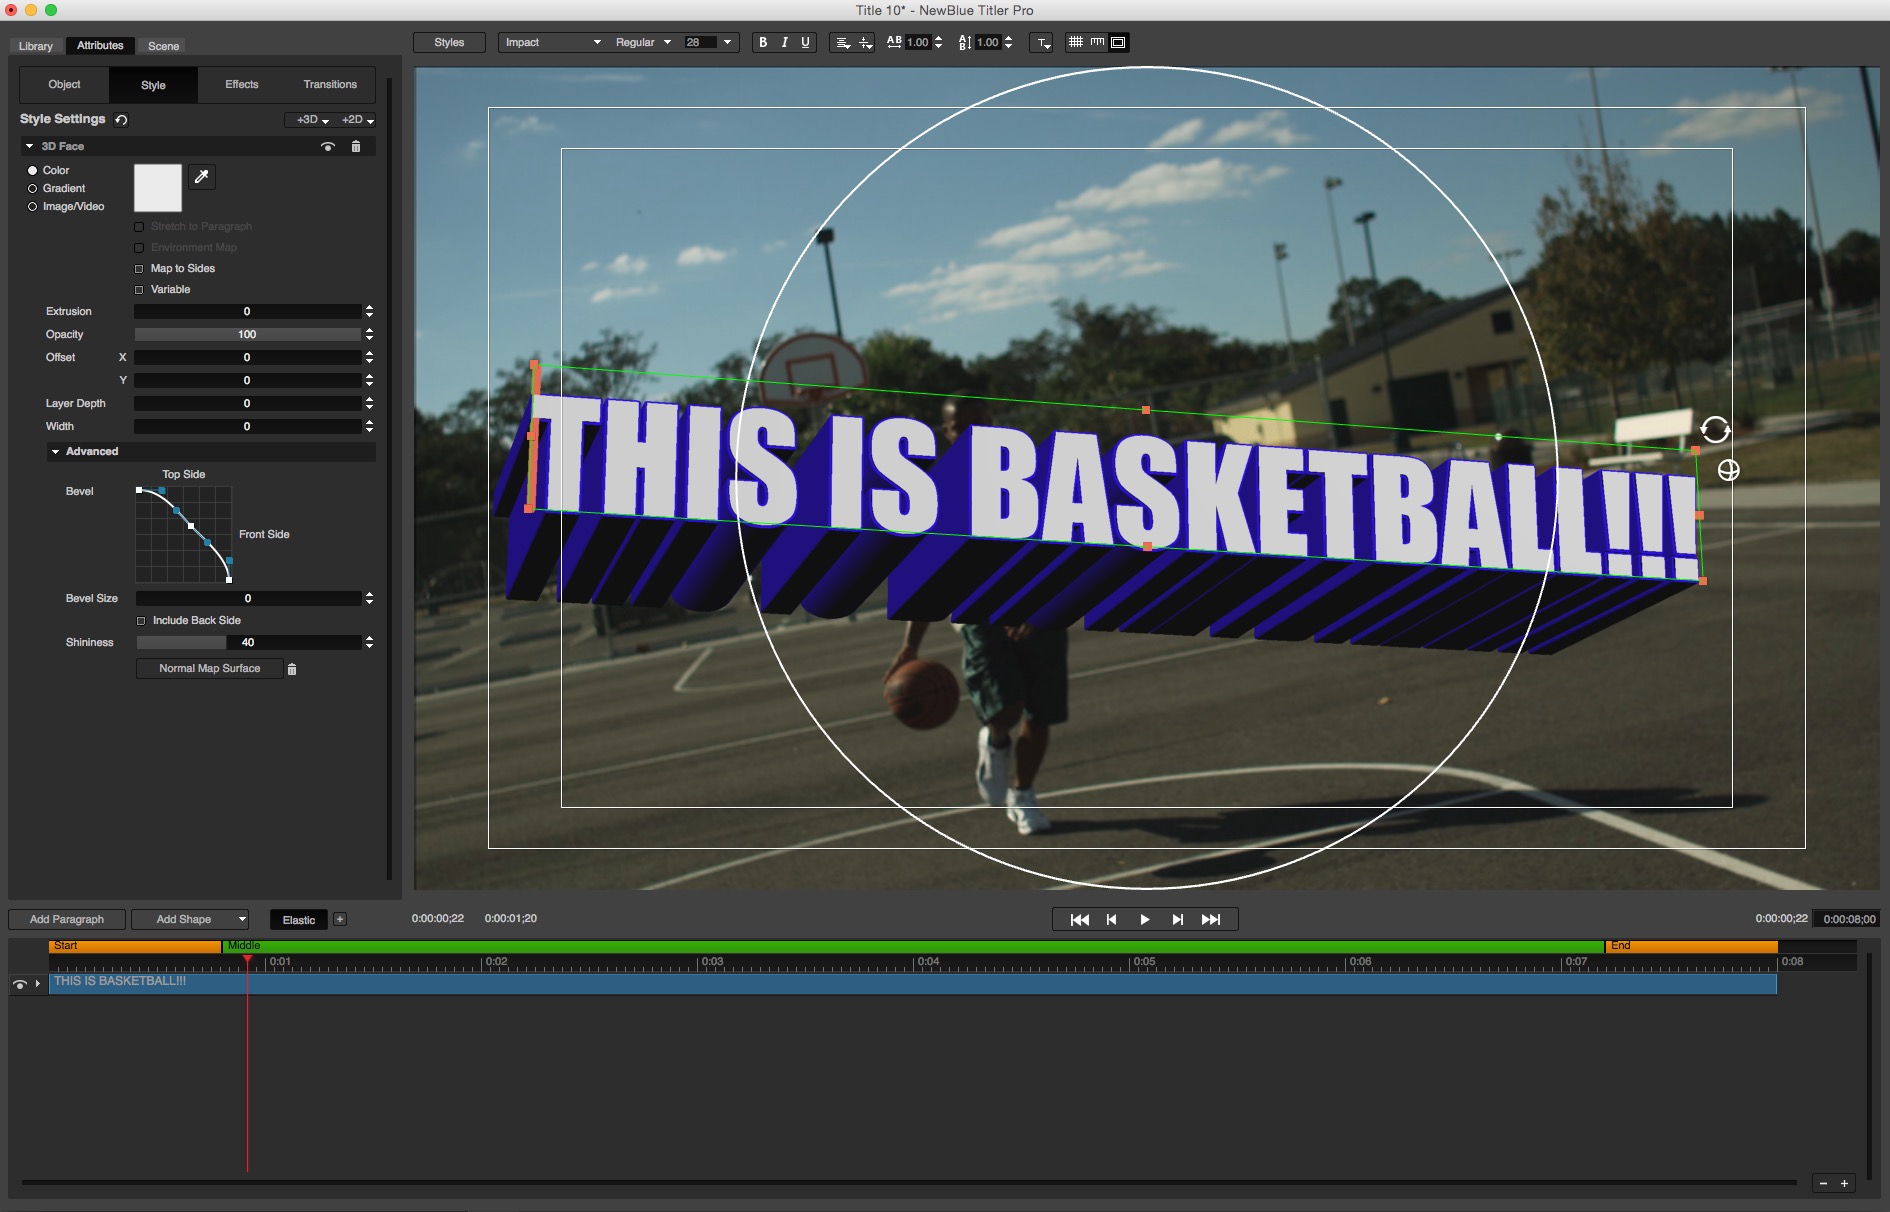
The first thing you’re going to notice is that there is no tool bar. Most of your positioning and rotation can be done by mouse overs, but we’ll get to that in a second. Let’s take a look at the Canvas first. You will notice at the top, some very common tools that you’re accustomed to from other applications including Photoshop and After Effects. Tools such as Font, Tracking/Leading (or line spacing as some people refer to it as), and most importantly for a titling application, a grid and Title/Picture safes. Now, let’s take a look at the text that is currently in the canvas. I had mentioned before that TP4 doesn’t have a toolbar, and most of that work can be done by simply hovering over your text. Well, if you take your mouse, and move it over the edges of the bounding box, the pointer will change to what looks like a little “Nintendo Joypad” icon. This is what will let you adjust the position of your text in the frame. You can, as always, grab the edge of the bounding box to adjust the scaling of the text. You’ll also notice two icons beside the bounding box. One looks like two arrows making a circle, and the other looks like a sphere. This is how you can quickly adjust the rotation of your text in 2D and in 3D. We’ll get to 3D in a little bit.
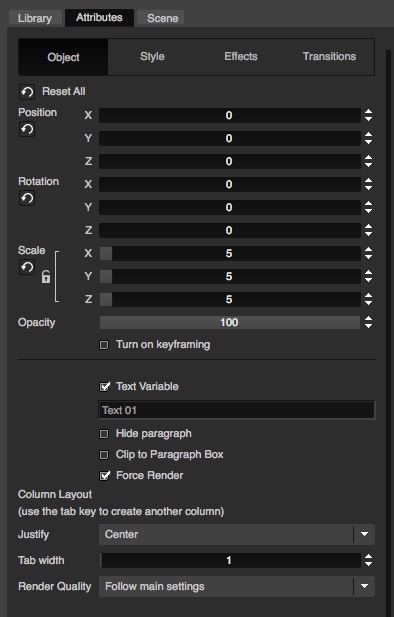
On the left side of the interface you have three tabs, of which you’ll spend most of your time in the Attributes main tab, which is where you can adjust “Object” properties (in the Object Subtab) including Position/Rotation/Scale. The next tab, Style, gives you parameter adjustment options for Face (color of your text including Gradients and even video overlays), Shadow and Stroke. The Effects and Transitions tabs is where you can keep track of, well, your effects and transitions. We’ll get more into this in just a second.
The last piece of the Interface is your timeline, located at the bottom of the window. Here is where you can create complex titles animations, with moving elements and text. What’s also very cool is the “Elastic Timeline” option, located just above the orange and green bars. What is the “Elastic Timeline”, you ask? Here’s a common situation that editors run into all the time. You’ve spent three hours coming up with a text animation that you think works really will in Media Composer. Producer takes a look and says “Awesome, now we just need it two seconds longer!”. What do you do? You now have to spend an hour rejigging the animation so that it takes place over eight seconds, instead of six seconds. Not necessary with the Elastic Timeline (ET). The way it works is simple. Anything that falls into the green second of the ET is flexible. Meaning that if the length of your animation changes in Media Composer, only what falls in the green section will be stretched out. Anything that falls into the Orange area will always stay the same length. Now, the Producer/Director can change whatever they want as far as timing goes, and TP4 has you covered! I should also point out that if you don’t want the Elastic Timeline, like maybe you’re only creating a static title, you can easily shut it off by simply toggling the “Elastic” parameter, until the orange and green bars disappear.

Now, I did say that I wanted to come back to the Effects and Transitions Tab, so why don’t we talk about that now, as it’s something that’s very important to talk about. We’ll start with Transitions. TP4 comes packed with transitions for you to apply to Text, Shapes or any other elements you might be working within your timelines. To get at the bundled transitions is very simple. Simply head up to the “LIBRARY” tab at the top of the UI. In here, you’ll find not only all the bundled transitions (in the Transitions dropdown), but you’ll also find all the Styles, Templates, Shapes and Lighting that not only come standard with TP4, but you can also purchase (or depending on which flavor of TP4 you purchased, you might get some additional elements right off the bat) extra elements to help take your work to the next level.
Here’s something that totally blew my mind. There is an Effects category located in the Library. Most people think that it will only contain NewBlueFX effects built for TP4. That is the case, but there are so many more possibilities with Effects inside of TP4. OFX effects are supported inside of TP4. What does that mean for you? Well, if you happen to be a Genarts Sapphire user, and you have the OFX version of the software, those effects will be available to you inside of TP4. A very cool and welcome addition.
I think it’s important now to move on and talk about some big things that will really impress editors. The first is that you have the ability to not only import still images, but moving images as well. For Media Composer editors, this is pretty big. TP4 is essentially taking the place of what Marquee should have been able to do for us. I can’t tell you how many times I’ve been asked to create credit crawls with logos at the end (show sponsors, etc), and I end up going to After Effects to do them. Not necessary with TP4. To take that a step further, sometimes I’ve had graphic artists create a PSD of a credit crawl with the text and logos formated, and essentially ready to go. Well, TP4 has the ability to quickly and easily import Photoshop documents, and all I have to do once I get it into TP4 is simply do a quick vertical movement on the PSD file, and my new credit crawl with logos is all set to go.
NewBlueFX has also given us the option of importing Vector based elements, like Illustrator EPS files into TP4. Now I know you’re probably thinking, again, that this really isn’t that big a deal as applications like After Effects has been doing this for a while, and you even have the ability to scale the image as large as you want, without affecting the quality. Well, you can do that in TP4, BUT you can also take the EPS file, and extrude it. In real 3D space, simply with the dragging of the “Extrude” parameter in the Style tab. This is how you extrude not only elements, but text as well, and you can use the “sphere” widget to adjust the element’s rotation in 3D space.
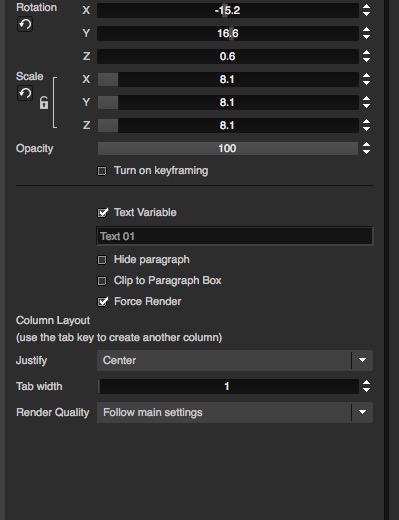
But wait, there’s more (yes, more). Assuming your EPS file is broken down into layers in Illustrator, TP4 can see those layers, and let you select each layer individually, and manipulate it however you want. Do you want your layered EPS file to sit in different position in Z space. It can all be done by simply selecting the particular element in the larger EPS file, and simply adjusting the Z Position in the Object tab. It couldn’t be any simpler.
I want to talk about control in TP4. It’s a pretty big option when working in your timeline. Now, what do I mean by control? Well, depending on your production, you might have one person creating animated titles for everyone. Whoever your designer is, they have the option to determine what is alterable in the Quick Edit window, and what isn’t by the simple click on one parameter. The “Text Variable” parameter in the Object tab. Normally turned on by default, this option is what gives you the editable text window in Quick Edit. They can even change what the window will be called by simply replacing “Text 01 or Text 02” with “First Name”/”Last Name” if that’s what they happen to be building a title for. Again, it’s all about options in TP4, and the Text Variable option is another great one!
Before I wrap thing up, I want to circle back to the Quick Edit window, as there are a few specific things that I think need mentioning. First, as you start adding titles to your project, you’re going to notice that the “Title List” starts populating. What it’s going to do is every time you add a new title to your timeline, it’s going to be added to the list. Once you’re done your show, let’s say that a director has come back and said that someone’s name was spelt incorrectly, and you are going to need to go back through the entire show to change it. Well, believe it or not, as you’ve been adding titles, and they have been added to the Title List, you now have the ability to bypass going visually through each title in your timeline to find all the ones that are incorrect, and you can simply look down the list at all the entered text, find the titles that need updating, update them right here in the Title List, and they will update in your timeline. Now, something to mention for Media Composer editors is that every title that is added to your timeline is added to the Title List. Even ones you’ve deleted. To have the list refresh itself, you will need to exit Media Composer, and relaunch, and TP4 will refresh the list with only those titles that are currently in your timeline.
The last thing that I want to mention, is how TP4 handles templates. Let’s say, for example, you used a template for a title. We’ll call the template “Number 1”. You’ve taken Number 1, added it to a clip, and have entered text. Producer takes a look at it, and says “Nice, but I think it needs to be Red.” Okay, no problem. Edit the title, and in the Quick Edit window, simply hit “Title Designer”, go in and make the title Red (or whatever aspect needs to be red). When you close out of Title Designer, you’re given a prompt by TP4. It asks you “Do you want to – Apply to Template – Apply to Title – Discard Changes – Cancel”.
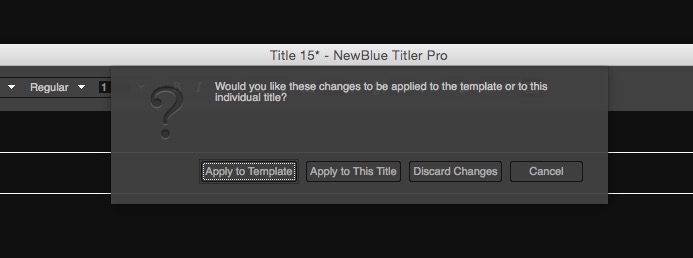
Last two are pretty self explanatory. Apply to Title is also fairly self explanatory. Changes will only happen to this individual title. The first option, though, is very cool. If you click “Apply to Template”, what TP4 will do is apply your changes to the template, and then it will look at all the titles in your timeline that us that particular template, and update them all so that the changes that were made to the template, have now been made to the same template used multiple times in your sequence! Very, very cool.
PROS
- Plug-in or Standalone version
- OFX Support
- Elastic Timeline
- EPS Extrusion
- Optional AE version
- Wide variety of templates & presets
- Quick Edit window is simple & powerful
- Lots of tutorials on the NewBlueFX site
- NewBlueFX App Manager keeps you up on TP4 updates
CONS
- Moderate learning curve
- Quitting out to refresh Title List can be annoying
- On Screen “Widgets” (Position/Rotation), can be frustrating at times
- AE version should come in the “Elite” bundle, instead of the included packs
I was going to write this at the beginning of the review, but I didn’t want to bias anyone’s opinion of Titler Pro before we got rolling, but to be honest, I wasn’t a fan of it for a while. I used the first version, and wasn’t really blown away by it. To be honest, I didn’t care for it at all, and had kind of written it off as a tool I’d never use. Once we went larger then HD, and I had no Title Tool, I gave it a second chance. That was version three, which really started to stand out and was a big leap forward from what I’d used in the past, and now that we’re at version 4, to be honest, I’m blown away. For an effect that I had pretty much written off, NewBlueFX has taken what was a very basic effect, and made it a super powerful, super easy to use effect that the more I use it, the more I’m impressed by it, and I can definately say at this point that if you’re a Media Composer editor and you’ve used Titler Pro in the past and didn’t like it, you owe it to yourself, and your clients to check out version four. For me, it’s one of the best single plug-ins out on the market today, and worth every penny of the $399 that NewBlueFX is charging for it. Download the demo today at www.newbluefx.com . You won’t be disappointed.

Filmtools
Filmmakers go-to destination for pre-production, production & post production equipment!
Shop Now