A few hiccups doesn’t stop this from being an awesome titling app!
As a Media Composer editor, I’ve been exposed to Titler Pro for a while now. When Avid added the ability to work in larger than HD projects, they licensed Titler Pro 2/2.5 to perpetual/subscription editors, as the Title Tool and Marquee Tool are not supported in larger than HD projects. At the time that Titler Pro 2 was released, it was a cool tool to use to create animated 2D and 3D titles inside of Media Composer. Looking at it today, it’s showing it’s age, and many editors might not be willing to give the latest version of Titler Pro a try (version 5). In this article, I want to take an in-depth look at Titler Pro 5 (TP5), and show you why it’s a product that you need to put back on your radar.
Now, in this article I’ll be addressing more the Media Composer version of the plug-in, but keep in mind that the plug-in is supported in Magix Vegas, Resolve, Premiere, After Effects FCPX HitFilm, EDIUS as well as a standalone version you can use outside of the NLE’s.
WHICH VERSION IS RIGHT FOR YOU?
Titler Pro 5 comes in three different flavours, but before I move on and talk about the different editions, I want to talk about the other effects packages across the NewBlueFX (NBFX) product line. Now, you’re probably wondering why I would even bring this up in a review of TP5, and there is a simple reason for it. NewBlueFX has added the capability to add any of the effects and transitions product lines directly into TP5, meaning that you can now have effects like glows, etc right inside of TP5, which is a very cool feature.
NewBlueFX has added the capability to add any of the effects and transitions product lines directly into TP5, meaning that you can now have effects like glows, etc right inside of TP5, which is a very cool feature.
The more effects packages that are added by NBFX, the “bigger” TP5 can get! Now that we’ve gotten that out of the way, let’s talk about the packages.
Titler Pro 5 – $299
The standard edition. Comes with the application, the third party plug-ins for all the mentioned NLE’s and the standalone version.
Titler Pro 5 Elite – $399
The mid-range edition. Comes with the application, the third party plug-ins for all the mentioned NLE’s, the standalone version and the Classics (40 Title Styles) and GraphPax which includes 12 lower thirds, both of which are a $59 value.
Titler Pro 5 Ultimate – $499 US
The top of the line edition. Comes with everything mentioned above AND:
- Fluid Motion Pack ($59)
- OnAir Collection ($59)
- PowerMotion Collection ($59)
- PrimeTime Collection ($59)
- Social Media Collection ($59)
- Sports Graphics Collection ($59)
- Reflections Collection ($59)
- After Effects Support ($99)
Now, keep in mind that all of these add-ons are titling related, not effects related. They are all different lower third template packages that are instantly accessible in TS5. For me, the big reason to pick up the Ultimate version is quite simply for the After Effects plug-in, to let you use TP5 in After Effects.
For me, the big reason to pick up the Ultimate version is quite simply for the After Effects plug-in.
There’s something else quite interesting that I want to point out about how the upgrade plan works. You can get discounts based on how many legacy NPFX products you own (basically, an upgrade path). As per their website:
Based on the NewBlueFX legacy products you own, we’re pleased to issue you a spending credit for the following products. To upgrade, simply add the desired product to your cart and the credit will automatically be applied during checkout.
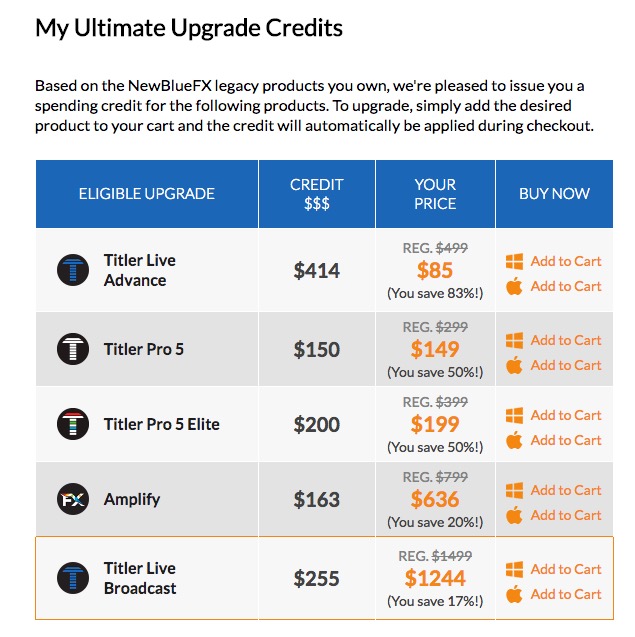
So if you’re looking for the TP5 Standard package, you could potentially get the newest version for half price.
GETTING STARTED
Normally, when working with TP5, no matter which application I’m working in, I prefer to add it to a secondary layer, above the layer that I want the text/text animation to appear on, just so I have more control over the effect. Again, we’re using Media Composer in this article, but the concept will be the same across all the NLE’s and compositing applications.

Once you’ve applied the effect to your timeline, the timeline will process for a few seconds, and then the TP5 interface will appear.
Let’s keep that thought in the back of our heads for just a second, as I want to talk about something else that’s important as well, and it’s more of a workflow comment. Many editors like to put basic titles into their timelines as placeholders for either them to go back and put final versions in later, or for Motion Graphic designers to create them for them, and then they can add them to their timelines. TP5 can not only create awesome animated and still titles, but it can also update titles from the standard Title Tool into TP5 for you to create final version of. To do this, choose one of the Segment Mode Tools at the left of your timelines, select the title you want to “upgrade” to TP5, right click on it, navigate to “Promote Titles” and select “TP5”.
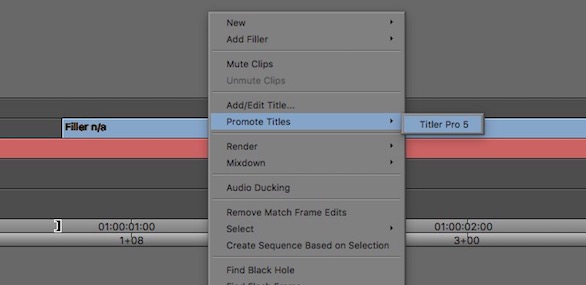
Once you’ve done this, it will appear as though nothing has happened, but if you look at your title, the “Title” icon has now been replaced with an “Effects” icon, which is the actual TP5 effect that has been added. Now you can right click on the title and select “Edit Title”, and you’re all set to go!
Now, once TP5 has opened, this is where editors who have used a version of TP before (especially 2/2.5) will begin to really take notice of the differences between previous versions and TP5.
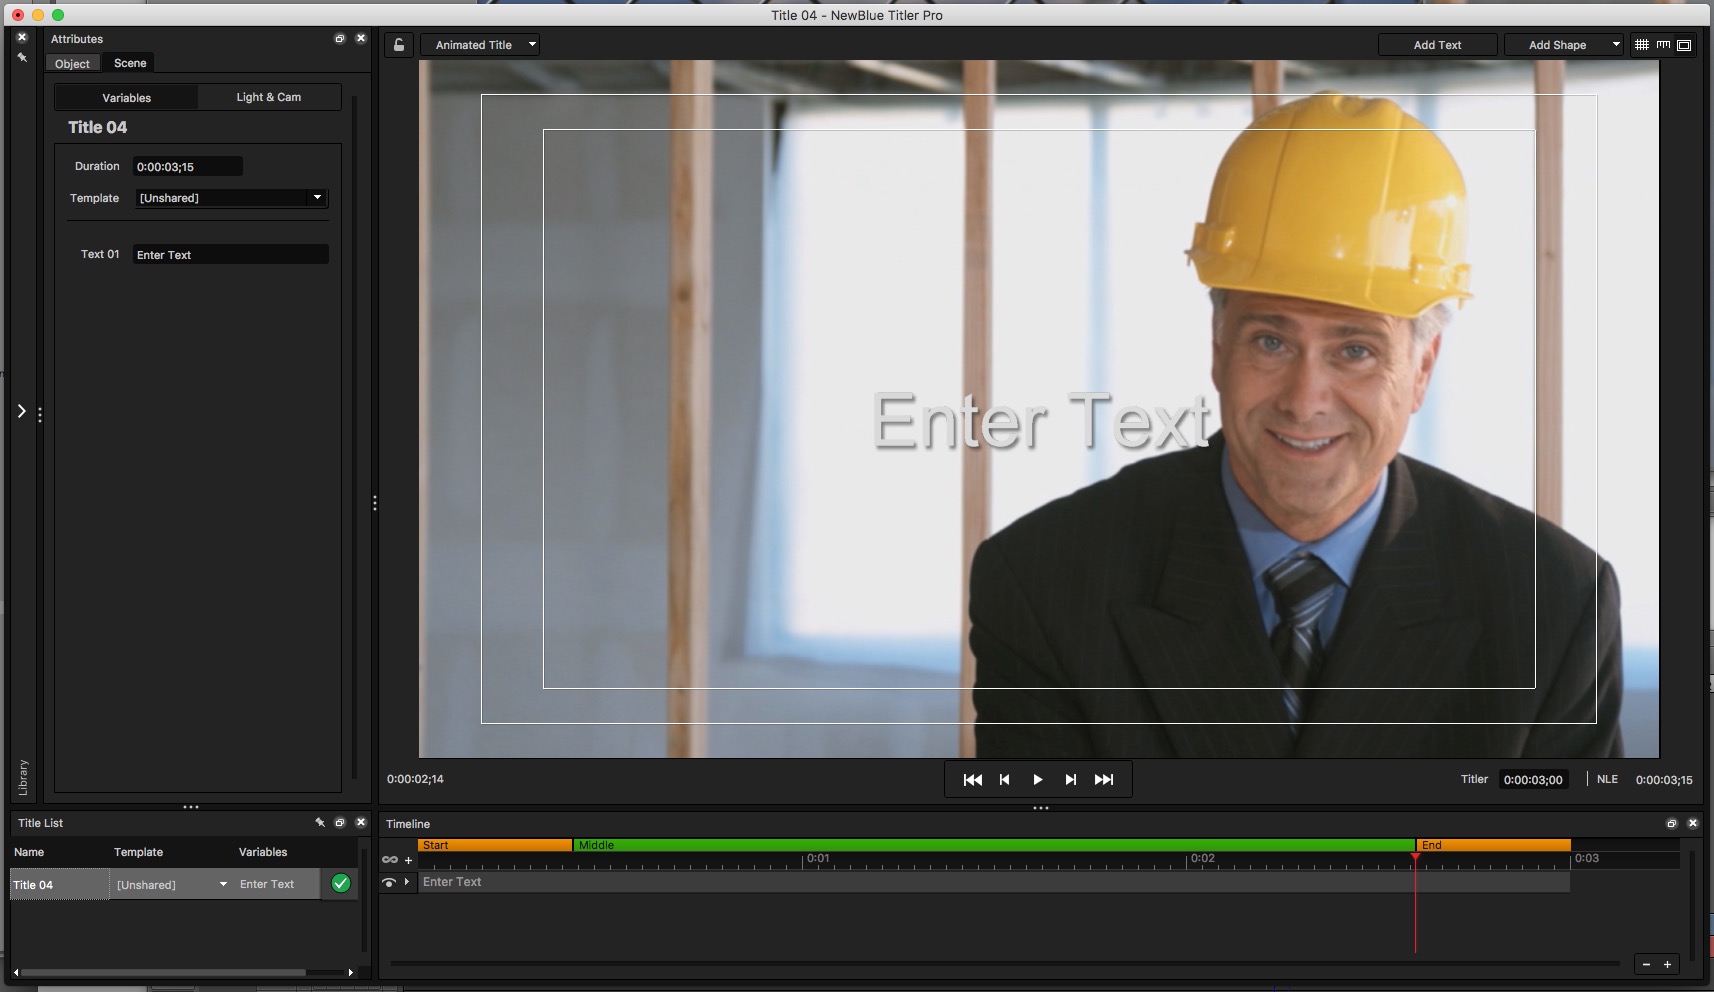
Because I’m a stickler for the small details, I immediately noticed a new option via dropdown at the top of the interface that said “Animated Title”, which got me very excited. We now have the ability to choose the type of title we want to create, either an Animated on or a Still title. As soon as “Still” is selected, you’ll immediately notice the timeline at the bottom of the interface disappear. Since we’re talking about new features, let’s run down the newest features inside of Titler Pro 5.
WHAT’S NEW
- Still/Animated Mode
- Multi-Title Management in Design Interface
- Flexible interface panels
- Smart Library
- Range select with Lasso
- Transform and text editing modes
- Bevel preset thumbnails
- New Fluid Motion transitions and effects
- New Kinetic Motion transitions and effects
- Arrange Layers menu
- Move objects arrow shortcuts
- Kerning control with Alt+arrow
- Save to Library
- Remember last saved and open locations
- Avid TT promote
HOW IT WORKS
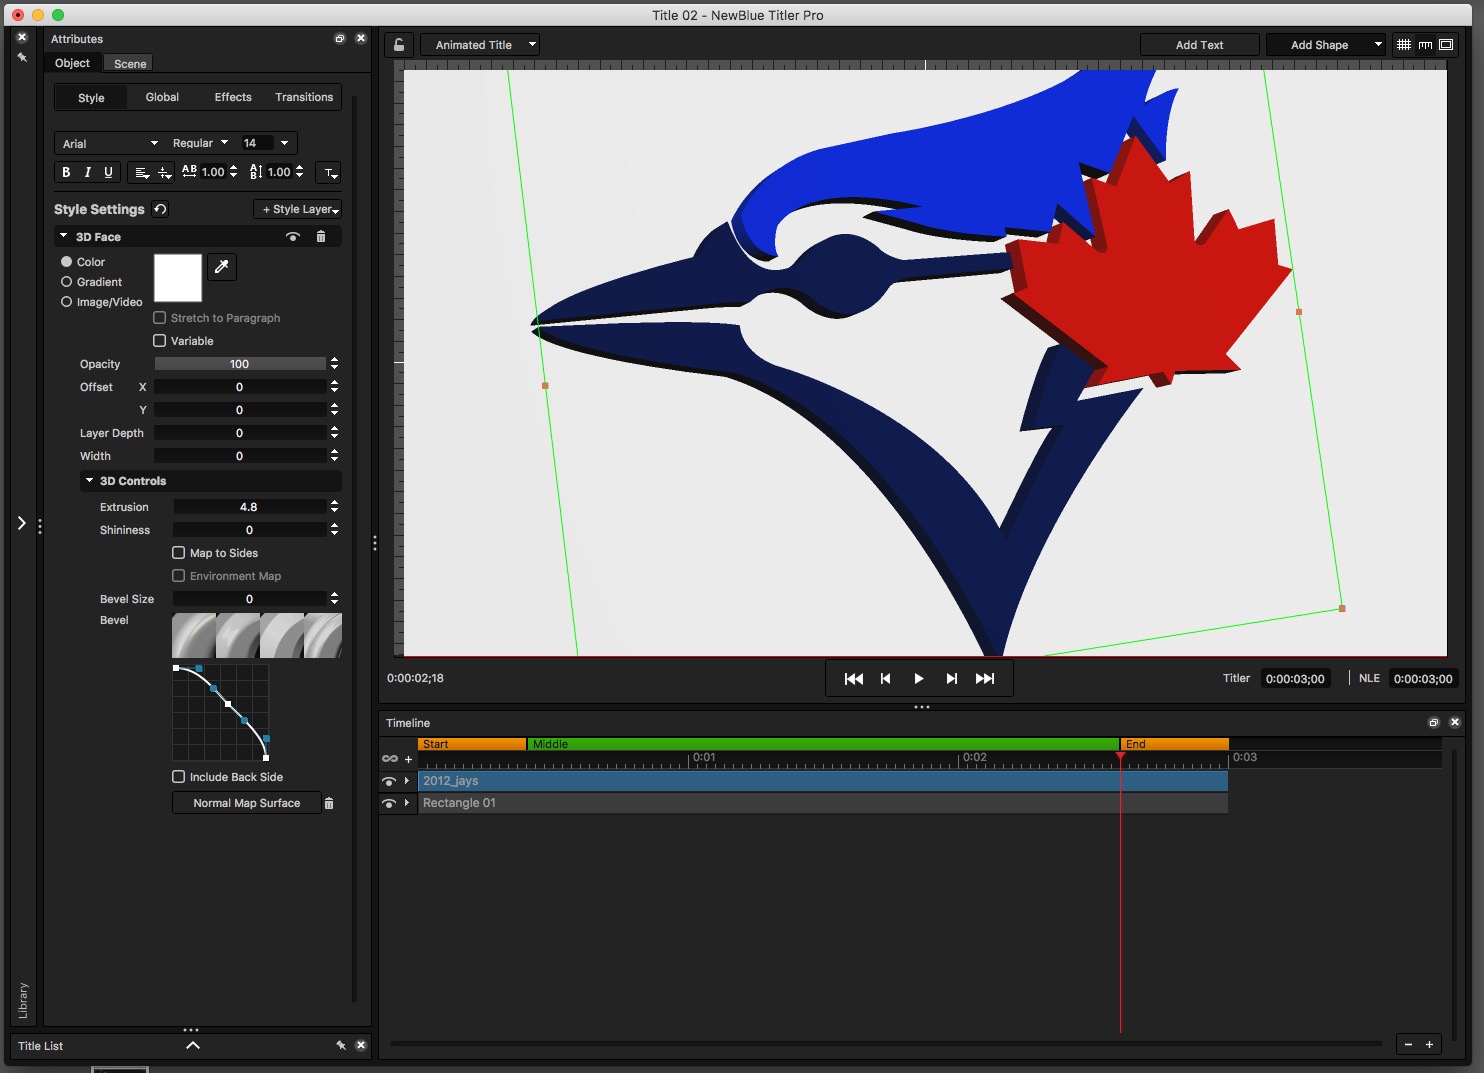
Once you’ve applied a TS5 effect to your timeline, TS5 will immediately open, and bring you to the main UI. It’s divided into five sections, as you can see below.
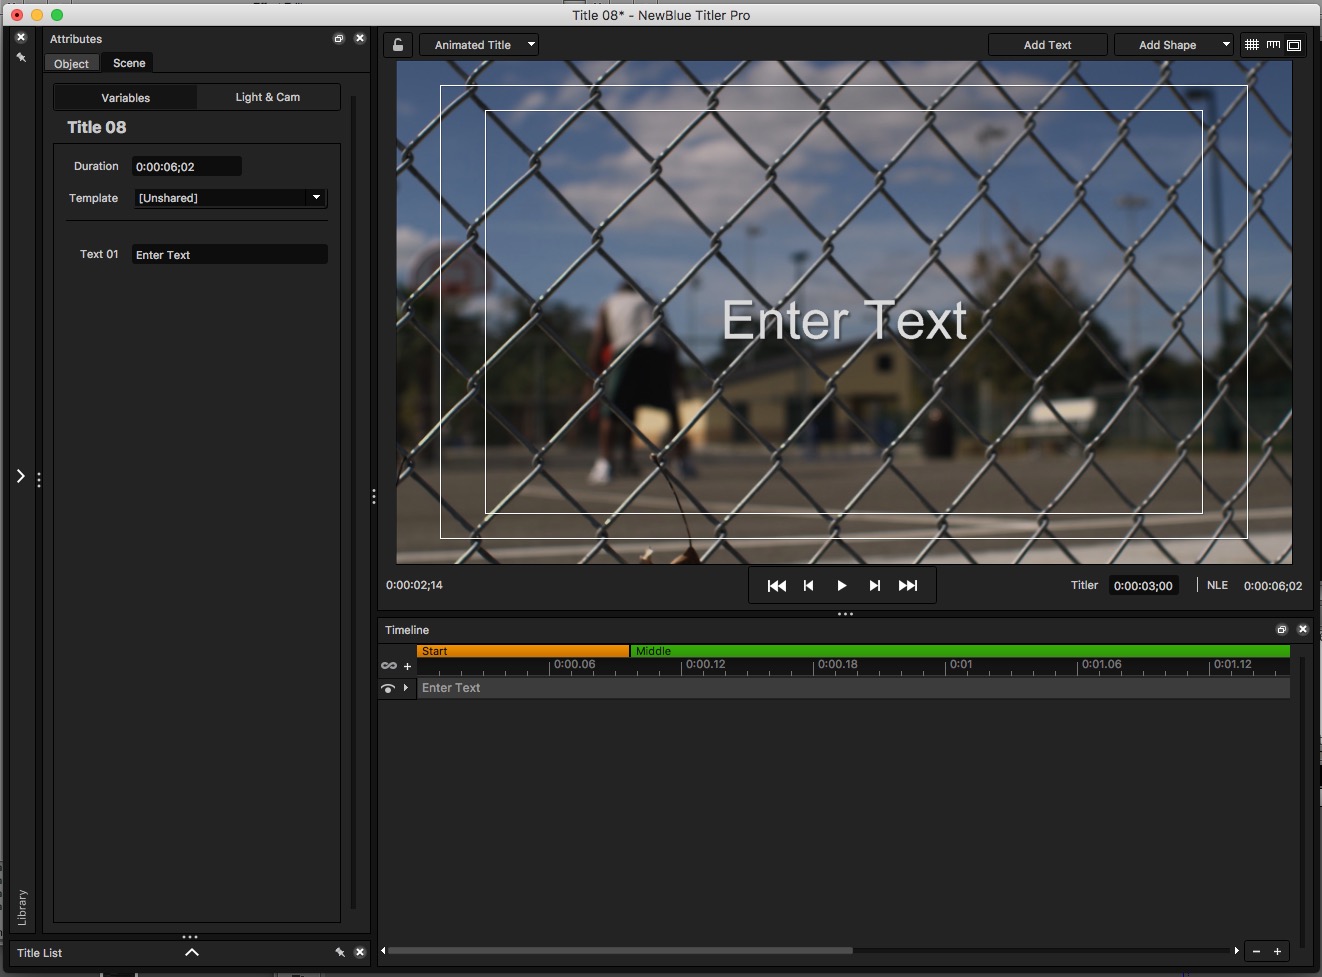
Now, something that’s important for me to point out, and one thing that I found slightly annoying is that if you work with the method I’ve described above, you’ll get the most flexibility out of the effect, but you’ll also run into the problem of not being able to see your video background in the TP5 interface. You need to apply the effect directly to a layer for it to be seen in the interface. This is something that needs to be addressed in TP6, or in an update to TP5. A dropdown should be available in the interface to let you toggle which background layer you want to use, as this functionality is available in the Premiere Pro version, since you have to apply TP5 as a secondary video layer.
Once the interface is up, you can now choose how you want to create your title. Do you want to use a template, or create from scratch. Templates can be found in the Library tab of the left side of the interface. Once clicked on, you’ll have access to as many “extra” templates as you have purchased, or what comes standard with TP5. You can also hover over the templates to get a preview of what they look like. Now again, here is where I had an issue, and I went to After Effects to double check to see what’s going on. Now, before I talk about this, I want to mention that I have a powerful machine. Mac Pro Trash Can 12-core, 32G Ram, Dual AMD FirePro D700 6G Ram. The AE version of TP previewed the elements to me in, pretty much, real time. Media Composer, on the other hand, wasn’t so smooth. In Draft mode (half yellow/half green), I would say that I go maybe 5 fps playback. It was pretty choppy. I took another preset, and dropped it into my timeline (6 seconds), and cached the title to see if I could get it to playback in real-time, and when it was done and I hit play, I go 12 frames previewed playback of a six second animation. Now, I will say that these were pretty hefty animations, and the preview when playing back simpler timelines played back in real-time, but just the fact that I’m caching these titles before playing back tells me that I should be getting real-time (or pretty darn close to real-time) playback in the interface, before heading back to Media Composer.
With that being said, let’s move on and talk about creating our own titles. TP5 will always start up with a standard title in the UI, ready for you to adjust. You can simply delete that layer from your timeline and create a new Text layer or Shape layer if you want to (from the buttons in the top right of the interface).
With nothing selected, the interface looks pretty grey, but once you select the default title, the interface will immediately come alive with options for you to alter including extrusion, bevels, outlines, gloss faces, and many many more. For the purposes of this tutorial, I wanted to create a simple text element, extruded with an edge, and have it rotate, slightly, over the length of title.
I will say this, and I can’t stress this enough. When working with text/titles in the canvas of TP5, it’s so quick, simple and intuitive to create titles. The interface works like a charm, and even better than Photoshop (for an editors use) in many instances.
With the title selected, the “Object” tab is where you will be making most of your parameter adjustments. You’ll notice that it’s broken down into four categories. Style, Global, Effects and Transitions.
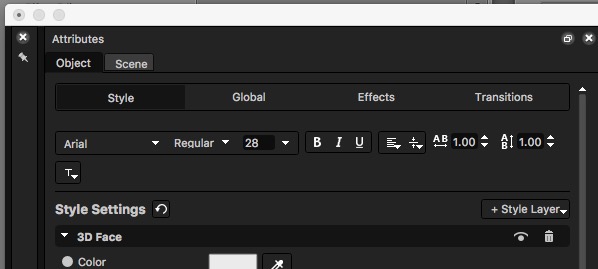
Now, before we go on, there’s something that I want to mention about the “Style/Global/Effects/Transitions” tabs. There are intuitive panels. What I mean by that is that depending on which tab you have selected, when you navigate to the library, only the elements/effects/transitions/etc that match that particular tab will be displayed. It really makes for a smooth workflow, as there is no need to go searching for what you need to find. It’s always displayed exactly where you need it to be.
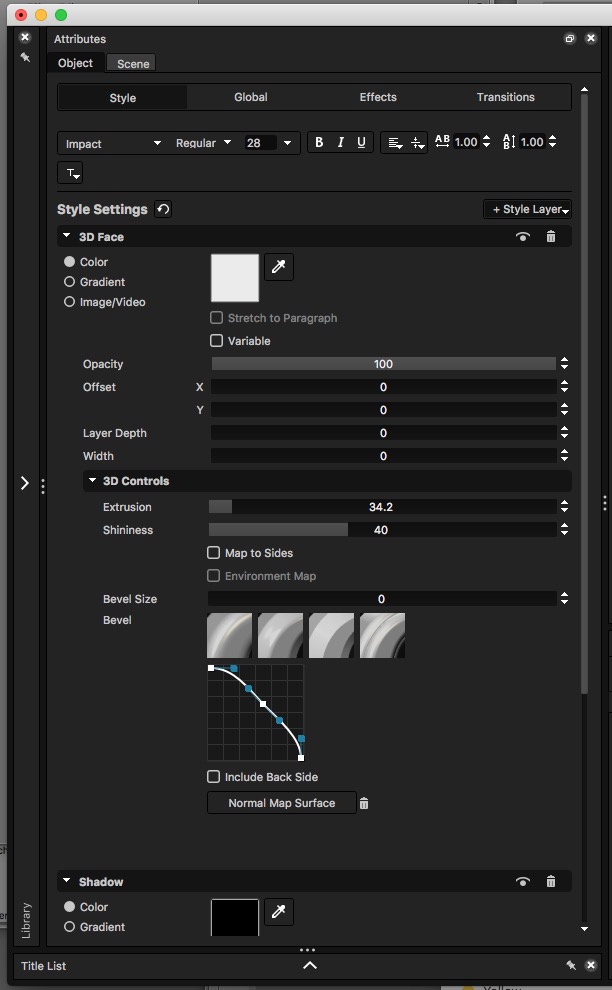
The Style and Global tabs are fairly self explanatory. The Style tab is where you’re going to give your text its look. It can be standard looking text, or you can add either 3D Outlines (edges) or 3D Gloss faces to your text. You’ll notice immediately that you have access to the font type, size, style (bold, italics, etc), and tracking/leading. Probably the most important aspect to this particular set of parameters is that here is where you will find the extrusion parameter, inside of the 3D Controls drop down. As soon as you grab the extrusion parameter and start dragging, you’ll immediately see the text’s depth widen.
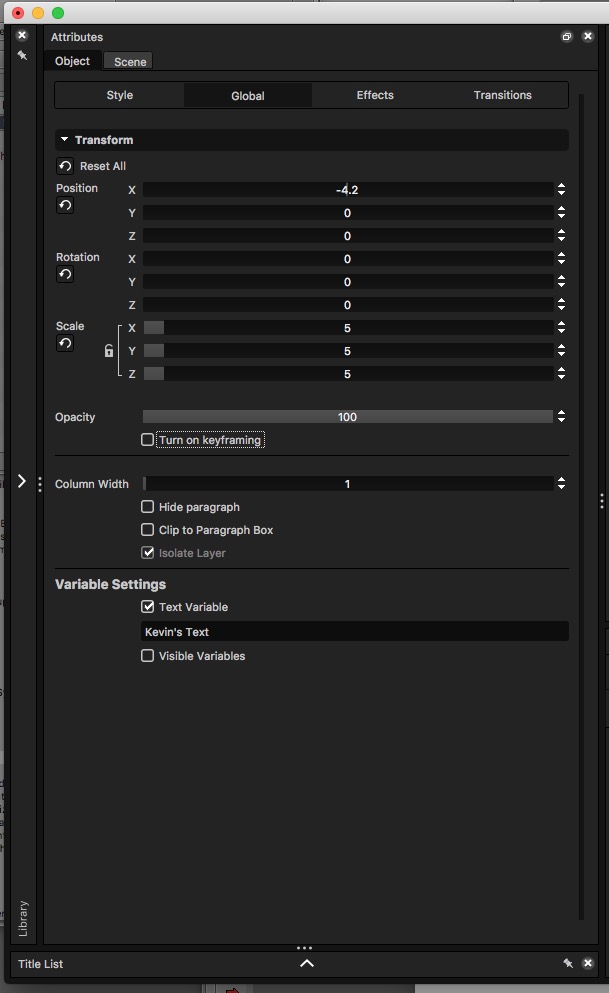
The next tab, Global, is where you’re going to make adjustments to position, rotation, scale, etc. Also, and possibly most importantly, inside this window you are going to be able to turn keyframing on and off. Now, I’m going to get to keyframing in a little bit, as it goes hand in hand with the Transitions tab, that we’ll talk about shortly.
This, for me, is where things really start to get interesting, and a feature that makes TP5 a standout from the rest. The Effects tab is just that. A way that you can add different effects to your titles. What makes this extra interesting is the fact that you can work with effects across any of the effects packages that NewBlueFX offers. All you have to do is take the effect you want, drag it out of the library and onto the element in your canvas that you want it applied to, and immediately you’ll see the parameters for that effect, appear in the Effects tab. This opens up TP5 to a whole new world of possibilities, as in many cases, work like this has to be done as secondary and tertiary work, outside of the TP5 interface.
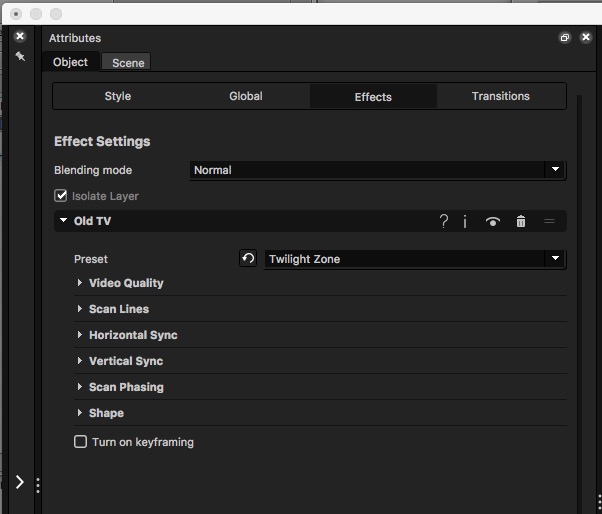
The Transitions tab works pretty much the same as the Effects Tab. Any additional transitions you might have via additional plug-in packages from NewBlueFX will appear here.
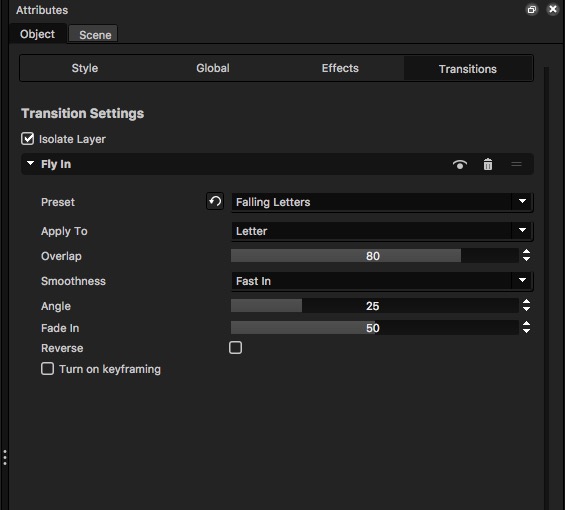
Now, this is where I want to circle back to keyframing, as transitions and keyframes, really, go hand in hand together. When working in applications like After Effects, creating animation is basically 100% reliant on keyframes. It’s not quite the same in TP5. We can combine transitions, much like ones you would use in your Media Composer timelines, with keyframes, to create powerful animations quickly and easily. My favorite “effects” when working with text inside of After Effects is the animation presets, where you can automatically animate the individual letters of a title, to animate in separate of each other. It (more or less) requires the Adobe Bridge to preview the presets before you apply them. Here, we can simply hover over the transition to quickly preview it, and then drag and drop to apply. Want to adjust the speed/duration of your transition? No problem, simply drag the in/out point of the transition to instantly adjust its duration.
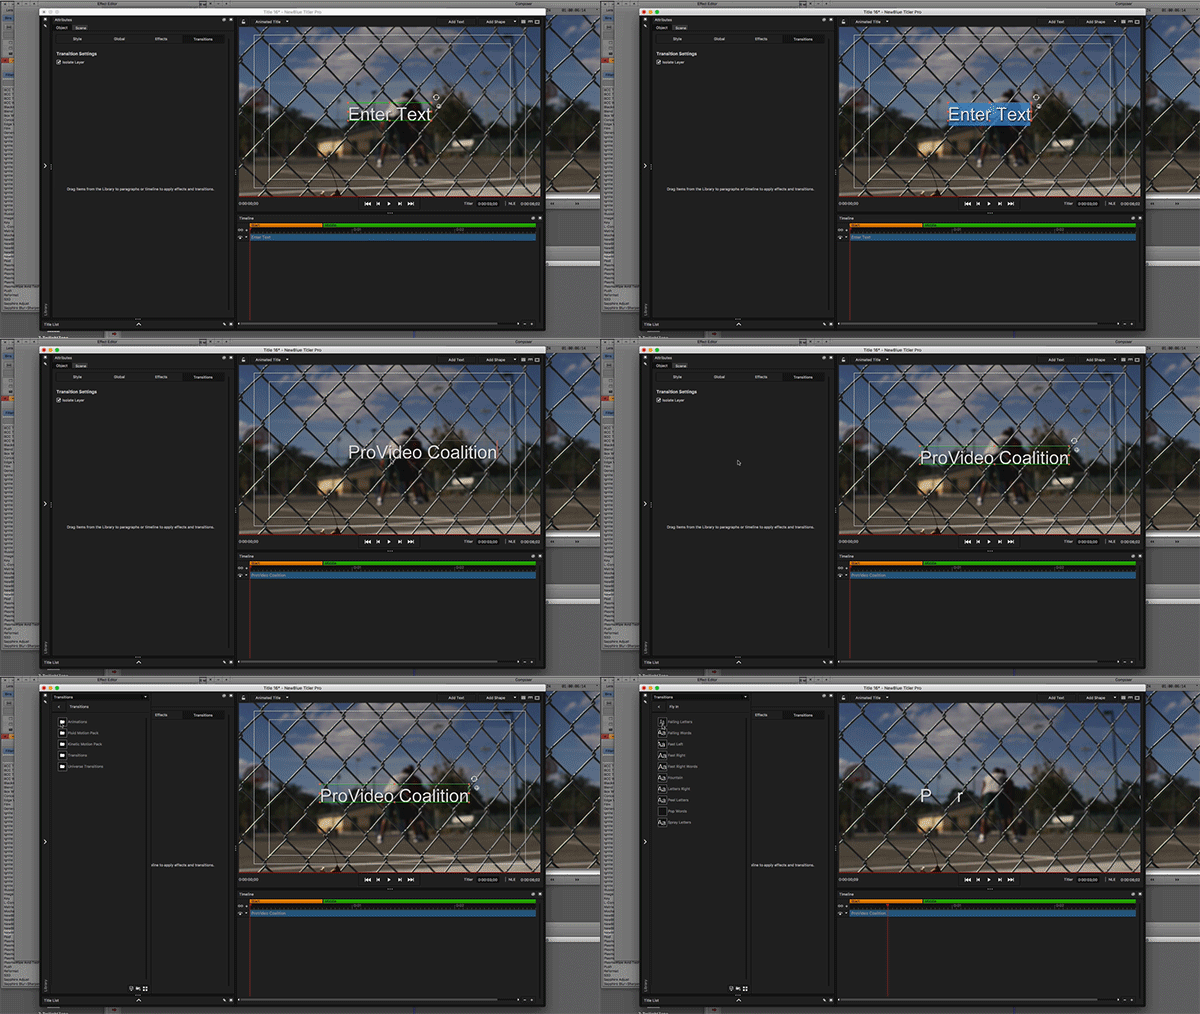
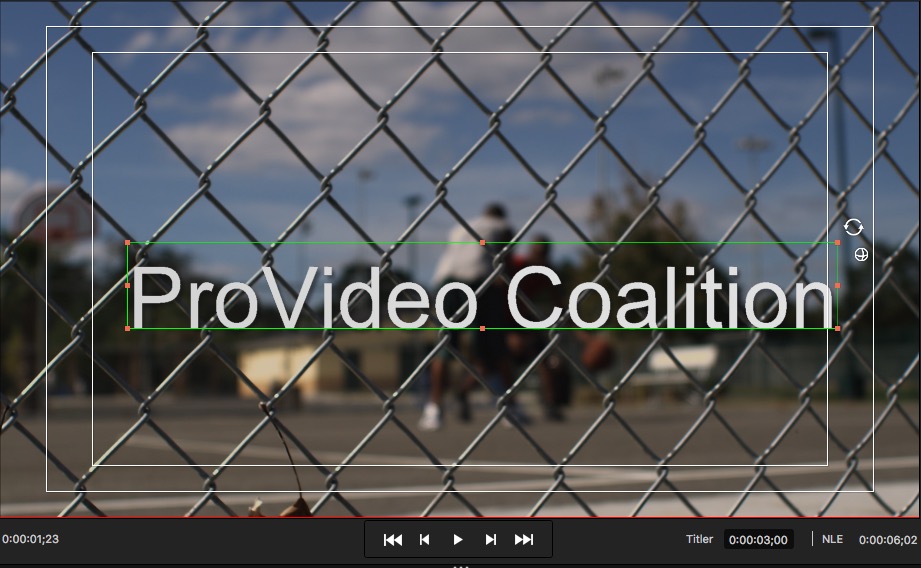
Once we are happy with our in/out transition, we can head back to the “Global” tab and turn on keyframing. Once enabled, it will be a little hard to see, but a keyframe will automatically be added to the first frame of your title animation. This is essentially a static keyframe, based on what you’ve done to your text up until this point, Any further adjustments you want make to your text, make sure you do at the beginning of the timeline, to make sure you’re not inadvertently adding keyframes to your timeline that you don’t want there. This is going to sound a little weird, but when I first started using TP5, I was expecting the keyframing system to be a little more, well, complicated. It always seems to be that way with applications like this, but I was very happy at how simple the keyframing is in TP5. Something else that I want to point out is that many of the standard parameter adjustments like Position, Scale and Rotation can be done via the on-screen widgets, AND you even have the ability to toggle between 2D and 3D rotation (Z rotation vs XYZ rotation)
Now, with all of this being said, there are some apparent issues that I have with TP5 inside of Media Composer, and the main two problems I have come down to lag. I’ve noticed that when you set your Preview Quality to be “Best”, it immediately brings TP5 down to a laggy crawl with previewing both in the library and in the viewer/canvas. If you switch back to Draft quality, the performance jumps back up to being excellent. Now, this might seem like a no brainer that everything is super responsive when in Previewing and slow in best quality, but even when caching the title in best quality, I would assume at this point that the title will playback full frame full frame rate, but it doesn’t. It’s still slightly laggy. This is disappointing in comparison to to other AVX effects that involve caching effects, because in those applications, the preview is 100% quality and frame rate, the moment the caching is done. Now, this problem is not limited to the previewing of elements and timelines. It also seems to directly affect lassoing (a new feature in PT5), where it becomes super laggy in full quality, and super responsive in Preview mode. For such a simple tool, I would expect no difference in it’s behavior, no matter what the quality. The surprising thing is that the difference between Preview Quality and Best Quality is negligible at best, I really shouldn’t have the option to switch. Preview should be the only option.
Another very annoying (not sure if I would call it a) bug is that when working in Media Composer, I normally apply titles or graphic elements to layers above my video, so I have better control over them. In TP5, if you use this workflow method, you can’t get any video to appear in the viewer window of TP5. The only way to get it to appear there is to apply the effect to the actual video clip itself. This is very annoying, and something that needs to be fixed.
WHAT’S AWESOME ABOUT TITLER PRO 5
- 2d/3D Still and Animated titling in your projects
- Animated Rolls and Crawls with the ability to add images to your credits
- Rulers, Guides and Grids – much like Photoshop
- Tons of add-ons (Transitions, Effects, etc)
- Elastic Region to control title animation outside of TP5 interface
- Saved TP5 project can be opened in any version, any NLE.
- Layered Vector images can be manipulated and extruded easily.
- Export movies from TP5 with Alpha Channels for any application.
WHAT’S ANNOYING ABOUT TITLER PRO 5
- Laggy interface and lasso in “Best” quality
- Title has to be applied to clip to see it in the interface in Media Composer
- Seems a little big “crashier” than it should be
In the end, I want to wrap up this article by saying this. Titler Pro 5 by NewBlueFX is good. It’s really good. If your only exposure to Titler Pro is versions 2 and 2.5 which come with the Perpetual and Subscription Media Composer licences respectively, you’re doing yourself and your clients a serious disservice by not looking at this titling application. Remember, we’re now without a titler since the standard Title Tool and the Marquee Tool are not supported in larger than HD projects, and the quality of end product, plus the simple and straightforward interface make this a title tool you should definitely check out. That does, of course, beg the question, which one should you pick up. Well, if you have the budget, I’m going with the $499 version, as having access to TP5 in After Effects opens up your titling to a whole new world of possibilities, and the fact that you can create titles in TP5 in After Effects, save it out to your desktop (or e-mail it to a friend), and open it in the AVX plug-in version, makes going with the Ultimate version of the plug-in a no brainer. For more information, and to check out a free trial of NewBlueFX’s Titler Pro 5, you can head over to www.newbluefx.com .

Filmtools
Filmmakers go-to destination for pre-production, production & post production equipment!
Shop Now