The Sony HDW-650F (US$44,950 list) is a 2/3″ 3-CCD 1080i/1080p shoulder-mount HDCAM camcorder using “Power HAD FX” CCDs, a 14-bit A/D, and a newer generation of DSP for a better image than previous HDCAM camcorders have offered. Yet it costs less, weighs less, and offers more features than the 700-series HDCAMs it succeeds. While it’s primarily aimed at broadcasters, it also offers 23.98p shooting and PsF recording, so it can also serve as a digital filmmaking tool—or just add the “film look” of 24p to TV production.
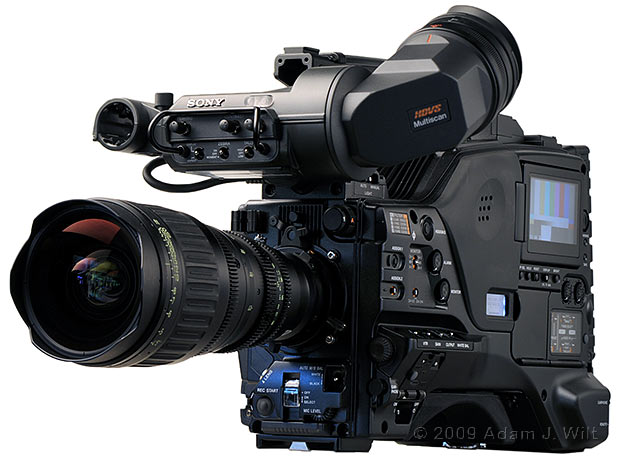
Sony HDW-650F with a Canon HD-EC zoom lens.
The Power HAD FX CCDs are the next iteration on the Power HAD EX frame-interline transfer (FIT) chips used in the HDC-1500 and F23 cameras. FX chips are also used in the PDW-700 XDCAM HD camcorder, which shares more than a passing resemblance to the HDW-650F. Indeed, in many ways the HDW-650F and PDW-700 are variations on the same theme, with the HDW satisfying HDCAM tape-based operators, while the PDW adds 2/3″ imaging to the XDCAM optical disk lineup.
The HDW-650F is eventually intended to replace the US$60,000 HDW-790, which currently remains available. The 650F weighs 9 lbs 4 oz compared to the 790’s 12 lbs; the 650F uses a 14-bit A/D compared to the 790’s 12-bit A/D, and the 650F is marginally more sensitive, rated at f/11 @2000 lux compared to the f/10 of the 790. The 650F also uses what Sony’s Juan Martinez calls “super duper extra special DNR” (not the official description, grin), allowing cleaner images: 59dB w/DNR, 54dB w/o DNR.
Despite its 23.98 recording capability, the 650F is not designed to replace the US$69,900 HDW-F900R CineAlta camcorder. It lacks the “world cam” flexibility of the F900R (which offers 23.98p, 25p, 29.97p, 50i, and 59.94i), the user-installable gammas (thus no Digital Praxis curves), and the vaunted CineAlta label. Its CCD block and image processing yield slightly quieter images than the F900R, and the images have a subtly different look overall. Sony is keeping the F900R as it is; shooters the world ’round have come to count on the look of the F900R and Sony doesn’t want to mess with a good thing. But that doesn’t mean that young turks, those not wedded to the F900R look, can’t go to town with the 650F and make excellent images with it. Just don’t expect 650F and F900R footage to intercut seamlessly.
Compared to its predecessors, the 650F loses the 50-pin multicore connector, user gammas, and TeleFile (the ability to record metadata in a chip embedded on the tape cassette’s label). But it includes a built-in downconverter and a cache board (for pre-record and interval recording) that were optional on earlier machines, and adds a slot for Sony’s digital wireless mic receiver, the DWR-S01D.
The 650F is one of a family of regionally-targeted models: Japan’s 650 shoots 50i and 59.94i only; the American 650F adds 23.98p, while the European 650P adds 25p. Both the 650P and the 650F are available in Asian markets, so Asia’s not lacking for proscan options.
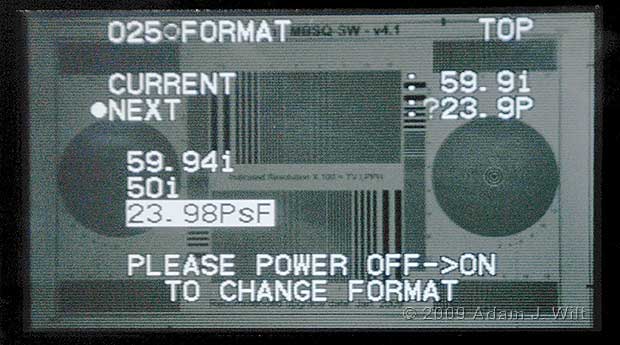
The 650F can shoot interlace for any country, plus 23.98PsF progressive.
Sony sent me an HDW-650F with an HDVF-20A 2″ CRT viewfinder for the Green/Magenta test, so I was able to give it a quick once-over. I borrowed a very nice 2/3″ cine lens from Simon Sommerfeld, hung a spare RED brick battery off the back, and I was ready to go.
Next: Design & Operation…
Design and Operation
The HDW-650F is a conventional shoulder-mount camcorder. There’s nothing earthshaking about its overall design, but with every generation of HDCAM camcorders, Sony makes ’em a little bit smaller, a little bit lighter, and a little bit more user-friendly.
If you just look at the left side, you see a control and display layout much like the PDW-700’s.
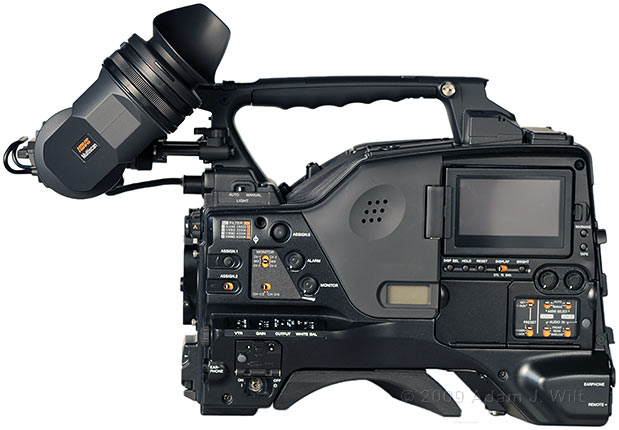
Left side of the HDW-650F, with optional HDVF-20A viewfinder.
It’s shorter than prior HDCAM camcorders, with a sharper drop ahead of the tape section affording operators a less-obstructed rightward view. The body is finished in metalflake black paint, with a gray rubber headrest panel with built-in monitor speaker. Camera controls are up front; VTR and audio controls are in the back behind protective flip-down covers, and two LCD screens are present: one is a flip-out 3.5″ color video and menu display; the other is a small, backlit monochrome readout of timecode, battery level and tape usage. This latter display remains enabled (if not backlit) even with power off, so you can assess the camera’s readiness without having to flip a switch: very helpful for run’n’gun work. As the display is transflective, it’s fully readable without the backlight.
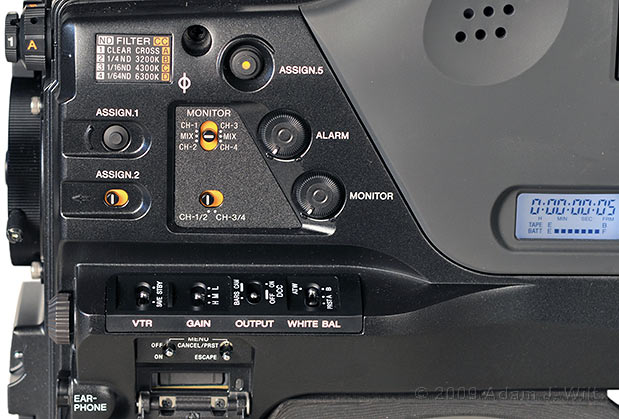
Main operator controls on the 650F.
The front left corner of the camera has concentric controls for the dual filter wheels in the camera: a four-position ND filter wheel and a four-position color-correction wheel. The knobs’ sizes and shapes are different enough to distinguish them by feel, and they are firmly click-stopped to avoid inadvertent rotation.
Two assignable buttons and one assignable slide switch, (plus two more assignable buttons on the top handle) let you set up the camera to operate the way you want it. And these aren’t any wimpy pick-one-of-five-choices buttons, no, these things are assignable. The pushbuttons can do any of the following functions:
- Select front mic to be mono or stereo.
- Picture cache on/off.
- Superimpose viewfinder data / menu displays on HD-SDI outputs on/off.
- Display or hide viewfinder markers.
- Re-take: delete the last take.
- ATW (auto-tracking white balance) on/off.
- Return video (display return video in EVF).
- Lens Ret: replicate function of RET button on lens, which is itself assignable.
- Record start/stop.
- Turbo-gain on/off.
- Zebra on/off.
- Zoom: Assign.3 & Assign.4 (on the handle) can be set up as zoom-in/zoom-out buttons, or vice versa, for lenses with the appropriate serial remote control. The menus let you choose any of 100 different zoom speeds.
- PB Mix: mix playback and live images, to help in aligning a new shot to an old one. The menu system allows you to set up multiple mix modes, either a full-color mix or a Y-channel mix, black or white “wireframe” outline mix-ins, mix levels from 0% to 80%, and whether to mix in a freeze frame, freeze field, or nothing at all when the deck’s STOP button is pressed.
- CC 5600K: preset 5600K color balance.
- UA1-UA10: ten additional assignable actions available in the menus (mostly momentary data displays).
Assign.2, the slide switch, “only” allows the following:
- Select front mic to be mono or stereo.
- Picture cache on/off.
- Superimpose viewfinder data / menu displays on HD-SDI outputs on/off.
- Display or hide viewfinder markers.
- Zebra on/off.
- UA1-UA10: ten additional assignable actions available in the menus.
Of course, any and all of the assignables can be set to do nothing at all, which is how they’re set at the factory.
Assign.5 also has an embedded orange LED to indicate when it’s engaged, as shown in the picture.
A monitoring panel lets you choose what combination of the four audio channels you wish to monitor, and rotary controls let you dial in separate monitoring and alarm volumes.
A VTR switch lets you put the tape in SAVE mode (VTR spun down; it spins up when you press RECORD), or STBY, keeping the VTR spun up and ready to roll. A GAIN switch chooses any three gain levels, each programmable in 3dB increments from -6dB to +18dB, and in 6dB increments from +18dB to +42dB. OUTPUT selects bars or camera, and lets you choose DCC (Dynamic Contrast Control) on or off. A three-position WHITE BAL switch selects preset (3200K default, but you can change this), A, and B; B can be set to auto-tracking white balance if you wish.
Ahead of these switches is a menu-controlling knob, which works in concert with two switches behind a flip-down panel to control the menus. The flip-down panel also covers a Memory Stick slot; Memory Sticks are used for storing and recalling camera setups. Below this panel is the camcorder’s power switch.
Above the main controls, at the base of the handle, is a LIGHT switch, letting you choose between having an optional Anton-Bauer video light stay on continuously, or just turn on when the camera is rolling.
The timecode / battery / tape LCD is centered on the body. Battery and tape-remaining levels are shown as bar graphs. The LCD can be set to stay on continuously (draining a very small amount of power), or to turn off after a programmable amount of time, or to be turned off at all times if it annoys you.
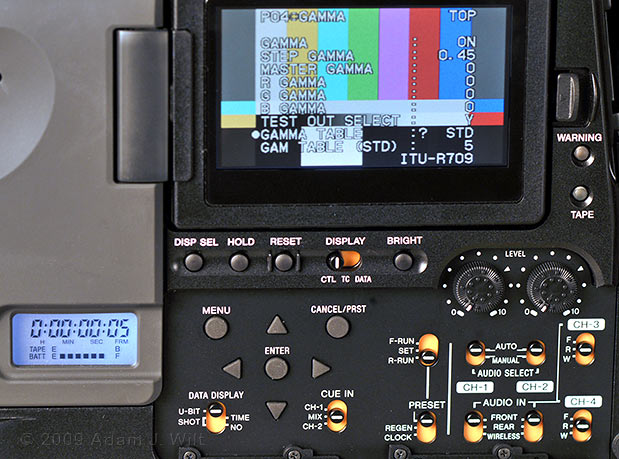
LCDs, menu and audio controls on the left side.
The left rear of the camera has the usual menu buttons, data display selectors, and timecode-setting switches you’d expect a professional-level camera to have. It also has a handy, flip-out 3.5″ LCD, which can be opened out and rotated, or folded into the body either opened and visible, or closed and shut off.
There are two audio level controls, for channels 1 & 2. Channel 1 can be leveled by its control here, by a thumbwheel on the front of the camera, or by both in series. Channel 2’s level is set by its control here, period. Channels 3 & 4 are set up in the menus: set to automatic level control, manually set, or set to be controlled by the front thumbwheel. Each channel can take its input from the stereo front connector, the two mono rear connectors, or the wireless mic receiver slot.
The rear of the camera is dominated by a V-mount battery plate, beneath which lies an array of connectors. All of the connectors have weather caps; eight of which are attached to a single “octopus” of tethers, which I removed for the photo.
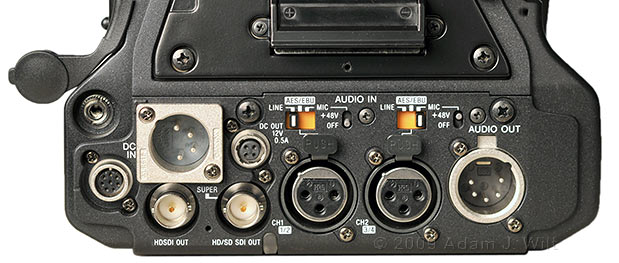
650F rear panel, minus the rubber-cap “octopus”.
There’s a 3.5mm stereo earphone lack, a remote-control port for any of a variety of Sony remote panels, an 11-17 volt DC IN jack, and dual HD-SDI outputs, one of which can display a downconverted image with embedded audio A 4-pin DC OUT port supplied half an amp of DC power for lights, microphones, or other accessories.
Two XLR inputs are switchable between balanced analog and digital AES/EBU audio. In analog, they can be set for line or mic levels, and offer +48v phantom power. A 5-pin XLR output carries either channels 1 & 2 or channels 3 & 4 depending on the settings of the switches on the side panel.
The right side of the camera has the tape-loading door at the top (tapes slide in vertically, facing forward), and only a few connectors.
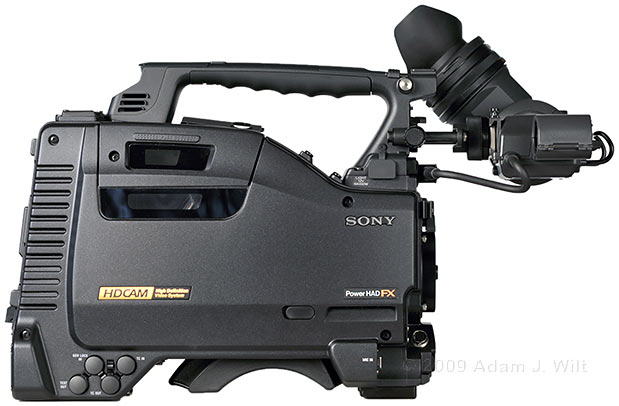
Right side of the HDW-650F.
A quartet of BNCs at the lower rear side lets you connect timecode in and out, genlock in, and test out. The genlock connector accepts analog HD with tri-level sync. The test output may be composite video, or an HD signal selected from Y (luma), R, G, or B. To genlock one camera to another, set the master camera to output HD-Y on its test connector, and cable it to the genlock connector on the slave. Genlock can be daisy-chained through multiple cameras this way.
A rubber cover at the base of the tape compartment conceals the manual-eject screw, which in the event of complete system failure allows you to laboriously extract the tape in the same manner as Dave opened the emergency airlock in “2001”.
Towards the front, there’s a 12v socket for the power cord of an optional video light at the base of the handle, and the 5-pin MIC IN XLR connector, allowing either mono or stereo mics to be connected.
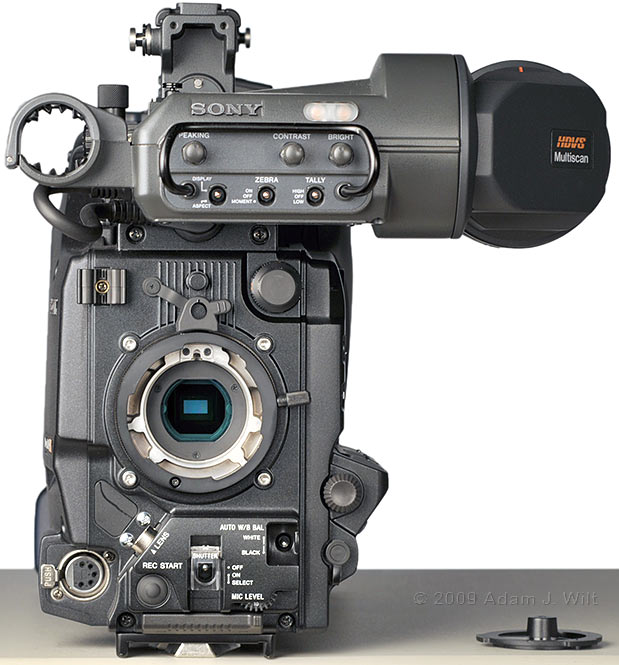
Sony HDW-650F: full frontal.
Looking at the front of the camera, from the top down we have:
- The EVF mount and EVF cable socket, here supporting the optional HDVF-20A 2″ CRT viewfinder.
- Cable clamps; a little rubber wedge block that stops the lens mount ring from spinning too easily; and the concentric filter wheel knobs.
- The B4 lens mount itself, with the 16×9 chips peering out through the prism block.
- At the right, the menu thumbwheel.
- On the diagonal, a lens cable port.
- The 5-pin MIC connector; a REC START/STOP button; a shutter mode switch behind a flip-up cover; a MIC LEVEL thumbwheel; the auto white/black balance flip switch, nicely recessed to prevent unexpected activation; and another 3.5mm stereo earphone socket.
- Below the switches, a sliding rubber block: slid to the left, it allows access to the MIC LEVEL wheel; slid to the right, it protects the wheel from inadvertent changes.
The HDVF-20A viewfinder (a $4000 option) has properly guarded knobs for peaking, contrast, and brightness, and flip switches for tally light, zebra displays and data displays.
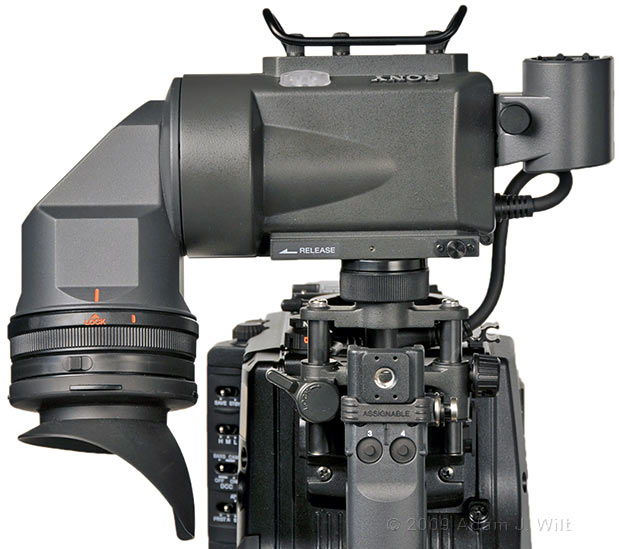
Viewfinder attachment details. Note ASSIGN 3 & 4 exposed by sliding cover.
The top handle has a tally lamp on the back (along with a switch), and two assignable buttons at the front, with a sliding cover to protect them. There are 1/4″x20 threaded sockets front and rear for accessories.
The viewfinder attaches to a versatile mount allowing both lateral and front-to-back adjustment. The front-to-back mechanism has a locking lever on the left, and a locking knob on the right: were the two sides of the camera designed by different people? The entire mechanism can be unbolted from the front of the camera and flipped upside down, letting you change the vertical position of the mount by about an inch or so. Lateral adjustment is handled by loosening the large lockring on the front of the mount and sliding the finder laterally.
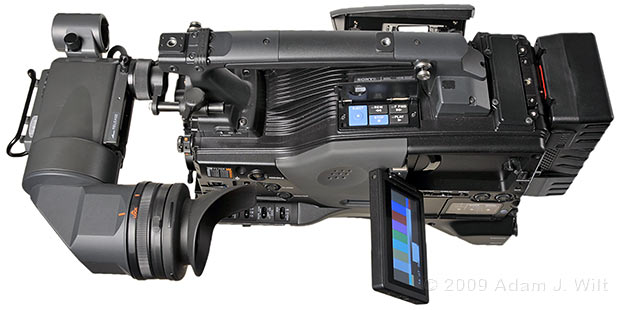
650F with LCD and tape-loading door open. RED brick battery not included.
Tape controls lurk beneath a flip-up panel on the top of the camera; they’re the same controls used on most high-end Sony professional tape cameras: Eject, Rewind, Fast-forward, Stop, and Play. Sorry, there’s no slo-mo, freeze-frame, or frame-advance—we’re pros, we don’t need no stinkin’ stunt-mode playback: if you buy a camera at this level, you’d better be able to afford a proper VTR with a shuttle knob on it, too!
Flip the camera over to reveal its shoulder pad. It has a small orange quick-release lever locking it in place; flip it and get about 1.5 inches of front-to-back adjustment. It’s very quick to get this camera balanced properly with this shoulder pad.
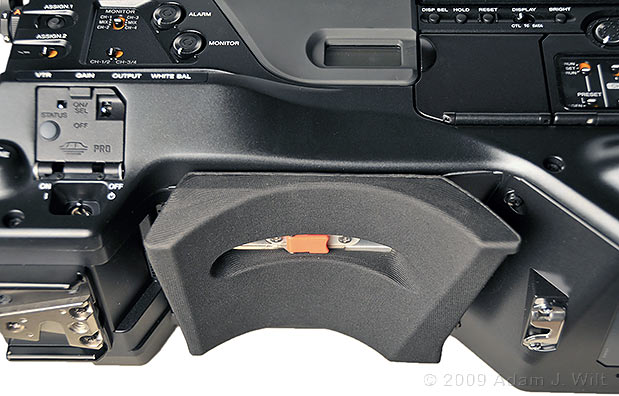
Flipping the orange lever allows the shoulder pad to slide.
The HDW-650F has a comprehensive menu system allowing for adjustment of almost any parameter you might imagine. The camera has three frame rates; five standard gammas and four hyper-gamma settings (gammas that use a more logarithmic highlight rolloff instead of a hard knee), adjustable gamma parameters within each master gamma setting; separate HD and SD detail configurations, plus skin detail settings; comprehensive color controls including both linear matrix tweaks and a 16-axis color-correction matrix; configurable fixed knees and DCC actions; and more—much more than I can cover here. It’s a fully professional camera and has all the no-excuses menu options you’d expect of a camera at this level. It may be easier to mention this things it doesn’t have: user-definable gammas, set up using Sony’s CVP editor; and S-Log, found on the F23 and F35.
Operationally, it’s a pro Sony: if you’ve used any shoulder-mount DVCAM, Digital Betacam, or HDCAM camcorder of the past decade, you’ll be comfortable with the familiar feel of the 650F.
All the control forces are just so, being neither too light and delicate for run’n’gun work nor too stiff for quick and certain actuation.
Everything that should be recessed or molly-guarded is.
With a monitor speaker and two separate headphone jacks, there’s never an excuse not to monitor audio.
The camera has a large collection of warning and error conditions that it’ll alert you about, using flashing LEDs, a gentle beeping sound, and/or messages in the EVF. But you’re in control; you can set the levels and severities of these warning, so you get the info you need without unnecessary distraction.
With five assignable buttons and switches (plus the possibility of assigning the function of the RET button on the lens), you can fine tune the controls to give you what you need while you’re shooting.
The shoulder pad lets you balance the camera just about perfectly. The size and weight are comfortably lower than those of previous HDCAMs, yet not so low as to make the beast unstable when handheld.
Is there anything I don’t like? Well, there is one: in this day and age, it’s downright silly not to have a proper, proportional zoom rocker on the top handle. Assignable buttons 3 & 4 can be set up for zooming, but only at a fixed (if selectable) speed, and the harshness of the now-you’re-zooming,-now-you’re-not behavior of a fixed zoom just isn’t usable in most situations. The GVG Infinity has a proportional rocker on the top handle, making low-mode zooming with eases and ramps much easier. Does GVG have a patent on the idea?
I might also quibble about the ease (or lack thereof) of adjusting audio channels 3 & 4, but practically, it’s not much of an issue: if I’m recording four channels of audio, I’m usually feeding audio from a separate mixer, and doing my leveling at the mixer (or, more likely, having a soundie watch levels while I shoot). If I’m using a camera like this for single-person ops, I’m normally not going to be using more than two channels of audio, and even then I’m probably not going to be tweaking them all live, while tape is rolling. Consider as well that more than a few comparable four-channel cameras don’t give you any control over channels 3 & 4. Really, the HDW-650F’s audio controls aren’t as lacking as they might seem at first glance.
Next: Performance…
Performance
I wasn’t able to do a comprehensive evaluation of the camera’s performance, but I did test a few things.
Dynamic Range, Noise, and Smear
When shooting a 41-step transilluminated Stouffer wedge I saw better than 10 stops of dynamic range from the 650F. I say “better than” because I wasn’t able to count more steps in the wedge; there was some front-lit spill on the wedge that fogged its lower levels. The black card around the wedge was visibly darker than the chart’s darkest surfaces, so there’s definitely more range in the camera than I saw on the wedge itself. Sadly, I had returned the camera before looking at the test in detail, so I wasn’t able to reshoot it.
The images from the camera are very clean. Comparing it to a 1/2″, 3-CMOS PMW-EX1 (not fair, I know, but that’s what I had), I would say that the 650F was about 9dB quieter at 0dB gain: I had to boost the 650F to +9db to get a comparably “grainy” image to the EX1’s at 0dB. Boosting the gain on both cameras to +18dB evened them up, but consider that the EX1 uses aggressive pixel-averaging noise reduction, such that its resolution drops to about 700 TVl/ph at +18dB whereas the 650F retained full resolution at that setting.
The 650F has gain all the way up to +42dB (“turbo gain”). Turbo gain appears to use horizontal pixel doubling to get the necessary gain; on the resolution charts I saw a null point at 540 TVl/ph with aliasing above. At lower gains, I saw some color moir© on the chart starting at +24dB, and horizontal resolution drops as gain increases: it’s almost as if the full-res signal had the pixel-doubled signal mixed in gradually as gain increases. As you might expect, extreme gain on the 650F isn’t Hollywood-pretty, but if you’re shooting news with the 650F, +42dB may be the difference between getting the shot and getting nothing.
All this testing was done with the 650F’s super duper extra special DNR (it’s called “noise suppressor” in the menus, but I like Mr. Martinez’s term better) turned off. I didn’t run the test with it on, alas; all I can say is that the camera is rated at 54dB SNR with the suppressor off, and 59dB SNR with it on.
The 650F uses CCDs, which are subject to vertical smear. The chips are rated as having a smear level of -135dB; practically speaking, if I I had the sun in a shot I saw some smear from it, but almost nothing else I shot caused any noticeable smear to appear. For example, shooting a LitePanels Mini LED array head-on causes smear in every other CCD camera I have access to, but not the 650F—but just in case, the camera offers a cross-star filter on its filter wheel, to help diffuse bright sources and hide the smear:

The HDW-650F has a cross-star filter for smear hiding or for a 1970s-style look.
CCDs, of course, do not suffer from rolling shutter artifacts. You can whip-pan and snap-zoom the camera, handhold it in a helicopter during an earthquake, and subject your hapless audience to the most egregious Bourne-Sequel-style shakycam imaginable, and nobody will have any cause to complain about the Jellocam look.
Geek Note
Power HAD EX and FX chips, like those used in the HDC-1500, F23, HDW-650 series, and PDW-700, have compound, two-element on-chip microlenses. That’s 2.2 million two-element microlenses per CCD! The dual-element lenses serve to focus incoming light more efficiently on the active area of each photosite, boosting sensitivity and reducing vertical smear over what a single-element microlens is capable of.
Seriously, what sort of black arts are needed to fab compound, multi-element on-chip microlenses? I thought mere single-element microlenses were a pretty neat idea (cue gratuitous reference to the Hitchhiker’s Guide to the Galaxy). If this sort of thing progresses, it won’t be long before we have on-chip 13x zoom microlenses, and then what will Canon and Fujinon do for a living?
Resolution
The 650F’s chips are progressive-scan CCD imagers with 1920×1080 active photosites each. We might expect to see about 1000 TVl/ph both horizontally and vertically in progressive capture, and 1000 horizontally, 800 vertically in interlaced (due to dual-row readout to reduce twitter). And indeed, that’s what we see, in frame grabs from an E-E capture using an AJA IO HD with 1920×1080 ProRes422 HQ recording:
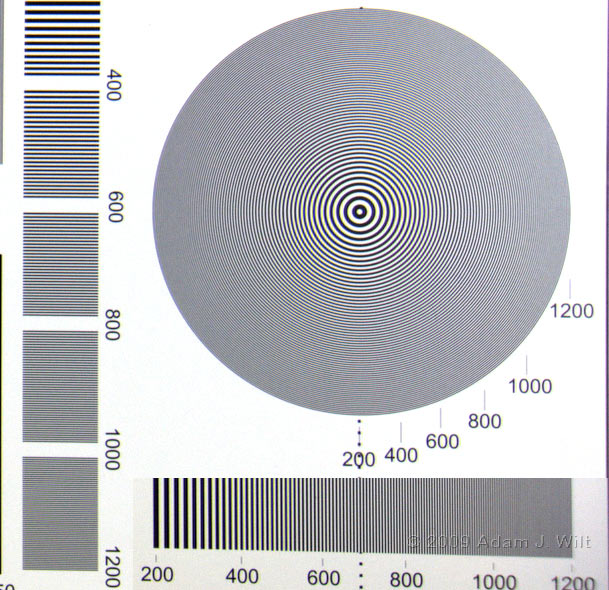
DSC Labs multiburst chart in 650F’s progressive mode.
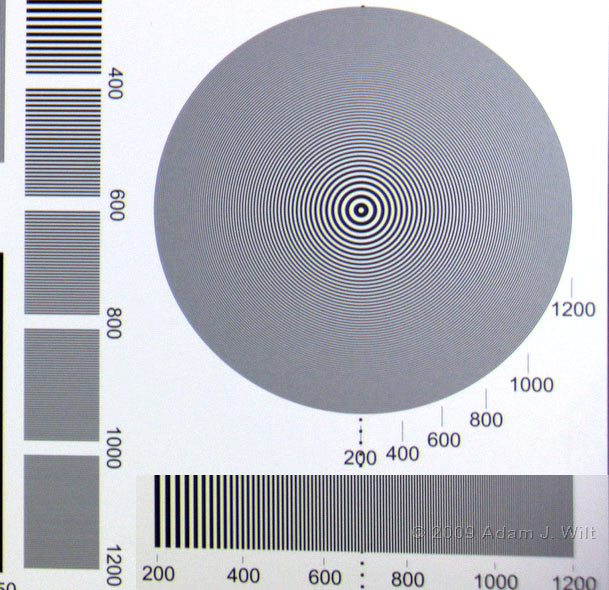
DSC Labs multiburst chart in 650F’s interlaced mode.
What’s of interest here is not so much that the camera makes its numbers, but how clean the image is above the Nyquist limit: there’s only a slight trace of aliasing. The 650F has a very sophisticated optical low-pass filter that comes as close to a brick-wall frequency cutoff as I’ve seen.
These filters aren’t cheap to fabricate (not that dual-element on-chip microlenses are cheap, either), and it’s subtle stuff like this that separates a $45,000 camcorder from an $8,000 one like the EX1.
For example, let’s look again at a couple of frame grabs from the Green/Magenta daylight test. By pure dumb luck, I managed to get the framing on both the EX1 and the 650F set for almost identical image magnification:

Two frames from the “Green/Magenta?” test.
When I looked at the images in close-up, I saw aliasing on the chart wedges on the EX1, but none on the 650F’s pictures—despite the fact that the EX1 was shot “flat”, without enhancement, while the 650F was saddled with the factory default sharpness setting, which I find excessive (and accounts for the higher “grain” in the 650F’s image):
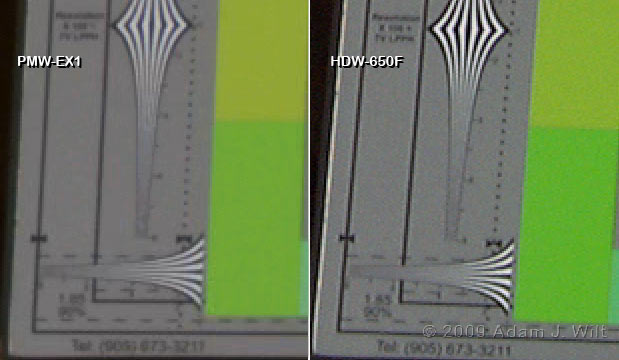
2x detail: note EX1’s aliasing, even with DTL boosted on 650F.
For those of you who don’t obsess over test charts, this translates to a more naturalistic image in real-world shots: less aliasing and “twinkle” in fine detail, such as foliage and hair, and repeating patterns such as chain-link fences, ventilation grilles, rows of windows in distant skyscrapers, and the like.
Image Tweaks
The 650F has all the tweaks we’d expect of this class of camera, as I mentioned above. What, you want ’em all explained? Crikey, we’d be here all week… Robert Goodman writes entire books on cameras of this complexity, and charges a hundred bucks for ’em; sadly, he hasn’t written up any of the Sonys yet. (He should, but I think Panasonic has a lock on him. But then, he’s got a book on the Viper, so maybe he can be convinced, nudge nudge…) I will however discuss tonal scale rendering tweaks a bit.
The 650F has five standard gammas and four hypergammas.
The standard gammas are all variations on Rec.709 video camera gamma, varying slightly in their contrast, black levels, and the like. With standard gammas, the steps on a chip chart will form a linear ramp on a waveform monitor, until the knee kicks in (at whatever level amnd whatever slope, you’ve set the knee up for). When I shot a chip chart, fixed my exposure , and read off the levels of the back, midgray, and white patches, I got the following:
Gamma, menu description: black-gray-white levels
STD 1, DVW-700Like(x3.5): 7-53-91
STD 2, x4.5: 10-52-90
STD 3, x3.5: 7-48-90
STD 4, SMPTE-240M: 9-49-90
STD 5, Rec.709: 10-50-90
STD 6, x5.0: 12-52-90
Really, the differences here are fairly subtle.
It’s the hypergammas that I find exciting. Hypergammas don’t allow the use of a knee; instead, they apply a log-like curve to the tonal scale; on the waveform monitor, a chip chart doesn’t form a linear ramp but gently rounds off the highlights:
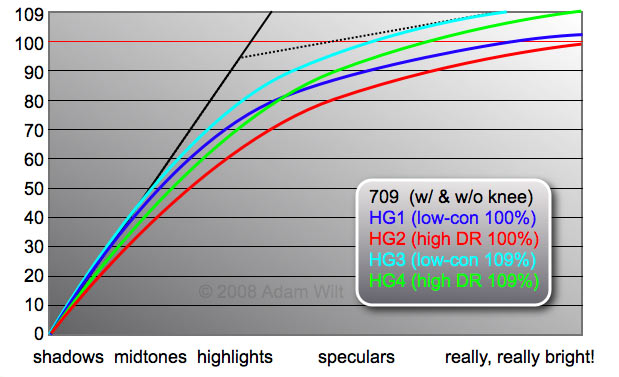
Conceptual plot of Sony hypergammas vs. 709 w/ and w/o knee.
These are the same hypergamma curves found in the F900R, the F23, and F35 cameras (Art Adams writes ’em up in some detail in this article, from page 4 onwards). Two of them also match Cinegamma settings on EX-series and PDW-F3xx-series camcorders: hypergamma 2 matches cinegamma 2, and HG 4 matches CG 1.
I’m a huge fan of hypergammas/cinegammas and find it hard to shoot in standard gammas with knees since discovering them; I appreciate the naturalistic way they round off highlight tone and saturation (although they’re something of an acquired taste).
When I switched the camera into hypergammas on my fixed-exposure chart test, I saw the following results
Gamma, intended use[1]: black-gray-white levels
HG 1: Lo-light HD 10-40-72
HG 2: Hi-con HD 9-33-62
HG 3: Lo-light DI 10-43-80
HG 4: Hi-con DI 9-37-68[1] Sony characterizes the curves as capturing the tonal scale into the range of 0%-100%, for direct broadcast as HD video, or 0%-109% for post-processing or digital-intermediate (DI) use. Within those two divisions, there are curves that stretch the shadows and boost midtones a bit for use in low-contrast situations, and curves that depress midtones more and allow more room for bright highlights: high-contrast situations.
The 650F has no user-definable gammas nor S-Log curves; for those you’ll still need an F900R, an F23, or an F35. But short of those features, the 650F gives you ample control over tonal scale rendering.
If you still prefer standard gammas, rest assured that the 650F lets you tweak the knee to perfection: you can set the knee point from 50% on up, tweak the slope, clip whites anywhere from 100% to 109%, and enable knee saturation adjustment.
DCC (Dynamic Contrast Control) is essentially an auto-knee function, varying the knee slope and knee point dynamically in response to scene content. You can tweak the dynamic range that DCC will attempt to compensate for, the minimum knee point it will use, its sensitivity to peak brightness levels (to avoid overreaction on small highlights, for example), and the speed at which DCC will vary the knee as the picture changes (similarly, you can vary the response rates of auto-exposure and auto-tracking white balance, so you can get the entire camera’s response set up to trade off between visible “pumping” and excessive lag in exactly the way you want).
DCC itself is switched on or off with the BARS/CAM side-panel switch (if you’ve enabled that switch to do so, of course), so you can customize both the fixed knee and DCC and choose between them without having to burrow through the menus again.
Etc.
The supplied (but optional) 2″ monochrome CRT EVF resolves between 500-600 TVl/ph; it’s hard to say exactly, because the details get too small to see before they mush together (turning up the peaking shows “peakable” detail down to 600 lines but it’s hard to see anything that small by eye). With its fully variable peaking control, I found it to be up to the task of fine focusing.
The 3.5″ LCD resolves 350 TVl/ph horizontally and a scant 200 lines vertically, with vigorous aliasing; this isn’t the 3.5″ panel off the EX1 or EX3! The LCD is great for getting a rough check on color (especially if you’re using a monochrome CRT EVF), for running through the menus, and for checking composition with your eye away from the EVF, but you won’t want to focus with it.
The small timecode/tape/battery status LCD stayed on for days without noticeably draining the battery. I soon came to depend on it, and now I miss having it on other, less enlightened cameras. It seems like a small detail, but being able to glance at the camera and instantly see battery and tape status without any button-pushing or powering up turned out to be a great convenience.
I ran the camera (with no tape in the VTR) and the 2″ CRT viewfinder for six and a quarter hours on a 140Wh RED brick battery, which powers a RED ONE for about a quarter as long. The camera is rated to pull 35 watts while recording, with the LCD off and with a 12 VDC supply.
The HD-SDI outputs are 10-bit, 1920×1080 4:2:2 with timecode and embedded audio. While the VTR section records a 1440×1080, “3:1:1” sampled, 8-bit compressed image, in E-E mode you get the full bit depth and resolution the camera can deliver.
The camera records four channels of 20-bit, 48kHz audio. I didn’t test its quality in any meaningful way.
I also didn’t get a chance to play with the picture cache function, which enables both pre-recording (letting you capture the action that happened up to 8 seconds before you press the record button) and interval recording (where the cache stores 5 seconds of timed or manual frame grabs, then records them off to tape in a burst, thus reducing wear and tear on the VTR section).
Next: The Lens; Conclusion…
The Lens
Like most camera at this price point, the HDW-650F comes naked into the world: no lens, no power, no viewfinder, not even a tripod plate.
Reviewing a camera without a lens would be difficult, so I borrowed a Canon HD-EC HJ8x5.5B, 5.5-44mm T2.1 zoom lens from my colleague Simon Sommerfeld, who normally uses it on a Panasonic AG-HPX500. Although I’m not formally reviewing the lens, it’s worth describing.
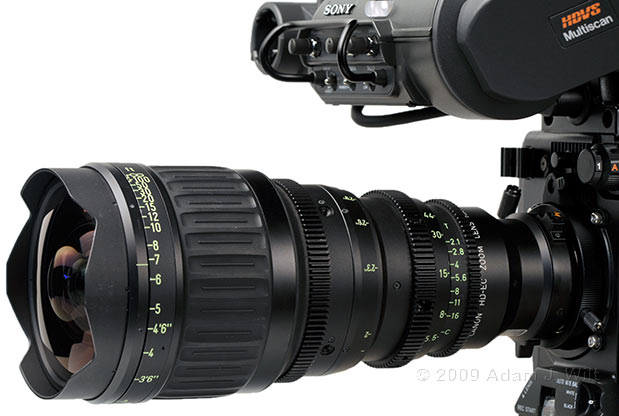
Canon HD-EC zoom lens HJ8x5.5B, 5.5-44mm T2.1
The “EC” in the designator stands for “Electronic Cinematography”, and the lens is set up for filmstyle work, not ENG-style operations. There is no handgrip and no zoom motor; instead, focus, zoom, and iris rings are all geared for external motors or follow-focus controls, using film-pitch gearing.
The focus barrel turns through about 270 degrees to focus (and it focuses down to just under 2 feet), to allow fine control during shooting. By comparison, “video” lenses are optimized for speed of operation, rather than fineness; they’ll focus in 120 degrees, 90 degrees, or less.
All lens scales are filled in bright, yellow-green paint for best visibility in dark conditions, and there are scales and witness marks on both the right and left sides of the lens, so it can be operated by a focus puller on either side of the camera.
The iris is calibrated in T stops, not f stops; T stops measure the actual light transmission; f stops measure the geometric aperture. On prime lenses, F and T stops are often the same (or close enough as to make no practical difference), but on a complex zoom the mass of glass can soak up as much as 1/3 to 1/2 stop. Film folks prefer T stops as they need to set exposure, and can’t see what they’re getting until the film comes back from the lab (on a video camera, though, the advantage of T stops is less clear).
The 8x zoom starts off at 5.5mm, a gratifyingly wide angle. On a 35mm academy-aperture camera, the equivalent lens would be a 13.6mm.
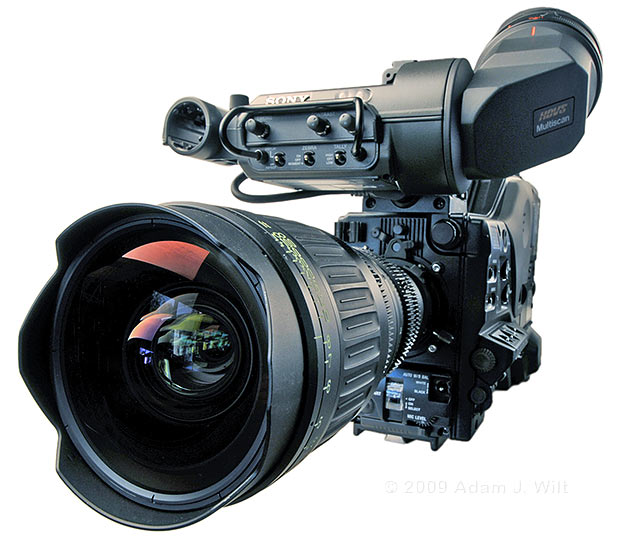
The Canon HJ8x5.5B is a wide-angle zoom.
The lens was pin-sharp, center to edges, in all my tests, and had minimal breathing for an 8:1 zoom.
It showed some barrel distortion fully wide, and pincushion in telephoto; the sweet spot is around 7-8mm, but it’s not a lens for architectural views (look at the resolution charts on the previous page and note the slanted row of numbers on the horizontal grating; the chart was shot at a moderate telephoto setting, and the horizontal grating was in the lower right corner of the frame).
The center holds T2.1 throughout the zoom range (actually, Canon says it ramps down to T2.2 at full tele, but I couldn’t see the difference on my ‘scope).
With the aperture wide open the lens vignettes smoothly through its zoom, from only a slight bit of edge darkening fully wide to a smooth rolloff from center to edges, losing nearly two stops at the corners at full telephoto (the waveform of a flat field looks like a parabola). It sounds worse than it looks; the vignette was smooth and even, as opposed to the more distinct “portholing” of some zooms. Stopping down to T4 flattened the vignette from full wide to about 25mm, and T5.6 yielded a perfectly flat field throughout the zoom range.
Flare was minimal. I aimed the danged thing into all manner of bright lights (all part of my dastardly attempt to get the 650F to show some smear), and the image stayed crisp and clean throughout. I sometimes saw some flare patterns, but they were well controlled and minimalist for a zoom, and they were never a problem.
Canon has a PDF describing their HD-EC lenses and it’s worth a look if you’re on the cine side of the fence.
Conclusion
It’s smaller, lighter, and faster than its predecessor. It’s less expensive and has lower noise. It shoots 59.94i, 50i, and 23.98p. It has hypergammas for those that want ’em. It has the best user controls yet (IMHO) on a Sony shoulder-mount camera. The HDW-650F is a great ENG/EFP camera for anyone shooting HDCAM.
“But”, you say, “HDCAM? In this day and age?”
Sure, why not? There are (by Sony’s estimation) over 43,000 HDCAM camcorders and decks out there already, so there’s a huge number of HDCAM users, and it’s good to see that they aren’t being hung out to dry in the mad rush to newfangled tapeless formats.
HDCAM is 3:1:1 tape at 140 Mbit/sec (more or less), and it’s a proven, mild, intraframe codec. Each frame stands on its own, so there’s no problem with sudden power loss or flaky bits disrupting a file structure or corrupting a directory: if you take a hit on a single frame, that frame may be toast, but the one before and the one after are still fine. Can’t say that about long-GOP compression, file-based disks or solid-state media, can you? Don’t be so quick to dismiss tape!
For those who want progressive scan, but for whom an F900R is too pricey, the 650F is an attractive lower-cost alternative with few compromises: no 25p or 29.97P, and no user gammas, but with most of the other features and functionality of the pricier CineAlta.
If tape isn’t your thing, consider that the PDW-700, the 650F’s XDCAM brother, offers a similar camera section and control layout mated with a 50 Mbit/sec, 4:2:2 XDCAM optical disk drive in place of the HDCAM tape transport. It’s a bit cheaper, too, around $31,000.
(Whether HDCAM or XDCAM is “better” is a religious argument I’ll refrain from addressing, grin. Each has its place, and with the HDW-650F and the PDW-700, Sony has a camera for shooters of either persuasion.)
Pros
- CCD imagers with no Jellocam.
- True 1920×1080 chips with superb optical low-pass filtering.
- Very low smear levels; high dynamic range; low noise.
- Comprehensive image tweaks including a linear matrix and a 16-axis color corrector.
- Great, consistent colorimetry out of the box (See the Green/Magenta test).
- 5 standard gammas, 4 hypergammas.
- Separate status LCD for battery, tape, and timecode.
- Flip-out color LCD.
- Best UI yet on a Sony shoulder-mount.
- Built-in picture cache for pre-record and interval recording.
- Built-in downconverter.
Cons
- Using the handle-mounted assignable buttons as zoom buttons only makes you wish you had a proper, proportional zoom rocker.
- Color LCD is disappointingly coarse.
Cautions
- Setting levels on audio channels 3 & 4 requires some menu-diving.
- “Only” 23.98PsF, 50i, and 59.94i; no 25p or 29.97p (choose the 650P if you need 25PsF, 50i, and 59.94i, if you can find the 650P in your market; or bump up to the HDW-F900R).
- No user gammas (choose the F900R instead).
See also:

Filmtools
Filmmakers go-to destination for pre-production, production & post production equipment!
Shop Now