I’m helping a friend build a three RED camera panoramic camera system that will shoot a 180 image, combining three 60 degree images in post. One of the more important things to consider when doing this kind of work is finding, and aligning, the “pivot point” of each lens to eliminate parallax errors that can occur during panning and tilting.
Some of you may be asking yourselves, “What the hell is this guy talking about?” For those of you who think such things, let me explain:
Every lens has a pivot point around which you can rotate the lens and not see any parallax errors during panning or tilting. Commonly, and erroneously, called the nodal point (this is what I was taught to call it, but apparently that is now completely wrong), this point is defined by the location of the “entrance pupil,” or the lens’s peephole to the world. For a lens where the aperture iris is in front of the body of the lens, the location of this point is at the aperture hole itself. For a lens where the aperture falls behind the body of the lens, the entrance pupil could be anywhere–inside the lens or, occasionally, in front of it. In a prime lens this location will be fixed; on a zoom lens it can move around with focal length changes.
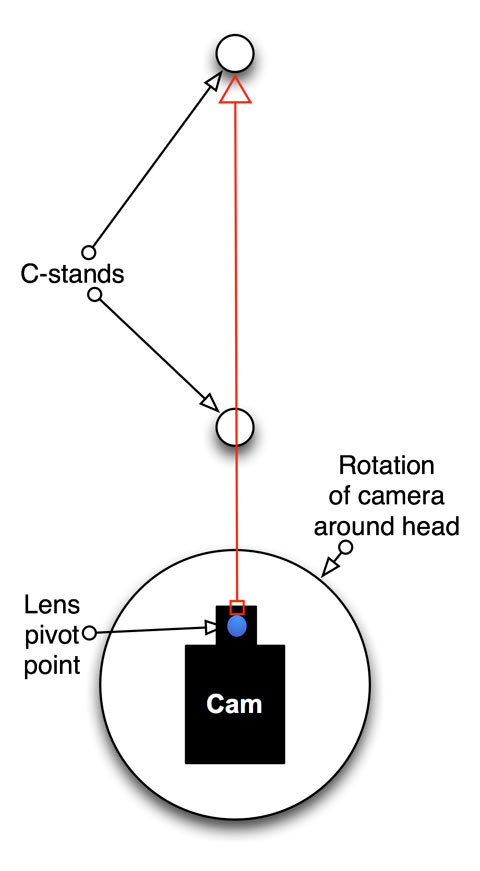
Imagine a simple setup where we are shooting two C-stands, lined up in a row so that one blocks the other:

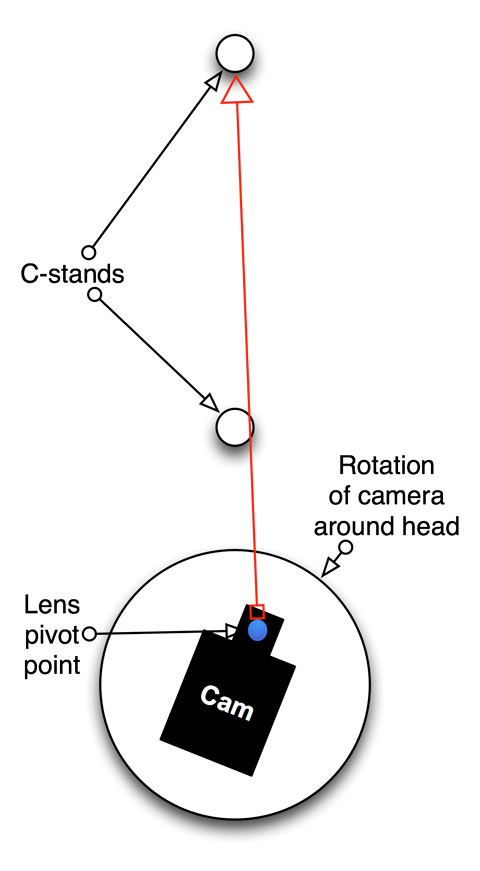
The camera is balanced on a fluid head (not shown). Watch what happens when we pan:

The rotation, or pivot, point of the camera/lens system is under the camera, so that the lens physically moves to another location when panned. That results in what many consider to be simply a side effect of wide angle lenses, which is that the foreground appears to move faster than the background. This movie, shot in the prep area at Chater Camera in Berkeley, demonstrates this effect using a RED ONE, an 18mm Arri Ultra Prime, and two headless C-stands: one parked about two feet from the camera, and one placed directly behind it about six feet away, both with orange tape attached:
Notice how, as the camera is panned, the rear C-stand becomes visible. That’s called parallax error, and that’s not always desirable. For example, in days of old it was common to execute special visual effects in-camera, in real time, because computers didn’t exist yet. One common trick was to paint a background, for example a castle, on a hill, on a piece of glass, leaving a clear area through which actors would be shot approaching. Most of these shots were locked off, but occasionally it was beneficial to be able to pan with the actors to help sell the “reality” of the shot. If the camera was panned on the lens’s pivot point then all the shot elements would track properly.
It’s also beneficial to pan around the pivot point in panoramic photography, as the images can be stitched together more cleanly without close objects shifting in odd ways that give away the stitching.
How to find the pivot point, and the result of doing so, on page 2…
The easiest way to find the pivot point, or entrance pupil, of your lens is to set up the C-stands, as illustrated in the drawings, and then slide the camera forward or backward until panning the camera results in the front C-stand hiding the back C-stand for the entire pan. This means the lens will be somewhere over the rotation point of the head, so be prepared for the camera to want to fall over backwards unless the head is locked down extremely well.
Here’s how it will work:
Notice how the lens stays in the center of rotation, eliminating parallax errors during panning. Here’s the result in a moving picture:
This is the same setup as used previously, except that the focus ring on the 18mm Ultra Prime is now centered over the axis of rotation. That seems to be where the entrance pupil is located.
Finding the pivot point for panning is relatively easy. Doing the same for tilting is more difficult: if the camera is on a standard fluid head (like a Sachtler Video 20 or O’Connor 2060–other than an underslung head like the Weaver-Steadman head or similar) the rotation point is the middle of the head, and you can’t get the lens there. Geared heads may allow the camera to be raised so that the lens is in the center of the cradle’s rotation axis. Weaver-Steadman heads can be used to find the vertical pivot point with great success.
Be wary of anamorphic lenses, though. Such lenses are really a combination of two different lenses: for example, a 40mm anamorphic lens is 40mm in the wide axis but 80mm in the tall axis, creating a 2:1 squeeze. Such lenses have two pivot points, one for each lens, and they don’t fall in the same place.
I haven’t used this trick more than a few times, but at least I knew how to use it when it counted. And now so do you.


