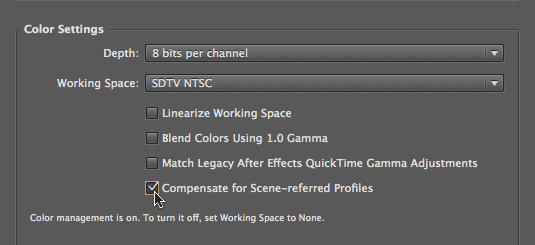
Color management has been improved in After Effects CS4 to now recognize and compensate for the differences between “scene-referred” and “display-referred” color profiles. The short explanation is “Don’t worry – CS4 is merely more accurate now. Leave the option File > Project Settings > Compensate for Scene-referred Profiles enabled when using color management, and in some scenarios your output will now be even more accurate than it was before.” For a longer explanation, read on; these changes affect Photoshop CS4 as well.


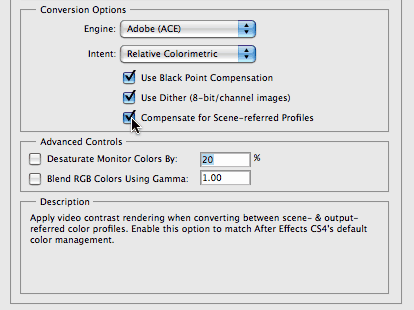
By enabling File > Project Settings > Compensate for Scene-referred Profiles (above), After Effects CS4 will properly translate between color profiles that describe how a footage item was shot versus profiles that describe how a footage item will be displayed. This option also exists in Photoshop CS4 under Edit > Color Settings (left).
Image States
Some color profiles – such as SDTV, HDTV, Camera Raw, and most film-based profiles – are based around how an image appeared when it was originally captured, and therefore are known as scene-referred. Other color profiles – such as sRGB, Adobe RGB, Apple RGB, SMPTE C and others – are based around how an image is to be displayed, and are therefore known as display-referred.
If you think of a typical video workflow, you shoot footage outdoors in sunlight or with the assistance of additional lighting, and the contrast (or “dynamic range”) between the brightest light and darkest shadow is considerable. However, a typical television does not have nearly the dynamic range available on a set, so the final image will inevitably be displayed with reduced contrast and potentially altered colors. As a result, when you shoot a scene on (for example) a high definition camera, it’s output – which is in the HDTV Rec. 709 color space – will be “tone mapped” (have its dynamic range reduced) by a high definition television to be displayed in its own sRGB color space. A side effect of this is that the image will typically appear darker on TV than it was on the set.
This becomes an issue when viewing HD (and other scene-referred) sources on your computer monitor in After Effects: You would prefer to see it as it would ultimately appear on its corresponding display device (in this case, a high-def TV). To accomplish this in CS3, you would use the View > Simulate Output > HDTV (Rec. 709) option to perform this tone mapping. In After Effects CS4, instead you can just enable File > Project Settings > Compensate for Scene-referred Profiles. Note that in CS4, this adjustment will take place automatically regardless of which combination of scene- and display-referred profiles you are using – in CS3, you would need to change the Simulate Output settings to match your viewing format. In either case, HDTV source material will now appear darker on your computer monitor while working with it in After Effects, matching what an HD television would do to the image. An important under-the-hood detail is that the underlying pixel values will not be changed, which means you don’t have to worry about color shifts in sources passed straight through After Effects.
Mixing Profiles
The second part of this issue comes in combining output-referred source material – such as digital photographs that have already been saved in the output-referred sRGB or Adobe RGB color space – with source material that has a scene-referred profile, such as SDTV or HDTV footage. As these additional sources already exist in an output-referred space, unlike your video they do not need additional adjustment to compensate for how they will ultimately be displayed (aside from any necessary translation from one output-referred space to another, such as from Adobe RGB to sRGB).
By way of example, the figures below contain two sources: keyed bluescreen footage that has been assigned a color profile of SDTV NTSC (which is scene-referred), and the still image background that has been assigned a color profile of Adobe RGB (which is output-referred).
The first image below was capture with “Compensate for Scene-referred Profiles” disabled. You might notice that the woman looks a little bright in this composite. That’s partially because you are viewing her as she was shot on the set. In a normal broadcast chain, a television set would display her darker than that.
In After Effects CS3, video-sourced footage (such as the keyed woman in the foreground here) will be displayed using its scene – rather than output – profile, causing it to appear artificially bright. Woman courtesy Photron.
In the following image, “Compensate for Scene-referred Profiles” has been enabled. Now Alex appears darker in the Comp panel: After Effects is compensating for how she will appear to a viewer on a properly calibrated television set (one that conforms to the SMPTE C color definition, in this case).
In CS4, the Compensate for Scene-referred Profiles option will display scene-referred video footage darker, while maintaining output-referred sources such as the background photo here.
Why didn’t the background photograph get darker as well? Because it is already output-referred, meaning it has been pre-compensated for how it will appear when displayed. You don’t want After Effects to throw a second output compensation on top of that; the result would be wrong. Instead, all After Effects has to do in this situation is translate the source’s Adobe RGB color space into the desired output space.
Yes, this is a confusing subject – but it is an important issue, and one that After Effects CS4 is taking it into account for you automatically (as long as you have the Project Settings option to Compensate for Scene-referred Profiles enabled!). In addition to the SDTV and HDTV cases, this scene- versus output-referred compensation will also take place for color-managed film projects as well.
Thanks to Peter Constable of Adobe who steered me through understanding the new scene-referred color profile behavior.
Adobe White Paper
Adobe has created a document that further explains the “image state adjustment” which After Effects CS4 performs between scene- and display-referred color profiles. Click here for more information. (The images above, as well as a the top of this article, are from that paper.)
More to Come…
The above article was taken from a free bonus chapter we are writing for owners of Creating Motion Graphics 4th edition that details the differences between After Effects CS3 and CS4. The entire chapter should go online in January 2009. Register here to be alerted when it is available.
In the meantime, here is an article we wrote on PVC about the major new features in After Effects CS4. We have also created video tutorials for lynda.com on the major new features in AE CS4. If you don’t already have a lynda.com subscription, click here for a free 7-day pass.
The content contained in our books, videos, blogs, and articles for other sites are all copyright Crish Design, except where otherwise attributed.


