First things first. I’m not a musician. I don’t play one on TV. I’d like to be – I did just start playing acoustic guitar. But if you heard me, you’d agree – I’m no musician.
But I am a video producer/editor. And a motion graphics designer. And I frequently need music for my work.
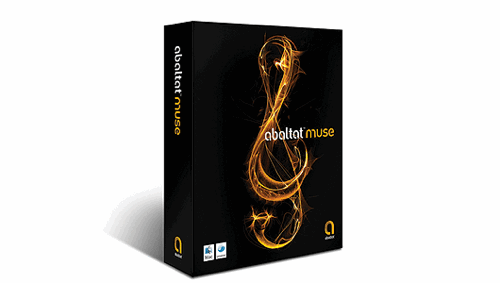
Which makes me an ideal candidate for Abaltat’s Muse.
These days, video producers have a lot of options when it comes to finding music for our projects. However, they general fall into two broad categories: you either purchase music that has already been composed, through CD collections or services such as MusicBakery.com and the newly launched istockaudio.com; or, you use a piece of software to compose the music for you. Examples abound: Ableton Live 7, Apple’s, Logic, Soundtrack Pro, and GarageBand, SmartSound’s SonicFire Pro, Digidesign’s Pro Tools, Adobe Soundbooth, Audition, Sony Acid, Cuebase, Digital Performer…it’s a long list. Some are good for music novices; others for pros. Some are built primarily for composing; others for other audio-based tasks.
Of course, if you have a big budget, you could hire musicians to score your project. Or, if you are a talented musician, you could compose and play your own music, and augment it with software instruments and effects. But for most of us, we either buy our music “pre-baked” or use software to make it for us.
Anyone who has gone the “pre-baked” route knows how difficult and time-consuming this can be. Even though sites that provide music try to make it as easy as possible to find what you are looking for with sophisticated search tools, you still need to browse and audition clip after clip to find something that matches your video. It’s a very subjective process and can take hours, even days to locate the right clips – which may or may not be the right length for your needs. So you often end up editing your video to better match the music.
And unless you are musically inclined, using software to create music can be equally frustrating. This is because more novice-oriented software solutions are generally based on building music out loops. I’ve personally created music tracks with SonicFire Pro, Soundtrack Pro and GarageBand – these are all excellent applications, but the core music-creating part in each of them is based on building up a song out of various loops. Which can be quite effective, but ultimately the software doesn’t know anything about your video, so you mold the music to fit your project.
Enter Muse, a new product from Abaltat that takes a different approach. The company calls it a “video-driven soundtrack composer”, which I find to be an accurate description. It does the composing for you – without loops. Rather, it analyzes your video, and then composes music based on the video. You can then adjust, or arrange the composition in a variety of ways – including moving it into another application for arranging, such as GarageBand or Logic.
This approach is intriguing: rather than trying to find some music that fits your video, or trying to change your video to better fit a piece of music, you create music based on your video – and not a bunch of loops, but full rhythms and melodies created by virtual “bands” that you select and modify. And the music always has an ending – something that can be difficult to achieve in a loop-based application (although SonicFire Pro does a good job with this).
Color Me in 4/4 Time
Muse analyzes the colors of each frame video in any Quicktime file and then, believe it or not, composes music based on these changing color patterns. It does this by matching what Abaltat calls a virtual band to the video. This “band” (you can select one of several) composes music “on the fly” to match the video. The band builds music out of samples rather than loops by using Native Instruments’ Kontakt Player and the Garritan Libraries of virtual instruments.
The key to understanding how Muse works is that it’s a two-step process: first, you compose your music. This is the essentially “automatic” process that creates the song. Once the software analyzes your video and composes the music, you can then change the arrangement either within the application, using a series of keyframable “events”, or by exporting a MIDI file to another application. Let’s see how it all works.
Making Music
Although I love the concept, I found that the software implementation (as of version 2.0) is not very intuitive. Muses’ creator, Abaltat founder Justin McCarthy from Galway, Ireland, was kind enough to take me on a Skype-based tour of Muse, which was extremely helpful and frankly necessary for me to really grasp the potential of the application. The Help documentation is thorough and I’d highly recommend perusing it before you start using the software.
You start by bringing your Quicktime movie into Muse. It’s not obvious how to do this because when you launch the application there are no windows open. You need to choose File > Open, then select your movie. This is odd behavior, because File > Open would normally be used to open a project file for the current application. An alternative process is to simply drag your movie onto the Muse icon to launch the application and load the movie.
Right away, Muse starts to analyze your movie. If it’s a full resolution movie, this process can take a long time – again, it’s not intuitive, but if you create a low-resolution proxy, the analysis will go much faster.
When the analysis is complete, you are presented with two windows: a Color Timeline, which shows the amount of each color in your video over time, and a “Picture Window” that shows your video, a timeline, and a variety of controls.
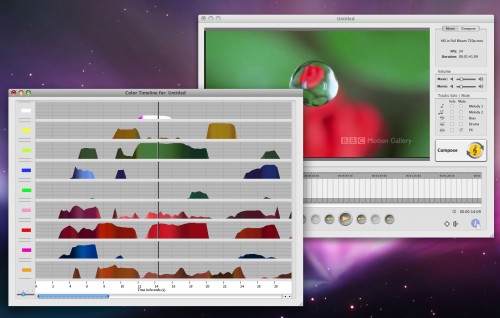
The next step is to compose the music by clicking the large Compose button. This action brings up a window that allows you to select a Band, and then a Preset for that Band. Or, skip the preset and go right to the Advanced button to make your own settings. I would like to see more selections of bands as I found it difficult to create music with a more contemporary, pop/rock ‘n roll feel.
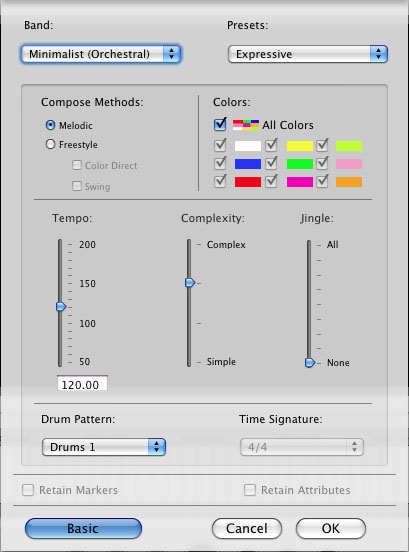
Here, you can choose different Compose methods, select which colors the composition should pay most attention to (if any), choose a tempo for the music, adjust the Complexity and the Jingle level, select a drum pattern and a time signature (which isn’t always adjustable).
While the ability to make these changes is quite powerful, it takes some experimentation to understand what they all mean. The Help comes in handy, but I found I needed to go back into this dialog several times and re-compose the music to get what I wanted as a starting point. For example, the “Melodic” composition method has strict composition rules, while the “Freestyle” lets you focus the composition on particular colors. It’s difficult to know what these terms actually mean – you just have to try them and listen to the results. The Complexity slider changes how complex the melody is, and the Jingle slider adjusts the level of repetition.
From here, click OK, and Muse uses the color analysis of the video in combination with your settings to select samples from its library to compose the music.
When the composition is complete, you are presented with a dialog that explains what you can do next.
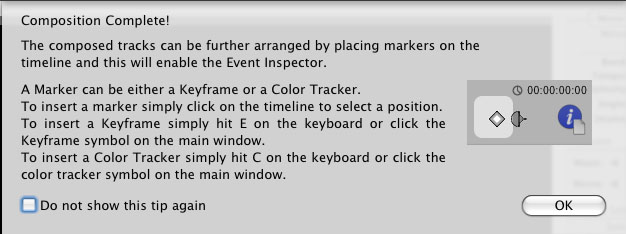
At this point, you move from composing to arranging: an optional process for changing your composition elements, or tracks, over time. If you’ve ever set keyframes to create animation, you’ll be right at home here. And if not, it’s quite easy.
The composition consists of two melody lines, a bass, drums, and effects. By setting keyframes, you can decide, for example, when you want each instrument to begin and end playing. You can even change the instrument in the middle of the composition.
Let’s say you want to change the Marimba to a Grand Piano at a particular edit point. To set a keyframe, move the playhead to the frame where you want the change to occur, and click the keyframe button.
The Event Inspector window appears, which lets you choose which parameter to change, and what kind of change to make to it.
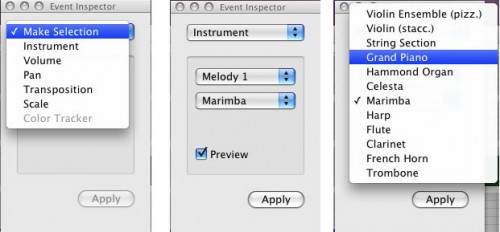
Changing the instrument.
You can also set the volume and pan of each instrument, and change either over time. You can transpose the pitch of the entire composition, and change the scale (but only between “standard” and “alternate”). Keyframes can be “stacked” so you can change multiple instruments and other parameters at the same frame, and you can move them simply by dragging.
Another type of keyframe is called a “Color Tracker” – this keyframing device lets you create a musical change that is based on a specific color event in your video – perhaps a woman in a red dress enters a room, or blue evening light pours through an opening curtain – or a flower blooms.
![]()
By default, all of the music tracks are in Solo mode, so you hear every track. But it can be very useful to solo individual tracks as you adjust them.
Now, this arranging business takes some work – but the payoff is music that is tightly tied to the video – something difficult to achieve “pre-baked” music or loops.
Taking it to the Next Level
At this point you may be happy with the result. But you can take it much further. Besides support for standard export formats like AIFF or WAV, you can also export a MIDI file.
This is where things get interesting.
By exporting a MIDI file, you can do additional arranging work in another application like Logic or GarageBand. For example, you could create essentially an “offline” of your temp tracks, then pass it to someone good with Logic to really make it shine. Well, I don’t use Logic. But I do use GarageBand. So I wanted to see what I could do myself.
Before exporting a MIDI file, you need to make sure your preferences are adjusted to 44.1kHz (the default is 48kHz, which won’t work with GarageBand). Export the MIDI file, launch GarageBand, create a new music project, then drag your exported MIDI file into GarageBand. You’ll see each of the tracks of your composition. Did you know you can also add your video to GarageBand to time your musical changes to specific frames? Just drag it in, and it forms a track.

You can now use GarageBand to modify the sound of each instrument, adjust individual notes, and add software or real instruments to the composition. Again, it does take some work to be able to make changes that sound good, but it’s really not as hard as you might think – and it’s actually quite fun.
I found that the best way to use Muse is iteratively: first create rough cut of video, then use Muse to make a guide track of audio, and use that guide track to further tweak the video. Once the video is locked, move from Muse to GarageBand to tweak the arrangement and add additional effects. I even use Soundtrack Pro on the final AIFF file in order to have access to more effects from it’s huge library (Soundtrack Pro doesn’t support MIDI so it’s best used to augment a finished composition).
A new paradigm?
Muse does something very unique in the world of music-generation tool: it creates music that really matches your video and doesn’t sound “loopy”. If part of your job involves finding and/or creating music to work with video, I’d recommend checking it out.

Filmtools
Filmmakers go-to destination for pre-production, production & post production equipment!
Shop Now